UPPER THREADING
32
d
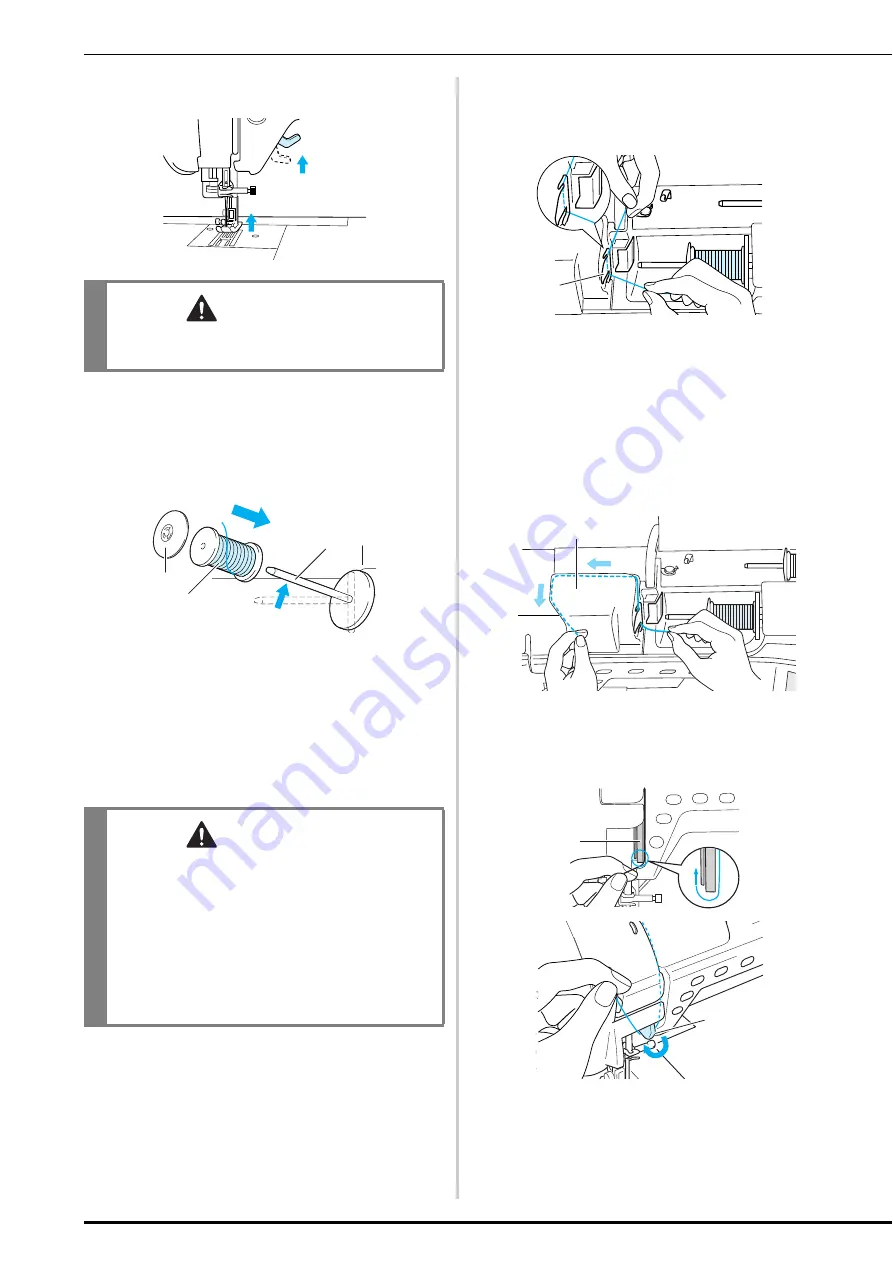
Raise the presser foot lever.
e
Pivot the spool pin so that it angles upward.
Set the thread spool on the spool pin so that
the thread unwinds from the front of the
spool.
a
Spool pin
b
Spool cap
c
Thread spool
f
Push the spool cap onto the spool pin as far
as possible, then return the spool pin to its
original position.
g
Holding the thread with both hands, slide
the thread into the grooves on the thread
guide plate.
a
Thread guide plate
h
While holding the thread in your right
hand, use your left hand to pull the thread
toward the threading path cover, then pass
it along the thread path as shown in the
illustration.
Be sure to pass the thread along the right
side of the thread path guide.
a
Threading path cover
b
Thread path guide
i
Pull the thread under the thread path guide.
a
Thread path guide
CAUTION
• If the presser foot is not raised, the sewing
machine cannot be threaded correctly.
CAUTION
• If the thread spool and/or spool cap are set
incorrectly, the thread may tangle on the spool
pin and cause the needle to break.
• Use the spool cap (large, medium, or small)
that is closest in size to the thread spool. If a
spool cap smaller than the thread spool is
used, the thread may become caught in the slit
on the end of the spool and cause the needle
to break.
b
c
a
a
1
a
b
a
(A)
a
Summary of Contents for 882-S85
Page 2: ......
Page 7: ...v ...
Page 12: ...Contents x ...
Page 20: ...NAMES OF MACHINE PARTS AND THEIR FUNCTIONS 8 ...
Page 54: ...CHANGING THE NEEDLE 42 ...
Page 68: ...USEFUL FUNCTIONS 56 ...
Page 126: ...SEWING THE STITCHES 114 ...
Page 208: ...EMBROIDERY APPLICATIONS 196 ...
Page 236: ...USING THE MEMORY FUNCTION 224 ...
Page 264: ...UPGRADING YOUR MACHINE S SOFTWARE 252 ...
Page 275: ......
Page 276: ...XF3896 001 English 882 S85 Printed in Taiwan ...


