USEFUL FUNCTIONS
Se
wi
n
g Ba
sics
87
2
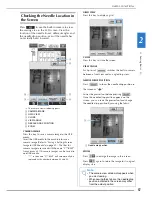
Checking the Needle Location in
the Screen
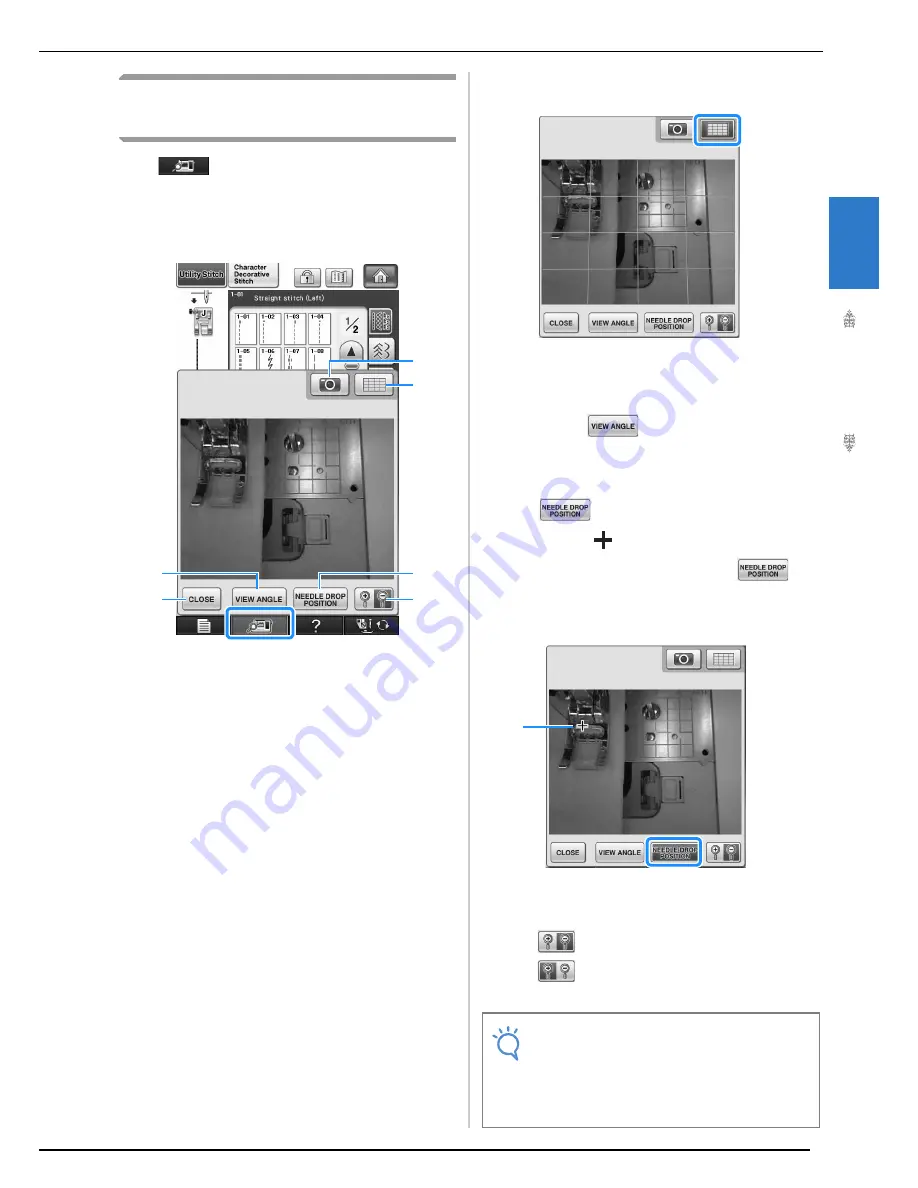
Press
to use the built-in camera to view
the sewing area in the LCD screen. View the
location of the needle from 2 different angles and
the needle drop position, even if the needle has
not actually been lowered.
→
The camera view window appears.
a
CAMERA IMAGE
b
GRID VIEW
c
CLOSE
d
VIEW ANGLE
e
NEEDLE DROP POSITION
f
ZOOM
CAMERA IMAGE
Press this key to save a camera image to the USB
media.
Insert the USB media to the machine to save a
camera image (Refer to “Saving a Settings Screen
Image to USB Media” on page 39). The files for
camera images are saved with the name “C**.BMP”.
A maximum of 100 camera images can be saved in
one USB media.
*
“**” in the name “C**.BMP” will automatically be
replaced with a number between 00 and 99.
GRID VIEW
Press this key to display a grid.
CLOSE
Press this key to close the screen.
VIEW ANGLE
Each press of
switches the built-in camera
between a front view and an angled top view.
NEEDLE DROP POSITION
Press
to show the needle drop position in
the screen as “
”.
Lower the presser foot before pressing
.
Once the needle drop position appears on the
screen, you can raise the presser foot and change
the needle drop position by moving the fabric.
a
Needle drop position
ZOOM
Press
to enlarge the image in the screen.
Press
again to return the image to its original
display size.
c
d
e
f
a
b
Note
• The camera view window disappears when
you start sewing.
• When sewing thick fabrics, the needle drop
position indicated in the screen may differ
from the actual position.
a
Summary of Contents for 882-W04
Page 7: ...IMPORTANT SAFETY INSTRUCTIONS 5 ...
Page 72: ...CHANGING THE NEEDLE 70 ...
Page 90: ...USEFUL FUNCTIONS 88 ...
Page 186: ...USING THE MEMORY FUNCTION 184 ...
Page 326: ...TROUBLESHOOTING 324 ...
Page 338: ...USING STORED CUSTOM STITCHES 336 ...
Page 373: ......
Page 374: ......
Page 375: ......
Page 376: ...English 882 W04 W05 XF0228 0011 Printed in Taiwan ...

