UTILITY STITCHES
78
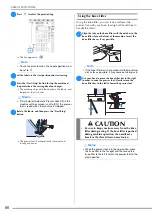
needle position) should be set to 5.50 mm (approx.
7/32 inch).
*
To sew a 6.5 mm (approx. 1/4 inch) seam allowance
along the left edge of the presser foot with
selected, the width should be set to 1.50 mm
(approx. 1/16 inch).
*
To change the needle position, use
or
in
the L/R Shift display.
■
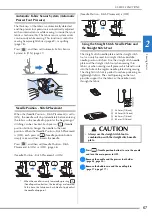
Piecing Using the 1/4 Quilting Foot with Guide
This quilting foot can sew an accurate 1/4 inch or 1/8 inch
seam allowance.
It can be used for piecing together a quilt or for
topstitching.
a
Press
, and then attach the 1/4 quilting foot with
guide.
b
Use the guide and marks on the presser foot to sew
accurate seam allowances.
Piecing a 1/4 inch seam allowance
Sew keeping the edge of the fabrics against the guide.
Creating an accurate seam allowance
Use the mark on the foot to begin, end, or pivot 1/4 inch
from edge of fabric.
Topstitching quilting, 1/8 inch
Sew with the edge of the fabric aligned with the left side of
the presser foot's front section.
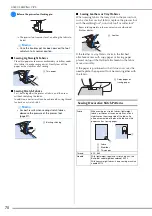
■
Quilting
Sewing the quilt top, batting, and backing together is
called quilting. You can sew the quilt with the dual feed
foot to keep the quilt top, batting, and backing from
sliding. The dual feed foot has a motorized belt that moves
together with the feed dogs in the needle plate during
sewing.
For straight line quilting, use the dual feed foot and the
straight stitch needle plate.
1
6.5 mm (approx. 1/4
inch)
1
6.5 mm (approx. 1/4
inch)
Memo
• In the case Q-01(center, at L/R Shift 3.5 mm) is
selected, if the guideline marker is set at 10.0 mm
(3.5 mm plus 6.5 mm, close to 1/4 inch), you can
sew piecing by referring to the guideline marker.
1
Guide
a
a
a
1
Guide
2
1/4 inch
Memo
• For accurate fabric placement, refer to “Aligning
the Fabric with a Mark on the Needle Plate or
Bobbin Cover (with Mark)” on page 72.
1
Align this mark with
edge of fabric to begin.
2
Beginning of stitching
3
End of stitching
4
Opposite edge of fabric
to end or pivot
5
1/4 inch
Memo
• For details on pivoting, refer to “Pivoting” on
page 65.
1
Surface of fabric
2
Seam
3
1/8 inch
a
b
a
e
e
c
d
b
a
b
c
Summary of Contents for 882-W70
Page 2: ......
Page 12: ...CONTENTS 10 ...
Page 56: ...CHANGING THE PRESSER FOOT 54 ...
Page 57: ...Chapter 2 Sewing Basics ...
Page 73: ...Chapter 3 Various Stitches ...
Page 106: ...MY CUSTOM STITCH 104 ...
Page 107: ...Chapter 4 Basic Embroidery ...
Page 141: ...Chapter 5 Advanced Embroidery ...
Page 156: ...EMBROIDERY APPLICATIONS 154 ...
Page 157: ...Chapter 6 My Design Center ...
Page 176: ...STIPPLING 174 ...
Page 177: ...Chapter 7 Appendix ...
Page 193: ...ERROR MESSAGES 191 Appendix 7 ...
Page 205: ......
Page 206: ......
Page 207: ......
Page 208: ......
Page 209: ......
Page 210: ......
Page 211: ......


