


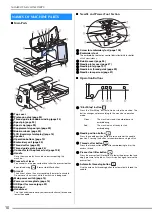
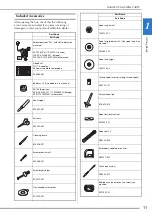
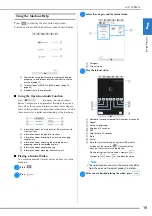
NAMES OF MACHINE PARTS
10
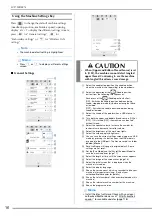
■
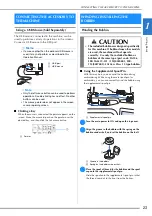
Main Parts
1
Top cover
2
Pretension disk (page 24)
3
Thread guide for bobbin winding (page 24)
4
Spool pin (page 25)
5
Spool cap (page 23)
6
Supplemental spool pin (page 23)
7
Bobbin winder (page 23)
8
LCD (liquid crystal display) (page 15)
9
Speaker
0
Operation buttons (page 10)
A
Embroidery unit (page 35)
B
Thread cutter (page 29)
C
Thread guide plate (page 25)
D
Connector for the presser foot (page 108)
E
Handle
Carry the machine by its handle when transporting the
machine.
F
Presser foot lever
You cannot use the presser foot lever after the presser foot has
been raised using
(Presser foot lifter button).
G
Air vent
The air vent allows the air surrounding the motor to circulate.
Do not cover the air vent while the machine is being used.
H
Main power switch (page 14)
I
Power cord receptacle (page 14)
J
USB port for mouse (page 23)
K
USB port
L
Handwheel
Turn the handwheel toward you (counterclockwise) to raise and
lower the needle.
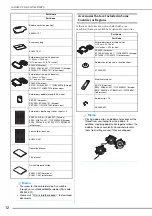
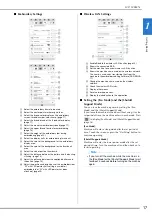
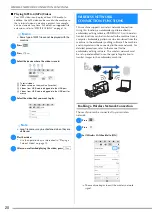
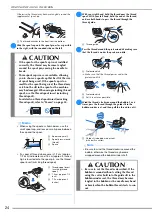
■
Needle and Presser Foot Section
1
Screw for embroidery foot (page 108)
2
Embroidery foot
The embroidery foot helps control fabric flexibility for better
stitch consistency.
3
Bobbin cover (page 26)
4
Needle plate cover (page 27)
5
Needle plate (page 107)
6
Needle bar thread guide (page 29)
7
Needle clamp screw (page 31)
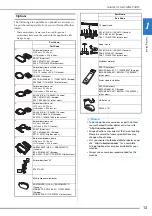
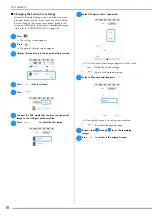
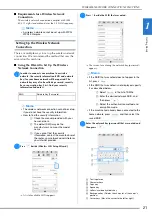
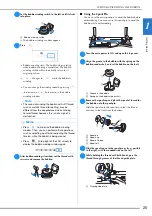
■
Operation Buttons
1
“Start/Stop” button
Press the “Start/Stop” button to start or stop the machine. The
button changes color according to the machine’s operation
mode.
2
Needle position button
Press the needle position button to raise or lower the needle
position. Pressing the button twice embroiders a single stitch.
3
Thread cutter button
Press the thread cutter button after embroidering to trim the
excess thread.
4
Presser foot lifter button
Press the presser foot lifter button to lower the presser foot and
apply pressure to the fabric. Press this button again to raise the
presser foot.
5
Automatic threading button
Use the automatic threading button to automatically thread the
needle.
NAMES OF MACHINE PARTS
a
b
c d e
f
g
h
i
j
k
l
m
n
o
p
q
r
s
t
u
v
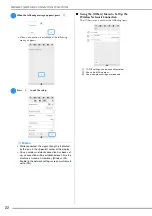
Green:
The machine is ready to embroider or is
embroidering.
Red:
The machine is not ready to start
embroidering.
a
b
c
d
e
f
g
Summary of Contents for 882-W80
Page 2: ......
Page 10: ...CONTENTS 8 ...
Page 34: ...CHANGING THE NEEDLE 32 ...
Page 35: ...Chapter 2 Basic Embroidery ...
Page 70: ...ADJUSTMENTS DURING THE EMBROIDERY PROCESS 68 ...
Page 71: ...Chapter 3 Advanced Embroidery ...
Page 86: ...EMBROIDERY APPLICATIONS 84 ...
Page 87: ...Chapter 4 My Design Center ...
Page 106: ...STIPPLING 104 ...
Page 107: ...Chapter 5 Appendix ...
Page 123: ......


