background image

LCD SCREEN

G

etting

 Re
ad

y

15

1

b

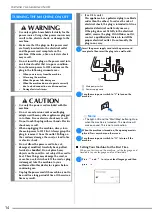
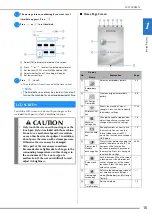
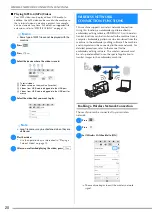
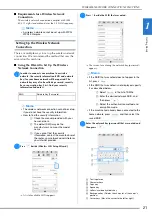
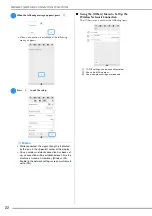
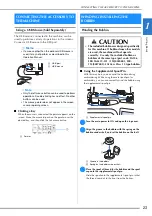
The message screen, confirming if you want to set 

time/date, appears. Press 

.

c

Press 

 or 

 to set time/date.

1

Select [ON] to display time/date on the screen.

2

Press 

 or 

 to select the date display format.

3

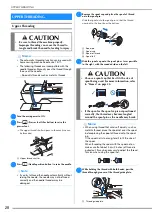
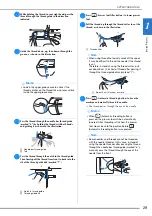
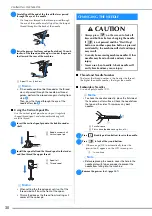
Set the year (YYYY), month (MM) and date (DD).

4

Select whether 24h or 12h setting will display.

5

Set the current time.

d

Press  

to 

set.

The clock starts from 0 second of the time you set.

Touch the LCD screen or a key with your finger or the 
included touch pen to select a machine function.

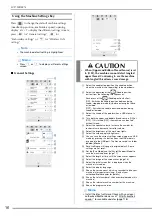
Home Page Screen

Note

• The time/date you set may be cleared, if you don't 

turn on the machine for an extended period of time.

LCD SCREEN

 CAUTION

• Only touch the screen with your finger or the 

touch pen (stylus) included with the machine. 
Do not use a mechanical pencil, screwdriver 
or any other hard or sharp object. In addition, 
do not press the screen with extreme pressure. 
Otherwise the screen may be damaged.

• All or part of the screen may sometimes 

become darker or lighter due to changes in the 
surrounding temperature or other changes in 
the environment. This is not a sign of a 
malfunction. If the screen is difficult to read, 
adjust its brightness.

3

1

4

5

2

No.

Display

Explanation

Page

Name

1

Select an embroidery pattern.

34

Embroidery 
key

2

Create an original embroidery 
pattern.

86

My Design 
Center key

3

Shows the machine’s signal 
strength. Press this key to specify 
the wireless settings.

17, 20

Wireless LAN 
key

4

Change the needle stop position, 
adjust the pattern or screen, and 
change other machine settings.

16

Machine 
settings key

5

See explanations on how to use 
the machine. You can see the 
tutorial videos and also MP4 
movie files that you have saved on 
USB media.

19

Machine help 
key

6

Press this key before changing the 
needle, the presser foot, etc. This 
key locks all key and button 
functions to prevent operation of 
the machine. Press this key again 
to unlock the settings.

26, 30

Presser foot/
Needle 
exchange key

7

Lock the screen. When the screen 
is locked, can still embroider, but 
cannot change any of the screen 
functions. Press this key again to 
unlock the screen.

Screen lock 
key

8

Return to the home page screen at 
any time and select a different 
mode ([Embroidery] or [My Design 
Center]).

Home page 
screen key

9

Set the time/date.

14

Time/Date key

2

1

9

3 4 5 6 7 8

Summary of Contents for 882-W80

Page 1: ...Operation Manual Embroidery Machine Product Code 882 W80 W82 Be sure to read this document before using the machine We recommend that you keep this document nearby for future reference ...

Page 2: ......

Page 3: ...nnect it to a DC power source or inverter If you are not sure what kind of power source you have contact a qualified electrician This machine is approved for use in the country of purchase only 4Never operate this machine if it has a damaged cord or plug if it is not working properly if it has been dropped or damaged or water is spilled on the unit Return the machine to the nearest authorized Brot...

Page 4: ... the event a malfunction occurs or adjustment is required first follow the troubleshooting table in the back of the Operation Manual to inspect and adjust the machine yourself If the problem persists please consult your local authorized Brother dealer Use this machine only for its intended use as described in the manual Use accessories recommended by the manufacturer as contained in this manual Us...

Page 5: ...owever there is no guarantee that interference will not occur in a particular installation If this equipment does cause harmful interference to radio or television reception which can be determined by turning the equipment off and on the user is encouraged to try to correct the interference by one or more of the following measures Reorient or relocate the receiving antenna Increase the separation ...

Page 6: ...relevant directives and regulations applied within the European Community The Declaration of Conformity DoC can be downloaded from Brother Solutions Center Visit http s brother cpeab and click Manuals select your model click Declaration of Conformity click Download Your Declaration will be downloaded as a PDF file Declaration of Conformity for RE Directive 2014 53 EU CENELEC and Turkey only Applic...

Page 7: ...for the purpose of back up or operational security 2 1 5 not to transfer rent lease sub license loan translate merge adapt vary alter or modify the whole or any part of the Software nor permit the Software or any part of it to be combined with or become incorporated in any other programs 2 1 6 to include Company s copyright notice and this Agreement on all entire and partial copies of the Software...

Page 8: ...eement or if Company does not enforce any rights against you or if Company delay in doing so that will not mean that Company have waived any rights against you and will not mean that you do not have to comply with those obligations If Company does waive a default by you Company will only do so in writing and that will not mean that Company will automatically waive any later default by you 6 7 The ...

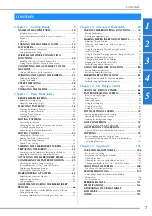
Page 9: ...d Breaks or the Bobbin Runs out of Thread During Embroidering 66 Resuming Embroidery after Turning off the Power 67 Chapter 3 Advanced Embroidery 69 VARIOUS EMBROIDERING FUNCTIONS 70 Basting Embroidery 70 Creating an Appliqué Piece 70 MAKING EMBROIDERY ADJUSTMENTS 73 Adjusting Thread Tension 73 Adjusting the Bobbin Case with No Color on the Screw 75 Using the Automatic Thread Cutting Function End ...

Page 10: ...CONTENTS 8 ...

Page 11: ...Chapter 1 Getting Ready Be sure to install the latest software Refer to UPGRADING YOUR MACHINE S SOFTWARE on page 118 http s brother cpeab ...

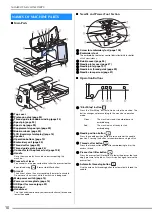
Page 12: ...Section 1 Screw for embroidery foot page 108 2 Embroidery foot The embroidery foot helps control fabric flexibility for better stitch consistency 3 Bobbin cover page 26 4 Needle plate cover page 27 5 Needle plate page 107 6 Needle bar thread guide page 29 7 Needle clamp screw page 31 Operation Buttons 1 Start Stop button Press the Start Stop button to start or stop the machine The button changes c...

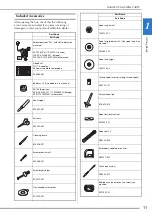
Page 13: ...s in machine SA156 Americas SFB XA5539 151 115J05E0001 Europe SFB 115J05E7001 other areas Seam ripper XF4967 001 Scissors XF2052 001 Cleaning brush X59476 051 Screwdriver small X55468 051 Screwdriver large XC4237 021 Disc shaped screwdriver XC1074 051 W Spool cap small 130013 154 Spool cap medium 2 One spool cap is on machine X55260 153 Spool cap large 130012 054 Thread spool insert mini king thre...

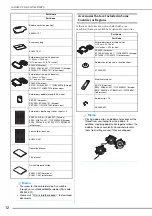
Page 14: ... EPS2 XF0763 001 EPS2CN 115Z05E600E other areas Lens calibration sheet XH4336 001 Operation Manual This manual Quick Reference Guide XH3875 001 Americas XH3951 001 other areas Memo The screw for the embroidery foot is available through your authorized Brother dealer Part code XA5904 051 Please visit http s brother cpeab to download documents Part Name Part Code Part Name Part Code Embroidery frame...

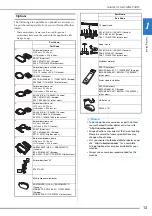
Page 15: ...ery frame H 30 cm W 10 cm H 12 inches W 4 inches SABF6200D1 U S A SABF6200D1C Canada BF3 XG6763 001 Europe BF3 XF4170 001 115D05E700N other areas Embroidery foot W XF4012 001 Multi purpose screwdriver SAMDRIVER1 U S A SAMDRIVER1C Canada MDRIVER1 XG1298 001 115Z05E0003 Europe MDRIVER1AP 115Z05E7003 other areas W 10 spool stand SA561 U S A SA561C Canada TS5 XG6765 001 Europe TS5 115L05E7003 other ar...

Page 16: ...ection During electrical storms CAUTION Use only the power cord included with this machine Do not use extension cords or multi plug adapters with many other appliances plugged in to them Fire or electric shock may result Do not touch the plug with wet hands Electric shock may result When unplugging the machine always turn the main power to OFF first Always grasp the plug to remove it from the outl...

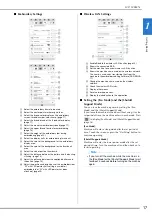
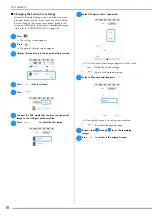
Page 17: ...nges in the environment This is not a sign of a malfunction If the screen is difficult to read adjust its brightness 3 1 4 5 2 No Display Explanation Page Name 1 Select an embroidery pattern 34 Embroidery key 2 Create an original embroidery pattern 86 My Design Center key 3 Shows the machine s signal strength Press this key to specify the wireless settings 17 20 Wireless LAN key 4 Change the needl...

Page 18: ...urrent settings screen image in a USB media by pressing this button when the USB media is inserted into the USB port The files are saved in a folder labeled bPocket 9 Reset settings on this page to original default Some settings are not reset 0 Set the Eco Mode and the Shutoff Support Mode to save the machine power page 17 A Select the length of time until the screen saver appears B Select the ima...

Page 19: ...he wireless LAN function page 20 2 Shows the connected SSID 3 Set the machine to connect wireless LAN function 4 Shows the machine name used on the wireless network This name is used when transferring files from the machine to the embroidery editing software PE DESIGN 11 5 Change the machine name used on the wireless network 6 Check the wireless LAN status 7 Display other menus 8 Reset network ope...

Page 20: ...n appears c Display Screen Saver in the general settings screen d Press in Screen Saver e Press f Connect the USB media that contains your personal image to the USB port of the machine g Press to select the first image h Select the device that is connected A list of your personal images appears on the screen Delete the selected image Return to the previous page i Select a file name and then press ...

Page 21: ...mation about threading the machine changing needles etc 4 Information about attaching the embroidery unit preparing fabric for embroidering etc 5 Information about troubleshooting 6 Information about cleaning the machine etc Playing a Tutorial Video This machine provides tutorial videos on how to use the machine a Press b Press c Select the category and the tutorial video 1 Category 2 Tutorial vid...

Page 22: ...machine supports a wireless network connection Using this function an embroidery pattern edited in embroidery editing software PE DESIGN 11 with wireless transfer functions can be transferred to the machine from a computer Embroidery patterns can be transferred from the machine to the embroidery editing software The machine and computer must be connected to the same network For detailed procedures...

Page 23: ...word that was noted and then press 1 Text input area 2 Character keys 3 Caps key 4 Space key 5 Letters numbers symbols key 6 Backspace key Deletes the character at the cursor s position 7 Cursor keys Move the cursor to the left or right Memo A wireless network cannot be set up with WPA WPA2 Enterprise SSID Network Key Password Memo The wireless network connection cannot be set up if you do not hav...

Page 24: ...menu contains the following items 1 TCP IP settings can be manually entered 2 Shows the MAC address 3 Use when proxy settings are required Memo While connected the signal strength is indicated by the icon in the upper left corner of the display Once a wireless network connection has been set up a connection will be established each time the machine is turned on However Wireless LAN Enable in the n...

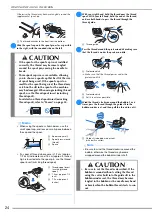
Page 25: ...and set the bobbin on the shaft 1 Groove in the bobbin 2 Spring on the bobbin winder shaft c Place the spool of thread for the bobbin and the spool cap onto the supplemental spool pin Slide the spool onto the supplemental spool pin so that the thread unwinds to the front from the bottom CONNECTING THE ACCESSORY TO THE MACHINE Memo If a mouse other than the optional USB mouse is used it may not per...

Page 26: ...able allowing you to choose a spool cap that best fits the size of spool being used If the spool cap is too small for the spool being used the thread may catch on the slit in the spool or the machine may be damaged When using mini king thread spool use the thread spool insert mini king thread spool For details on thread spool insert mini king thread spool refer to Memo on page 24 Memo When using t...

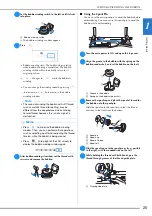
Page 27: ... winder shaft and set the bobbin on the shaft 1 Groove in the bobbin 2 Spring on the bobbin winder shaft c Remove the spool cap and place the spool of thread for the bobbin onto the spool pin Slide the spool onto the spool pin so that the thread unwinds to the front from the bottom 1 Spool pin 2 Spool cap 3 Spool of thread 4 Spool felt d Slide the spool cap onto the spool pin as far as possible to...

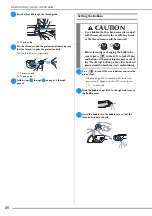
Page 28: ... message OK to automatically lower the presser foot appears on the LCD screen press to continue b Slide the bobbin cover latch to the right and remove the bobbin cover c Insert the bobbin into the bobbin case so that the thread unwinds to the left a a b CAUTION Use a bobbin that has been correctly wound with thread otherwise the needle may break or the thread tension will be incorrect Before inser...

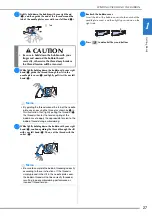
Page 29: ...e cover and then lightly press down on the right side h Press to unlock all keys and buttons 1 Tab CAUTION Be sure to hold down the bobbin with your finger and unwind the bobbin thread correctly otherwise the thread may break or the thread tension will be incorrect Memo By guiding the thread around the tab of the needle plate cover passing the thread as shown by 2 in this illustration then lightly...

Page 30: ...automatic threading function can be used with home sewing machine needle size 75 11 The following threads are incompatible with the needle threader Manually pass the thread through the eye of the needle Speciality threads such as metallic threads Note If you try to thread the needle automatically without raising the needle the needle may not be thread correctly and the needle threader may be damag...

Page 31: ... to have the machine automatically thread the needle The thread passes through the eye of the needle Memo Look in the upper groove area to check if the thread catches on the thread take up lever visible inside the upper groove area a b a b Note When using thread that quickly winds off the spool it may be difficult to thread the needle if the thread is cut Therefore instead of using the thread cutt...

Page 32: ...inue c Remove the presser foot page 107 Memo If the needle could not be threaded or the thread was not passed through the needle bar thread guides perform the procedure again starting from step c Then pass the thread through the eye of the needle after step i 1 Bobbin winder shaft 2 Vertical spool pin 1 Spool felt 2 Thread spool Memo When setting the thread spool set it so that the thread winds of...

Page 33: ...eedle clamp Use the disc shaped screwdriver to securely tighten the needle clamp screw 1 Needle stopper 2 Hole for inserting the needle 3 Flat side of the needle f Attach the presser foot page 107 g Press to unlock all keys and buttons CAUTION Be sure to push in the needle until it touches the stopper and securely tighten the needle clamp screw with the disc shaped screwdriver If the needle is not...

Page 34: ...CHANGING THE NEEDLE 32 ...

Page 35: ...Chapter 2 Basic Embroidery ...

Page 36: ...operation buttons is accidentally pressed Do not move the machine with the embroidery unit attached The embroidery unit could fall off and cause injury Keep your hands and foreign objects away from the embroidery carriage and frame when the machine is embroidering Otherwise injuries or damage may result To avoid distorting your embroidery design do not touch the embroidery carriage and frame when ...

Page 37: ...ear d Press The carriage will move to the initialization position Removing the Embroidery Unit a Press then press The carriage will move to the removal position b Turn the main power to OFF c Squeeze the release lever and pull the embroidery unit away from the machine Note Be sure there is no gap between the embroidery unit and the machine If there is a gap the embroidery patterns will not embroid...

Page 38: ...oved to the start position the pattern selection screen appears 1 Embroidery patterns 2 Character patterns 3 Decorative alphabet patterns 4 Frame patterns 5 Utility embroidery patterns 6 Pattern type selection keys 7 My Design Center page 86 8 Patterns saved in the machine s memory page 80 9 Patterns to be transferred via the wireless network page 80 0 Patterns saved in USB media page 80 A Move th...

Page 39: ...age with bright thread colors to get a clearer image The pattern is designated with a red box around it on the edit screen d Press to edit the selected pattern page 42 e Press The embroidery screen appears f Press to edit the pattern before embroidering page 53 To return to the edit screen press g Start embroidering page 63 ...

Page 40: ...ess to display and then select the character The size of the selected character is changed Size key 3 Change the layout of the character patterns To arrange the character patterns on an arc press or Make the arc flatter Make the arc rounder To arrange the character patterns on an incline press Change the incline counterclockwise Change the incline clockwise Reset the layout Array key 4 Change the ...

Page 41: ...es of characters are input Right alignment Left alignment Center alignment Alignment key 6 Change the font of the characters Depending on the font that was selected it may not be possible to change the font To change the font of one character press to display and then select the character The font of the selected character is changed Font Type key 7 Apply the character pattern editing Set key 8 En...

Page 42: ...cters Characters can also be moved by directly dragging them with your finger or the touch pen h Press i Press to change the color of the characters page 49 j Press k When all editing is finished press Selecting a Pattern If multiple patterns have been combined use to select the pattern to be edited Patterns can also be selected by directly touching the screen with your finger or touch pen Note Co...

Page 43: ...nded with a red box Grouping Patterns If the multiple patterns are grouped they can be edited as a single pattern a Select patterns you want to group page 41 b Press The selected patterns are grouped To ungroup a grouped pattern select the grouped pattern and then press At this time multiple patterns are selected To cancel the multiple selection press any other pattern or the blank area Memo You c...

Page 44: ...n vertically Decrease the pattern horizontally Enlarge the pattern proportionately Stretch the pattern vertically Stretch the pattern horizontally Change the size of the character patterns Reset the size except for character patterns Move the pattern in the direction shown by the arrow 44 Size key 3 Display the pattern rotating window Reset the position Move the pattern in the direction shown by t...

Page 45: ...d as you embroider Multi color key F Proceed to the embroidery screen Embroidery key G Save a pattern in the machine s memory or USB media The pattern can also be transferred to a computer via a wireless network connection 80 Memory key H Redo the last operation that was undone Redo key I Undo the last operation Undo key J Delete the selected pattern the pattern outlined by the red box Delete key ...

Page 46: ...th this function the pattern will be enlarged or reduced at a larger ratio than with normal pattern resizing a Select in the size window Change the pattern size while maintaining the number of stitches The thread density for the pattern increases or decreases Change the pattern size while maintaining the thread density After the pattern size is changed the thread density can be changed in the edit...

Page 47: ...s and then press b Select the direction in which the pattern will be repeated Repeat the pattern above Delete above pattern Delete below pattern Repeat the pattern below Vertical direction 1 Repeating and deleting keys 2 Spacing keys 3 Key to cancel pattern repeating Horizontal direction 1 Repeating and deleting keys 2 Spacing keys 3 Key to cancel pattern repeating c Adjust the spacing of the repe...

Page 48: ... repeated patterns a Press b Choose the direction in which the repeated pattern will be cut Cut horizontally Cut vertically The pattern direction indicator will change depending on the direction selected c Use and to select the cut line d Press The repeated pattern will be divided into separate elements e Press f Use and to select the element to repeat g Repeat the selected element h Press ...

Page 49: ...read When embroidering a series of patterns use the point of this arrow for positioning the following designs to be embroidered a Press b Press c Press to select the thread mark to be sewn d Press Embroidering the Pattern Repeatedly After creating the repeated pattern rehoop the embroidery frame and keep embroidering for the next pattern Memo When a grouped pattern is repeated the embroidering ord...

Page 50: ...read color d Remove the embroidery frame e Rehoop the fabric in the embroidery frame f Attach the embroidery frame to the machine and then press g Press to set the starting point to the center top of the pattern h Press i Press and then press Note Adjust the position of the fabric so that the embroidering area for the next pattern is within the embroidering area of the embroidery sheet 1 Pattern e...

Page 51: ...olor palette appears b Press the color of the part to be changed Press or to display the thread color that is not on the screen The selected thread color image appears 1 Selected thread color image Memo For the accurate needle drop point slowly turn the handwheel toward you counterclockwise to lower the needle Then turn the handwheel away from you clockwise until the mark on the handwheel is at th...

Page 52: ...Soft sample color schemes for the selected effect are displayed a Press and then press The thread color palette screen appears b Press c Select the thread brand for colors and the number of colors you want to create the pattern with 1 Thread brand for colors 2 Number of colors to be used d Select the desired effect 1 Effects for schemes If you select Random or Gradient the color specifying screen ...

Page 53: ...ect The effect will be created using the selected colors 1 Select colors from the palette 2 Selected colors are listed Manual setting for Gradient You can select one color to be used in the Gradient effect The effect will be created with a color you select 1 Select a color from the palette 2 Selected color is displayed f Press g Select the color scheme from samples Press to add the new schemes 1 P...

Page 54: ...minimal number of times Before starting to embroider press in the embroidery screen to rearrange the embroidery order and sort it by thread colors a Press in the embroidery screen b Press Press again to check the sorted thread colors Memo To temporarily register your favorite schemes press to release your favorite schemes press again 9 color schemes can be added Press to check the registered favor...

Page 55: ...e already spent embroidering the pattern not including time for changing and automatically trimming the thread 6 The number of colors in the pattern and the number of the color currently being embroidered 7 Switch the progress bar which shows the embroidering progress between showing only one color or all colors This key appears after starting embroidering or after pressing the key 8 The part of t...

Page 56: ...g Even if uninterrupted embroidering has been set the automatic thread cutting function and the thread trimming function can be used The icons of the spool of thread are grayed out Uninterrupted embroidery key A Rearrange the embroidery order and sort it by thread colors 52 Thread color sorting key B Press this key to align the embroidering position 61 Embroidery positioning key C Save the pattern...

Page 57: ...ble stabilizer on the top surface of the towel This will help to reduce the nap of the toweling and result in more attractive embroidery CAUTION Always use a stabilizer material for embroidery when embroidering on stretch fabrics lightweight fabrics fabrics with a coarse weave or fabrics which cause pattern shrinkage Otherwise the needle may break and cause injury 1 Fusible side of stabilizer 2 Fa...

Page 58: ... frame b Lay the fabric right side up on top of the outer frame c Insert the inner frame making sure to align the inner frame s with the outer frame s 1 Inner frame s 2 Outer frame s d Slightly tighten the frame adjustment screw e Gently smooth out the fabric Make sure fabric is flat and without wrinkles After stretching the fabric make sure the fabric is taut Make sure the inside and outside fram...

Page 59: ...With a chalk pencil mark the area of the fabric you want to embroider 1 Embroidery pattern 2 Mark b Place the embroidery sheet on the inner frame Align the guide lines on the embroidery sheet with the mark you made on the fabric 1 Inner frame 2 Guide line c Gently stretch the fabric so there are no folds or wrinkles and press the inner frame into the outer frame 1 Inner frame 2 Outer frame d Remov...

Page 60: ...me s with the holder s 1 Arrow mark d Lower the frame securing lever to be level with the frame to secure the embroidery frame in the embroidery frame holder 1 Frame securing lever Removing the Embroidery Frame a Press Presser foot lifter button to raise the presser foot b Raise the frame securing lever c Pull the embroidery frame toward you ATTACHING THE EMBROIDERY FRAME Note Wind embroidery bobb...

Page 61: ... a to c of Adjusting the LED Pointer on page 59 to display the embroidery foot with LED pointer adjustment screen b Use or to adjust the brightness of the LED pointer c Press to return to the original screen CONFIRMING THE PATTERN POSITION Memo When the LED pointer turns on the presser foot height is automatically adjusted according to the fabric thickness appears when the embroidery foot W with L...

Page 62: ...ground and with the advanced mode of the application transfer it to the machine For a detailed procedure refer to the application c Press Attach the frame used in the image before pressing The carriage will move and the LED pointer will turn on d Use to align the LED pointer with the center of the larger circle in the embroidery positioning sticker 1 Center of the larger circle in the embroidery p...

Page 63: ...ticker and then start embroidering To remove the embroidery positioning sticker more easily press so that the embroidery frame moves slightly forward and away from under the needle After the embroidery positioning sticker is removed press Checking the Pattern Position The carriage moves and shows the pattern position Watch the embroidery frame closely to make sure the pattern will be embroidered i...

Page 64: ...some conditions based on the type of fabric stabilizer or thread being used there may be some looping in the upper thread In this case attach the included embroidery needle plate cover to the needle plate Attach the cover by inserting the two projections on Memo To see the entire embroidering area press The carriage moves and shows the embroidery area CAUTION Make sure the needle is up when the ca...

Page 65: ...numbers 2 Current time Total time 3 Part of pattern to be embroidered next 4 Embroidered colors Total colors When the last color is embroidered Finished embroidering will appear on the display Press and the display will return to the original screen 1 Groove 2 Projection 3 Notch CAUTION Push the embroidery needle plate cover as far as possible to attach it If the embroidery needle plate cover is n...

Page 66: ...hread and fabric that are used an end of upper thread may remain on the surface of the fabric at the beginning of the stitching After embroidering is finished cut off this excess thread If the setting has been turned off trim the excess thread jumps using scissors after the pattern is finished Refer to page 76 for information on the thread trimming function CAUTION Do not press Thread cutter butto...

Page 67: ...Embroidering the Remainder of the Pattern a Change the embroidery thread according to the embroidery color order display and then finish embroidering the remainder of the pattern Note If the appliqué piece cannot be attached to the base fabric with fabric glue or temporary spray adhesive securely baste it in place with basting stitches If thin fabric is used for the appliqué piece reinforce and se...

Page 68: ...stitches before the area where the thread broke and then press Press to restart from the beginning d Lower the presser foot and press the Start Stop button to continue embroidering ADJUSTMENTS DURING THE EMBROIDERY PROCESS Note If Upper and Bobbin Thread Sensor in the settings screen of the machine is set to OFF the message shown above does not appear Note It is recommended to stitch over the top ...

Page 69: ...ESS 67 Basic Embroidery 2 Resuming Embroidery after Turning off the Power The current color and stitch number are saved when embroidery is stopped The next time the machine is turned on you have the option to continue or delete the pattern ...

Page 70: ...ADJUSTMENTS DURING THE EMBROIDERY PROCESS 68 ...

Page 71: ...Chapter 3 Advanced Embroidery ...

Page 72: ...an Appliqué Piece The following pattern will be used to create an appliqué piece VARIOUS EMBROIDERING FUNCTIONS Note It is recommended to finish combining and editing the pattern before selecting the basting setting If the pattern is edited after selecting the basting setting the basting and pattern may become misaligned and the basting under the pattern may be difficult to remove after embroideri...

Page 73: ... shown below 1 Embroidering area 2 About 1cm 1 2 inch 3 Pattern size a b c Note When is pressed the pattern is moved to the center After selecting the appliqué setting move the pattern to the desired position Memo The appliqué setting is applied only to the selected pattern To select multiple patterns refer to Selecting Multiple Patterns at the Same Time on page 41 Three steps are added to the emb...

Page 74: ...d for the outline from step k embroider the outline APPLIQUE n After embroidering is finished remove the stabilizer material from the embroidery frame 1 Cutting line for appliqué Memo We recommend using thread for the cutting line that is closest to the color of the fabric Note Depending on the pattern density and fabric used there may be shrinking of the pattern or the appliqué may be misaligned ...

Page 75: ...the water soluble stabilizer q Dry the appliqué piece and then iron it if necessary Adjusting Thread Tension When embroidering the thread tension should be set so that the upper thread can slightly be seen on the wrong side of the fabric The following screen appears when you press Note Do not apply a strong force when ironing otherwise the stitching may be damaged MAKING EMBROIDERY ADJUSTMENTS ...

Page 76: ...rns If an individual embroidery pattern needs additional fine tuning refer to Adjusting Thread Tension on page 73 a Press The settings screen appears b Press The embroidery settings screen appears c Display Embroidery Tension in the embroidery settings screen d Use to adjust the upper thread tension Tighten the upper thread tension Loosen the upper thread tension e Press 1 Right side 2 Wrong side ...

Page 77: ...ul not to over tighten the screw approximately 30 45 degrees to increase bobbin tension Bobbin Thread Is Too Tight Upper thread on the right side of fabric seems to be lifting looping and bobbin thread is not seen on the wrong side of fabric If this occurs turn the slotted screw counterclockwise being careful not to over loosen the screw approximately 30 45 degrees to decrease bobbin tension 1 Rig...

Page 78: ...on Jump Stitch Trim The thread trimming function will automatically trim any excess thread jumps within the color This function is initially turned ON To turn this function OFF press key and then Your customized setting remains after turning the machine off and on 1 Jump stitch a Press b Press to turn off the thread trimming function The key will display as The machine will not trim the thread bef...

Page 79: ...er e Use to select a thread brand Aligning the Pattern and the Needle Example Aligning the lower left side of a pattern and the needle Note If design has many trims it is recommended to select a higher jump stitch trim setting in order to reduce the amount of excess tails on backside of fabric The higher number of the jump stitch length selected the fewer number of times the machine will trim In t...

Page 80: ...mbroider linked characters in a single row when the entire pattern extends beyond the embroidery frame Example Linking FG to the characters ABCDE a Select the character patterns for ABCDE b Press c Press The needle is positioned in the lower left corner of the pattern The carriage moves so that the needle is positioned correctly The machine is set to embroider until the first stitch of the next ch...

Page 81: ...the remaining characters FG can be embroidered and then attach the embroidery frame 1 End of the embroidering i As in step a select the character patterns for FG j Press k Press The needle is positioned in the lower left corner of the pattern The carriage moves so that the needle is positioned correctly l Press then and use to align the needle with the end of embroidering for the previous pattern ...

Page 82: ...a USB media insert the USB media into the USB port on the machine 3 Retrieve the pattern via the wireless network connection For detailed procedures refer to PE DESIGN manual Version 11 or higher b Press Press to delete the embroidery pattern USING THE MEMORY FUNCTION Note Do not turn the main power to OFF while the Saving screen is displayed You will lose the pattern you are saving Embroidery pat...

Page 83: ...e appliqué piece created in step a Attach the appliqué to the base fabric matching the shapes d Select the satin stitch frame pattern of the same shape as the appliqué Embroider over the fabric for the appliqué piece and base fabric from step c to create the appliqué Method 2 a Select a straight stitch frame pattern and embroider the pattern onto the base fabric b Place the fabric for the appliqué...

Page 84: ...plit embroidery patterns embroidery patterns larger than the embroidery frame are divided into multiple sections which combine to create a single pattern after each section is embroidered For details on creating split embroidery patterns and for more detailed embroidery instructions refer to the Instruction manual included with PE DESIGN Ver 7 or later or PE DESIGN NEXT a Insert the USB media cont...

Page 85: ...ss to display the embroidery screen e Embroider the pattern section f When embroidering is finished the following screen appears Press A screen appears so that a section of the split embroidery pattern can be selected g Repeat steps b through f to embroider the remaining sections of the pattern ...

Page 86: ...EMBROIDERY APPLICATIONS 84 ...

Page 87: ...Chapter 4 My Design Center ...

Page 88: ... PATTERN DRAWING SCREEN Memo The actual dimension of the pattern area is the size of the embroidery frame which is shown in the pattern preview area The pattern you drew may be bigger than you expected Please resize the pattern after converting the design to the embroidery pattern When the pattern is enlarged so that only a part of it appears in the pattern drawing area the entire pattern is displ...

Page 89: ...drawing area The picked up color is shown as the currently selected region color beside the button and as the selected color in the Region Property screen 89 Brush tool key 9 Erase lines and shapes that have been drawn You can select the size shape of the eraser 91 Erase key 0 Select the stamp shape for pattern drawing 90 Stamp key A Select a section for moving by finger or pen copying deleting ch...

Page 90: ...nes Setting the Line Types Stitch Types and Colors You can set or change the line types stitch types and colors anytime You can also specify the line types stitch types and colors before drawing lines a Press to set the line types stitch types and colors The settings screen appears 1 Line types 2 Stitch types 3 Line color selection touch the color palette to activate the drawing pen color Line typ...

Page 91: ...lection touch the color palette to activate the paint brush color Brush shapes sizes Fill stitch types Select when you don t want fill stitch Zigzag stitch Running stitch Triple stitch Candlewicking stitch Chain stitch Line without stitch for creating a region Created region will be defined by the gray line Memo Press to magnify the image when you cannot press on the line correctly Press and then ...

Page 92: ...ess b Select a stamp type and stamp shape 1 Stamp shapes 2 Stamp types 3 Saved outlines 4 Frame embroidering areas Stamp shapes Stamp types Only for Basic shapes Select the outline fill stitch or outline and fill stitch of a basic shape Memo Press to magnify the image when you cannot press on the fill correctly Press and then select a pattern color in the pattern drawing area to apply that fill co...

Page 93: ... b Select the area you want to edit To select an area you want to edit hold the touch pen stylus at a point on the screen and drag the touch pen stylus to create the red box around your selected area to be edited c Edit the design with available keys Refer to Key Functions on page 87 for the details of each key function d Press and then specify the stitch setting Embroidery pattern outlines can be...

Page 94: ...Fill stitch settings Stippling stitch settings Decorative fill stitch settings STITCH SETTINGS SCREEN Zigzag width Specifies the width of the stitch Density Specifies the density of the stitch Run pitch Specifies the length of the stitch 1 2 Size Increases reduces the size of the stitch Spacing Specifies the spacing of the stitch Size Increases reduces the size of the stitch Repetition Sets repeat...

Page 95: ...tion d Press to apply the setting appears on the tab for settings that were changed Change other settings in the same way Specifying Global Stitch Settings The same stitch settings can be changed at the same time for multiple patterns of the same type a Use to select the stitch whose settings are to be changed and then press The same stitch type lines or regions will be selected at the same time b...

Page 96: ... the embroidery data Loading the Background Image Prepare the data file of your favorite picture so that you can create an embroidery pattern Load the image file from the application or a USB media a Press b Select the device you saved the data to c Select the data and then press d The selected image is displayed transparently in the pattern drawing area 1 2 ...

Page 97: ...Line drawings must be drawn clearly using lines with approximately 1 mm thickness Line drawings should be drawn in a strong contrast If the lines are too short or gathered too densely they will not be loaded correctly Create a Pattern with Line Conversion a Press The image display screen appears 1 LINE CONVERSION Note For details on creating patterns using color illustrations refer to ILLUSTRATION...

Page 98: ...e Detection level again if necessary 1 The settings for the lines to be embroidered appear If you do not know how the settings should be changed first continue the operation without specifying settings and check the results Enlarge the image Display the image before being converted Compare the images before and after being converted and then change the settings if necessary Return to the previous ...

Page 99: ...ct the data and then press d When loading is finished specify the necessary settings in the loaded image confirmation screen Change the settings to adjust the image so it can easily be converted to the desired pattern To stop loading and return to the screen in step b press ILLUSTRATION CONVERSION 1 Max Number of Colors The number of colors in an image will be reduced less than the number specifie...

Page 100: ...changes to Press to check that the image is as desired h Press The pattern drawing screen appears i If necessary edit the loaded image After the loaded image is converted to stitching it appears as a background in the pattern drawing screen Use gauge 1 to adjust the transparency of the background Each press of lightens the background making the illustration pattern darker Each press of darkens the...

Page 101: ...an also start the function by pressing in the embroidery pattern selection screen b Press c Select the square shape and then press d Press e Select the heart shape and then press f Press STIPPLING Note You can load a line drawing to create a stippling stitch or use image design function of a fabric pattern and incorporate the stippling stitch ...

Page 102: ...ect the stitch color Press after setting the color j Select the region you want to set stippling effect 1 Select this region k Press l Adjust the stippling stitch settings to create the desired effect and then press For details refer to Specifying Individual Stitch Settings on page 92 When the following message appears press 1 ...

Page 103: ...pling stitch around an embroidery pattern a Hoop the top layer of fabric in the embroidery frame and then attach the frame to the machine b Press in the home page screen and select the pattern that decorative stitching will be added around and then press in the embroidery edit screen The outline of the pattern is displayed c Set the distance and press A message appears and the pattern outline is r...

Page 104: ...s to load the embroidered fabric Refer to Loading the Background Image on page 94 for details k Press press to recall the stamp shape registered in step c and then arrange it over the loaded pattern l Use a stamp or rectangular frame to determine the region to be stitched m Use the brush tool keys to select the stitch and color of the decorative stitching n Fill the region to be stitched outside o...

Page 105: ... Stitch settings can be adjusted in the stitch settings screen For details refer to STITCH SETTINGS SCREEN on page 92 p Specify the stitch spacing and length in the stitch settings screen and then press Check the pattern and then press q Embroider the stippling stitch around the embroidery pattern ...

Page 106: ...STIPPLING 104 ...

Page 107: ...Chapter 5 Appendix ...

Page 108: ... Exposed to high humidity or steam Near a flame heater or air conditioner Outdoors or exposed to direct sunlight Exposed to extremely dusty or oily environments Cleaning the Race a Press Needle position button to raise the needle b Turn the main power to OFF c Remove the needle and presser foot page 30 page 108 d Remove the bobbin cover e Slide the needle plate cover toward you to remove it f Gras...

Page 109: ...o firmly tighten the screw on the left side Finally firmly tighten the screw on the right side f Replace the bobbin case and the needle plate cover following steps h through j in Cleaning the Race Changing Embroidery Foot W with LED Pointer a Press Needle position button to raise the needle b Press to lock all keys and buttons If the message OK to automatically lower the presser foot appears on th...

Page 110: ...w for embroidery foot h Plug the connector of the embroidery foot W with LED pointer into the jack on the back left side of your machine i Press to unlock all keys and buttons All keys and operation buttons are unlocked and the previous screen is displayed Touch Panel is Malfunctioning If the screen does not respond correctly when you touch a key the machine does not perform the operation or perfo...

Page 111: ...h the pretension disk correctly the thread may become tangled beneath the bobbin winder seat Wind off the thread according to the following procedure a Press to stop the bobbin winding b Cut the thread with scissors near the pretension disk 1 Pretension disk c Push the bobbin winder switch to the right and then raise the bobbin at least 10 cm 4 inches from the shaft Note Only use the included touc...

Page 112: ... is not passed through the bobbin winding thread guide correctly 24 Bobbin spins slowly 25 The thread that was pulled out was not wound onto the bobbin correctly 24 The empty bobbin was not set on the pin properly 23 While winding the bobbin the bobbin thread was wound below the bobbin winder seat You have not wound the bobbin thread properly when you initially wound thread on the bobbin Ensure th...

Page 113: ... not catch the needle bar threader etc 28 Knotted or tangled thread is being used Upper thread tension is too tight 73 Thread is twisted Symptom Cause solution Reference Needle is turned bent or the point is dull 30 Needle is installed incorrectly 30 There are scratches around the opening in the presser foot There are scratches on the bobbin case Using improper needle or thread for the selected fa...

Page 114: ...tc 56 Stabilizing material was not attached Always use stabilizing material especially with stretch fabrics lightweight fabrics fabrics with a coarse weave or fabrics that often cause pattern shrinkage See your authorized Brother dealer for the proper stabilizer 55 There was an object placed near the machine and the carriage or embroidery frame hit the object during embroidering 34 Fabric outside ...

Page 115: ...y to save a copyright protected pattern to USB media According to copyright laws patterns that are illegal to reproduce or edit cannot be saved to USB media If this message displays save the pattern in the machine s memory 9 Lower the presser foot lever This message is displayed when Presser foot lifter button is pushed while the presser foot lever is raised the needle is lowered 10 Make sure embr...

Page 116: ...idery unit is initializing 28 The safety device was activated since the main shaft motor was heated Is the thread tangled This message is displayed when the temperature of the motor increases activating the safety device Wait until the temperature decreases If the error persists contact your nearest authorized Brother dealer 29 The safety device was activated since the main shaft motor seized Is t...

Page 117: ...message is displayed when an error occurs with the USB media 41 Use the presser foot lifter button to lower the presser foot This message is displayed when a button such as the Start Stop button is pushed while the presser foot is raised 42 Use the presser foot lifter button to raise the presser foot This message is displayed when the embroidery unit is attached and the power is turned on with the...

Page 118: ...ions of box Approx 735 mm W 620 mm H 190 mm D approx 28 15 16 inches W 24 13 32 inches H 7 15 32 inches D Weight of embroidery unit Approx 4 6 kg approx 10 1 lb Weight of box for shipping Approx 6 8 kg approx 15 0 lb Total Shipping Weight Combination of all 2 boxes complete Approx 32 7 kg approx 72 1 lb Data Precaution Memory Embroidery patterns 10 MB Images can be imported to the machine My Desig...

Page 119: ...fications may change without notice Condition of the Eco Mode and Shutoff Support Mode Eco Mode Available time OFF 10 120 minute Start Stop button Green flashing Suspended function Machine light Screen display LED pointer After recovering The machine starts from the previous operation Shutoff Support Mode Available time OFF 1 12 hour Start Stop button Green slow flashing Suspended function All fun...

Page 120: ...utomatic threading button turn the main power to ON b Press c Insert the USB media into the primary top USB port on the machine d Press When upgrading is finished the completion message appears e Turn the machine off remove the USB media and turn the machine on again UPGRADING YOUR MACHINE S SOFTWARE Note When using USB media to upgrade the software check that no data other than the upgrade file i...

Page 121: ...inter 107 Embroidery frames attaching 58 inserting fabric 56 removing 58 types 56 using the embroidery sheet 57 Embroidery needle plate cover 62 Embroidery patterns checking the position 61 editing 42 embroidering 62 linked characters 78 retrieving 80 saving 80 selecting 36 using a frame pattern to make an appliqué 81 Embroidery sheet 57 Embroidery unit 34 Error messages 113 F Favorite color schem...

Page 122: ...l cap 10 Spool net 28 Spool pin 10 Stabilizer 55 Start Stop button 10 Starting point key 78 Supplemental spool pin 10 23 T Terms of Use 5 Thread thread tension 73 Thread color display 77 Thread color palette 49 Thread cutter 10 Thread cutter button 10 Thread guide 10 24 26 Thread guide plate 10 25 Thread marks 47 Touch pen 109 Trial key 61 Troubleshooting 109 Tutorial video 19 U Upgrading 118 Uppe...

Page 123: ......
Page 124: ...y of purchase only Local Brother companies or their dealers will only support machines purchased in their own countries Be sure to install the latest software A variety of functional improvements are being performed in the latest version Brother SupportCenter is a mobile app that provides the support information for your Brother product English 882 W80 W82 XH3862 001 ...

Reviews: