background image

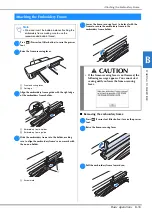
Attaching the Embroidery Unit

Basic operations

B-27

ST

AR
T

ING T

O

 EMBR

O

IDE
R

B

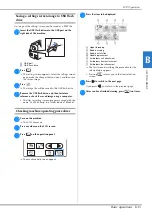
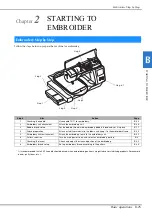
1

Carriage

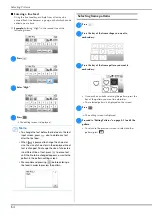
The screen for selecting the embroidery pattern type 
is displayed.

• For details on the embroidery patterns, refer to 

“Viewing the LCD” on page B-9.

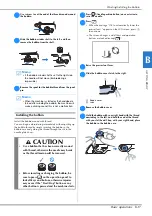
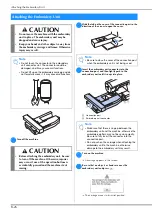
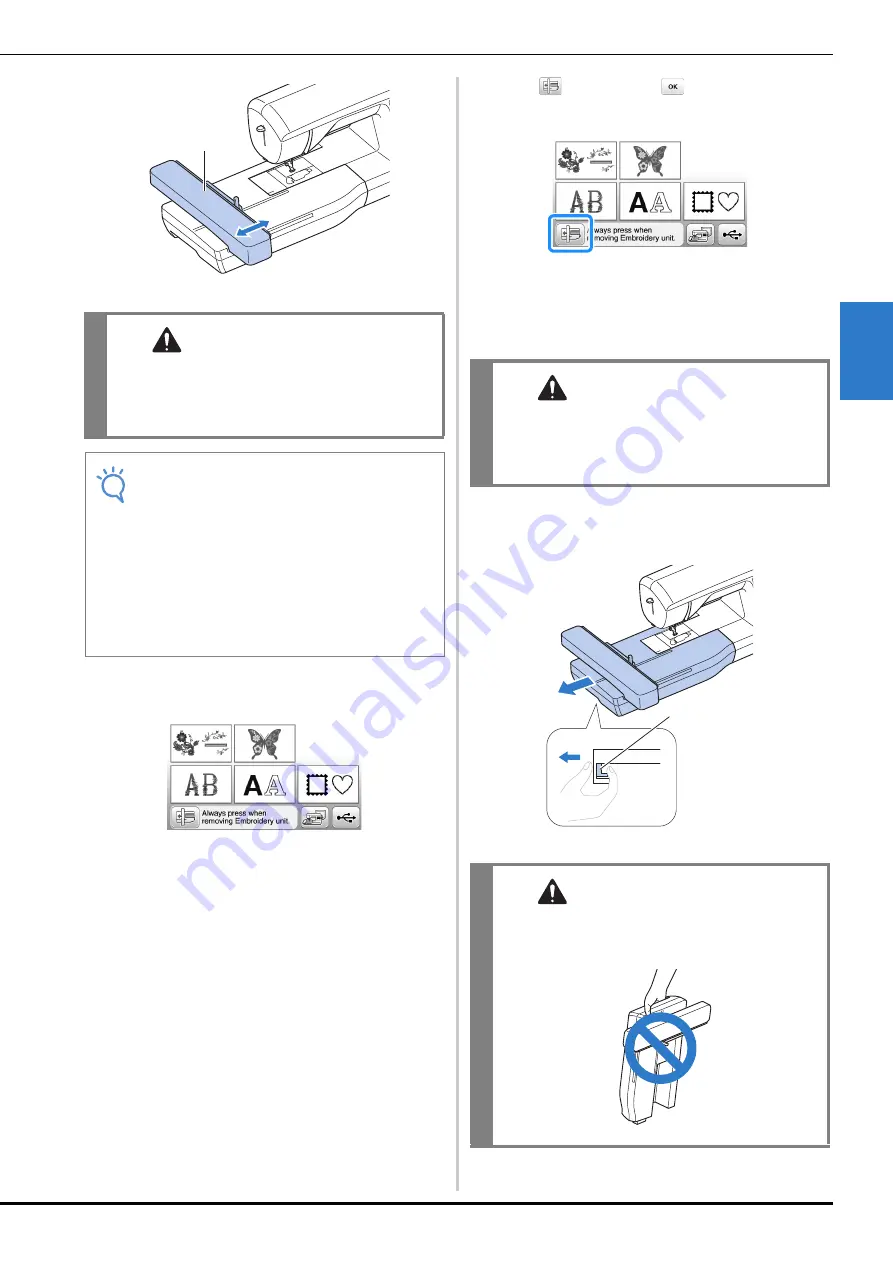
Removing the embroidery unit

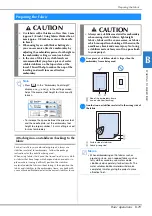
Make sure that the machine is completely stopped and 
follow the instructions below.

a

Remove the embroidery frame. 

• For details on removing the embroidery frame, refer 

to “Attaching the Embroidery Frame” on page B-33. 

b

Press 

, and then press 

.

The embroidery carriage moves into a position 
where it can be stored. 

c

Turn off the machine.

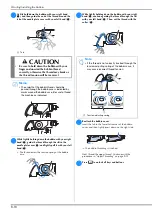
d

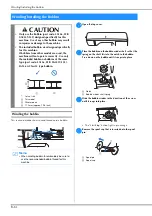
Hold the release button on the bottom left of the 
embroidery unit, and slowly pull the embroidery unit 
to the left. 

1

Release button

 CAUTION

• Keep your hands and foreign objects away 

from the embroidery carriage and frame when 
the machine is embroidering. Otherwise, 
injury may result.

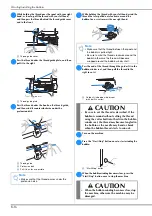
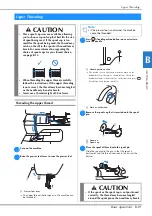
Note

• If the machine was not initialized correctly, the 

initial screen may not appear. This is not a sign of 
a malfunction. If this occurs, turn the machine 
off, then on again.

• A confirmation message to lower the frame-

securing lever after the carriage moves to its 
initial position is displayed. Continue with pattern 
selection and remember to lower the frame-
securing lever when the embroidery frame is 
attached.

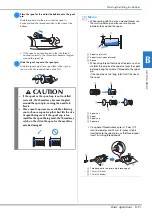
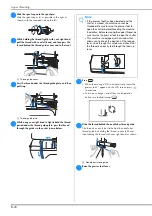
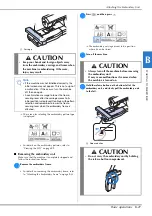
1

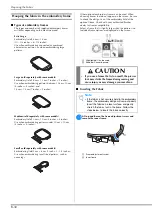
 CAUTION

• Always turn off the machine before removing 

the embroidery unit. 
It may cause malfunctions if removed when 
the machine is turned on.

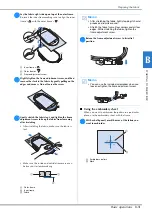
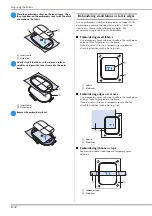
 CAUTION

• Do not carry the embroidery unit by holding 

the release button compartment.

1

Summary of Contents for 888-G90

Page 1: ...Operation Manual Embroidery Machine Product Code 888 G90 Be sure to read this document before using the machine We recommend that you keep this document nearby for future reference ...

Page 2: ......

Page 3: ...tly into the electrical outlet Do not use an extension cord Always unplug your machine if there is a power failure 3Electrical Hazards This machine should be connected to an AC power source within the range indicated on the rating label Do not connect it to a DC power source or converter If you are not sure what kind of power source you have contact a qualified electrician This machine is approved...

Page 4: ...tion is necessary when the machine is used by or near children The plastic bag that this machine was supplied in should be kept out of the reach of children or disposed of Never allow children to play with the bag due to the danger of suffocation Do not use outdoors 8For a longer service life When storing this machine avoid direct sunlight and high humidity locations Do not use or store the machin...

Page 5: ...years and above and persons with reduced physical sensory or mental capabilities or lack of experience and knowledge if they have been given supervision or instruction concerning use of the appliance in a safe way and understand the hazards involved Children shall not play with the appliance Cleaning and user maintenance shall not be made by children without supervision FOR USERS IN THE UK EIRE MA...

Page 6: ... and or other materials provided with the distribution The name of Intel Corporation may not be used to endorse or promote products derived from this software without specific prior written permission This software is provided by the copyright holders and contributors as is and any express or implied warranties including but not limited to the implied warranties of merchantability and fitness for ...

Page 7: ...s Chapter 2 STARTING TO EMBROIDER Page B 25 To learn how to prepare for embroidering and basic embroidering operations E Embroidering This section provides instruction on editing embroidery patterns and recalling stored embroidery patterns Chapter 1 EMBROIDERY Page E 2 Embroider artistically by editing the built in patterns you can easily create your own original designs A Appendix This section pr...

Page 8: ... the pattern 6 Changing the size of the pattern 6 Rotating the pattern 6 Changing the thread color 7 Creating a horizontal mirror image 7 Changing the density alphabet character and frame patterns only 7 Deleting the pattern 7 Displaying patterns in the screen magnification 8 After editing 8 Editing Character Patterns 9 Changing the colors of alphabet character patterns 9 Switching between text wr...

Page 9: ...e machine 2 Cleaning the LCD Screen 2 Cleaning the machine surface 2 Cleaning the race 2 About the maintenance message 4 Touch panel is malfunctioning 4 Operation beep 4 Replacing the embroidery foot 5 Troubleshooting 6 List of symptoms 6 Error messages 10 Specifications 12 Upgrading your machine s software using USB flash drive 13 Index 14 ...

Page 10: ...CONTENTS viii ...

Page 11: ...ection provides details on the initial setup procedures as well as descriptions of this machine s more useful functions Page number starts with B in this section Chapter1 GETTING READY B 2 Chapter2 STARTING TO EMBROIDER B 25 ...

Page 12: ...lected and edited and operations for using the machine can be selected page B 4 9 Operation buttons Use these buttons to operate the machine page B 4 0 Embroidery unit Attach embroidery unit to embroider page B 26 A Thread cutter Pass the threads through the thread cutter to cut them B Needle threader lever Use the needle threader lever to thread the needle Right side rear view 1 Handwheel Turn th...

Page 13: ...idery Unit 1 Embroidery frame holder Insert the embroidery frame into the embroidery frame holder to hold the frame in place page B 33 2 Frame securing lever Press the frame securing lever down to secure the embroidery frame page B 33 3 Embroidery unit connection Insert the embroidery unit connection into the connection port when attaching the embroidery unit page B 26 4 Carriage The carriage move...

Page 14: ...Press to set the needle stop position the buzzer sound and more 6 Embroidery key Press this key to sew embroidery 7 Back key Press to return to the previous screen 8 Presser foot Needle exchange key Press this key before changing the needle the presser foot etc This key locks all key and button functions to prevent operation of the machine Green The machine is ready to embroider or is embroidering...

Page 15: ...les 90 14 1 needle Bobbin 4 One is on machine Seam ripper Scissors Cleaning brush 7 8 9 10 11 12 Screwdriver large Screwdriver small L shaped screwdriver Disc shaped screwdriver Spool cap large Spool cap medium On machine 13 14 15 16 17 Spool cap small Thread spool insert mini king thread spool Spool net Bobbin case no color on the screw on machine Embroidery frame set extra large 26 cm H 16 cm W ...

Page 16: ...6 cm W 1 inch H 2 1 2 inches W 4 5 6 7 Border embroidery frame set 18 cm H 10 cm W 7 inches H 4 inches W Square embroidery frame 15 cm H 15 cm W 6 inches H x 6 inches W Stabilizer material for embroidery Water soluble stabilizer Memo To obtain optional accessories or parts contact your authorized Brother dealer All specifications are correct at the time of printing Please be aware that some specif...

Page 17: ...achine always turn the main power to OFF first Always grasp the plug to remove it from the electrical outlet Pulling on the cord may damage the cord or lead to fire or electric shock Do not allow the power cord to be cut damaged modified forcefully bent pulled twisted or bundled Do not place heavy objects on the cord Do not subject the cord to heat These things may damage the cord or cause fire or...

Page 18: ...e screen Turning off the machine When you are finished using the machine turn it off In addition before transporting the machine to another location be sure to turn it off a Make sure that the machine is not embroidering b Press the main power switch on the right side of the machine in the direction of the symbol to turn the machine off Select machine setting for the first time When you first turn...

Page 19: ...select the embroidery pattern to select a machine function or to select an operation indicated on the key The screen below appears after the embroidery carriage moves to its initial position LCD Operation 1 Embroidery patterns 2 Brother Exclusives 3 Floral alphabet patterns 4 Character patterns 5 Frame patterns 6 Press this key to position the embroidery unit for storage 7 Patterns saved in the ma...

Page 20: ...lected select from six thread brands page B 37 5 Adjust the maximum embroidery speed setting For details refer to Adjusting the embroidery speed in the Embroidering section 6 Adjust the upper thread tension for embroidering For details refer to Adjusting thread tension in the Embroidering section 7 Select the height of the embroidery foot during embroidering page B 29 8 Change the color of the bac...

Page 21: ...ty for operation keys page B 12 H Display the service count which is a reminder to take your machine in for regular servicing Contact your authorized Brother dealer for details I Display the total number of stitches sewn on this machine J The No is the internal machine number for your machine K Display the program version of the LCD panel Page 5 Page 6 Page 7 Memo The latest version of software is...

Page 22: ... display the settings screen b Display page 6 by pressing c Press Start The adjusting screen is displayed d Adjust the Input Sensitivity by pressing The higher the setting the more sensitive the keys will be The default setting is 3 e Press to return to previous screen If the machine does not respond when an operation key is pressed Hold down Thread cutter button and turn on the machine to reset t...

Page 23: ... a computer The files for settings screen images are saved with the name S bmp in a folder labeled bPocket Checking machine operating procedures a Turn on the machine The LCD comes on b Press anywhere on the LCD screen c Press on the operation panel The machine help screen appears d Press the item to be displayed 1 Upper threading 2 Bobbin winding 3 Bobbin installation 4 Needle replacement 5 Embro...

Page 24: ... inserted onto the spool pin 1 Spool pin 2 Spool cap Winding Installing the Bobbin CAUTION Only use the Bobbin part code SA156 SFB XA5539 151 designed specifically for this machine Use of any other bobbin may result in injuries or damage to the machine The included bobbin was designed specifically for this machine If bobbins from other models are used the machine will not operate correctly Use onl...

Page 25: ...hoose a spool cap that best fits the size of spool being used If the spool cap is too small for the spool being used the thread may catch on the slit in the spool or the machine may be damaged Memo When sewing with fine cross wound thread use the small spool cap and leave a small space between the cap and the spool 1 Spool cap small 2 Spool cross wound thread 3 Space When using thread that winds o...

Page 26: ...ull the thread to the right to cut it 1 Guide slit in bobbin winder seat with built in cutter l Turn on the machine m Press the Start Stop button once to start winding the bobbin 1 Start Stop button n When the bobbin winding becomes slow press the Start Stop button once to stop the machine Note Make sure that the thread passes under the pretension disk 1 1 1 2 3 Note Make sure that the thread betw...

Page 27: ...n buttons are locked except c Raise the presser foot lever d Slide the bobbin cover latch to the right 1 Bobbin cover 2 Latch e Remove the bobbin cover f Hold the bobbin with your right hand with the thread unwinding to the left and hold the end of the thread with your left hand Then with your right hand place the bobbin in the bobbin case Memo If the bobbin winder shaft is set to the right side t...

Page 28: ...attach the bobbin cover Insert the tab in the lower left corner of the bobbin cover and then lightly press down on the right side The bobbin threading is finished Next thread the upper thread Continue with the procedure in Upper Threading on page B 19 k Press to unlock all keys and buttons CAUTION Be sure to hold down the bobbin with your finger and unwind the bobbin thread correctly otherwise the...

Page 29: ... spool onto the pin so that the spool is horizontal and the thread unwinds to the front at the bottom Upper Threading CAUTION Three spool cap sizes are available allowing you to choose a spool cap that best fits the size of spool being used If the spool cap is too small for the spool being used the thread may catch on the slit in the spool or the needle may break For more information regarding the...

Page 30: ...rs on the LCD screen press to continue The screen changes and all keys and operation buttons are locked except k Slide the thread behind the needle bar thread guide The thread can easily be slid behind the needle bar thread guide by holding the thread in your left hand then feeding the thread with your right hand as shown 1 Needle bar thread guide l Raise the presser foot lever 1 Note If the press...

Page 31: ...es the thread through the eye of the needle Memo The needle threader can be used with machine needles 75 11 through 100 16 If the needle threader cannot be used refer to Threading the needle manually without using the needle threader on page B 22 1 2 2 1 1 Note If the thread is pulled through and cannot be cut correctly lower the presser foot lever so that the thread is held in place before cuttin...

Page 32: ...s to unlock all keys and buttons Threading the needle manually without using the needle threader Some needles cannot be threaded with the needle threader In this case thread the needle as described below a Thread the machine to the needle bar thread guide For details refer to Upper Threading on page B 19 b Insert the thread through the eye of the needle from front to back c Raise the presser foot ...

Page 33: ...e 2 Needle type marking Replacing the needle Use the screwdriver and a needle that has been determined to be straight according to the instructions in Checking the needle a Press Needle position button once or twice to raise the needle b Place fabric or paper under the presser foot to cover the hole in the needle plate c Press When the message OK to automatically lower the presser foot appears on ...

Page 34: ... needle clamp screw otherwise certain parts of the machine may be damaged e With the flat side of the needle toward the rear of the machine insert the needle until it touches the needle stopper 1 Needle stopper f While holding the needle with your left hand use the screwdriver to tighten the needle clamp screw by turning it clockwise g Press to unlock all keys and buttons CAUTION Be sure to insert...

Page 35: ...idery bobbin thread and set it in place B 17 4 Fabric preparation Attach a stabilizer material to the fabric and hoop it in the embroidery frame B 29 5 Embroidery frame attachment Attach the embroidery frame to the embroidery unit B 35 6 Pattern selection Turn the main power to on and select an embroidery pattern B 9 7 Checking the layout Check and adjust the size and position of the embroidery B ...

Page 36: ...broidery carriage and frame Otherwise injury may result Note Do not touch the connector in the embroidery unit connector slot The connector could be damaged and it may cause malfunctions Do not lift up on the embroidery carriage and do not forcefully move it It may cause malfunctions CAUTION Before attaching the embroidery unit be sure to turn off the machine Otherwise injuries may occur if one of...

Page 37: ...nit and slowly pull the embroidery unit to the left 1 Release button CAUTION Keep your hands and foreign objects away from the embroidery carriage and frame when the machine is embroidering Otherwise injury may result Note If the machine was not initialized correctly the initial screen may not appear This is not a sign of a malfunction If this occurs turn the machine off then on again A confirmati...

Page 38: ...threads may not yield optimum results Bobbin thread Use embroidery bobbin thread intended for use with this machine Note Before embroidering check that there is enough thread in the bobbin If you start to sew your embroidery project without enough thread in the bobbin you will need to rewind the bobbin in the middle of the embroidery pattern Memo If you use threads other than those listed above th...

Page 39: ... layers with thicker batting etc you can sew more attractive embroidery by adjusting the embroidery presser foot height in the embroidery settings screen see below In the case of thick terry cloth towels we recommend that you place a piece of water soluble stabilizer on the top surface of the towel This will help to reduce the nap of the toweling and result in more attractive embroidery Note Press...

Page 40: ...s Use when embroidering small sized patterns such as name tags Other optional embroidery frames can be used When choosing frames that do not appear on the screen be sure to check the design size of the embroidery field of the optional frame Check with your authorized Brother dealer for frame compatibility Select a frame that is slightly larger than the pattern size Included frame options are displ...

Page 41: ...etching the fabric make sure the fabric is taut Make sure the inside and outside frames are even before you start embroidering 1 Outer frame 2 Inner frame 3 Fabric e Return the frame adjustment screw to its initial position Using the embroidery sheet When you want to embroider the pattern in a particular place use the embroidery sheet with the frame a With a chalk pencil mark the area of the fabri...

Page 42: ...he stabilizer as shown in the following examples We recommend using a stabilizer for embroidery Embroidering small fabrics Use a temporary spray adhesive to adhere the small piece of fabric to the larger piece in the frame If you do not wish to use a temporary spray adhesive attach the stabilizer with a basting stitch 1 Fabric 2 Stabilizer Embroidering edges or corners Use a temporary spray adhesi...

Page 43: ... s arrow mark with the one on holder 1 Arrow mark e Lower the frame securing lever to be level with the frame to secure the embroidery frame in the embroidery frame holder Removing the embroidery frame a Press Presser foot lifter button to raise the presser foot b Raise the frame securing lever c Pull the embroidery frame toward you Attaching the Embroidery Frame Note Wind and insert the bobbin be...

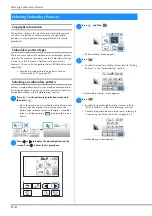
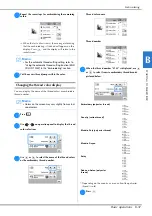
Page 44: ...ses You can try various selection of patterns and pattern editing in the Embroidering section a Press in the pattern type selection screen and then press Once the machine has finished the initialization and the carriage has moved to the start position the pattern type selection screen will display If another screen is displayed press to display the screen below b Press or to display the desired pa...

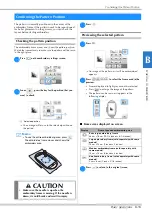
Page 45: ...oidered appears b Press to select the frame used in the preview Frames displayed in light gray cannot be selected Press to enlarge the image of the pattern The pattern can be sewn as it appears in the following display Frame sizes displayed on screen c Press to return to the original screen Confirming the Pattern Position Memo To see the entire embroidering area press The embroidery frame moves an...

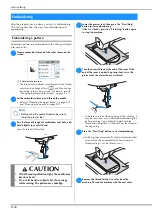
Page 46: ...the Start Stop button to start embroidering After 5 6 stitches press the Start Stop button again to stop the machine e Trim the excess thread at the end of the seam If the end of the seam is under the presser foot raise the presser foot then trim the excess thread If the thread is left at the beginning of the stitching it may be sewn over as you continue embroidering the pattern making it very dif...

Page 47: ... to display the thread color selections c Use or to select the name of the thread colors or the embroidery thread number Thread color name Thread number d When the thread number 123 is displayed use or to select from six embroidery thread brands pictured below Depending on the country or area cotton like polyester thread is sold e Press Memo For the automatic thread cutting setting refer to Using ...

Page 48: ...Embroidering B 38 ...

Page 49: ... provides instruction to embroider designs with this machine Page number starts with E in this section The screen display and machine illustration may vary slightly depending on the countries or regions Chapter1 EMBROIDERY E 2 ...

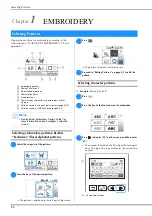
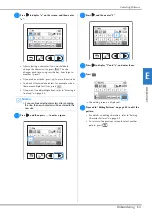
Page 50: ...Entering We Fly a Press b Press the key of the font you want to embroider c Press to display W on the screen and then enter W The number located on the left side of the text input box at the top of the screen indicates the current line number 1 Current line number Chapter 1 EMBROIDERY Selecting Patterns 1 Embroidery patterns 2 Brother Exclusives 3 Floral alphabet patterns 4 Character patterns 5 Fr...

Page 51: ...ltiple text lines press If you want to add multiple lines refer to Entering a line feed on page E 4 e Press and then press to enter a space f Press and then enter F g Press to display l and y and enter them h Press The editing screen is displayed i Proceed to Editing Patterns on page E 5 to edit the pattern For details on editing characters refer to Editing Character Patterns on page E 9 To return...

Page 52: ...ern you want to embroider The selected pattern is displayed on the screen d Press The editing screen is displayed e Proceed to Editing Patterns on page E 5 to edit the pattern To return to the previous screen to select another pattern press Memo To change the text before the line feed in the text input screen press also to delete any text after the line feed When is pressed to change the character...

Page 53: ...he pattern You can rotate a pattern one degree ten degrees or ninety degrees at a time E 6 6 Thread palette key Press this key to change the colors of the displayed pattern E 7 7 Delete key Press this key to delete the selected pattern the pattern outlined by the red box E 7 8 Font edit key Press this key to display the font editing screen For details refer to Editing All Patterns E 9 9 Edit End k...

Page 54: ...tern c Press to return to the original screen Rotating the pattern a Press b Select the angle of rotation for the pattern Pressing each key to rotate the pattern as follows Rotate the pattern 90 degrees to the left Rotate the pattern 90 degrees to the right Rotate the pattern 10 degrees to the left Rotate the pattern 10 degrees to the right Rotate the pattern 1 degree to the left Rotate the patter...

Page 55: ...1 Color palette The display shows the changed colors d Press Creating a horizontal mirror image Press so it appears as to create a horizontal mirror image of the selected pattern Press again to return the pattern to normal Changing the density alphabet character and frame patterns only The thread density for some alphabet character and frame patterns can be changed A setting between 80 and 120 in ...

Page 56: ...nlarge the pattern Press to return to the normal size c Press to return to the original screen After editing a Press To combine the pattern with other patterns select page E 13 For more information about sewing patterns refer to Embroidering a pattern in the Basic operations section Memo If you want to return to the editing screen after pressing press ...

Page 57: ...ally and horizontally a Press to switch between text written vertically and horizontally b Press to return to the pattern editing screen Editing Character Patterns No Display Key Name Explanation Page 1 Multi color key Press this key to change the color of individual characters in a pattern E 9 2 Array key Press this key to change the configuration of a character pattern E 12 3 Font key Press this...

Page 58: ...eparating combined character patterns Combined character patterns can be separated to adjust the character spacing or to separately edit the patterns after all characters have been entered a Press b Use to select where the pattern is to be separated and then press to separate it For this example the pattern will be separated between A and B Note Depending on the font that was selected it may not b...

Page 59: ... character is surrounded with a red box c Select the direction in which to change the size For details on the various keys refer to the procedure in Changing the size of the pattern on page E 6 d Press to return to the font editing screen Changing the font a Press b Press and then select the character whose font is to be changed To select the character press or The selected character is surrounded...

Page 60: ...the layout you want to embroider When selecting an arc use and to change the degree of the arc Make the arc flatter Make the arc rounder The display will show the selected layout Example c Press to return to the font editing screen Memo When selecting and change to and You can increase or decrease the incline ...

Page 61: ...r will be displayed in the upper part of the screen f Press g Press h Press to move the characters With your finger drag the characters to move them i Press to return to the pattern editing screen j Press and to change the layout of the characters Press two times to return to the pattern editing screen See page E 12 for more information about changing the layout k Press to change the color of the ...

Page 62: ...patterns Combined patterns will be embroidered in the order they were entered In this example the embroidery order will be as follows For more information about sewing patterns refer to Embroidering a pattern in the Basic operations section a Embroider the flower pattern by following the color order on the display After the flowers are embroidered the cursor will move to the character part of the ...

Page 63: ...ion moves to the bottom left corner of the pattern the embroidery frame moves so that the needle is positioned correctly d Press Editing All Patterns No Display Key Name Explanation Page 1 Move key Press these keys to move the pattern in the direction shown by the arrow Press the center key to return the pattern to the center of the embroidery area E 15 2 Rotate key Press this key to rotate the en...

Page 64: ... is positioned correctly d Press e Lower the embroidery foot and then press the Start Stop button to begin embroidering f After the characters are embroidered cut the threads remove the embroidery frame and then press for Finished embroidering 1 End of the embroidering g Reposition the fabric in embroidery frame so that the right side of the letter C will be partially inside the embroidery frame b...

Page 65: ...e needle is positioned in the lower left corner of the pattern The embroidery frame moves so that the needle is positioned correctly l Use to align the needle with the end of the embroidering for the previous pattern m Press n Lower the embroidery foot and press the Start Stop button to begin embroidering the remaining character patterns ...

Page 66: ...it 1 Applique material cotton felt etc 2 Iron on stabilizer c Thread the machine with the embroidery thread lower the presser foot lever and then press the Start Stop button to sew the cutting line of the appliqué piece The outline of the appliqué piece is sewn and then the machine stops 1 Outline of applique 2 Applique material d Remove the fabric for the appliqué piece from the embroidery frame ...

Page 67: ...mbroidery frame to the machine Thread the machine with the embroidery thread lower the presser foot lever and then press the Start Stop button to sew the appliqué The appliqué piece is sewn to the base fabric and then the machine stops Note Do not remove the base fabric from the embroidery frame until all sewing is finished Note If the appliqué piece is not securely attached to the base fabric the...

Page 68: ...oider the same pattern from step a onto the base fabric c Apply a thin layer of fabric glue or a temporary spray adhesive to the rear of the appliqué created in step a Attach the appliqué to the base fabric matching the shapes d Select the satin stitch frame pattern of the same shape as the appliqué Embroider over the appliqué and base fabric from step c to create the appliqué Memo Since glue may ...

Page 69: ...ric completely covers the stitched line c Embroider the same pattern on the appliqué fabric d Remove the embroidery frame from the embroidery unit and cut around the outside of the stitches e Select the satin stitch frame pattern of the same shape as the appliqué f Reattach the embroidery frame to the embroidery unit and embroider the satin stitch pattern to create an appliqué Note Do not remove t...

Page 70: ...ttern and then select the split embroidery pattern to be embroidered For details on recalling patterns refer to Recalling from USB flash drive on page E 35 A screen appears so that a section of the split embroidery pattern can be selected b Select section to be embroidered and press Select the sections in alphabetical order A maximum of 5 sections can be displayed in one page If there are 6 or mor...

Page 71: ...ss After the thread is automatically cut the carriage will move b Unlock the frame securing lever and remove the embroidery frame Be careful not to apply strong force to the fabric at this time Otherwise the fabric may loosen in the frame c Insert a wound bobbin into the machine see Setting the Bobbin of Basic operations d Press e Attach the embroidery frame f To return to the area in the pattern ...

Page 72: ...ition c Press Presser foot lifter button to lower the presser foot and start sewing Resuming embroidery after turning off the power The current color and stitch number are saved when embroidery is stopped The next time the machine is turned on you have the option to continue or delete the pattern 1 Current stitch number when embroidery was stopped a Turn the main power to ON b Follow the instructi...

Page 73: ...h the embroidery frame and press The previous embroidery screen displayed before the machine was turned off appears d Continue embroidering 1 Stitch number when embroidery is resumed Memo If you want to start a new embroidery pattern press so the pattern selection screen appears 1 ...

Page 74: ...ad is too loose resulting in a loose upper thread loose thread locks or loops appearing on the right side of the fabric 1 Right side 2 Wrong side a Press b Press to tighten the upper thread tension The tension number will increase Making Embroidery Adjustments Note If the thread tension setting is made extremely weak the machine may stop during sewing This is not the sign of a malfunction Increase...

Page 75: ...ping and bobbin thread is not seen on the wrong side of fabric 1 Right side 2 Wrong side If this occurs turn the slotted head screw counterclockwise being careful not to over loosen the screw approximately 30 45 degrees to decrease bobbin tension Note With Embroidery Tension on the setting screen the tension of the upper thread can be adjusted for embroidering The selected setting will be applied ...

Page 76: ...elect the length of the jump stitch not to trim the thread This function can be turned on or off during embroidering Select a setting from 5 mm to 50 mm in 5 mm increments Your customized setting remains after turning the machine off and on Press or to select the length of jump stitch For example Press to select 25 mm 1 inch and the machine will not trim a jump stitch of 25 mm or less before movin...

Page 77: ...ery frame 15 cm 15 cm 6 inches 6 inches 6 Medium frame embroidering area 10 cm 10 cm 4 inches 4 inches 7 Embroidery area for small embroidery frame 2 cm 6 cm 1 inch 2 1 2 inches 8 Grid lines c Press to return to the original screen Memo spm is the number of stitches sewn in one minute Decrease the embroidery speed when embroidering on thin thick or heavy fabrics The sewing speed can be changed aft...

Page 78: ...s Depending on the pattern color select the desired background color from the 66 settings available Different background colors can be selected for the embroidery pattern and pattern thumbnails a Press to display the following screen 1 Embroidery pattern background 2 Pattern thumbnails background b Press c Select the background color from the 66 available settings 1 Embroidery pattern background 2...

Page 79: ...mbnails The thumbnails for selecting an embroidery pattern can be set to be displayed at the smaller size or a larger size The larger size is 1 5 times the smaller size a Press to display the following screen b Press or to select the desired thumbnail size c Press to return to the original screen ...

Page 80: ...ign can not exceed a maximum number of 200 000 stitches or a maximum number of 125 color changes Above numbers are approximate depending on the overall size of the design Use one of our design software programs to edit the embroidery pattern so that it meets these specifications Embroidery data stored in a folder created in USB flash drive can be retrieved Even if the embroidery unit is not attach...

Page 81: ...ved or the pattern you want to save uses a lot of memory and the machine cannot save it If you delete a previously saved pattern you can save the current pattern a Press Press to return to the original screen without saving The machine displays the patterns currently saved b Select the pattern you want to delete Press to move to the previous next page c Press 1 Amount of memory used by the pattern...

Page 82: ...ove to the previous next page Press to return to the original screen Memo If there is enough memory available after deleting the pattern the pattern you want to save will be saved automatically If there is not enough memory available after deleting the pattern repeat the steps above to delete another pattern from the machine s memory It takes a few seconds to save a pattern See page E 34 for more ...

Page 83: ...ious next page Press to return to the original screen without recalling Stitch patterns within a folder are displayed The folder name or the path to show the current folder is displayed under the folder icon Embroidery patterns and subfolders within a folder are displayed Press to return to the previous screen Use the computer to create folders Folders cannot be created with the machine d Press th...

Page 84: ...Using the Memory Function E 36 f If necessary edit the pattern and press Embroidery settings screen is displayed g Press The embroidery screen is displayed ...

Page 85: ...ation for operating this machine Please read this section to find troubleshooting tips and pointers as well as how to keep your machine in the best working order Page number starts with A in this section Chapter1 MAINTENANCE AND TROUBLESHOOTING A 2 ...

Page 86: ...n neutral detergent squeeze it out firmly and then wipe the surface of the machine After cleaning it once with a damp cloth wipe it again with a dry cloth Cleaning the race Sewing performance will suffer if lint and dust collects in the bobbin case therefore it should be cleaned regularly a Press Needle position button to raise the needle b Turn off the machine c Unplug the power cord from the pow...

Page 87: ... and then slide it toward you 1 Needle plate cover g Remove the bobbin case Grasp the bobbin case and then pull it out 1 Bobbin case h Use the cleaning brush or a vacuum cleaner to remove any lint and dust from the race and bobbin thread sensor and the surrounding area 1 Cleaning brush 2 Race 3 Bobbin thread sensor Do not apply oil to the bobbin case i Insert the bobbin case so that the mark on th...

Page 88: ...in power switch to OFF and back to ON The touch panel adjustment screen is displayed b Lightly touch the center of each in order from 1 to 5 c Turn the main power to OFF then turn it back to ON Operation beep Each time a key is pressed you will hear one beep If an incorrect operation is performed you will hear two or four beeps If a key is pressed correct operation One beep sounds If an incorrect ...

Page 89: ... c Raise the presser foot lever d Use the included screwdriver to loosen the embroidery foot screw and then remove the embroidery foot 1 Screwdriver 2 Embroidery foot 3 Embroidery foot screw e Hold the embroidery foot in place with your right hand and then use the included screwdriver to securely tighten the embroidery foot screw f Slowly lower the presser foot lever g Raise the presser foot lever...

Page 90: ...ng thread guide correctly Correctly pass the thread through the bobbin winding thread guide B 16 The thread that was pulled out was not wound onto the bobbin correctly Wind the thread that was pulled off around the bobbin 5 or 6 times clockwise B 16 The empty bobbin was not set on the pin properly Set the empty bobbin on the pin and slowly turn the bobbin until you hear it click in place B 14 Whil...

Page 91: ...eedle is turned or bent Replace the needle B 23 Using improper needle or thread for the selected fabric Check the information about the needle and thread to be used B 23 Upper thread tension is too tight Adjust the thread tension E 26 Spool cap is set incorrectly Check the method for attaching the spool cap then reattach the spool cap B 14 There are scratches around the opening in the needle plate...

Page 92: ...ised position when threading the machine so that the upper thread sets properly in the upper tension B 19 Using improper needle or thread for the selected fabric Check the information about the needle and thread to be used B 23 The upper thread is too tight The bobbin thread is incorrectly installed Correctly install the bobbin thread B 17 Bobbin thread breaks Bobbin is set incorrectly Reset the b...

Page 93: ...ine and rethread the machine B 19 Bobbin is set incorrectly Reset the bobbin B 17 Using improper needle or thread for the selected fabric Check the information about the needle and thread to be used B 23 Thread tension is set incorrectly Adjust the thread tension E 26 Bobbin thread is incorrectly wound Use a correctly wound bobbin B 17 Needle is turned bent or the point is dull Replace the needle ...

Page 94: ... is incorrect Change the bobbin case or bobbin thread so that the correct combination is used B 28 Error messages Cause solution 1 A malfunction occurred Turn the machine off then on again This message is displayed if some malfunction occurs Turn the machine off then back on again If this message continues to appear the machine may be malfunctioning Please contact your authorized Brother dealer or...

Page 95: ... when Embroidery Frame Identification View is set to ON 16 The bobbin thread is almost empty This message is displayed when the bobbin thread is running out Follow the procedure described in If the bobbin runs out of thread on page E 23 17 The bobbin winder safety device has activated Is the thread tangled This message is displayed when the bobbin is being wound and the motor locks because the thr...

Page 96: ...ight of machine Approx 8 8 kg Approx 19 4 lb Embroidering speed 70 to 850 stitches per minute Needles Home sewing machine needles HA 130 Item Specification Dimensions of embroidery unit Approx 458 mm W 131 8 mm H 420 7 mm D Approx 18 inches W 5 1 4 inches H 16 1 2 inches D Dimensions of machine with embroidery unit attached Approx 693 mm W 300 mm H 420 8 mm D Approx 27 1 4 inches W 11 7 8 inches H...

Page 97: ...rning off the machine and then turn on the machine again Upgrading your machine s software using USB flash drive Note When using USB flash drive to upgrade the software check that no data other than the upgrade file is saved on the USB flash drive being used before starting to upgrade Upgrade file can be recalled from a USB flash drive of any size Allow several seconds for machine to recognize fla...

Page 98: ...32 thread color display B 37 Embroidery edit changing the thread color E 7 combined patterns E 13 E 14 key functions E 5 Embroidery frame display E 29 Embroidery frames inserting fabric B 30 removing B 33 types B 30 using the embroidery sheet B 31 Embroidery key B 4 E 8 Embroidery pattern selection B 34 Embroidery pattern types B 34 Embroidery patterns aligning the position E 15 checking the posit...

Page 99: ...ine s memory E 34 USB media E 35 Rotate key E 6 S Saving machine s memory E 33 USB media E 34 Selecting embroidery patterns B 34 Settings automatic thread cutting E 28 display language B 12 thread tension E 26 Settings key B 4 Size key E 6 Solving operation problems A 6 Spool net B 15 Stabilizer B 29 Start Stop button B 4 Starting point key E 15 T Thread color display B 37 Thread cutter B 2 Thread...

Page 100: ...English 888 G90 Printed in Vietnam XG8674 001 Please visit us at http support brother com where you can get product support and answers to frequently asked questions FAQs ...

Reviews: