98
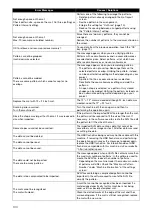
Drawing
Scanning
Symptom
Possible Causes (or Results)
Solutions
Reference
The drawn line is thicker
(thinner) than intended.
The drawing speed (“Draw Speed”)
or drawing pressure (“Draw
Pressure”) is incorrect.
Adjust the settings for “Draw Speed” and
“Draw Pressure” in the settings screen.
To draw thicker lines, increase the
drawing pressure. To draw thinner lines,
decrease the drawing pressure.
To draw thicker lines, reduce the drawing
speed. To draw thinner lines, increase
the drawing speed.
After adjusting the settings, perform a
test/trial drawing operation.
The machine stopped
while an operation is
being performed.
For safety, the machine stops
operating if the panel is touched
while drawing.
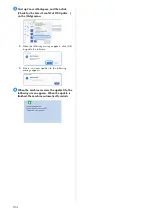
Follow the instructions in the message
that appears in the screen. Touch the
“OK” key to move the carriage to its
initial position. Load the mat and perform
the operation again.
—
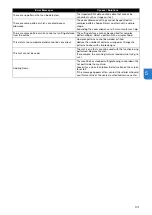
Symptom
Possible Causes (or Results)
Solutions
Reference
Unwanted images are
scanned.
The scanning area is incorrectly
specified.
In “Scan to USB” mode, specify the
paper size with the “Scan Size” setting.
In “Direct Cut” or “Scan to Cut Data”
mode, trim the image in the editing
screen after scanning.
Scanning cannot be
done cleanly (there are
lines in the scanned
image).
The scanner glass is dirty.
Clean the scanner glass inside the
machine.
The original to be scanned is dirty
or scratched.
In “Direct Cut” or “Scan to Cut Data”
mode, remove thin lines or dirt in the
image editing screen.
The lines printed on the
mat are scanned.
The original is transparent so the
lines printed on the mat are being
scanned.
In “Direct Cut” or “Scan to Cut Data”
mode, remove the lines in the image
editing screen.
The scanned image is
red.
When the optional scanning mat is
used, scanning is performed
without peeling off the blue tape.
Peel off the blue tape from the optional
scanning mat before scanning.
—
The scan image is out of
focus.
The scanner lever is not correctly
positioned for the thickness of the
material
Set the scanner lever position to "1".


