BES-961BC
•
BES-1261BC
160
Connection and Installation of Optional Equipment
q
e
o
i
y
!0
t
u
r
w
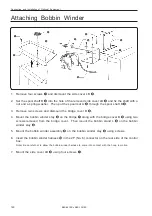
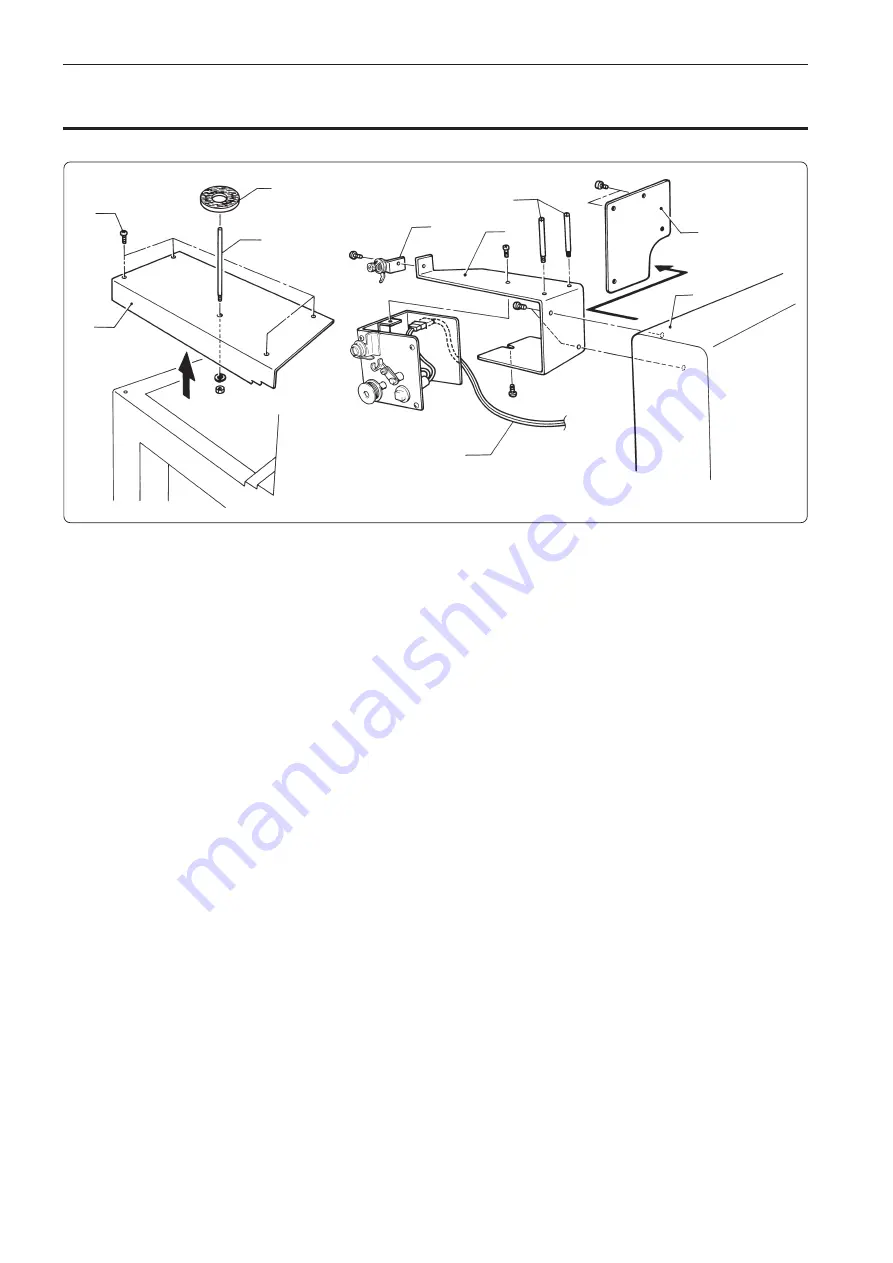
Attaching Bobbin Winder
1.
Remove four screws
q
and dismount the side cover LB
w
.
2.
Set the spool shaft B
e
into the hole of the removed side cover LB
w
and fix the shaft with a
nut and a spring washer. Then put the spool mat A
r
through the spool shaft B
e
.
3.
Remove two screws and dismount the bridge cover B
t
.
4.
Mount the bobbin winder stay
y
on the bridge
u
along with the bridge cover B
t
using two
screws removed from the bridge cover. Then mount the bobbin stand L
i
on the bobbin
winder stay
y
.
5.
Mount the bobbin winder assembly
o
on the bobbin winder stay
y
using screws.
6.
Insert the bobbin winder harness
!0
in the 2P (No. 6) connector on the rear side of the control
box.
Note) Be careful not to allow the bobbin winder harness to come into contact with the hoop in motion.
7.
Mount the side cover LB
w
using four screws
q
.
Summary of Contents for BES-1261BC
Page 7: ...5 BES 961BC BES 1261BC 2 1 7 1 6 3 4 5 7 3 2 Belt cover Finger guard BES 961BC ...
Page 13: ...11 BES 961BC BES 1261BC Setting of thread breakage sensor page 93 Setting of Machine page 96 ...
Page 18: ...16 BES 961BC BES 1261BC ...
Page 19: ...Chapter 1 Preparation of Embroidery Machine ...
Page 60: ...BES 961BC BES 1261BC 58 Chapter 2 Embroidering Procedures ...
Page 78: ...BES 961BC BES 1261BC 76 Chapter 3 Selection of Data and Embroidering ...
Page 118: ...BES 961BC BES 1261BC 116 Chapter 5 Setting ...
Page 119: ...Chapter 6 Operation of Machine ...
Page 130: ...Chapter 6 Operation of Machine BES 961BC BES 1261BC 128 ...
Page 131: ...Chapter 7 Maintenance ...
Page 140: ...Chapter 7 Maintenance BES 961BC BES 1261BC 138 ...
Page 141: ...Chapter 8 Standard Adjustment ...
Page 153: ...Chapter 9 List of Error Messages ...
Page 161: ...Connection and Installation of Optional Equipment ...

