background image

6

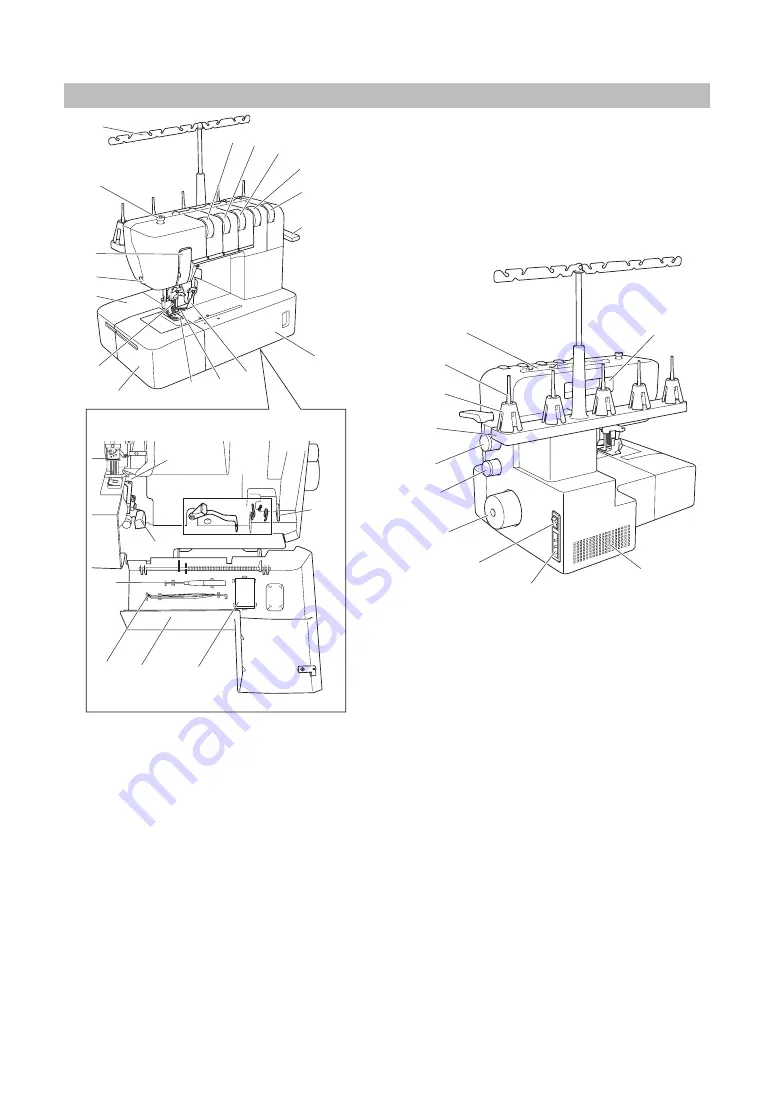
Machine (Top cover stitch model) (Product code: 884-B31)

1

  Thread tree

2

  Presser foot pressure adjustment screw

3

  Thread take-up cover

4

  Thread cutter

5

  Material plate cover

6

  Needles

7

  Bed extension

8

  Presser foot

9

  Top cover spreader

0

  Top cover thread guide

A

  Left needle thread tension dial

B

  Center needle thread tension dial

C

  Right needle thread tension dial

D

  Top cover thread tension dial

E

  Looper thread tension dial

F

  Presser foot lever

G

  Front cover

H

  Thread guide

I

  Spool pin

J

  Spool cushion

K

  Spool support

L

  Stitch length adjustment dial

M

  Differential feed ratio adjustment dial

N

  Handwheel

O

  Main power and light switch

P

  Foot controller socket

Q

  Handle

R

  Air openings

Inside of the front cover

S

  Looper thread tension adjustment lever

t

  Looper thread take-up

U

  Looper

V

  Looper release lever

W

  Front cover compartment

You can store the included accessories in this 

front cover compartment. <A>: Needle set, <B>: 

Tweezers, <C>: Hexagonal driver

a

b

c

d

e

f

g

h

i

j

q

p

o

n

m

l

k

T

U

S

V

W

$!

%!

&!

H

L

M

N

O

P

Q

R

I

J

K

Inside of the front cover

Summary of Contents for CV3550

Page 1: ...Brother CV3550 Coverstitch Machine View Buy Here https www thesewingstudio co uk brother cv3550 coverstitch machine ir ...

Page 2: ...tion Manual Cover stitch machine Top cover stitch machine Product Code 884 B30 B31 Be sure to read this document before using the machine We recommend that you keep this document nearby for future reference ...

Page 3: ...ou are not sure what kind of power source you have contact a qualified electrician This machine is approved for use in the country of purchase only 17 This sewing machine is not intended for use by young children or infirm persons without supervision 18 Young children should be supervised to ensure that they do not play with this sewing machine 19 Do not disassenble the machine 20 If the LED light...

Page 4: ...e correct lead SAVE THESE INSTRUCTIONS This machine is intended for household use FOR USERS IN COUNTRIES EXCEPT CENELEC COUNTRIES This appliance is not intended for use by persons including children with reduced physical sensory or mental capabilities or lack of experience and knowledge unless they have been given supervision or instruction concerning use of the appliance by a person responsible f...

Page 5: ...ted alloy mounted in felt heat treated with oil that enables them to withstand long hours of continuous operation Continuous operation of the sewing machine can cause heat to build in the motor area but not enough to adversely affect its performance It is important to keep fabric and paper away from the air openings on the back and sides of the machine so air can get to these openings When the mot...

Page 6: ... 13 Using the thread spool cap 13 Spool mat 13 Using the spool mat 13 Using the thread net 14 Before threading 14 Chapter 3 THREADING Cover stitch model 15 Threading the looper 15 Threading the needles 16 Chapter 4 THREADING Top cover stitch model 17 Threading the looper 17 Threading the needles 18 Attaching Removing the top cover spreader and top cover thread guide 19 Threading the top cover spre...

Page 7: ...ncluded accessories in this front cover compartment A Needle set B Tweezers C Hexagonal driver 1 Thread tree 2 Presser foot pressure adjustment screw 3 Thread take up cover 4 Thread cutter 5 Material plate cover 6 Needles 7 Bed extension 8 Presser foot 9 Left needle thread tension dial 0 Center needle thread tension dial A Right needle thread tension dial B Looper thread tension dial C Presser foo...

Page 8: ...200001 Argentina XB3156001 Korea XB3255001 China XB3190001 Australia New Zealand XF2826001 Brazil 127V XB3178001 Brazil 220V C Instruction DVD XB3301001 NTSC XB3305001 PAL D Operation Manual 1 5 B 3 7 0 D 2 6 9 C 4 8 A Optional accessory When using the following accessories use the presser foot included in the accessories No Product Name Part Code Americas Europe Others E Hemming set SA221CV SA221...

Page 9: ... dial F Presser foot lever G Front cover H Thread guide I Spool pin J Spool cushion K Spool support L Stitch length adjustment dial M Differential feed ratio adjustment dial N Handwheel O Main power and light switch P Foot controller socket Q Handle R Air openings Inside of the front cover S Looper thread tension adjustment lever t Looper thread take up U Looper V Looper release lever W Front cove...

Page 10: ...230V Area XB3134001 U K XB3200001 Argentina XB3156001 Korea XB3255001 China XB3190001 Australia New Zealand XF2826001 Brazil 127V XB3178001 Brazil 220V E Instruction DVD XB3301001 NTSC XB3305001 PAL F Operation Manual Optional accessory When using the following accessories use the presser foot included in the accessories No Product Name Part Code Americas Europe Others G Hemming set SA221CV SA221C...

Page 11: ...pening Closing front cover It is necessary to open the front cover when threading this machine Slide it to the right 1 and then open it 2 After closing it slide it to the left CAUTION For your safety make sure that the front cover is closed when operating the machine Always turn off the machine before opening the front cover a b Attaching Removing a presser foot 1 Turn off the main power and light...

Page 12: ...retch fabric or with a small stitch length raise the lever to increase the tension of the looper thread When sewing non stretch fabric or with a large stitch length lower the lever to reduce the tension of the looper thread 2 1 1 Raise the lever to increase the tension of the looper thread 2 Lower the lever to reduce the tension of the looper thread A Looper thread tension adjustment lever Non str...

Page 13: ... assists in removing rippling when sewing stretch fabrics Differential feed adjustment Feed ratio Main feed rear Differential feed front Effect Application Less than 1 0 Material is pulled tight Prevents thin materials from puckering 1 0 Without differential feed Normal sewing Greater than 1 0 Material is gathered or pushed together Prevents stretch materials from stretching or puckering The norma...

Page 14: ... marked in green is for the center needle thread 3 The tension dial marked in pink is for the right needle thread 4 The tension dial marked in blue is for the looper thread Top cover stitch model 1 2 3 4 5 4 4 4 4 4 1 The tension dial marked in yellow is for the left needle thread 2 The tension dial marked in green is for the center needle thread 3 The tension dial marked in pink is for the right ...

Page 15: ...heel is aligned with the line on the machine See Turning direction of handwheel in CHAPTER 1 3 Loosen the corresponding needle set screw by turning it with the included hexagonal driver toward 2 in the illustration and then remove the needle To install 1 Turn off the main power and light switch 2 Turn the handwheel so that the line on the handwheel is aligned with the line on the machine 3 Hold th...

Page 16: ...sure to install the spool cushion If the thread spool cap is not fully pushed down the thread may become entangled on the spool pin or the needle may bend or break Spool mat When using thread spools or loosely spun thread that easily slips off the spool place this mat under the spool This prevents the thread from becoming entangled on the spool pin Using the spool mat 1 Remove the spool cushion an...

Page 17: ...t the thread from slipping off the spool Adapt the net to the shape of the spool Before threading 1 Turn off the main power and light switch for safety 2 Raise the presser foot using the presser foot lever 3 Turn the handwheel so that the line on the handwheel A is aligned with the line B on the machine See Turning direction of handwheel in CHAPTER 1 ...

Page 18: ...ical order in the illustration 6 After running the thread to 9 push the looper release lever 0 to move the looper to the right A and then run the thread through B C 7 Pull about 10 cm 4 inch of thread through the eye of the looper 8 While pushing the looper D return the looper to its original position 9 Close the front cover NOTE When using thick thread such as decorative thread as the looper thre...

Page 19: ...ted following the yellow numbers and marks next to the threading points 1 9 Threading the center needle Run the thread in the sequence illustrated following the green numbers and marks next to the threading points 1 9 Threading the right needle Run the thread in the sequence illustrated following the pink numbers and marks next to the threading points 1 9 CAUTION When threading the needles always ...

Page 20: ... 3 as shown in the illustration 4 Pass the thread through the tension disc 4 in the channel next to the tension dial marked with a blue 5 Guide the thread down the channel and through threading points 5 9 following the numerical order in the illustration 6 After running the thread to 9 push the looper release lever 0 to move the looper to the right A and then run the thread through B C 7 Pull abou...

Page 21: ...wing the yellow numbers and marks next to the threading points 1 9 Threading the center needle Run the thread in the sequence illustrated following the green numbers and marks next to the threading points 1 9 Threading the right needle Run the thread in the sequence illustrated following the pink numbers and marks next to the threading points 1 9 CAUTION When threading the needles always thread in...

Page 22: ...op cover drive shaft 3 Insert the top cover thread guide into the slot in the top cover thread guide mount 5 4 4 Top cover thread guide 5 Slot Removing the top cover spreader and top cover thread guide 1 Turn the handwheel so that the line on the handwheel is aligned with the line on the machine 2 Press the lever on the top cover thread guide mount and then remove the top cover thread guide 1 2 1 ...

Page 23: ... through 3 shown in the illustration 3 Pass the thread through the tension disc 4 in the channel next to the tension dial marked with a purple 4 Guide the thread down the channel and across through threading points 5 9 next to the color marks following the numerical order in the illustration 5 Turn the handwheel counterclockwise to move the point of the top cover spreader completely to the left 6 ...

Page 24: ...al settings listed above are based on a stitch length of 3 and a differential feed ratio of 1 0 Since the settings may differ depending on the types of fabric and thread used be sure to check the thread tension Triple cover stitch Stitching direction Balanced tension The needle thread sews a straight seam on the surface of the fabric and the looper thread forms loops on the back Needle thread is t...

Page 25: ...er to decrease the tension or turn the looper thread tension dial to a higher number to increase the tension Chain stitch Stitching direction Balanced tension The needle thread sews a straight seam on the surface of the fabric and the looper thread forms loops on the back Needle thread is too loose Turn the needle thread tension dial to a higher number to increase the tension or turn the looper th...

Page 26: ...rease the tension or turn the needle thread tension dial to a higher number to increase the tension Top cover stitch Wide Narrow Stitching direction Balanced tension The top cover thread sews a straight seam on the surface of the fabric and the looper thread forms loops on the back Top cover thread is too loose Turn the top cover thread tension dial to a higher number to increase the tension or tu...

Page 27: ...reading or changing thread colors the thread will be on top of the presser foot In order to sew without incident place fabric under the presser foot Turn hand wheel toward you a few times by hand Thread will be anchored into the fabric Cut the threads shown to continue to sew NOTE When sewing stretch fabrics adjust the differential feed and check that the desired finish is achieved Removing the fa...

Page 28: ...to pull the fabric to the back 4 Cut the needle threads which come out from the surface of the fabric 5 Slowly pull the fabric in the direction of the arrow so that the ends of the needle threads are pulled to the back of fabric 6 Cut the looper thread NOTE We recommend using scissors to cut the looper thread Scissors can also be used to cut the machine threads 7 Pull all threads at the back of th...

Page 29: ... Scissors can also be used to cut the machine threads NOTE You can sew all the way to the edge of a fabric and also sew off the edge of the fabric to create a chain of thread Cut thread after any length of chain has been stitched 7 Use a pointed object such as a needle to push in the top cover thread from the surface of the fabric and then pull the thread at the back of the fabric 8 Pull all threa...

Page 30: ... taking care of the threads 2 4 3 1 6 5 1 Fabric surface 2 Mark drawn with fabric marker 3 Left needle just barely on the left side of the mark 4 Right needle 5 Fabric 6 Needle Sewing tubular garments for example cuffs Without free arm sewing 1 Raise the presser foot insert the fabric as shown in the illustration lower the presser foot and then begin sewing 2 Finish sewing by overlapping about 4 c...

Page 31: ...below Beginning of stitching 1 Raise the presser foot and then insert the scrap fabric Lower the presser foot turn the handwheel toward you a few times by hand and then lightly step on the foot controller to start sewing 2 When nearing the end of stitching for the scrap fabric stop the machine Insert the fabric as shown in the illustration below and then lightly step on the foot controller to star...

Page 32: ...ngled thread 3 Thread tension too tight Adjust the thread tension See pages 11 4 Needles incorrectly installed Install needles correctly See page 12 5 Wrong needle used Use correct needle 130 705H recommended See page 12 4 Skipped stitches 1 Needle bent or needle tip blunt Replace with new needle See page 12 2 Needle incorrectly installed Install needle correctly See page 12 3 Wrong needle used Us...

Page 33: ...30 Chapter 8 MAINTENANCE Cleaning CAUTION Turn off the machine before cleaning Periodically clean out dust trimmed fabric and thread with the included cleaning brush ...

Page 34: ... set 130 705H Top cover stitch model Use Fine to heavy materials Sewing speed Maximum 1 000 stitches per minute Stitch width 6 mm 3 mm Stitch length pitch 2 mm to 4 mm 5 64 to 5 32 inch Needle bar stroke 29 mm 1 1 8 inches Presser foot Free presser type Presser foot lift 5 mm to 6 mm 3 16 to 15 64 inch Needle SCHMETZ 130 705H 90 14 Number of needles and threads Convertible to two three four five t...

Page 35: ......

Page 36: ......

Page 37: ...English 884 B30 B31 Printed in Taiwan XB3391 201 Please visit us at http support brother com where you can get product support and answers to frequently asked questions FAQs ...

Reviews: