background image

From the library of: Superior Sewing Machine & Supply LLC

Summary of Contents for DB2-B773-003

Page 1: ...SERVICE MANUAL FOR 082 8773 082 8774 082 87740 SINGLE NEEDLE ADJUSTABLE TOP AND BOTTOM FEED LOCK STITCH MACHINE From the library of Superior Sewing Machine Supply LLC ...

Page 2: ...adtrimmer o o o o o o o o o o o o o o o o o o o o o o o o o o o o o o o o o o o o o o o o o o o o 19 Feed mechanism 0 0 0 0 0 0 0 0 0 0 0 0 0 0 0 0 0 0 0 0 0 0 0 0 0 0 0 0 0 0 0 0 0 0 20 1 Needle bar mechanism 0 0 0 0 0 0 0 0 0 0 0 0 0 0 0 0 0 0 0 0 0 0 0 0 0 0 0 0 21 IASSEMBLY I 22 Needle bar mechanism 0 0 0 0 0 0 0 0 0 0 0 0 0 0 0 0 0 0 0 0 0 0 0 0 0 0 0 0 0 0 0 0 0 22 lZJ Feed mechanism 0 0 0 0...

Page 3: ...g sensor position 45 Ill Adjusting the indication of the distance between needle hole and sensor 87740 46 IREPLACEMENTS I 47 li1 Replacing Solenoids 47 l1l Replacing tension release wire 50 Replacing bobbin tension spring 50 Replacing photo cell and reflector 87740 51 SJ Replacing Synchronizers 53 IOPTIONAL EQUIPMENT 54 li1 Thread wiper 54 l2l Presser foot lifting solenoid set 55 ITROUBLESHOOTING ...

Page 4: ...n Presser regulating screw 0 Tension nut Control panel 87740 SPICII m nrg oooo1H EXE A brother r 3 Fo4l fo 4 0 l 0 5 1om o o ul l il lruMI H W l 1 082 8773 006 A Machine pulley Reverse lever 082 87740 Machine pulley Reverse lever B c 0 COftRECTlON IDDDD I I I r3Jrill r tc STTTQtES From the library of Superior Sewing Machine Supply LLC ...

Page 5: ...Base DB2 B774 Motor Thread w iper DB2 B7740 Power switch Quick reverse Compensation se w 1ng 2 Thread t rimmer Automatic presser bar Iifter From the library of Superior Sewing Machine Supply LLC ...

Page 6: ...d amount is 4 mm or more use a sewing speed Jess than 3500 spm When the upper feed amount is 6 mm or more or When the lower feed amount is 4 mm or more use a sewing speed less than 3500spm Use a maximum feed amount of 6 mm or less than 6 mm when a pucker type gauge assembly A or pucker control gauge assembly C is used on model 082 8772 D 26 I 003 006 Use Medium material Gathering Sewing speed 4 50...

Page 7: ...anel E 20 E RD c E 40 11 40 c E 100 Ply sensor I SENSORfi The control panels are optional Use one that suits your operation Perspective 4 Piece counter brother EJ P COUNTER u From the library of Superior Sewing Machine Supply LLC ...

Page 8: ...bar is guided by the needle bar bushings upper and lower l1l Lower shaft and rotary hook mechanism 1 Rotation of the machine pulley 0 is transferred from the upper shaft bevel gear attached on the upper shaft to the vertical shaft bevel gear upper attached on the top ofthe vertical shaft e 2 The motion is relayed from the vertical shaft bevel gear lower attached on the bottom of the vertical shaft...

Page 9: ...d arm assembly ID moves the upper feed bracket and the feed dog forward and backward The upper feed crank IDguides the upper feed bracket 5 The eccentric w heel assembly moves the upper feed lifting rock lever assembly swinging the upper feed lifting rock shaft f and the upper feed lifting rock arm 6 The upper feed lifting rock arm moves the upper feed connecting lever swinging the upper feed lift...

Page 10: ...ft moves the horizontal feed bracket arm ED moving the feed bracket forward and backward 5 The eccentric wheel CID moves the vertical feed connecting rod 4D up and down 6 The vertical feed connecting rod 4D swings the feed lifting rock shaft crank 0 attached to it 7 The feed lifting rock shaft crank 0 moves the feed lifting rock shaft 8 The feed lifting rock shaft moves the feed lifting crank movi...

Page 11: ...2 The feed regulator moves the level regulator connecting rod assembly changing the angle of the feed regulator Then the fulcrum of the arm link assembly ID moves changing the range of the movement of the feed rock shaft arm 3 For the movement after the feed rock shaft arm see page 7 Feed mechanism 11 Rotating the length control assembly changes the feed amount The quick reverse mechanism 1 When t...

Page 12: ...d regulating plate assembly left 0 changes the upper feed amount Shirring 1 When the shirring wire attached to the shirring lever 9 is pulled in the direction of the arrow the shirring lever 9 moves the upper feed regulator shaft the upper feed regulator arm the upper feed regulator assembly and the feed regulator shaft assembly 6 Rotating the upper feed regulating plate assembly right changes the...

Page 13: ...inst the thread trimmer solenoid Because the thread trimmer cam lever assembly f does not engage with the thread trimmer clutch I the movable knife holder e does not function The thread trimmer lever springiD presses the thread trimmer lever 0 to prevent the movable knife holder 9 from shifting 2 When the thread trimming signal is received When the treadle is heeled back and the thread trimming si...

Page 14: ...ignal is not received the thread trimmer solenoid retracts and the thread trimmer cam lever spring tiD pushes the thread trimmer cam lever assembly f Then the roller bearing of the thread trimmer cam lever assembly f moves away from the thread trimmer clutch and returns to its original position The thread trimmer lever spring 4D returns the thread trimmer rod 49 and the movable knife holder 0 to t...

Page 15: ...roximately 330 and the needle thread is spread by the movable knife as shown in the figure above If the timing of the movement is too early loop spreading is not performed properly which results in thread trimming errors Bobbin thread As seen with the fixed knife removed Movable knife 4 The needle and bobbin threads caught by the movable knife in step 3 are gradually spread by the movable knife an...

Page 16: ...ring 4D forces the tension releasing lever all the way back NOTE When the presser foot is raised by the knee lifter the knee lifter lifting leverG presses the thread tension releasing plate The subsequent action is the same as steps 4 through 7 above When the presser foot is lowered the presser lifter lever spring 0 returns the thread tension releasing plate to its original position m J Thread wip...

Page 17: ... regulating rod pushes up the knee lifter complying bar via the presser foot lifting link 9 3 The knee lifter complying bar moves up the presser bar clamp 4ID via the knee lifter bar 1 the knee lifter lever I the knee lifter connector and the knee lifter lifting lever 4 The presser bar 0 and the presser foot 4fl1attached to the presser bar clamp I are lifted 14 From the library of Superior Sewing ...

Page 18: ...he upper shaft the thread take up body is lubricated through the thread take up crank and the needle bar crank 3 The thread take up lever is lubricated through the felt attached to the needle bar crank The felt prevents oil clogging and over lubrication 4 The oil cap attached at the upper shaft s right edge prevents oil from being shed outside the machine 5 The oil which is collected in the portio...

Page 19: ...ting rock shaft e 4 The oil sprayed inside the vertical portion of the body lubricates the lower shaft bushing right 8 the feed rock shaft and the feed lifting rock shaft e through the arm channel 3 Pump mechanism By means of the rotation of the pump propeller 0 attached at the vertical shaft bottom oil is drawn to the pump through the center hole The oil is fed to the lubrication tubes through th...

Page 20: ...ove the rear cover 4ID and the rear cover packing I 5 Remove the screw and the thread take up cover 6 Remove the two screws 49 and the oil stopper plate 7 Remove the screw and the upper tension regulator assembly 49 For a sewing machine with automatic thread trimmer Before removing the rear cover 4ID remove stop ring E washer and the connecting pin W Remove the three screws and the solenoid bracke...

Page 21: ... presser bar 0 7 Remove the presser bar 0 from the arm top llJ Upper feed mechanism 0 0 1 Loosen the screw 0 and remove connecting stud lower 2 Remove the two screws then remove the upper feed connecting lever 9 and the crank assembly 3 Loosen the screw By inserting the screwdriver into the notch of the upper feed rock arm lower remove the upper feed arm assembly and the washer 4 Loosen the four s...

Page 22: ...r and the thread trimmer rod 7 Remove the thread trimmer lever spring 4D from the thread trimmer lever 8 Remove the stud screw the tension release lever and the tension release spring fl 9 Remove the screw and the thread trimmer solenoid 4ID NOTE When not removing the thread trimmer solenoid 4ID tighten the screws and temporarily 10 Loosen the screw i then remove the snap ring tD by moving the thr...

Page 23: ...ing rock shaft e The feed lifting crank and the feed lifting rock shaft crank will come off 6 Remove the wick Q from the feed rock shaft 7 Loosen the two screws and remove the set collar 4D 8 Loosen the two screws 4t of the horizontal feed bracket arm Loosen the screw of the feed rock shaft arm0 9 By inserting a wedge in Fig A into the notches of the horizontal feed bracket arm and the feed rock s...

Page 24: ...he screw fl then remove the needle bar and the needle bar clamp The slide block will come off 6 Loosen the screw 4D then remove the thread take up lever hinge pin 4 1 7 Loosen the two screws then remove the thread take up lever assembly 9 The washer will come off 8 Remove the oil caps and These caps must be removed to attach the wick 21 From the library of Superior Sewing Machine Supply LLC ...

Page 25: ...rew fl 4 Slide the slide block into the channel then slide the needle bar guide clamp into the thread take up lever and the slide block Be sure the chamfered side of the slide block is facing the inside 5 Pass the needle bar Il from the top of the needle bar bushing upper I through the needle bar clamp 6 Turn the machine pulley to lower the needle barto its down position 7 Align the needle bar Il ...

Page 26: ...rews 49 so that it moves easily but is not loose 8 Put the slide block of the feed bracket assembly e into the feed lifting crank assembly tD and tighten the screw 9 Secure the feed lifting rock shaft crank and the vertical feed connecting rod with the stud screw W and the nut 10 Secure the feed lifting rock shaft crank with the screw 0 11 Minimize the feed amount and turn the machine pulley 12 Ad...

Page 27: ...ush both ends of the wick in the holes NOTE The wick length approx 300 mm 1 Remove the oil cap from the feed rock shaft 2 Pass the wick into the feed rock shaft until one end of the wick reaches the far end of the feed rock shaft 3 Attach the oil cap 4 Attach the oil cap of the horizontal feed bracket arm on the feed rock shaft 5 Remove the oil cap from the feed lifting rock shaft 6 Pass the wick ...

Page 28: ... lever 7 Set the movable knife holder in the arm bed Secure the knife holder presser with the bolt fD and the washer 8 Place the thread trimmer lever spring fD and the thread trimmer lever on the forked shaft 0 I and tighten the screw fD 9 Attach the thread trimmer rod to the thread trimmer lever with the stud screw 10 Secure the lower thread finger 0 in the arm bed with the screw fD 11 Secure the...

Page 29: ...f the thread trimmer clutch and the roller bearing is 0 6 0 8 mm 2 Adjusting the movable knife and fixed knife positions The fixed knife tip and the movable knife D must overlap for 1 mm when the roller bearing of the thread trimmer cam lever is lifted to the top of the thread trimmer clutch G The notch marks of the movable knife holder and the knife holder presser assembly 4ID will be aligned If ...

Page 30: ...o 0 05 0 1 mm 5 Attach the needle plate 6 Attach the slide plate 7 Adjust the feed timing 8 Set the feed amount to 0 9 Turn the pulley towards the machine front When the feed dog descends and is aligned with the needle plate s upper surface the needle tip should be 2 4 mm above the needle plate s upper surface To adjust the timing turn the level feed eccentric wheel 4Ii and the feed lifting eccent...

Page 31: ... into the upper feed bracket and tighten the screw so that the tip of the presser bar 0 extends 0 0 5mm from the bottom of the upper feed bracket Check that 15 chamfered side ofthe presser bar 0 is below 5 Attach the adjusting screw and t e presser spring to the machine head using the presser regulating screw CD 6 Check that the needle is in the center of the presser foot groove 7 Lift the presser...

Page 32: ...ock arm lower into the branch of the upper feed rock arm upper Place the washer 0 on the upper feed rock arm lower CI Then attach them to the upper feed arm assembly 5 Tighten the screw 0 firmly 6 Attach the connecting lever stud the upper feed connecting lever tD and the crank assembly with the screw and the two screws 411 NOTE After assembling the upper feed mechanism see page 36 Adjusting the t...

Page 33: ...he screw 4 Secure the face plate and the face plate packing with the three screws 5 Secure the upper cover and the upper cover packing mwith the four screws 0 6 Secure the rear cover and the rear cover packing 49 with the six screws For a sewing machine with an automatic thread trimmer Secure the solenoid bracket with the three screws a the connecting pin tiD I stop ring ECIDI and the washer 30 Fr...

Page 34: ...8mm Oil cap After rotating the machine pulley until the rotary hook point is aligned with the needle 0 center remove the oil cap loosen thescrew0 then adjust the needle bar height so thatthe o os 0 1mm gap between the rotary hook point and the needle 0 hole top edge is approximately 0 5 mm 3 The gap between the needle and the rotary hook point Loosen the screw then adjust the gap to 0 05 0 1 mm by...

Page 35: ...ont Fig B 2 To adjust the angle loosen the screw and then rotate the feed bracket shaft 9 within 90 in the directions indicated by the arrows 2 Adjusting the feed timing 1 Turn the machine pulley toward the machine front until the feed dog descends and the tips of the feed dog align with the needle plate s upper surface At this time check that the needle tip is 2 4 mm above the needle plate s uppe...

Page 36: ...ilt the machine head until it stops 2 Loosen the screw 3 When the forward stitch length is greater than the backward one rotate the pin clockwise When the forward stitch length is less than the backward one rotate the pin counterclockwise NOTE If the pin has been rotated 180 these adjustments should be reversed After adjusting the stitch lengths firmly tighten the screw Rotation of the length cont...

Page 37: ...s within the set maximum values 5 5 to 6 0 mm for subclass 003 7 5 to 8 0 mm for subclass 006 When it exceeds or is short of the maximum value loosen the screw and adjust the maximum amount of movement by rotating the feed regulator shaft 4 After completing the above adjustment tighten the screw Be sure not to move the upper feed regulator assembly 6 5 Tighten the bolt 8 so that the gap between th...

Page 38: ...he adjustment described above above and below the needle plate For this adjustment use the above the plate position only 6 While slowly rotating the eccentric wheel push down and pull up the reverse lever e stop moving it where the upper feed dog stops and tighten the screw Adjusting the clearance between the upper feed dog and the presser foot 1 Remove the face plate 2 Maximize the upper feed amo...

Page 39: ...ew firmly 3 From its upper position lower the needle by rotating the pulley until the needle tip is just above the needle plate s upper surface 4 loosen the screw rotate the eccentric wheel in the normal rotation direction of the machine then rotate it in the opposite direction Attach the roller bearing of the upper feed lifting rock crank to the upper feed bracket assembly and tighten the screw o...

Page 40: ...eedle thread tension stronger when sewing with a longer stitch length place the presser foot 0 backward in the oval hole NOTE For normal sewing align the presser with the reference line The standard upper feed pressure is obtained when the red line of the regulating nut is between the two red lines of the pressure regulating dial 0 By rotating the regulating nut adjust the upper feed pressure so t...

Page 41: ...ntil the screws become visible 5 Remove the screws and the movable knife NOTE Before removing the needle plate and the movable knife remove the needle Reassembly is performed by reversing the above procedures 2 Adjusting the fixed knife movable knife and the lower thread finger After attaching the movable knife and the fixed knife 0 align the notch marks of the movable knife holder 41 and the knif...

Page 42: ...r solenoid 0 is released the tension discs should close 3 Loosen the nut then depress the thread trimmer solenoid 0 approximately 2 mm 4 Tighten the nut left side at the point where the tension discs begin to open Check that the tension discs open when the thread trimmer solenoid 0 is fully depressed and that the discs close when the solenoid 0 is released B If the tension discs do not close 1 Che...

Page 43: ... own weight from the bobbin thread when it is suspended by the bobbin thread After lowering the presser foot adjust the needle thread tension by turning the nut 40 Thread take up spring The standard operation height of the thread take up spring is 6 8 mm To adjust the height loosen the screw e then turn the upper tension regulator assembly The standard tension of the thread take up spring is 25 35...

Page 44: ... If the adjustment is necessary refer to the following 3 Be sure to turn off the power before adjustment Adjusting the needle up position 1 Loosen the two screws 0 2 To raise the needle bar rotate the screws 0 in the direction of normal pulley rotation To lower the needle bar rotate the screws 0 in the opposite direction Adjusting the needle down position 082 8774 1 Press the pedal then release it...

Page 45: ...he thread wiper solenoid up and down and adjust its position so that the tip of thread wiper does not strike the upper feed dog presser foot needle and any other part 2 After adjustment tighten the screws 0 42 From the library of Superior Sewing Machine Supply LLC ...

Page 46: ...t the potentio meter following the procedures below Adjustment 1 After loosening the two screws rotate the potentio meter assembly Tighten the screws temporarily The indicated number is decreased when the potention meter is rotated clockwise 2 Sew several stitches and check that the actual pitch matches the indicated one 3 Repeat 1 and 2 to match the indicated pitch with the actual pitch 4 After t...

Page 47: ... connecting rod 0 and the feed regulator lever lower are attached properly 2 The feed regulator connecting rod upper and the feed regulator lever upper e are attached properly 3 The potentio meter and the potentio meter lever are attached properly 4 The branch of the potentio meter lever plate assembly 6 and the potentio meter lever are attached properly The reverse lever could get stiff and might...

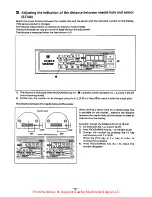
Page 48: ...is on the presser foot Adjustment 1 Move the photo cell slightly right and left or back and forth by loosening the screw fi 2 Secure the photo cell with the screw fi when the indicated number is at its maximum NOTE Ittakes about 5seconds to indicate the number NOTE After adjustment turn off the power Connect the synchronizer cord and set the correction switch Cautions for attaching the sensor guar...

Page 49: ...2 At this time the number can be changed using the 0 5 or keys to match it with the actual pitch The distance between the needle hole and the sensor Needle plate 2 11m 18mm Sensor distance display 25mm 46 When drilling a sensor hole on a needle plate that is available on the market measure the distance between the needle hole and the sensor in order to indicate it on the display Example change the...

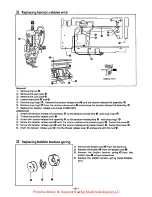
Page 50: ...nect the cord from the cord holder 4 Remove the cord from the cord bushing 5 Remove the stud screw eI the tension release lever I the washer I and the tension release spring 6 Remove the screw to remove the thread trimmer solenoid bracket along with the thread trimmer solenoid ID 7 Remove the thread trimmer solenoid by removing the two nuts i 8 Remove the solenoid lever I the washer ID and t he cu...

Page 51: ...ve the reverse solenoid e by removing the two screws ID 6 Replace the reverse solenoid assembly code 154727 001 DB2 B7440 1 Disconnectthe terminal pin male from pins 10 and 11 of the nylon connector 12P 2 Remove the three screws to remove the reverse solenoid e and the solenoid bracket 3 Remove the stop ring the pin f the washer and the plunger 4 Remove the reverse solenoid e by removing the two s...

Page 52: ...ink assembly from the thread wiper solenoid fi Remove the rubber stopper 5 Loosen the screw tiDI disconnect the cord from the cord holder 4D 6 After removing the four screws 0 and the washer 4ilI remove the thread wiper solenoid fl 7 Disconnect the plunger of the thread wiper solenoid fl Remove the stop ring 49 and the plunger rubber 8 Replace the thread wiper solenoid assembly code 502799 001 Thr...

Page 53: ...release wire 8 3 Attach the tension release link assembly to the tension release plate CID with stop ring E 4 Secure the tension release wire 8 with the tension release wire presser upper 4D Fasten the screw 5 Secure the tension release wire 8 with the tension release wire presser lower 0 Fasten the screw 9 6 Insert the tension release wire 8 into the thread release lever Q and secure with the nut...

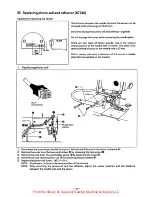
Page 54: ...ole is 25 mm Drill a sensor hole with a diameter of 4 2 mm on a needle plate that is available on the market 1 Disconnect the terminal pin male from pins 1 white and 4 black of the nylon connector 6P 2 Remove the cords from the two cord holders by loosening the two screws 0 3 Remove the cord from the cord holder spring 0 by loosening the screw 4 Remove the cord and the photo cell by loosening the ...

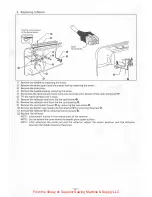
Page 55: ...e cord holder 0 8 Remove the reflector cord from the the cord bushing 9 Remove the cord holder lower e by removing the two screws 10 Remove the bobbin case holder position bracket by removing the screw 11 Remove the reflector by removing the two screws f 12 Replace the reflector NOTE Attachment is done in the reverse order of the removal NOTE Do not extend the cover above the needle plate upper su...

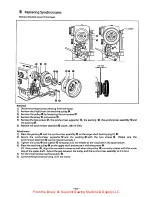
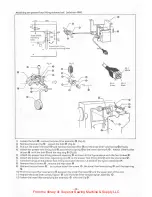
Page 56: ... on the upper shaft bushing right 2 Secure the synchronizer supporter and the packing 6 with the two screws Make sure the synchronizer assembly 6 can be moved manually 3 Tighten the screw and washer 9 temporarily at the middle of the long hole in the synchronizer 4 Place the machine pulley 0 on the upper shaft and secure it with the screws Of these screws align the one which comes second when the ...

Page 57: ...hine head using the cord holder e and the screw 3 Connect the terminal pin male with pins 7 and 8 of the nylon connector 12p Adjusting the thread wiper 1 Loosen the four screws Move the thread wiper solenoid up and down and adjust its position so that the tip of thread wiper does not strike the upper feed dog presser foot needle and any other part 2 After adjustment tighten the screw 54 From the l...

Page 58: ... presser foot lifting solenoid assembly 4Ii to the position shown in the figure above with the screw 4D 5 Attach the presser foot lifter regulating joint to the presser foot lifting link with the stud screw ti 6 Connect the tips of the presser foot lifting cord with the pins 1 4 and 6 of the nylon connector 6 7 Remove the six screws 4D remove the rear cover 8 Remove the stud screw In its place att...

Page 59: ...the presser foot lifting solenoid assembly as shown in the figure above with the four screws 6 Attach the presser foot Iifter regulating joint ID to the presser foot Iifting Iink with the stud screw 7 Connect the tips of the presser foot lifting cord with the pins 1 4 and 6 of the nylon connector GP 8 Remove the six screws remove the rear cover 9 Remove the stud screw In its place attach the screw...

Page 60: ...g solenoid The solenoid is adjusted prior to shipping from the factory If the solenoid is replaced adjust it as follows 1 Push and hold the plunger in the direction of the arrow until it stops 2 Attach the solenoid plate with the screws ID so that the gap between the solenoid plate and the front of the plunger W is 15 2 mm 3 Adjust the gap between the solenoid plate and the plunger to 15 mm by the...

Page 61: ...itch Oas described below In the case that the plug with white cord of the knee lifter switch 0 is connected with the plug with t he white cord of the knee Iifter switch cord the presser foot is lowered when the treadle is not pressed I and the presser foot is raised when the knee lifter switch is pressed on In the case that the plug with red cord of the knee lifter switch 0 is connected w ith the ...

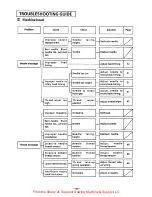
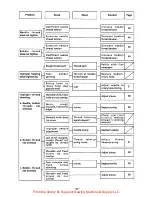
Page 62: ... 31 1 hook gap rotary hook timing Thread wiper too Thread wiper Adjust thread wiper 42 high position 1 Improper threading threading 1 Rethread Bent needle Blunt needle tip jammed Needle 1 Replace needle eye Improper needle Needle facing Reattach needle installation height 1 Thread breakage Excessive needle Needle thread Adjust needle 40 thread tension tension 1 thread tension Excessive bobbin Bobb...

Page 63: ... r r 1 contact adjustment screw _ Presser bar height 1 Adjust presser bar height Skipped stitches r Adjust needle to r Needle bar rise 1 rotary hook timing 31 Improper needle to r Needle bar height 1 Adjust needle to 31 r rotary hook timing rotary hook timing Needle to rotary Tighten presser foot 31 hook timing 1 adjustment screw Needle thread remainder too short does not Adjust pretension 40 rema...

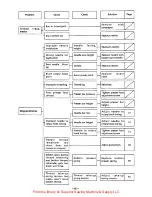
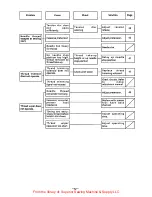
Page 64: ...op Gap 1 31 gap too small rotary hook timing Improper thread Movable knife fixed Adjust knives 38 trimming knife do not overlap a Needler bobbin Worn rough threads not movable fixed knife Knives Replace knives 38 trimmed r r 1 edges Check electrical v Movable knife does Thread trimming circuits replace __ not move signal relayed 1 thread trimming solenoid Improper needle Needle facing 1 Reattach n...

Page 65: ...sition thread take up Thread trimming solenoid does not 1 Check with tester Replace thread 47 operate 1 trimming solenoid Thread trimmer does not operate Check circuits Refer 1 Thread trimming to motor signal not relayed adjustment manual Needle thread Adjust pretension 40 remainder too long Excessive material Replace with presser 1 i presser foot foot have back Thread wiper does resistance channe...

Page 66: ...tch lengths do not Improper forward Adjust eccentric pin 33 match when using 1 reverse adjustment the quick reverse function Reverse solenoid Reverse solenoid Adjust solenoid 44 makes noise f gap too small lever Not enough oiI pan ___ Oil Add oil v f Filter clogged Pump filter Clean fi Iter or v ___ __ replace No oil in gauge v window rotary f f Tube disconnected ___ Tube I Reconnect tube hook not...

Page 67: ...OTH R INDUSTRIES LTD HEAD OFFICE No 35 9 CHOME HORITA OORI MIZUHO KU NAGOYA JAPAN 46i CABLE BROTHER NAGOYA TELEX 4473696 BROS J 19030354H D Printed in Japar From the library of Superior Sewing Machine Supply LLC ...

Reviews: