background image

User’s Guide

DCP-1608

DCP-1619

DCP-1618W

MFC-1906

MFC-1908

MFC-1919NW


!CAUTION  Before using this product, read carefully 
these instructions for correct operation.

Keep the User's Guide in a secure place for future 
reference.

Version 0

CHN-ENG

Summary of Contents for DCP?1618W

Page 1: ...608 DCP 1619 DCP 1618W MFC 1906 MFC 1908 MFC 1919NW CAUTION Before using this product read carefully these instructions for correct operation Keep the User s Guide in a secure place for future reference Version 0 CHN ENG ...

Page 2: ... 3 When the machine need replacing parts for the maintenance and repair please discard used circuit boards used electrical parts and products as disposed electrical materials 4 The power consumption is 0 W after you turn off the machine and unplug it from the AC outlet 5 Some parts in the machine can be used on the same series model machines which are produced in the same factory Note If any parts...

Page 3: ... the Brother Warranty Registration or for your convenience and most efficient way to register your new product register on line at http www brother com registration To search Frequently asked questions FAQs ASCs Drivers Manuals etc please visit our service website www 95105369 com To search for where you can purchase consumables please visit the official website of BROTHER CHINA LTD www brother cn...

Page 4: ...y Scan and Copy operations See troubleshooting tips and machine specifications For Chinese Printed In the box For English Windows only PDF file Installer CD ROM In the box Software and Network User s Guide This Guide provides instructions for Scanning Printing PC FAX and other operations that can be performed by connecting your Brother machine to a computer You can also find useful information abo...

Page 5: ...General Setup 13 2 Fax 17 3 Copy 30 4 Printer 31 5 Print Reports 32 6 Network For MFC 1919NW 34 7 Machine Info 1 40 Menu and features for DCP models 41 On screen programming 41 Menu table 42 1 General Setup 43 2 Copy 45 3 Printer 46 4 Network For DCP 1618W 47 5 Machine Info 1 50 Entering text 51 MFC models 51 DCP models 52 Ecology features 53 Deep Sleep mode 53 Auto Power Off DCP models 53 Toner S...

Page 6: ...ing numbers 63 Storing Speed Dial numbers 63 Changing or Deleting Speed Dial numbers 63 How to dial 64 Manual dialling 64 Speed dialling 64 Search 64 Redial 64 Caller ID feature 64 7 Using PC FAX MFC models 66 PC FAX Receive For Windows only 66 PC FAX sending 68 Sending a file as a PC FAX 68 8 Making copies 70 How to copy 70 ID COPY 71 Double sided ID copy 71 One sided ID copy 72 Other copies 73 9...

Page 7: ... faxes or Fax Journal report MFC models 94 Transferring faxes to another fax machine 94 Transferring faxes to your PC 94 Transferring the Fax Journal report to another fax machine 95 Cleaning and Checking the machine 95 B Specifications 96 DCP 1608 DCP 1619 MFC 1906 and MFC 1908 96 General 96 Document Size 99 Print Media 99 Fax 100 Copy 100 Scanner 101 Printer 101 DCP 1618W and MFC 1919NW 102 Gene...

Page 8: ...vi ...

Page 9: ...s situation which if not avoided could result in death or serious injuries IMPORTANT IMPORTANT indicates a potentially hazardous situation which if not avoided may result in damage to property or loss of product functionality NOTE NOTE specifies the operating environment conditions for installation or special conditions of use Prohibition icons indicate actions that must not be performed Electrica...

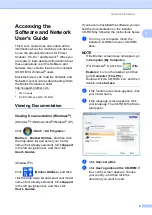
Page 10: ...t All Programs Brother Brother Utilities Windows 8 and Windows Server 2012 Tap or double click Brother Utilities either on the Start screen or the desktop Windows 8 1 and Windows Server 2012 R2 Move your mouse to the lower left corner of the Start screen and click if you are using a touchbased device swipe up from the bottom of the Start screen to display the Apps screen When the Apps screen appea...

Page 11: ...ady selected Click Support in the left navigation bar and then click User s Guides Windows 8 Click Brother Utilities and then click the drop down list and select your model name if not already selected Click Support in the left navigation bar and then click User s Guides If you have not installed the software you can find the documentation on the installer CD ROM by following the instructions belo...

Page 12: ...r more information about network setup see Software and Network User s Guide Accessing Brother CreativeCenter 1 If you are using Windows double click the Brother CreativeCenter icon on your desktop to access our FREE website designed as a resource to help you easily create and print customized materials for business and home use with photos text and creative touch Mac users can access Brother Crea...

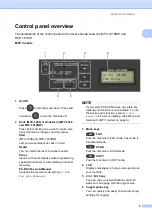
Page 13: ...mbers or when dialling a number manually PC FAX Fax Auto Manual Switches the receive mode among PC FAX Fax Auto or Manual NOTE If you select PC FAX Receive using this key backup print function is not available To use the backup print function select PC Fax Receive in Fax menu setting See Menu and features for MFC models on page 8 3 Mode keys FAX Puts the machine in FAX mode Fax mode is the default...

Page 14: ...ings in the machine OK Lets you store your settings and confirm LCD messages on the machine Volume keys or Press to scroll backwards or forwards through menu selections Press to change the volume when in fax or standby mode a or b Press to scroll through the menus and options Address Book Lets you access speed dial numbers directly 9 Dial pad Use these keys to dial telephone and fax numbers and as...

Page 15: ...tions DCP 1618W You can copy both sides of your Identification card onto one page with the original size You can quickly and easily choose temporary settings for copying Copy Options DCP 1608 and DCP 1619 You can quickly and easily choose temporary settings for copying 8 WiFi DCP 1618W Press the WiFi button and launch the wireless installer on your computer Follow the on screen instructions to set...

Page 16: ...nter menu Press 5 for Print Reports menu Press 6 for Network menu Press 7 for Machine Info menu Press 9 for Service menu 1 1 This will appear only when the LCD shows an error message You can also scroll through each menu level by pressing a or b c Press OK when the option you want appears on the LCD The LCD will then show the next menu level d Press a or b to scroll to your next menu selection and...

Page 17: ...r keys or a and b to display different menu options Press OK to select an option In the below example the copy quality setting is changed from Auto to Text a Press Menu b Press 3 to choose Copy c Press 1 to choose Quality d Press a or b to display Text e Press OK f Press Stop Exit 3 Copy Level 2 1 Quality Auto Text Photo Receipt Level 3 Descriptions 1 Options You can choose the Copy resolution for...

Page 18: ...number to appear on each page you fax Fax Enter your fax number up to 20 digits Tel Enter your telephone number up to 20 digits If your telephone number and fax number are the same enter the same number again Name Enter your name up to 20 characters 51 3 Tone Pulse Chooses the dialling mode Tone Your machine comes set for Tone dialling service Pulse If you have Pulse dialling service rotary you ne...

Page 19: ...2 Level 3 Descriptions 1 Options Descriptions 2 Page 1 Date Time 1 Date Time Puts the date and time on the LCD and in headings of faxes you send if you set up the station ID Year Enter the last two digits of the year e g Enter 1 3 for 2013 Month Enter the two digits for the month e g Enter 0 1 for January Day Enter the two digits for the day e g Enter 0 1 for 1st Time Enter the time in 24 hour for...

Page 20: ... as it detects a dial tone No Detection When you send a fax automatically by default your machine will wait for a fixed amount of time before it starts to dial the number 5 Dial Prefix Sets a prefix number that will always be added before the fax number every time you dial 6 Reset 1 Machine Reset Restores all the function settings to factory default 1 Reset 2 Exit Cancel restore and exit the menu ...

Page 21: ... takes after the last Copy or Scan operation to return to Fax mode 0 Sec Return to the fax mode at once 30 Secs Return to the fax mode after the time you choose 1 Min 2 Mins 5 Mins Off The machine will stay in the mode you used last 2 Paper 1 Paper Type Plain Recycled Paper 55 2 Paper Size Sets the size of the paper in the paper tray A4 Letter Legal Folio A5 A5 L B5 JIS Executive 16K 195x270mm 16K...

Page 22: ... the contrast of the LCD nnnno nnnon nnonn nonnn onnnn Press c to make the LCD darker or press d to make the LCD lighter 6 Scan Size Adjusts the scan area to the size of the document A4 Letter 7 Replace Toner Sets the machine to continue or stop printing after the LCD shows Replace Toner Continue The machine will continue printing Replace the toner cartridge with a new one after the LCD shows Tone...

Page 23: ...oose 1 Min 2 Mins 5 Mins Off The machine will stay in the mode you used last 3 Paper 1 Paper Type Plain Recycled Paper 55 2 Paper Size Sets the size of the paper in the paper tray A4 Letter Legal Folio A5 A5 L B5 JIS Executive 16K 195x270mm 16K 184x260mm 16K 197x273mm 55 4 Volume 1 Ring Adjusts the ring volume Low Med High Off 2 Beeper When the beeper is on the machine will beep when you press a k...

Page 24: ... 7 Scan Size Adjusts the scan area to the size of the document A4 Letter 8 Replace Toner Sets the machine to continue or stop printing after the LCD shows Replace Toner Continue The machine will continue printing Replace the toner cartridge with a new one after the LCD shows Toner Ended 53 Stop The machine will stop printing Replace the toner cartridge with a new one 1 General Setup For MFC 1919NW...

Page 25: ...ng for you to pick up the call Fax Tel is displayed on the LCD when set External TAD MFC 1906 Your external telephone answering device TAD automatically answers every call Voice messages are stored on the external TAD Fax messages are automatically printed External TAD is displayed on the LCD when set Manual You control the phone line and must answer every call yourself Manual is displayed on the ...

Page 26: ...f If you are at the machine and answer a fax call first by lifting the handset of an external telephone MFC 1906 or the machine MFC 1908 press Start 4 Auto Reduction The machine calculates the reduction ratio by using the page size of the fax and your Paper Size setting Menu 1 2 2 On If you choose On the machine automatically reduces each page of an incoming fax to fit on one page of A4 Letter Leg...

Page 27: ...chine will then stop automatically answering calls until fresh paper is put in the paper tray To print the last fax you received put fresh paper in the tray and press Start 6 Print Density You can adjust the Print Density setting to make your printed pages darker or lighter nnnno nnnon nnonn nonnn onnnn Press c to make darker press d to make lighter 2 Setup Send 1 Contrast Changes the lightness or...

Page 28: ...y on for the next fax only Off Keep this setting Off when the network connection is good and you can send an overseas fax sucessfully 3 Anti Junk Fax 1 Register If you do not want to receive a fax call from the specific numbers you can register the numbers up to 100 to the Anti Junk Fax list You need to apply for the Caller ID service at your local telephone company You can not choose the numbers ...

Page 29: ...ful due to a transmission error Off Image Prints a report if your fax is unsuccessful due to a transmission error A portion of the fax s first page appears on the report 2 Journal Period Sets the interval for automatic printing of the Fax Journal The Fax Journal is a list of information about your last 200 incoming and outgoing faxes Off If you set the interval to Off you can still print the repor...

Page 30: ...prompts on the LCD 60 0 Miscellaneous 1 Compatibility If you are having difficulty sending or receiving a fax due to possible interference on the telephone line adjust the equalization for compatibility to reduce the modem speed for fax operations Normal Sets the modem speed at 14400 bps Basic for VoIP Cuts the modem speed to 9600 bps and turns the error correction mode ECM off If you regularly ex...

Page 31: ...x 3 Caller ID Type You can switch the mode if Caller ID cannot be displayed normally Auto FSK DTMF Caller ID has two modes FSK and DTMF for displaying your calls The default mode of this machine is Auto Please ask your local telephone company for whether your mode is FSK or DTMF 4 Caller ID Allows the subscriber to see the caller s phone number on the display Display The Caller ID of the last call...

Page 32: ...r machine automatically transfers received faxes to your computer 2 Ring Delay The Ring Delay setting sets the number of times the machine rings before it answers in Fax Only and Fax Tel modes 00 10 04 If you have external or extension telephones on the same line as the machine choose the maximum number of rings 3 Fax Detect Receives fax messages without pressing Start When Fax Detect is On you ca...

Page 33: ...urther incoming faxes will also be stored into memory until the memory is full When the memory is full the machine will stop automatically answering calls To print the faxes put fresh paper in the tray and press Start Off Further incoming faxes will not be stored in memory The machine will then stop automatically answering calls until fresh paper is put in the paper tray To print the last fax you ...

Page 34: ...smits slower than Fine resolution Photo Use when the document has varying shades of grey or is a photograph This has the slowest transmission time 3 Overseas Mode If you are having difficulty sending a fax overseas due to a bad connection then turning on Overseas Mode may help On Turn this feature on if you are having difficulties sending faxes overseas This feature will stay on for the next fax o...

Page 35: ...99 Speed Dial numbers Press Address Book twice and enter the two digit Speed Dial number 5 Report Setting 1 Transmission You can use the Transmission Verification Report as proof that you sent a fax This lists the receiving party s name or fax number the time and date of transmission duration of transmission number of pages sent and whether or not the transmission was successful On Prints a report...

Page 36: ...feature and your machine stores received faxes in memory you can print a fax from the memory 7 Remaining Jobs You can check which jobs are in the memory and lets you cancel scheduled jobs XXX Please follow the prompts on the LCD 60 0 Miscellaneous 1 Compatibility If you are having difficulty sending or receiving a fax due to possible interference on the telephone line adjust the equalization for c...

Page 37: ...e a fax 3 Caller ID Type You can switch the mode if Caller ID cannot be displayed normally Auto FSK DTMF Caller ID has two modes FSK and DTMF for displaying your calls The default mode of this machine is Auto Please ask your local telephone company for whether your mode is FSK or DTMF 4 Caller ID View or print a list of the last 30 Caller IDs stored in the memory Display The Caller ID of the last ...

Page 38: ...c to increase the brightness or press d to decrease the brightness 3 Contrast Adjust the contrast to help an image look sharper and more vivid nnnno nnnon nnonn nonnn onnnn Press c to increase the contrast or press d to decrease the contrast 4 ID Copy 1 Quality You can change the default settings for ID Copy Auto Auto is the standard mode for ordinary printouts If you want to make it clearer choos...

Page 39: ...test page 2 Auto Continue If this setting is enabled the machine will automatically clear a paper size error and will use the paper loaded in the paper tray On Off Size mismatch is displayed on the LCD and printing does not occur 3 Reset Printer Restores the printer settings to the original factory default settings 1 Reset 2 Exit The factory settings are shown in Bold with an asterisk 3 Copy conti...

Page 40: ...ssion number of pages sent and whether or not the transmission was successful You can view the Transmission Verification Report for your last 200 outgoing faxes 2 Print Report Print the last report 2 Address Book 1 Numeric Lists names and numbers stored in the Speed Dial memory Print in numerical order 2 Alphabetic Print in alphabetical order 3 Fax Journal Prints a list of information about your l...

Page 41: ...ission Verification Report for your last 200 outgoing faxes 2 Print Report Print the last report 2 Address Book 1 Numeric Lists names and numbers stored in the Speed Dial memory Print in numerical order 2 Alphabetic Print in alphabetical order 3 Fax Journal Prints a list of information about your last 200 incoming and outgoing faxes TX transmit RX receive 4 Print Settings Print a list of your sett...

Page 42: ...ds 2 IP Address Enter the IP address 3 Subnet Mask Enter the Subnet mask 4 Gateway Enter the Gateway address 5 Node Name Enter the Node name Up to 32 characters 6 WINS Config Auto Static Chooses the WINS configuration mode 7 WINS Server address of the primary or secondary WINS server Primary 000 255 000 255 000 255 000 255 Secondary 000 255 000 255 000 255 000 255 The factory settings are shown in...

Page 43: ...PA On Off Automatically allocates the IP address from the linklocal address range 0 IPv6 On Off Enable or Disable the IPv6 protocol If you want to use the IPv6 protocol visit http support brother com for more information 2 Ethernet Auto 100B FD 100B HD 10B FD 10B HD Choose the Ethernet link mode 6 Network continued Level 2 Level 3 Descriptions 1 Level 4 Descriptions 2 Page The factory settings are...

Page 44: ...ed network status 4 MAC Address Shows the MAC address of the machine 5 Set to Default Restore the wired network setting to factory default 1 Reset 2 Exit 6 Wired Enable On Off Enable or disable the wired network manually 6 Network continued Level 2 Level 3 Descriptions 1 Level 4 Descriptions 2 Page The factory settings are shown in Bold with an asterisk ...

Page 45: ... the Gateway address 5 Node Name Enter the Node name Up to 32 characters 6 WINS Config Auto Static Chooses the WINS configuration mode 7 WINS Server Specifies the IP address of the primary or secondary WINS server Primary 000 255 000 255 000 255 000 255 Secondary 000 255 000 255 000 255 000 255 6 Network continued Level 2 Level 3 Descriptions 1 Level 4 Descriptions 2 Page The factory settings are ...

Page 46: ...he IPv6 protocol If you want to use the IPv6 protocol visit http support brother com for more information 2 WLAN Assistant Windows only You can configure your wireless network settings using the Brother CD ROM 3 Setup Wizard The Setup Wizard guides you through the wireless network configuration 4 WPS AOSS You can easily configure your wireless network settings using the one button push method 6 Ne...

Page 47: ...e current SSID 4 Comm Mode You can see the current Communication Mode 7 MAC Address Shows the MAC address of the machine 8 Set to Default Restore the wireless network setting to factory default 1 Reset 2 Exit 9 WLAN Enable Enable or disable the wireless network manually On Off 3 Network Reset Restore all network settings back to the factory settings 1 Reset 2 Exit 6 Network continued Level 2 Level...

Page 48: ...ber of pages the machine has printed during its life Total Displays the total page count Fax List Displays the page counter for faxes and lists Copy Displays the page counter for copies Print Displays the page counter for printed pages 4 Parts Life 1 Toner You can check the percentage of Toner life that remains 2 Drum You can check the percentage of Drum life that remains 5 Reset Drum You can rese...

Page 49: ...enu mode 1 a Press Menu b Scroll through each menu level by pressing a or b c Press OK when the option you want appears on the LCD The LCD will then show the next menu level d Press a or b to scroll to your next menu selection and then press OK e Press a or b to display the option you want and then press OK When you have finished setting an option the LCD will show Accepted f Press Stop Exit to ex...

Page 50: ...ress OK to select an option In the below example the paper type setting is changed from Plain to Recycled Paper a Press Menu b Press a or b to choose 1 General Setup Press OK c Press a or b to choose 1 Paper Press OK d Press a or b to choose 1 Paper Type Press OK e Press a or b to choose Recycled Paper Press OK f Press Stop Exit 1 General Setup Level 2 1 Paper 1 Paper Type Plain Recycled Paper Lev...

Page 51: ...sing this feature On Increases the page yield of the toner cartridge When you set Toner Save to On print appears lighter Off 2 Auto Power Off If the machine remains in Deep Sleep mode for the time set in the Auto Power Off settings it will automatically go into Power Off mode To disable the Power Off mode press and hold Off 1 hour 2 hours 4 hours 8 hours 53 3 LCD Contrast Adjusts the contrast of t...

Page 52: ...ne Reset 1 Restores all the function settings to factory default a Reset b Exit Cancel restore and exit the menu 2 Network 1 Restores all network settings to the factory default a Reset b Exit Cancel restore and exit the menu 3 All Settings 2 Restores all the machine settings to factory default Restores all the function settings to factory default a Reset b Exit Cancel restore and exit the menu 0 ...

Page 53: ...Press a to increase the brightness or press b to decrease the brightness 3 Contrast Adjust the contrast to help an image look sharper and more vivid nnnno nnnon nnonn nonnn onnnn Press a to increase the contrast or press b to decrease the contrast 4 ID Copy 1 Quality You can change the default settings for ID Copy Auto Auto is the standard mode for ordinary printouts If you want to make it clearer...

Page 54: ...criptions 2 Page 1 Print Options 1 Test Print Prints a test page 2 Auto Continue If this setting is enabled the machine will automatically clear a paper size error and will use the paper loaded in the paper tray On Off Size mismatch is displayed on the LCD and printing does not occur 3 Reset Printer Restores the printer settings to the original factory default settings a Reset b Exit The factory s...

Page 55: ...P Address Enter the IP address 3 Subnet Mask Enter the Subnet mask 4 Gateway Enter the Gateway address 5 Node Name Enter the Node name Up to 32 characters 6 WINS Config Auto Static Chooses the WINS configuration mode 7 WINS Server Specifies the IP address of the primary or secondary WINS server Primary 000 255 000 255 000 255 000 255 Secondary 000 255 000 255 000 255 000 255 The factory settings a...

Page 56: ...col visit http support brother com for more information 2 WLAN Assistant Windows only You can configure your wireless network settings using the Brother CD ROM 3 Setup Wizard The Setup Wizard guides you through the wireless network configuration 4 WPS AOSS You can easily configure your wireless network settings using the one button push method 5 WPS w PIN Code You can easily configure your wireles...

Page 57: ...urrent Communication Mode 7 MAC Address Shows the MAC address of the machine 8 Set to Default Restore the wireless network setting to factory default Reset Exit 9 WLAN Enable Enable or Disable the Wireless LAN manually On Off 2 Network Reset Restore all network settings back to the factory settings Reset Exit 4 Network continued Level 2 Level 3 Descriptions 1 Level 4 Descriptions 2 Page The factor...

Page 58: ...hine has printed during its life Total Displays the total page count List Displays the page counter for lists Copy Displays the page counter for copies Print Displays the page counter for printed pages 4 Parts Life 2 1 Toner You can check the percentage of Toner life that remains 2 Drum You can check the percentage of Drum life that remains 5 Print Settings 3 Print a list of your settings for prin...

Page 59: ...t do not allow lower case characters use the following table Inserting spaces To enter a space in a fax number press c once between numbers To enter a space in a name press c twice between letters Press number Key on dial pad once twice three times four times five times six times seven times eight times nine times 1 1 1 2 a b c A B C 2 a b 3 d e f D E F 3 d e 4 g h i G H I 4 g h 5 j k l J K L 5 j ...

Page 60: ... the symbol or character you want Press OK to choose it The symbols and characters below will appear depending on your menu selection DCP models 1 When setting certain options such as the Network Key you must enter characters on the machine Hold down or repeatedly press a or b to select a character from this list 0123456789abcdefghijklmnopqrstuvwxyzABCDEFGHIJKLMNOPQRSTUVWXYZ space _ Press OK when ...

Page 61: ...Ecology Press OK c Press a or b to choose 2 Auto Power Off Press OK d Press a or b to choose how many hours before the machine goes into Power Off mode Choose 1 hour 2 hours 4 hours 8 hours or Off Press OK e Press Stop Exit Toner Settings 1 Toner Setting Continue mode 1 You can set the machine to continue printing after the LCD shows Replace Toner The machine will continue printing until the LCD s...

Page 62: ... is OK If the quality is not good choose 2 No The machine will keep the faxes stored in the memory so you can reprint them after you replace the toner cartridge with a new one If the print quality is good choose 1 Yes The LCD will ask if you want to delete the printed faxes from the memory If you choose not to delete them you will be asked again after you replace the toner cartridge with a new one...

Page 63: ...r b to choose Plain or Recycled Paper Press OK e Press Stop Exit Paper Size 2 a For MFC 1906 and MFC 1908 Press Menu 1 2 2 and go to step d For MFC 1919NW Press Menu 1 3 2 and go to step d For DCP models Press Menu and then press a or b to choose 1 General Setup Press OK b Press a or b to choose 1 Paper Press OK c Press a or b to choose 2 Paper Size Press OK d Press a or b to choose A4 Letter Lega...

Page 64: ...t is extremely smooth or shiny that is curled or warped 1 A curl of 2 mm or greater may cause jams to occur that is coated or has a chemical finish that is damaged creased or folded that exceeds the recommended weight specification in this guide with tabs and staples with letterheads using low temperature dyes or thermography that is multipart or carbonless that is designed for inkjet printing If ...

Page 65: ...Document Sizes Supported 3 How to load documents 3 a Lift up and unfold the ADF document output support flap b Load your document face down top edge first in the ADF until the LCD message changes c Adjust the paper guides 1 to fit the width of your document Using the scanner glass 3 You can use the scanner glass to fax for MFC Models copy or scan pages of a book one page at a time Document Sizes S...

Page 66: ...document guidelines on the left and top place the document face down in the upper left corner of the scanner glass c Close the document cover IMPORTANT If the document is a book or is thick do not slam the cover or press on it ...

Page 67: ...se the scanner glass the ADF must be empty If you want to change the fax resolution press b and then press a or b to choose the fax resolution c Enter the fax number d Press Start to send a fax Cancelling a fax in progress 4 Press Stop Exit to cancel the fax If you press Stop Exit while the machine is dialling or sending the LCD will ask you to confirm Dialing XXX 1 Clear 2 Exit Sending XXX P01 1 ...

Page 68: ...shed the machine will print a broadcast report to let you know the results Cancelling a Broadcast in progress 4 While broadcasting you can cancel the fax currently being sent or the whole broadcast job a Press Menu 2 7 The LCD will display the Broadcast job number followed by the fax number or name being dialled for example 001 0123456789 Press a or b to show the broadcast job number for example B...

Page 69: ...fax machine rings 4 times 1 For the fax call send fax received signal 2 For the telephone call make a fast double ring waiting for you answer the phone 2 For MFC 1906 Tip If your machine is connecting an external answering phone device you could set the ringing time from 4 to 6 rings to answer the call 1 External TAD For MFC 1906 The external answering machine TAD automactically answers every call...

Page 70: ... sends you a fax call press Start under Easy mode on the control panel of the machine 2 Because the F T ring is made by the machine external telephones will not ring 3 Ring Delay means setting the number of times the machine rings before it answers in Fax Auto and Fax Tel modes ...

Page 71: ...lowing Enter the name using the dial pad up to 15 characters For help entering characters see Entering text on page 51 Press OK Press OK to store the number without a name d If you want to change the pinyin you can change it using the dial pad Press OK e To store another Speed Dial number go to step a Changing or Deleting Speed Dial numbers 6 You can change or delete a Speed Dial number that has a...

Page 72: ... enter a letter and press OK in step c all registered names will appear Press a or b to scroll until you find the name you are looking for If the LCD shows No Contact Found when you enter the first few letters of the name it means that a name for the letters is not stored Redial 6 Ensuring the line is not in use press Redial to find the last 20 numbers you recently dialled Press Redial or a or b t...

Page 73: ...n the display If no ID is stored the beeper will sound and No Caller ID will appear on the display Go to step d c Press a or b to scroll through the Caller ID memory to choose the Caller ID you want to view and then press OK The LCD will show the caller s number and the date and time of the call d To finish viewing press Stop Exit ...

Page 74: ...ies and then click the drop down list and select your model name if not already selected Click PC FAX Receive in the left navigation bar and then click Receive Then complete the following steps on your machine a MFC 1906 and MFC 1908 Press Menu 2 6 1 MFC 1919NW Press Menu 2 1 1 b MFC 1906 and MFC 1908 Press a or b to choose On or Off Press OK c MFC 1919NW Press a or b to choose PC FAX Receive Pres...

Page 75: ...e your PC is connected and turned on For more information see Software and Network User s Guide If your machine has an error and is unable to print faxes from memory you can use this setting to transfer your faxes to a PC See Transferring your faxes or Fax Journal report MFC models on page 94 PC Fax Receive is not supported in Mac OS ...

Page 76: ... fax NOTE The PC FAX software can only send Black White fax documents in A4 size Please install MFL Pro Suite software connect your machine and PC before using PC FAX sending Sending a file as a PC FAX 7 a Create a file in any application on your PC b Click File then Print The Print dialog box appears ...

Page 77: ...Book button and then choose a member or group from the Address Book If you make a mistake click All Clear to delete all the entries e To include a cover page click Add Cover Page NOTE You can also click the cover page icon to create or edit a cover page f Click Start to send the fax NOTE If you want to cancel the fax click Cancel or press Stop Exit on the machine s control panel If you want to red...

Page 78: ...m the scanner glass After placing the document on the scanner glass close the document cover NOTE To use the scanner glass the ADF must be empty c For MFC models Use the dial pad to enter the number of copies you want up to 99 copies For DCP models Press a or b to enter the number of copies you want d Press Start to copy Making copies 8 ...

Page 79: ...For DCP models Press Menu and then press a or b to choose 2 Copy Press OK b Press a or b to choose 4 ID Copy Press OK c Press a or b to choose 4 2in1 1in1 Press OK Press a or b to choose 2in1 for double sided copy as a default Press OK and then press Stop Exit d For MFC models Press COPY e For MFC models Enter the number of copies you want For DCP models Press a or b to enter the number of copies ...

Page 80: ... b to choose 4 ID Copy Press OK c Press a or b to choose 4 2in1 1in1 Press OK Press a or b to choose 1in1 for one sided copy as a default Press OK and then press Stop Exit d For MFC models Press COPY e For MFC models Enter the number of copies you want For DCP models Press a or b to enter the number of copies you want f Place your identification card face down on the scanner glass g For MFC models...

Page 81: ...ions MFC models 8 DCP 1608 and DCP 1619 8 Press a or b then press OK MFC models Press a b d or c then press OK DCP models Press a or b then press OK DCP 1618W 8 Press a or b to choose Copy Options Press OK Press a or b then press OK Quality Auto Text Photo Receipt Stack Sort Stack Sort Brightness onnnn nonnn nnonn nnnon nnnno Contrast onnnn nonnn nnonn nnnon nnnno The factory settings are shown in...

Page 82: ...EXE 83 LGLiA4 1 78 LGLiLTR 1 70 A4iA5 50 Custom 25 400 Auto 2 200 141 A5iA4 104 EXEiLTR Page Layout Off 1 in 1 2 in 1 P 2 in 1 L 4 in 1 P 4 in 1 L Press Menu selections Options MFC models 8 DCP 1608 and DCP 1619 8 Press a or b then press OK MFC models Press a b d or c then press OK DCP models Press a or b then press OK DCP 1618W 8 Press a or b to choose Copy Options Press OK Press a or b then pres...

Page 83: ...wing Windows XP Windows Vista and Windows 7 Click Start All Programs Brother Brother Utilities and then click the drop down list and select your model name if not already selected Click SCAN in the left navigation bar and then click ControlCenter4 The ControlCenter4 application will open Windows 8 Click Brother Utilities and then click the drop down list and select your model name if not already s...

Page 84: ...Chapter 9 76 c Choose Advanced Mode and then click OK d Click File in the Scan tab ...

Page 85: ...your preferred folder by clicking the Browse button When you select the SharePoint check box you can save the file to a SharePoint library by entering the address 4 You can choose a scanning resolution from the Resolution drop down list 5 You can choose the document size from the Document Size drop down list e Click Scan The machine starts the scanning process The folder where the scanned data is ...

Page 86: ... to select No and then press OK f Press Start The machine starts the scanning process SCAN key settings 9 You can change your machine s SCAN key settings using ControlCenter4 a Do one of the following Windows XP Windows Vista and Windows 7 Click Start All Programs Brother Brother Utilities and then click the drop down list and select your model name if not already selected Click SCAN in the left n...

Page 87: ...he drop down list 2 You can enter the file name you want to use for the document 3 You can save the file to the default folder or choose your preferred folder by clicking the Browse button 4 You can choose a scanning resolution from the Resolution drop down list 5 You can choose the document size from the Document Size drop down list e Click OK 1 2 4 5 3 ...

Page 88: ...ources If damage is caused to the drum unit or other parts of this machine as a result of the use of toner or toner cartridges other than Brother Original products due to the incompatibility or lack of suitability of those products with this machine any repairs required as a result may not be covered by the warranty For best performance use a Brother Original drum and toner cartridge Printing with...

Page 89: ...e paper tray The interface cables are securely connected to the machine and the computer If you did not solve your problem with the above checks identify your problem and then go to the page suggested below Telephone and Fax problems MFC models on page 84 Improving the print quality on page 86 If the machine is connected to a PC depending on the error a Popup application may appear on the PC Follo...

Page 90: ...ned from the ADF was too long Pull the jammed paper out of the ADF unit Drum End Soon Replace Drum It is time to replace the drum unit The drum unit counter was not reset when a new drum was installed Replace the drum unit or reset the drum unit counter when a new drum is installed See the instructions that are supplied with the new drum unit Out of Memory The machine s memory is full Fax sending ...

Page 91: ...mismatch The paper in the tray is not the correct size Load the correct size of paper in the tray and set the size of paper to the tray Toner Low If the LCD shows Toner Low you can still print however the machine is telling you that the toner cartridge is near the end of its life Order a new toner cartridge now so a replacement toner cartridge will be available when the LCD shows Replace Toner or ...

Page 92: ... the machine s power cord is connected correctly and the machine is turned on 2 Connect one end of the telephone line cord to the area labelled LINE and then connect the other end of the telephone line cord directly to a telephone wall socket If you can send and receive faxes when the telephone line is directly connected to the fax the problem may be unrelated to the machine Please contact your se...

Page 93: ... you should choose Fax Auto Can I set the machine not to print the Transmission Verification report This product will print a Transmission Verification report Even if the Transmission Verification report is set to Off a report is printed when there is a communication error If the Journal Period is set to Off Fax Journal are not printed Can I cancel the fax job Press Stop Exit to cancel the fax or ...

Page 94: ...lts check the following 1 The machine s environment Choose a location where the temperature remains between 10 C and 32 C and the humidity is between 20 to 80 without condensation 2 Acceptable paper is loaded in the paper tray See Acceptable paper on page 56 3 The paper is loaded correctly in the machine Turning the paper over may help paper loading become smoother Adjusting the guide may help pap...

Page 95: ...nstructions included with the drum unit for replacing the drum unit or see the instructions printed on the box of the toner cartridge for replacing the toner cartridge 5 Clean the inside of the machine Cleaning the scanner glass Clean the white plastic surface 1 and scanner glass 2 For ADF models Clean the white bar 3 and the scanner glass strip 4 1 2 3 4 ...

Page 96: ... to left several times NOTE Be sure to return the tab to the home position a 5 If you do not printed pages may have a vertical stripe Clean the drum unit if black or white dots appear on printed pages Push down the lock lever and take the toner cartridge out of the drum unit 5 ...

Page 97: ...and other information 89 A Turn the drum unit gear by hand while looking at the surface of the drum roller 1 Wipe the surface of the drum gently with a dry cotton swab until the dust or glue on the surface comes off 1 ...

Page 98: ...ver settings Try changing the Print Settings in the Basic tab If the paper is curled or the toner is not fixed well on the paper you can adjust these settings in Improve Print Output Click Other Print Options in the Advanced tab ...

Page 99: ... the jammed document out c Close the ADF cover d Lift the document cover e Pull the jammed document out to the right f Insert a piece of stiff paper such as cardstock into the ADF to push any small paper scraps through If the document rips or tears be sure you remove all small paper scraps to prevent future jams g Close the document cover h Press Stop Exit ...

Page 100: ...revents paper jams a Turn the machine off b Wait at least 15 minutes for the product to cool down before you touch the internal parts of the product c Remove all paper loaded in the tray d Use both hands to slowly pull out the jammed paper e Open the scanner cover The pull arm 1 on the left side of the machine will lock Open the top cover f Slowly take out the drum unit and toner cartridge assembl...

Page 101: ...matically i Place the drum unit and toner cartridge assembly back in to the machine j Close the top cover After lifting the scanner cover slightly pull the pull arm 1 on the left side of the machine down and then close the scanner cover using both hands k Load the paper back in to the tray Make sure that the paper is below the protruding section of the rear guide Slide the paper guides to fit the ...

Page 102: ...Menu 0 2 to register your fax number telephone number and name Transferring faxes to your PCA You can transfer the faxes from your machine s memory to your PC a Make sure that you have installed MFL Pro Suite and then turn on PC FAX Receive on the PC For more information see Software and Network User s Guide Do one of the following Windows XP Windows Vista and Windows 7 Click Start All Programs Br...

Page 103: ...e to read the guidelines in the Product Safety Guide before cleaning the machine Clean the outside and inside of the machine regularly with a dry lint free cloth When you replace the toner cartridge or the drum unit make sure that you clean the inside of the machine If printed pages are stained with toner clean the inside of the machine with a dry lint free cloth WARNING DO NOT use flammable subst...

Page 104: ... Type Laser Print Method Electrophotographic Laser Printer Memory Capacity 16 MB Power Source 220 240 V AC 50 60 Hz Power Consumption Average Peak 1 Approx 1 080 W Printing 1 Approx 380 W at 25 C Copying 1 Approx 380 W at 25 C Ready 1 Approx 40 W at 25 C Deep Sleep 1 Approx 0 8 W Approx 1 3 W Power Off 1 2 3 Approx 0 28 W ...

Page 105: ...essure Printing LPAm 51 dB A LPAm 52 dB A Sound Power Printing LWAd 6 5 B A LWAd 6 59 B A Temperature Operating 10 to 32 C 4 Storage 0 to 40 C Humidity Operating 20 to 80 without condensation Storage 35 to 85 without condensation Model DCP 1608 DCP 1619 MFC 1906 MFC 1908 340 mm 385 mm 255 mm 340 mm 385 mm 283 mm 340 mm 456 mm 283 mm ...

Page 106: ...IEC 19752 8 Drum life is approximate and may vary by type of use Interface USB Hi Speed USB 2 0 5 6 It is recommended you use a USB 2 0 cable Type A B that is no more than 2 metres long Support OS Windows Windows XP Home Windows XP Professional Windows XP Professional x64 Edition Windows Vista Windows 7 Windows 8 Windows 8 1 Windows Server 2003 Windows Server 2003 x64 Edition Windows Server 2008 W...

Page 107: ...65 to 90 g m2 Scanner Glass Up to 2 0 kg Model DCP 1608 DCP 1619 MFC 1906 MFC 1908 Paper Input Paper Tray Paper Type Plain Paper Recycled Paper Paper Size A4 Letter Legal Folio A5 A5 Long Edge B5 JIS Executive 16K Width 148 to 216 mm Length 148 to 355 6 mm Paper Weight 65 to 105 g m2 Maximum Paper Capacity Up to 150 sheets of 80 g m2 Plain paper Paper Output Face Down Output Tray Up to 50 sheets o...

Page 108: ...idth Max 208 mm Greyscale 8 bit 256 levels Resolution Horizontal 8 dot mm Vertical Standard 3 85 line mm Fine 7 7 line mm Photo 7 7 line mm Superfine 15 4 line mm Speed Dial 99 stations Automatic Redial 3 times at 5 minute intervals Memory Transmission Up to 400 1 pages Out of Paper Reception Up to 400 1 pages Model DCP 1608 DCP 1619 MFC 1906 MFC 1908 Copy Width Max 210 mm Multiple Copies Stacks o...

Page 109: ... MFC 1906 MFC 1908 Colour Yes TWAIN Compliant Yes Windows XP Windows Vista Windows 7 Windows 8 Windows 8 1 OS X v10 7 5 10 8 x 10 9 x 1 WIA Compliant Yes Windows XP Windows Vista Windows 7 Windows 8 Windows 8 1 ICA Compliant Yes OS X v10 7 5 10 8 x 10 9 x Colour Depth Colour 24 bit colour processing Input 24 bit colour processing Output Greyscale 8 bit colour processing Input 8 bit colour processi...

Page 110: ... Source 220 240 V AC 50 60 Hz Power Consumption Average Peak 1 Approx 1 080 W Printing 1 Approx 390 W at 25 C Copying 1 Approx 390 W at 25 C Ready 1 Approx 50 W at 25 C Deep Sleep 1 Approx 0 9W Approx 1 5 W Power Off 1 2 3 Approx 0 28 W Approx 0 3 W Dimensions DCP 1618W MFC 1919NW Weights with consumables 7 2 kg 8 5 kg 340 mm 385 mm 255 mm 340 mm 456 mm 283 mm ...

Page 111: ...ower Printing LWAd 6 6 B A Temperature Operating 10 to 32 C 4 Storage 0 to 40 C Humidity Operating 20 to 80 without condensation Storage 35 to 85 without condensation Interface USB Hi Speed USB 2 0 5 6 It is recommended you use a USB 2 0 cable Type A B that is no more than 2 metres long Ethernet 10BASE T 100BASE TX Use a straight through Category 5 or greater twisted pair cable Wireless LAN 7 IEEE...

Page 112: ... g m2 Scanner Glass Up to 2 0 kg Model DCP 1618W MFC 1919NW Paper Input Paper Tray Paper Type Plain Paper Recycled Paper Paper Size A4 Letter Legal Folio A5 A5 Long Edge B5 JIS Executive 16K Width 148 to 216 mm Length 148 to 355 6 mm Paper Weight 65 to 105 g m2 Maximum Paper Capacity Up to 150 sheets of 80 g m2 Plain paper Paper Output Face Down Output Tray Up to 50 sheets of 80 g m2 Plain Paper f...

Page 113: ...inting Width Max 208 mm Greyscale 8 bit 256 levels Resolution Horizontal 8 dot mm Vertical Standard 3 85 line mm Fine 7 7 line mm Photo 7 7 line mm Superfine 15 4 line mm Speed Dial 99 stations Automatic Redial 3 times at 5 minute intervals Memory Transmission Up to 400 1 pages Out of Paper Reception Up to 400 1 pages Model DCP 1618W MFC 1919NW Copy Width Max 210 mm Multiple Copies Stacks or Sorts...

Page 114: ...FC 1919NW Colour Yes TWAIN Compliant Yes Windows XP Windows Vista Windows 7 Windows 8 Windows 8 1 OS X v10 7 5 10 8 x 10 9 x 1 WIA Compliant Yes Windows XP Windows Vista Windows 7 Windows 8 Windows 8 1 ICA Compliant Yes OS X v10 7 5 10 8 x 10 9 x Colour Depth Colour 24 bit colour processing Input 24 bit colour processing Output Greyscale 8 bit colour processing Input 8 bit colour processing Output...

Page 115: ...onnect your machine to a network for Network Printing Network Scanning PC Fax Send 1 PC Fax Receive Windows only 1 and Remote Setup 1 2 Also included is Brother BRAdmin Light 3 4 Network Management software Protocols IPv4 ARP RARP BOOTP DHCP APIPA Auto IP WINS NetBIOS name resolution DNS resolver mDNS LLMNR responder LPR LPD Custom Raw Port Port 9100 IPP FTP Server SNMPv1 v2c HTTP Server TFTP Clie...

Page 116: ...5 7 D Deep Sleep mode 53 Dialling manual 64 Speed Dial 64 using the Search key 64 Dimensions 97 102 Document how to load 57 jam 91 Drum unit 80 cleaning 88 E Error messages on LCD 82 F FAX PC FAX Macintosh See Software and Network User s Guide Windows receiving 66 sending 68 Fax stand alone receiving Continue Mode 54 sending 59 broadcasting 60 H Help LCD messages for DCP models 41 LCD messages for...

Page 117: ...setup See Software and Network User s Guide Resolution copy 100 105 fax 100 105 print 101 106 scan 101 106 S Scan a document to a computer 75 Scanner glass using 57 Scanning 75 See Software and Network User s Guide Specifications 96 copy 100 105 document size 99 104 107 fax 100 105 general 96 102 print 101 106 print media 99 104 scan 101 106 Speed Dial changing 63 setting up 63 using 64 T Text ent...

Page 118: ... Visit us on the World Wide Web http www brother com These machines are approved for use in the country of purchase only Local Brother companies or their dealers will only support machines purchased in their own countries ...

Reviews: