8 - 2
Confidential
8.2 CLEANING THE MAINTENANCE UNIT
(1) Plug the power cord of the machine into an electrical outlet.
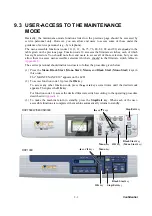
(2) Press
the
Menu
and
Black
Start
(
Mono Start
)
keys. Next press the key four times to make
the machine enter the maintenance mode.
The machine displays "
" on the LCD, indicating that it is placed in
the initial stage of the maintenance mode, a mode in which the machine is ready to accept
entry from the keys.
(3) Move the head/carriage unit to the center of its travel (function code 63 in
) by entering 6, 3, and * with the / and
OK
keys.
(4) Unplug the power cord of the machine from the electrical outlet.
(5) Open the scanner cover (scanner unit).
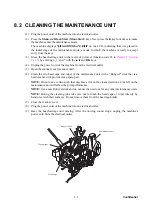
(6) Clean the two head caps and wiper of the maintenance unit with a "Rubycel" stick that is a
head cleaner stick provided as a spare part.
NOTE:
Do not use a cotton swab that may leave lint on the cleaned sections. Lint left on the
maintenance unit will affect the print performance.
NOTE:
Use a new Rubycel stick and do not use the used one for any other maintenance units.
NOTE:
During the cleaning jobs, take care not to touch the head caps or wiper directly by
hand or scratch their surfaces. Do not remove them from the head cap holder.
(7) Close the scanner cover.
(8) Plug the power cord of the machine into an electrical outlet.
(9) Hear the head/carriage unit moving. After the moving sound stops, unplug the machine's
power cord from the electrical outlet.
Maintenance unit
Head caps
Head wiper
Rubycel stick
Summary of Contents for DCP 330C - Color Inkjet - All-in-One
Page 1: ...Confidential MULTIFUNCTION EQUIPMENT SERVICE MANUAL MODELS DCP750CW DCP540CN DCP330C DCP130C ...
Page 9: ...vii Confidential Legal limitations for copying ...
Page 10: ...Confidential CHAPTER 1 PARTS NAMES AND FUNCTIONS ...
Page 16: ...1 5 Confidential 1 2 CONTROL PANEL Models with color LCD 1 2 3 4 5 10 9 8 7 6 Color Black ...
Page 17: ...1 6 Confidential Ink ...
Page 18: ...1 7 Confidential Models with monochrome LCD 1 2 3 4 5 10 9 8 7 6 ...
Page 19: ...1 8 Confidential ...
Page 21: ...Confidential CHAPTER 2 SPECIFICATIONS ...
Page 39: ...Confidential CHAPTER 3 THEORY OF OPERATION ...
Page 88: ...Confidential CHAPTER 4 ERROR INDICATION AND TROUBLESHOOTING ...
Page 131: ...Confidential CHAPTER 6 DISASSEMBLY REASSEMBLY AND LUBRICATION ...
Page 209: ...Confidential CHAPTER 7 ADJUSTMENTS AND UPDATING OF SETTINGS REQUIRED AFTER PARTS REPLACEMENT ...
Page 222: ...7 11 Confidential Head Positioning Test Pattern ...
Page 226: ...7 15 Confidential Paper Feeding Check Pattern for the Paper Feed Roller ...
Page 227: ...7 16 Confidential Paper Feeding Check Pattern for the Paper Ejection Roller ...
Page 229: ...7 18 Confidential Vertical Alignment Check Patterns 600DPI 1200DPI ...
Page 232: ...7 21 Confidential Margin Check Pattern ...
Page 241: ...Confidential CHAPTER 8 CLEANING ...
Page 245: ...Confidential CHAPTER 9 MAINTENANCE MODE ...
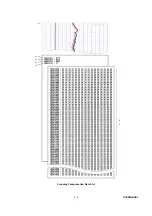
Page 253: ...9 6 Confidential Scanning Compensation Data List a b c d e f i ...
Page 256: ...9 9 Confidential Test Pattern ...
Page 261: ...9 14 Confidential Configuration List ...
Page 269: ...9 22 Confidential Paper Feeding Check Pattern for the Paper Feed Roller ...
Page 270: ...9 23 Confidential Paper Feeding Check Pattern for the Paper Ejection Roller ...
Page 275: ...9 28 Confidential Vertical Alignment Check Patterns 600DPI 1200DPI ...
Page 278: ...9 31 Confidential Margin Check Pattern ...
Page 381: ...Confidential Power supply PCB U S A and Canadian models ...
Page 382: ...Confidential Power supply PCB European Asian and Oceanian models ...
Page 383: ...Confidential January 07 SM FAX054 8CAA01 2 Printed in Japan ...

