background image

Chapter 5

34

Print Index (Thumbnails)

5

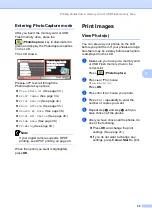
The PhotoCapture Center™ assigns 
numbers for images (such as No.1, No.2, 
No.3, and so on).


The PhotoCapture Center™ uses these 
numbers to identify each pictures. You can 
print a thumbnail page (Index page with 5 
images per line). This will show all the 
pictures on the  memory card or USB Flash 
memory drive.


Note

Only file names that are 8 characters or 
less will be printed correctly on the index 
sheet.


a

Make sure you have put the memory 
card or USB Flash memory drive in the 
correct slot.
Press (

PhotoCapture

). 

b

Press 

a

 or 

b

 to choose 

Print Index

.

Press 

OK

.

c

Press 

a

 or 

b

 to choose the paper 

settings, 

Paper Type

 or 

Paper Size

.

Do one of the following.

„

If you chose Paper Type, press 

d

 or 

c

 to choose the type of paper 

you are using, 

Plain Paper

Inkjet Paper

Brother Photo


or 

Other Photo

Press 

OK

.

„

If you chose Paper Size, press 

d

 or 

c


to choose the paper size you are 
using, 

Letter

 or 

A4

.

Press 

OK

.

„

If you do not want to change the 
paper settings, go to 

d

d

Press 

Colour Start

 to print.

Print Photos

5

Before you can print an individual image, you 
have to know the image number.

a

Make sure you have put a memory card 
or USB Flash memory drive in the 
correct slot.
Press (

PhotoCapture

). 

b

Print the Index. (See 

Print Index 

(Thumbnails)

on page 34.)

c

Press 

a

 or 

b

 to choose 

Print Photos

.

Press 

OK

.

d

Press 

a

 repeatedly to choose the image 

number that you want to print from the 
Index page (Thumbnails).
If you want to choose a two digit 
number, press 

c

 to move the cursor to 

the next digit.
(For example, enter 1, 

c

, 6 to print image 

No.16.)
Press 

OK

.

Note

Press 

b

 to decrease the image number.


Summary of Contents for DCP-770CW

Page 1: ...USER S GUIDE DCP 770CW ...

Page 2: ...ent record of your purchase in the event of theft fire or warranty service Register your product on line at http www brother com registration By registering your product with Brother you will be recorded as the original owner of the product Your registration with Brother may serve as confirmation of the purchase date of your product should you lose your receipt and may support an insurance claim b...

Page 3: ...of this manual and the specifications of this product are subject to change without notice Brother reserves the right to make changes without notice in the specifications and materials contained herein and shall not be responsible for any damages including consequential caused by reliance on the materials presented including but not limited to typographical and other errors relating to the publica...

Page 4: ...ii EC Declaration of Conformity under the R TTE Directive ...

Page 5: ...g documents and paper 9 Loading documents 9 Using the scanner glass 9 Scannable area 9 Acceptable paper and other media 10 Recommended media 10 Handling and using media 11 Choosing the right media 12 Loading paper and other media 14 Loading envelopes and post cards 16 Loading photo paper 17 Removing small printouts from the machine 18 Printable area 19 3 General setup 20 Paper settings 20 Paper Ty...

Page 6: ...d or USB Flash memory drive without a PC 30 Using PhotoCapture Center from your computer 30 Using a memory card or USB Flash memory drive 30 Memory cards or a USB Flash memory drive folder structure 31 Getting started 32 Entering PhotoCapture mode 33 Print Images 33 View Photo s 33 Print Index Thumbnails 34 Print Photos 34 Photo Effects 35 Search by Date 38 Print All Photos 39 Slide show 39 Trimmi...

Page 7: ... connection 59 Radio interference 59 EU Directive 2002 96 EC and EN50419 60 Legal limitations for copying 60 Trademarks 61 B Troubleshooting and Routine Maintenance 62 Troubleshooting 62 If you are having difficulty with your machine 62 Error messages 66 Changing LCD language 68 Error animation 68 Printer jam or paper jam 68 Routine maintenance 70 Replacing the ink cartridges 70 Cleaning the outsi...

Page 8: ...able 80 Mode and menu keys 80 Menu table 81 D Specifications 90 General 90 Print media 91 Copy 92 PhotoCapture Center 93 PictBridge 94 Scanner 95 Printer 96 Interfaces 97 Computer requirements 98 Consumable items 99 Network LAN 100 E Glossary 101 F Index 102 ...

Page 9: ...Section I General I General Information 2 Loading documents and paper 9 General setup 20 ...

Page 10: ...n important point or refers you to a related topic Courier New Text in the Courier New font identifies messages on the LCD of the machine Warnings tell you what to do to prevent possible personal injury Electrical Hazard icons alert you to possible electrical shock Cautions specify procedures you must follow or avoid to prevent possible damage to the machine or other objects Notes tell you how you...

Page 11: ...s below a Turn on your PC Insert the Brother CD ROM into your CD ROM drive b If the model name screen appears click your model name c If the language screen appears click your language The CD ROM main menu will appear Note If this window does not appear use Windows Explorer to run the start exe program from the root directory of the Brother CD ROM d Click Documentation e Click the documentation yo...

Page 12: ...application How to find Network setup instructions 1 Your machine can be connected to a wireless or wired network You can find basic setup instructions in the Quick Setup Guide For more information or if your access point supports SecureEasySetup or AOSS please see the Network User s Guide Viewing Documentation For Macintosh 1 a Turn on your Macintosh Insert the Brother CD ROM into your CD ROM dri...

Page 13: ...nning For Mac OS X 10 2 4 or greater Presto PageManager User s Guide The complete Presto PageManager User s Guide can be viewed from the Help selection in the Presto PageManager application How to find Network setup instructions 1 Your machine can be connected to a wireless or wired network You can find basic setup instructions in the Quick Setup Guide For more information or if your access point ...

Page 14: ... a scanning operation in colour or mono depending on the scanning setting in the ControlCenter software Mono Start Lets you start making copies in monochrome Also lets you start a scanning operation in colour or mono depending on the scanning setting in the ControlCenter software 5 Stop Exit Stops an operation or exits from a menu 6 On Off You can turn the machine on and off If you turn the machin...

Page 15: ... Type setting is changed from Plain Paper to Inkjet Paper a Press Menu b Press a or b to choose General Setup Press OK c Press a or b to choose Paper Type d Press d or c to choose Inkjet Paper Press OK You can see the current setting on the LCD e Press Stop Exit 0 Max Normal 100 100 Enlarge Reduce Enlarge Reduce Plain Paper Plain Paper Paper Paper Type ype 100 100 100 Ratio Ratio Ratio Quality Mem...

Page 16: ...or b to choose Print Reports Press OK c Press a or b to choose the report you want Press OK d Press Mono Start LED DCP status Description Off Ready The DCP is ready for use Red Cover open The cover is open Close the cover See Error messages on page 66 Ink empty Replace the Ink cartridgewith anewone See Replacing the ink cartridges on page 70 Paper error Put paper in the tray or clear the paper jam...

Page 17: ...ace down on the scanner glass c Close the document cover CAUTION If you are scanning a book or thick document DO NOT slam the cover down or press on it Scannable area 2 The scannable area depends on the settings in the application you are using The figures below show the areas you cannot scan on A4 or Letter paper Loading documents and paper 2 Length Up to 297 mm Width Up to 215 9mm Weight Up to 2...

Page 18: ...per Type on page 28 When you print on Brother photo paper load the instruction sheet included with the photo paper in the paper tray first and then put the photo paper on top of the instruction sheet When you use transparencies or photo paper remove each sheet at once to prevent smudging or paper jams Avoid touching the printed surface of the paper immediately after printing the surface may not be...

Page 19: ...t quality Transparencies designed for laser printers copiers may stain your next document Use only transparencies recommended for inkjet printing Improper Setup DO NOT use the following kinds of paper Damaged curled wrinkled or irregularly shaped paper 1 2 mm or longer Extremely shiny or highly textured paper Paper already printed on by a printer Paper that cannot be arranged uniformly when stacke...

Page 20: ...5 8 8 3 in Yes Yes A6 105 148 mm 4 1 5 8 in Yes Cards Photo 10 15 cm 4 6 in Yes Yes Yes Photo L 89 127 mm 3 1 2 5 in Yes Photo 2L 13 18 cm 5 7 in Yes Yes Index Card 127 203 mm 5 8 in Yes Post Card 1 100 148 mm 3 9 5 8 in Yes Post Card 2 Double 148 200 mm 5 8 7 9 in Yes Envelopes C5 Envelope 162 229 mm 6 4 9 in Yes DL Envelope 110 220 mm 4 3 8 7 in Yes COM 10 105 241 mm 4 1 8 9 1 2 in Yes Monarch 9...

Page 21: ...e Loading photo paper on page 17 Paper Type Weight Thickness No of sheets Cut Sheet Plain Paper 64 to 120 g m2 0 08 to 0 15 mm 100 1 Inkjet Paper 64 to 200 g m2 0 08 to 0 25 mm 20 Glossy Paper Up to 220 g m2 Up to 0 25 mm 20 2 Cards Photo Card Up to 220 g m2 Up to 0 25 mm 20 2 Index Card Up to 120 g m2 Up to 0 15 mm 30 Post Card Up to 200 g m2 Up to 0 23 mm 30 Envelopes 75 to 95 g m2 Up to 0 52 mm...

Page 22: ... pull the paper tray completely out of the machine Lift the output paper tray cover 1 b Press and slide the paper side guides 1 and paper length guide 2 to fit the paper size c Fan the stack of paper well to avoid paper jams and misfeeds Note Always make sure that the paper is not curled d Gently put the paper into the paper tray print side down and top edge first Check that the paper is flat in t...

Page 23: ...e the paper side guides touch the sides of the paper Note Be careful that you do not push the paper in too far it may lift at the back of the tray and cause feed problems f Close the output paper tray cover g Slowly push the paper tray completely into the machine h While holding the paper tray in place pull out the paper support 1 until it clicks and unfold the paper support flap 2 Note Do not use...

Page 24: ...Occasionally you may experience paper feed problems caused by the thickness size and flap shape of the envelopes you are using How to load envelopes and post cards2 a Before loading press the corners and sides of the envelopes or post cards to make them as flat as possible Note If the envelopes or post cards are double feeding put one envelope or post card in the paper tray at a time b Put the env...

Page 25: ...aper 2 Use the photo paper tray which has been assembled on the top of the output paper tray cover to print on photo 10 15 cm and photo L size paper When you use the photo paper tray you do not have to take out the paper that is in the tray beneath it a Press the photo paper tray release button with your left thumb and push the photo paper tray backward until it clicks into the photo printing posi...

Page 26: ...ems Always make sure that the paper is not curled d When you have finished printing photos return the photo paper tray to the normal printing position Press the photo paper tray release button with your left thumb and pull the photo paper tray forward until it clicks Removing small printouts from the machine 2 When the machine ejects small paper onto the output paper tray you may not be able to re...

Page 27: ...e unprintable areas on cut sheet paper and envelopes The machine can only print in the shaded areas when the Borderless print feature is available and turned on Note The Borderless feature is not available for envelopes Cut Sheet Paper Envelopes Top 1 Bottom 2 Left 3 Right 4 Cut Sheet 3 mm 3 mm 3 mm 3 mm Envelopes 12 mm 24 mm 3 mm 3 mm 3 4 1 2 3 4 1 2 ...

Page 28: ...surfaces face up onto the paper tray in front of the machine When you use transparencies or glossy paper remove each sheet at once to prevent smudging or paper jams Paper Size 3 You can use five sizes of paper for printing copies Letter Legal A4 A5 and 10 15 cm When you change the size of paper you load in the machine you will need to change the paper size setting at the same time a Press Menu b P...

Page 29: ...or b to choose LCD Settings Press OK d Press a or b to choose LCD Contrast e Press d or c to choose Light Med or Dark Press OK f Press Stop Exit Setting the backlight brightness 3 If you are having difficulty reading the LCD try changing the brightness setting a Press Menu b Press a or b to choose General Setup Press OK c Press a or b to choose LCD Settings Press OK d Press a or b to choose Backli...

Page 30: ... Press OK f Press Stop Exit Setting the Off Timer 3 You can set how long the LCD stays on after the last key press This is a power saving feature The machine can print and scan from your computer when the LCD is off a Press Menu b Press a or b to choose General Setup Press OK c Press a or b to choose LCD Settings Press OK d Press a or b to choose Off Timer e Press d or c to choose 1Min 2Mins 3Mins...

Page 31: ...Section II Copy II Making copies 24 ...

Page 32: ... or repeatedly Press a or b to scroll through the copy options menu Quality See page 25 Enlarge Reduce See page 25 Paper Type See page 28 Paper Size See page 28 Brightness See page 27 Contrast See page 27 RED Adjust See page 27 GREEN Adjust See page 27 BLUE Adjust See page 27 Page Layout See page 26 Set New Default See page 28 Factory Reset See page 28 When the option you want is highlighted press...

Page 33: ...e number of copies you want c Press a or b to choose Enlarge Reduce d Do one of the following Press d or c to choose the enlargement or reduction ratio you want Press OK Press d or c to choose Custom 25 400 Press OK and or to enter an enlargement or reduction ratio from 25 to 400 Press OK e If you do not want to change additional settings press Mono Start or Colour Start Note Page Layout Options a...

Page 34: ...ndscape You can only make one poster copy at a time a Load your document b Enter the number of copies you want c Press a or b to choose Page Layout d Press d or c to choose Off 1 in 1 2 in 1 P 2 in 1 L 4 in 1 P 4 in 1 L or Poster 3 x 3 Press OK e If you do not want to change additional settings press Mono Start or Colour Start to scan the page If you are making a poster the machine scans the pages...

Page 35: ...an image look sharper and more vivid a Load your document b Enter the number of copies you want c Press a or b to choose Contrast d Press d or c to change the contrast Press OK e If you do not want to change additional settings press Mono Start or Colour Start Colour Saturation 4 a Load your document b Enter the number of copies you want c Press a or b to choose RED Adjust GREEN Adjust or BLUE Adj...

Page 36: ...e d Press d or c to choose Letter Legal A4 A5 or 10x15cm Press OK e If you do not want to change additional settings press Mono Start or Colour Start Setting your changes as a new default 4 You can save the copy settings for Quality Paper Type Brightness Contrast RED Adjust GREEN Adjust and BLUE Adjust that you use most often by setting them as the default settings These settings will stay until y...

Page 37: ...Section III Direct Photo PrintingIII Printing photos from a memory card or USB Flash memory drive 30 Printing photos from a camera 47 ...

Page 38: ...re Center for Macintosh in the Software User s Guide on the CD ROM Using a memory card or USB Flash memory drive 5 Your Brother machine has media drives slots for use with popular digital camera media CompactFlash Memory Stick Memory Stick Pro SecureDigital MultiMediaCard xD Picture Card and USB Flash memory drives miniSD can be used with a miniSD adapter Memory Stick Duo can be used with a Memory...

Page 39: ... cards must be in a valid format See DPOF printing on page 40 Please be aware of the following When printing the INDEX or IMAGE the PhotoCapture Center will print all the valid images even if one or more images have been corrupted A portion of the corrupted image may be printed The corrupted image will not be printed memory card users Your machine is designed to read memory cards that have been fo...

Page 40: ...light is on the memory card or USB Flash memory drive is properly inserted PhotoCapture light is off the memory card or USB Flash memory drive is not properly inserted PhotoCapture light is blinking the memory card or USB Flash memory drive is being read or written to CAUTION DO NOT unplug the power cord or remove the memory card or USB Flash memory drive from the media drive slot or USB direct in...

Page 41: ...he LCD before you print them If your photos are large files there may be a delay before each photo is displayed on the LCD a Make sure you have put a memory card or USB Flash memory drive in the correct slot Press PhotoCapture b Press a or b to choose View Photo s Press OK c Press d or c to choose your photo d Press or repeatedly to enter the number of copies you want e Repeat step c and step d un...

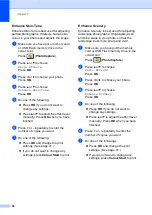
Page 42: ...per Type press d or c to choose the type of paper you are using Plain Paper Inkjet Paper Brother Photo or Other Photo Press OK If you chose Paper Size press d or c to choose the paper size you are using Letter or A4 Press OK If you do not want to change the paper settings go to d d Press Colour Start to print Print Photos 5 Before you can print an individual image you have to know the image number...

Page 43: ...ou can enlarge the view of the image by pressing Ink Management To go back to the original size press Ink Management again The Photo Effects feature is supported by technology from Reallusion Inc Auto Correct 5 Auto Correct is available for most photos The machine decides the suitable effect for your photo a Make sure you have put a memory card or USB Flash memory drive in the correct slot Press P...

Page 44: ...t settings See page 41 If you do not want to change any settings press Colour Start to print Enhance Scenery 5 Enhance Scenery is best used for adjusting landscape photographs It highlights green and blue areas in your photo so that the landscape looks more sharp and vivid a Make sure you have put the memory card or USB Flash memory drive in the correct slot Press PhotoCapture b Press a or b to ch...

Page 45: ... shown in a red frame When Remove Red Eye is unsuccessful Unable to Detect is shown Note Press a to try Remove Red Eye again e Press OK and or repeatedly to enter the number of copies you want f Do one of the following Press OK and change the print settings See page 41 If you do not want to change any settings press Colour Start to print Monochrome 5 You can convert your photo to monochrome a Make...

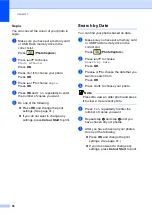
Page 46: ...t to print Search by Date 5 You can find your photos based on date a Make sure you have put a memory card or USB Flash memory drive in the correct slot Press PhotoCapture b Press a or b to choose Search by Date Press OK c Press a or b to choose the date that you want to search from Press OK d Press d or c to choose your photo Note Press d to view an older photo and press c to view a more recent ph...

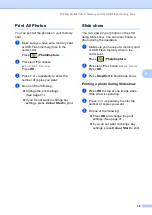
Page 47: ...ettings press Colour Start to print Slide show 5 You can view all your photos on the LCD using Slide show You can also choose a photo during the operation a Make sure you have put a memory card or USB Flash memory drive in the correct slot Press PhotoCapture b Press a or b to choose Slide show Press OK c Press Stop Exit to finish Slide show Printing a photo during Slide show 5 a Press OK to stop a...

Page 48: ...t settings See page 41 If you do not want to change any settings press Colour Start to print DPOF printing 5 DPOF stands for Digital Print Order Format Major digital camera manufacturers Canon Inc Eastman Kodak Company Fuji Photo Film Co Ltd Matsushita Electric Industrial Co Ltd and Sony Corporation created this standard to make it easier to print images from a digital camera If your digital camer...

Page 49: ...rint Photos Photo Effects Trimming You can see the number of copies of each photo that will be printed For DPOF printing This does not appear Menu Selections Options 1 Options 2 Page Print Quality Does not appear for DPOF printing Normal Photo 42 Paper Type Plain Paper Inkjet Paper Brother Photo Other Photo 42 Paper Size Letter A4 10x15cm 13x18cm When A4 or Letter is chosen 10 x 8cm 13 x 9cm 15 x ...

Page 50: ...to print Paper and print size 5 a Press a or b to choose Paper Size b Press d or c to choose the paper size you are using Letter 10x15cm 13x18cm or A4 Press OK c If you chose Letter or A4 press d or c to choose the print size Press OK d If you do not want to change additional settings press Colour Start to print Color Enhance Does not appear when Photo Effects is chosen On Off White Balance Sharpn...

Page 51: ...nd then go to step f c Press a or b to choose White Balance Sharpness or Color Density d Press d or c to adjust the degree of the setting Press OK e Do one of the following If you want to customize another colour enhancement press a or b to choose another option If you want to change other settings press a or b to choose Exit and then press OK f If you do not want to change additional settings pre...

Page 52: ...Press d or c to choose Off or On Press OK c If you do not want to change additional settings press Colour Start to print Setting your changes as a new default 5 You can save the print settings you use most often by setting them as the default settings These settings will stay until you change them again a Press a or b to choose your new setting Press OK Repeat this step for each setting you want t...

Page 53: ... file formats The factory setting is Color 150 dpi and the default file format is PDF The machine automatically creates file names based on the current date For details see Quick Setup Guide For example the fifth image scanned on June 1 2007 would be named 01060705 PDF You can change the colour and quality a Insert a CompactFlash Memory Stick Memory Stick Pro SecureDigital MultiMediaCard xD Pictur...

Page 54: ...ear if a Hub or USB Flash memory drive with a Hub has been put into the USB direct interface Media Error This message will appear if you put in a memory card that is either bad or not formatted or when there is a problem with the media drive To clear this error take out the memory card No File This message will appear if you try to access a memory card or USB Flash memory drive in the drive slot t...

Page 55: ...your PictBridge compatible camera Depending on your camera some of these settings may not be available 1 See DPOF printing on page 48 for more details 2 If your camera is set to use the Printer Settings Default setting the machine will print your photo using the following settings When your camera does not have any menu selections this setting is also used The names and availability of each settin...

Page 56: ...era When the machine starts printing a photo the LCD will show Printing WARNING To prevent damage to your machine do not connect any device other than a digital camera or USB Flash memory drive to the USB direct interface DPOF printing 6 DPOF stands for Digital Print Order Format Major digital camera manufacturers Canon Inc Eastman Kodak Company Fuji Photo Film Co Ltd Matsushita Electric Industria...

Page 57: ...ase refer to the documentation supplied with your camera for detailed information such as how to switch from PictBridge mode to USB mass storage mode Printing Images 6 Note Remove any memory cards or USB Flash memory drive from the machine before connecting a digital camera a Make sure that your camera is turned off Connect your camera to the USB direct interface 1 on the machine using the USB cab...

Page 58: ...ms Out of Memory This message will appear if you are working with images that are too large for the machine s memory Unusable Device This message will appear if you connect a camera which is not in PictBridge mode nor using the USB Mass Storage standard This message can also appear if you connect a broken device to the USB direct interface For more detailed solutions see Error messages on page 66 ...

Page 59: ...Section IV Software IV Software and Network features 52 ...

Page 60: ...ve not installed the software see Viewing Documentation on page 3 a From the Start menu point to Brother DCP XXXX where XXXX is your model number from the programs group then click User s Guides in HTML format b Click SOFTWARE USER S GUIDE or NETWORK USER S GUIDE from the top menu c Click the heading you would like to read from the list at the left of the window For Macintosh a Make sure your Maci...

Page 61: ...Section V Appendixes V Safety and Legal 54 Troubleshooting and Routine Maintenance 62 Menu and Features 80 Specifications 90 Glossary 101 ...

Page 62: ...machine on carpet DO NOT put the machine near heaters air conditioners refrigerators medical equipment chemicals or water DO NOT expose the machine to direct sunlight excessive heat moisture or dust DO NOT connect your machine to electrical sockets controlled by wall switches or automatic timers Disruption of power can wipe out information in the machine s memory DO NOT connect your machine to ele...

Page 63: ...he inside of the machine make sure you have unplugged the power cord from the electrical socket Doing this will prevent an electrical shock DO NOT handle the plug with wet hands Doing this may cause an electrical shock DO NOT pull in the middle of the AC power cord Doing this may cause an electrical shock DO NOT put your hands on the edge of the machine under the document cover or the scanner cove...

Page 64: ... the edge of the paper tray under the output paper tray cover Doing this may cause injury DO NOT touch the paper feed roller Doing this may cause injury DO NOT touch the area shaded in the illustration Doing this may cause injury ...

Page 65: ... strong smells immediately turn off the power switch and unplug the machine from the electrical socket Call your Brother dealer or Brother Customer Service If metal objects water or other liquids get inside the machine immediately turn off the power switch and unplug the machine from the electrical socket Call your Brother dealer or Brother Customer Service WARNING This product must be installed n...

Page 66: ...h this machine 10 This product is equipped with a 3 wire grounded plug a plug having a third grounded pin This plug will only fit into a grounded power outlet This is a safety feature If you are unable to insert the plug into the outlet call your electrician to replace your obsolete outlet DO NOT defeat the purpose of the grounded plug 11 DO NOT allow anything to rest on the power cord DO NOT plac...

Page 67: ...s not imply that the power is grounded and that the installation is completely safe For your safety if in any doubt about the effective grounding of the power consult a qualified electrician Wiring information for U K only A Important If you need to replace the plug fuse fit a fuse that is approved by ASTA to BS1362 with the same rating as the original fuse Always replace the fuse cover Never use ...

Page 68: ...ies if in doubt about a particular item or document The following are examples of documents which may not be copied Money Bonds or other certificates of indebtedness Certificates of Deposit Armed Forces Service or Draft papers Passports Postage Stamps cancelled or uncancelled Immigration Papers Welfare documents Cheques or Drafts drawn by Governmental Agencies Identification Documents badges or in...

Page 69: ...l Business Machine Corporation CompactFlash is a registered trademark of SanDisk Corporation Memory Stick is a registered trademark of Sony Corporation SanDisk is a licensee of the SD and miniSD trademarks MultiMediaCard is a trademark of Infineon Technologies and licensed to the MultiMediaCard Association xD Picture Card is a trademark of Fujifilm Co Ltd Toshiba Corporation and Olympus Optical Co...

Page 70: ... quality Check the print quality See Checking the print quality on page 76 Make sure that the Media Type setting in the printer driver or the Paper Type setting in the machine s menu matches the type of paper you are using See Printing for Windows or Printing and Faxing for Macintosh in the Software User s Guide on the CD ROM Make sure that your ink cartridges are fresh The following may cause ink...

Page 71: ...slow Try changing the printer driver setting The highest resolution needs longer data processing sending and printing time Try the other quality settings in the printer driver Basic tab Also click the Settings and make sure you uncheck Colour Enhancement Turn the borderless feature off Borderless printing is slower than normal printing See Printing for Windows or Printing and Faxing for Macintosh ...

Page 72: ...e is turned On and connected to your computer This will allow you to access all the functions of FaceFilter Studio PhotoCapture Center Difficulties Difficulty Suggestions Removable Disk does not work properly 1 Have you installed the Windows 2000 update If not do the following 1 Unplug the USB cable 2 Install the Windows 2000 update using one of the following methods Install MFL Pro Suite from the...

Page 73: ... the CD ROM for more information The network scanning feature does not work For Windows users only Firewall settings on your PC may be rejecting the necessary network connection Follow the instructions below to configure the Firewall If you are using a personal Firewall software see the User s Guide for your software or contact the software manufacturer For Windows XP SP2 and Windows Vista users s...

Page 74: ...oportions of your photo are irregular so effects could not be added Choose a regularly proportioned image Image Too Small The size of your photo is too small to trim Choose a larger image Ink Empty One or more of the ink cartridges are empty The machine will stop all print operations Replace the empty ink cartridges See Replacing the ink cartridges on page 70 Low Temperature The print head is too ...

Page 75: ...n the document Delete unused files from your memory card or USB flash memory drive to make some free space and then try again Paper Jam Paper is jammed in the machine Remove the Jam Clear Cover at the back of the machine and pull out the jammed paper See Printer jam or paper jam on page 68 Unable to Clean XX Unable to Init XX Unable to Print XX Unable to Scan XX The machine has a mechanical proble...

Page 76: ...o see the next step and d to go backward If you do not press a key after 1 minute the animation starts running automatically again Note You can press d c or OK to pause the auto animation and go back to step by step mode Printer jam or paper jam B Take out the jammed paper depending on where it is jammed in the machine Open and close the scanner cover to clear the error a Pull the paper tray 1 out...

Page 77: ...down as shown in the illustration You may damage the cover and cause paper jams d Put the Jam Clear Cover back on Make sure the cover is set properly e Lift the scanner cover 1 from the front side of the machine until it locks securely into the open position Make sure that there is no jammed paper left inside the machine Check both ends of the print carriage 1 1 ...

Page 78: ...s equipped with an ink dot counter The ink dot counter automatically monitors the level of ink in each of the 4 cartridges When the machine detects an ink cartridge is running out of ink the machine will tell you with a message on the LCD The LCD will tell you which ink cartridge is low or needs replacing Be sure to follow the LCD prompts to replace the ink cartridges in the correct order Even tho...

Page 79: ...cartridge d Remove the protective yellow cap 1 Improper Setup DO NOT touch the area shown in the illustration below Note If the protective yellow caps come off when you open the bag the cartridge will not be damaged e Each colour has its own correct position Insert the ink cartridge in the direction of the arrow on the label f Lift the lock release lever and push it until it clicks and then close ...

Page 80: ...etergent at once If you mix the colours by installing an ink cartridge in the wrong position clean the print head several times after correcting the cartridge installation Once you open an ink cartridge install it in the machine and use it up within six months of installation Use unopened ink cartridges by the expiration date written on the cartridge package DO NOT dismantle or tamper with the ink...

Page 81: ...he machine as follows B a Pull the paper tray 1 completely out of the machine b Wipe the outside of the machine with a soft cloth to remove dust c Lift the output paper tray cover and remove anything that is stuck inside the paper tray d Wipe the inside and outside of the paper tray with a soft cloth to remove dust e Close the output paper tray cover and put the paper tray firmly back in the machi...

Page 82: ...ely into the open position b Clean the machine printer platen 1 and the area around it wiping off any scattered ink with a soft dry lint free cloth Cleaning the paper pick up roller B a Pull the paper tray completely out of the machine b Unplug the machine from the electrical socket and remove the Jam Clear Cover 1 CAUTION DO NOT place the jam clear cover face down as shown in the illustration You...

Page 83: ... you get a horizontal line in the text or graphics on your printed pages You can clean Black only three colours at a time Yellow Cyan Magenta or all four colours at once Cleaning the print head consumes ink Cleaning too often uses ink unnecessarily CAUTION DO NOT touch the print head Touching the print head may cause permanent damage and may void the print head s warranty a Press Ink Management b ...

Page 84: ...urs Press Yes or No h The LCD asks you if you want to start cleaning Press Yes The machine starts cleaning the print head i After cleaning is finished press Colour Start The machine starts printing the Print Quality Check Sheet again and then returns to step e j Press Stop Exit If you repeat this procedure at least five times and the print quality is still poor replace the ink cartridge for the cl...

Page 85: ...est matches press Yes to finish Alignment Check and go to step h If another test print number is a better match for either 600 dpi or 1200 dpi press No to choose it f For 600 dpi press d or c to choose the number of the test print that most closely matches the number 0 sample 1 8 Press OK g For 1200 dpi press d or c to choose the number of the test print that most closely matches the number 0 samp...

Page 86: ...your warranty CAUTION It is important to allow the machine to park the print head after a print job Listen carefully to the machine before unplugging it to make sure that all mechanical noise has stopped Not allowing the machine to finish this parking process may lead to print problems and possible damage to the print head a Open the ink cartridge cover b Pull the lock release levers down and take...

Page 87: ...ical socket e Using both hands use the plastic tabs on both sides of the machine to lift the scanner cover until it locks securely into the open position Then unplug the interface cable from the machine if it is connected f Lift the scanner cover to release the lock 1 Gently push the scanner cover support down 2 and close the scanner cover 3 g Wrap the machine in the bag and put it in the original...

Page 88: ...ogram your machine All you need to do is follow the instructions as they guide you through the menu selections and programming options Menu table C You can program your machine by using the Menu table that begins on page 81 These pages list the menu selections and options Mode and menu keys C Menu and Features C Access the main menu PhotoCapture menu or Scan menu a b Scroll through the current men...

Page 89: ...pe of paper in the paper tray 20 Paper Size Letter Legal A4 A5 10x15cm Sets the size of the paper in the paper tray 20 LCD Settings LCD Contrast Light Med Dark Adjusts the contrast of the LCD 21 Backlight Light Dark You can adjust the brightness of the LCD backlight 21 Dim Timer Off 10Secs 20Secs 30Secs You can set how long the LCD backlight stays on for after the last key press 22 Off Timer Off 1...

Page 90: ... Gateway address Node Name BRN_XXXXXX You can see the current Node name WINS Config Auto Static Chooses the WINS configuration mode WINS Server Primary 000 000 000 000 Secondary 000 000 000 000 Specifies the IP address of the primary or secondary server DNS Server Primary 000 000 000 000 Secondary 000 000 000 000 Specifies the IP address of the primary or secondary server APIPA On Off Automaticall...

Page 91: ...Gateway 000 255 000 255 000 255 000 255 Enter the Gateway address Node Name BRW_XXXXXX You can see the current Node name WINS Config Auto Static Chooses the WINS configuration mode WINS Server Primary 000 000 000 000 Secondary 000 000 000 000 Specifies the IP address of the primary or secondary server DNS Server Primary 000 000 000 000 Secondary 000 000 000 000 Specifies the IP address of the prim...

Page 92: ...tatus You can see the current wireless network status Signal You can see the current wireless network signal strength SSID You can see the current SSID Comm Mode You can see the current Communication Mode Network I F Wired LAN WLAN You can choose the network connection type Factory Reset Yes No Restores all wired and wireless network settings to the factory default Level1 Level2 Level3 Level4 Opti...

Page 93: ... Language English French German Dutch Italian Allows you to change the LCD language for your country SeeQuick Setup Guide The factory settings are shown in Bold with an asterisk Level 1 Level 2 Level 3 Options Descriptions Page Quality Fast Normal Best Choose the Copy resolution for your type of document 25 Enlarge Reduce 50 69 A4iA5 78 LGLiLTR 83 LGLiA4 93 A4iLTR 97 LTRiA4 100 104 EXEiLTR 142 A5i...

Page 94: ...f copies 27 Contrast Adjusts the contrast of copies 27 RED Adjust Adjusts the amount of Red in copies 27 GREEN Adjust Adjusts the amount of Green in copies BLUE Adjust Adjusts the amount of Blue in copies Page Layout Off 1 in 1 2 in 1 P 2 in 1 L 4 in 1 P 4 in 1 L Poster 3 x 3 You can make N in 1 or Poster copies 26 Level 1 Level 2 Level 3 Options Descriptions Page The factory settings are shown in...

Page 95: ...le You can print an individual image 34 Photo Effects Auto Correct Enhance Skin Tone Enhance Scenery Remove Red Eye Monochrome Sepia See the print settings in the following table You can adjust your photos with these settings 35 Search by Date You can search your photos from date 38 Print All Photos See the print settings in the following table You can print all photos in your media card or USB Fl...

Page 96: ...x 13cm 20 x 15cm Max Size Choose the paper and print size 42 Brightness Does not appear when Photo Effects is chosen Adjusts the brightness 43 Contrast Does not appear when Photo Effects is chosen Adjusts the contrast 43 Color Enhance Does not appear when Photo Effects is chosen On Off White Balance Adjusts the hue of the white areas 43 Sharpness Enhances the detail of the image Color Density Adju...

Page 97: ...ent into your E mail application See Software User s Guide on the CD ROM Scan to Image You can scan a colour picture into your graphics application Scan to OCR You can have your text document converted to an editable text file Scan to File You can scan a monochrome or a colour document into your computer Scan to Media when a memory card or USB Flash memory drive is inserted Color 150 dpi Color 300...

Page 98: ... liquid crystal display 83 8 mm Colour LCD Power Source AC 220 to 240V 50 60Hz Power Consumption Power Save Mode Standby Operating Average 7 W Average 9 W Average 23 W Dimensions Weight 7 3 kg Noise Operating 50 dB or less 1 Temperature Operating Best Print Quality 10 to 35 C 20 to 33 C Humidity Operating Best Print Quality 20 to 80 without condensation 20 to 80 without condensation 398 mm 150 mm ...

Page 99: ...l Executive A4 A5 A6 JIS B5 envelopes commercial No 10 DL C5 Monarch JE4 Photo 2L Index card and Post card 3 Width 89 mm 3 5 in 216 mm 8 5 in Height 127 mm 5 0 in 356 mm 14 0 in For more details see Paper weight thickness and capacity on page 13 Maximum paper tray capacity Approx 100 sheets of 80 g m2 plain paper Photo Paper Tray Paper type Plain paper inkjet paper coated paper and glossy paper 2 ...

Page 100: ...dth Max 215 9mm Scanner Glass Height Max 297 mm Copy Width Max 210 mm Copy Speed Monochrome Up to 22 pages minute A4 paper 1 Colour Up to 20 pages minute A4 paper 1 Multiple Copies Stacks up to 99 pages Enlarge Reduce 25 to 400 in increments of 1 Resolution Monochrome Scans up to 600 1200 dpi Prints up to 1200 1200 dpi Colour Scans up to 600 1200 dpi Prints up to 600 1200 dpi ...

Page 101: ...tible Media 1 CompactFlash Type I only Microdrive is not compatible Compact I O cards such as Compact LAN card and Compact Modem card are not supported Memory Stick Memory Stick Pro Memory Stick Duo with adapter MultiMediaCard SecureDigital 2 miniSD with adapter xD Picture Card 3 USB Flash memory drive 4 Resolution Up to 1200 2400 dpi File Extension Media Format Image Format DPOF EXIF DCF Photo Pr...

Page 102: ...94 PictBridge D Compatibility Supports the Camera Imaging Products Association PictBridge standard CIPA DC 001 Visit http www cipa jp pictbridge for more information Interface USB direct interface ...

Page 103: ...Compliant Yes Windows 2000 Professional XP XP Professional x64 Edition Windows Vista Mac OS X 10 2 4 or greater WIA Compliant Yes Windows XP 1 Windows Vista Colour Depth 36 bit colour Processing Input 24 bit colour Processing Output Actual Input 30 bit colour Actual Output 24 bit colour Resolution Up to 19200 19200 dpi interpolated 2 Up to 600 2400 dpi optical Scanning Speed Colour up to 6 02 sec ...

Page 104: ...ition Windows Vista driver supporting Brother Native Compression mode Mac OS X 10 2 4 or greater Brother Ink Driver Resolution Up to 1200 6000 dpi 1200 2400 dpi 1200 1200 dpi 600 600 dpi 600 300 dpi 600 150 dpi Print Speed Monochrome Up to 30 pages minute 1 Colour Up to 25 pages minute 1 Printing Width 204 mm 216 mm 2 Disk Based Fonts 35 TrueType Windows only Borderless Letter A4 A6 Photo 10 15cm ...

Page 105: ...s a USB 1 1 interface 2 Third party USB ports are not supported for Macintosh 3 See the Network User s Guide on the CD ROM for detailed network specification USB A USB 2 0 interface cable that is no longer than 2 0 m 1 2 LAN cable 3 Ethernet UTP cable category 5 or greater Wireless LAN Your machine supports IEEE 802 11b g wireless communication with your wireless LAN using Infrastructure mode or a...

Page 106: ...r 1GB 1 1GB Mac 5 OS X 10 2 4 or greater Printing Scanning Removable Disk 3 USB 2 10 100 BASE TX Wireless 802 11 b g PowerPC G4 G5 Intel Core Solo Duo PowerPC G3 350MHz 256MB 480MB Conditions 1 Microsoft Internet Explorer 5 5 or greater 2 Third party USB ports are not supported 3 Removable disk is a function of PhotoCapture Center 4 PaperPort 11SE supports Microsoft SP4 or higher for Windows 2000 ...

Page 107: ... print may change depending on how often you use the machine and how many pages you print with each use The machine will automatically and periodically clean the print head assembly a process that uses a small amount of ink When the machine identifies a cartridge as empty there may be a small amount of ink left in it This is necessary to prevent air from drying out and damaging the print head asse...

Page 108: ...2000 Professional XP XP Professional x64 Edition Windows Vista Mac OS X 10 2 4 or greater Ethernet 10 100 BASE TX Auto Negotiation Wired LAN IEEE 802 11 b g Wireless LAN Protocols TCP IP ARP RARP BOOTP DHCP APIPA Auto IP NetBIOS Name Resolution WINS DNS Resolver LPR LPD Custom Raw Port Port9100 FTP Server mDNS Web Services TELNET SNMP TFTP LLTD Network Security SSID ESSID 128 104 64 40 bit WEP WPA...

Page 109: ... the machine that shows interactive messages during On Screen Programming Menu mode Programming mode for changing your machine s settings OCR optical character recognition The bundled ScanSoft PaperPort 11SE with OCR or Presto PageManager software application converts an image of text to text you can edit PhotoCapture Center Allows you to print digital photos from your digital camera at high resol...

Page 110: ...fault 28 single 24 using scanner glass 9 D Direct printing from a non PictBridge camera 49 from a PictBridge camera 47 Document loading 9 E Envelopes 12 16 17 Error messages on LCD 66 Ink Empty 66 Near Empty 66 No Paper Fed 67 Out of Memory 67 Unable to Change 67 Unable to Clean 67 Unable to Init 67 Unable to Print 67 Unable to Scan 67 G Greyscale 95 H Help LCD messages 80 using Menu keys 80 Menu ...

Page 111: ... DPOF printing 40 from PC See Software User s Guide on the CD ROM Memory Stick Pro 30 Memory Stick 30 MultiMediaCard 30 Photo Effects Auto Correct 35 Enhance Scenery 36 Enhance Skin Tone 36 Monochrome 37 Remove Red Eye 37 Sepia 38 Preview photos 33 Print settings Brightness 43 Colour enhancement 43 Contrast 43 Paper type size 42 Quality 41 42 Return to factory setting 44 Set new default 44 Printin...

Page 112: ... Serial Number how to find See inside front cover Shipping the machine 78 T Transparencies 10 11 13 91 Troubleshooting 62 checking ink volume 77 error messages on LCD 66 if you are having difficulty copying 64 Network 65 PhotoCapture Center 64 printing 62 scanning 64 software 64 paper jam 68 print quality 76 W Windows See Software User s Guide on the CD ROM Wireless Network DCP 770CW only See Quic...

Page 113: ... World Wide Web http www brother com This machine is approved for use in the country of purchase only Local Brother companies or their dealers will only support machines purchased in their own countries UK IRE GEN SAF ...

Reviews: