5-134
Confidential
9.10.3
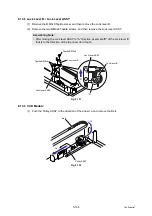
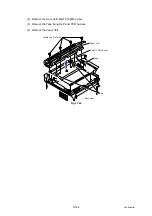
Lock Lever B / Lock Lever ASSY
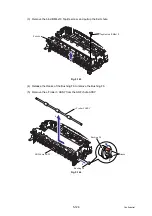
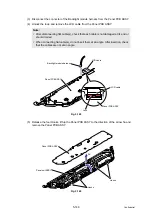
(1) Remove the B M3x6 Taptite screw, and then remove the Lock lever B.
(2) Remove the two B M3x6 Taptite screws, and then remove the Lock lever ASSY.
Fig. 5-151
9.10.4
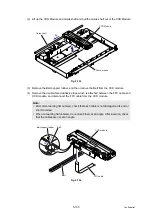
CCD Module
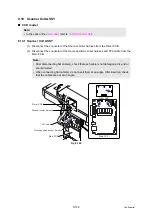
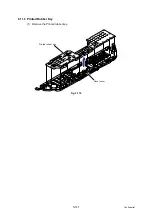
(1) Push the Pulley ASSY to the direction of the arrow 1a and remove the Belt.
Fig. 5-152
Assembling Note:
• After moving the Lock lever ASSY to "A" direction, assemble "B" of the Lock lever B
that is to the direction of the top cover rib in touch.
Taptite B M3x6
Taptite B M3x6
Lock lever ASSY
Lock lever ASSY
Lock lever B
Lock lever B
"A"
"B"
Belt
1a
1b
Pulley ASSY
Summary of Contents for DCP 8085DN
Page 13: ...CHAPTER 1 SPECIFICATIONS ...
Page 52: ...Confidential CHAPTER 2 THEORY OF OPERATION ...
Page 69: ...2 16 Confidential 3 3 Paper Feeding Fig 2 18 LT path DX path MP path Paper tray path ...
Page 89: ...CHAPTER 3 ERROR INDICATION AND TROUBLESHOOTING ...
Page 178: ...Confidential CHAPTER 4 PERIODICAL MAINTENANCE ...
Page 248: ...CHAPTER 5 DISASSEMBLY REASSEMBLY ...
Page 265: ...5 12 Confidential Fig 5 7 EM2 4 places Separation pad ASSY ...
Page 501: ...Confidential CHAPTER 6 ADJUSTMENTS AND UPDATING OF SETTINGS REQUIRED AFTER PARTS REPLACEMENT ...
Page 507: ...6 5 Confidential 8 Alert warning message of WHQL appears Click Continue Anyway to proceed ...
Page 516: ...CHAPTER 7 SERVICE MODE ...
Page 525: ...7 7 Confidential For color scanning Fig 7 2 ...
Page 527: ...7 9 Confidential For white and black scanning Fig 7 3 ...
Page 528: ...7 10 Confidential For color scanning Fig 7 4 ...
Page 567: ...Confidential CHAPTER 8 CIRCUIT DIAGRAMS WIRING DIAGRAM ...
Page 569: ...8 1 Confidential 1 CIRCUIT DIAGRAMS High voltage Power Supply PCB Circuit Diagram Fig 8 1 ...
Page 570: ...8 2 Confidential LVPS PCB Circuit Diagram 230V Fig 8 2 ...
Page 571: ...8 3 Confidential LVPS PCB Circuit Diagram 115V Fig 8 3 ...


