background image

Routine maintenance 

37

A

Setting the date and 

time

A

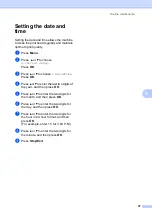
Setting the date and time allows the machine 
to clean the print head regularly and maintain 
optimum print quality.

a

Press 

Menu

.

b

Press  

a

 or 

b

 to choose 

0.Initial Setup

.

Press 

OK

.

c

Press 

a

 or 

b

 to choose 

1.Date&Time

.

Press 

OK

.

d

Press 

a

 or 

b

 to enter the last two digits of 

the year, and then press 

OK

.

e

Press 

a

 or 

b

 to enter the two digits for 

the month, and then press 

OK

.

f

Press 

a

 or 

b

 to enter the two digits for 

the day, and then press 

OK

.

g

Press 

a

 or 

b

 to enter the two digits for 

the hour in 24-hour format, and then 
press 

OK

.

(For example, enter 1 5 for 3:00 P.M.)

h

Press 

a

 or 

b

 to enter the two digits for 

the minute, and then press 

OK

.

i

Press 

Stop/Exit

.

Summary of Contents for DCP-J100

Page 1: ...Basic User s Guide DCP J100 DCP J105 Version 0 ASA SAF ...

Page 2: ...l number Serial Number 1 Date of Purchase Place of Purchase 1 The serial number is on the back of the unit Retain this User s Guide with your sales receipt as a permanent record of your purchase in the event of theft fire or warranty service Register your product on line at http www brother com registration 2014 Brother Industries Ltd All rights reserved ...

Page 3: ...ware and Network User s Guide 1 This Guide provides instructions for Scanning Printing and other operations that can be performed by connecting your Brother machine to a computer You can also find useful information about using the Brother ControlCenter utility using your machine in a network environment and frequently used terms HTML file CD ROM AirPrint Guide 3 This Guide provides information fo...

Page 4: ...h 5 Control panel overview 6 Warning LED indications 8 LCD display 8 LCD Contrast 8 2 Loading paper 9 Loading paper and other print media 9 Loading envelopes 12 Unprintable area 14 Paper settings 15 Paper Type 15 Paper Size 15 Acceptable paper and other print media 16 Recommended print media 16 Handling and using print media 16 Choosing the right print media 18 3 Loading documents 19 How to load d...

Page 5: ...nner glass 34 Cleaning the print head 34 Checking the print quality 35 Checking the print alignment 36 Setting the date and time 37 B Troubleshooting 38 Identifying your problem 38 Error and maintenance messages 39 Printer jam or paper jam 44 If you are having difficulty with your machine 52 Machine Information 58 Checking the serial number 58 Checking the firmware version 58 Reset functions 58 Ho...

Page 6: ...iv D Specifications 71 General 71 Print media 73 Copy 74 Scanner 75 Printer 76 Interfaces 77 Network DCP J105 78 Computer requirements 79 Consumable items 80 E Index 81 ...

Page 7: ...CP model LCD Mode Timer MFC models only 2 Security features MFC models only TX Lock 3 Sending a fax MFC models only Additional sending options Additional sending operations 4 Receiving a fax MFC models only Memory Receive Monochrome only Additional receiving operations 5 Dialling and storing numbers MFC models only Additional dialling operations Additional ways to store numbers 6 Printing reports ...

Page 8: ...vi ...

Page 9: ... topic Courier New Text in the Courier New font identifies messages on the LCD of the machine WARNING WARNING indicates a potentially hazardous situation which if not avoided could result in death or serious injuries CAUTION CAUTION indicates a potentially hazardous situation which if not avoided may result in minor or moderate injuries IMPORTANT IMPORTANT indicates a potentially hazardous situati...

Page 10: ...Scanner and Network features When you are ready to learn detailed information about these operations you can read the Advanced User s Guide and Software and Network User s Guide in HTML format that are on the CD ROM Viewing User s Guides 1 Windows 1 Windows XP Windows Vista Windows 7 Windows Server 2003 DCP J105 Windows Server 2008 DCP J105 Windows Server 2008 R2 DCP J105 Start All Programs select...

Page 11: ...language screen appears click your language The CD ROM Top Menu will appear d Click User s Guides e Click PDF HTML documents If the country screen appears choose your country After the list of User s Guides appears choose the guide you want to read Macintosh 1 a Turn on your Macintosh Insert the Brother CD ROM into your CD ROM drive The following window will appear b Double click the User s Guides...

Page 12: ...1 You can view and download these Guides from the Brother Solutions Center at http solutions brother com Click Manuals on your model s page to download the documentation AirPrint Guide DCP J105 1 This Guide provides information for using AirPrint to print from OS X v10 7 x 10 8 x and your iPhone iPod touch iPad or other iOS device to your Brother machine without installing a printer driver Google ...

Page 13: ...Center http www brother com creativecenter for FREE photo projects and printable downloads click Brother CreativeCenter To return to the top menu click Back or if you have finished click Exit Accessing Brother Support Macintosh 1 You can find all the contacts you will need such as web support Brother Solutions Center on the CD ROM Double click the Brother Support icon The following screen will app...

Page 14: ...ou can quickly and easily select temporary settings for copying 2 Menu keys Menu Lets you access the main menu a or b Press to scroll through the menus and options OK Lets you select a setting 3 SCAN Lets you access Scan mode 4 Start keys Mono Start Lets you start making copies in monochrome Also lets you start a scanning operation in colour or mono depending on the scan setting in the ControlCent...

Page 15: ...fe provide the best ink cartridge economy and maintain print quality you should keep your machine connected to the power at all times 6 Stop Exit Stops an operation or exits from a menu 7 Warning LED Blinks in orange when the LCD displays an error or an important status message 8 LCD Liquid Crystal Display Displays messages on the screen to help you set up and use your machine 2 6 3 4 5 ...

Page 16: ...up Press OK c Press a or b to choose 2 LCD Contrast Press OK d Press a or b to choose Light or Dark Press OK e Press Stop Exit LED DCP status Description Off Ready The DCP is ready for use Orange Cover open The cover is open Close the cover See Error and maintenance messages on page 39 Cannot print Replace the ink cartridge with a new one See Replacing the ink cartridges on page 31 Paper error Put...

Page 17: ...se it and then close the paper support 2 When you load a different paper size in the tray you will need to change the Paper Size setting in the menu of the machine at the same time See Paper Size on page 15 b Lift the output paper tray cover 1 c Gently press and slide the paper width guides 1 and then the paper length guide 2 to fit the paper size Make sure that the triangular marks 3 on the paper...

Page 18: ...ently put the paper into the paper tray print side down and top edge in first Check that the paper is flat in the tray IMPORTANT Be careful not to push the paper in too far it may lift at the back of the tray and cause paper feed problems NOTE If you want to add paper before the tray is empty remove the paper from the tray and combine it with the paper you are adding Always fan the stack of paper ...

Page 19: ...r g Close the output paper tray cover h Slowly and firmly push the paper tray completely into the machine i While holding the paper tray in place pull out the paper support 1 until it locks into place and then unfold the paper support flap 2 IMPORTANT DO NOT use the paper support flap for Legal size paper Only available for some countries 1 2 1 ...

Page 20: ...orrectly That are of a baggy construction That have windows That are embossed have raised writing on them That have clasps or staples That are pre printed on the inside Occasionally you may experience paper feed problems caused by the thickness size and flap shape of the envelopes you are using Loading envelopes 2 a Before loading press the corners and sides of envelopes to make them as flat as po...

Page 21: ...de 2 to fit the size of the envelopes If you have problems printing on envelopes with the flap on the short edge try the following 2 a Open the envelope flap b Put the envelope into the paper tray with the address side down and the flap positioned as shown in the illustration c Select Reverse Print Windows or Reverse page orientation Macintosh in the printer driver s dialog box and then adjust the...

Page 22: ... The machine can print in the shaded areas of cut sheet paper when the Borderless print feature is available and turned on See Software and Network User s Guide NOTE The Borderless print feature is not available for envelopes and 2 sided printing Cut Sheet Paper Envelopes Top 1 Left 2 Bottom 3 Right 4 Cut Sheet 3 mm 3 mm 3 mm 3 mm Envelopes 22 mm 3 mm 22 mm 3 mm 1 3 2 4 1 3 4 2 ...

Page 23: ...face up onto the paper tray at the front of the machine When you use transparencies or glossy paper remove each sheet at once to prevent smudging or paper jams Paper Size 2 You can use the following sizes of paper for copies A4 A5 Photo 10 15 cm Letter and Legal 1 When you change the size of paper you load in the machine you will need to change the Paper Size setting at the same time a Press Menu ...

Page 24: ...event smudging or paper jams Avoid touching the printed surface of the paper immediately after printing the surface may not be completely dry and may stain your fingers Recommended print media 2 To get the best print quality we suggest using the Brother paper in the table If Brother paper is not available in your country we recommend testing various papers before purchasing large quantities We rec...

Page 25: ...l may cause jams to occur Extremely shiny or highly textured paper Paper that cannot be arranged uniformly when stacked Short grain paper Paper capacity of the output paper tray cover 2 Up to 50 sheets of 80 gsm A4 paper Transparencies and photo paper must be picked up from the output paper tray cover one page at a time to avoid smudging 1 1 ...

Page 26: ... in Yes Cards Photo 10 15 cm 4 6 in Yes Yes Photo 2L 13 18 cm 5 7 in Yes Index Card 127 203 mm 5 8 in Yes Envelopes C5 Envelope 162 229 mm 6 4 9 in Yes DL Envelope 110 220 mm 4 3 8 7 in Yes Com 10 105 241 mm 4 1 8 9 1 2 in Yes Monarch 98 191 mm 3 7 8 7 1 2 in Yes Transparencies A4 210 297 mm 8 3 11 7 in Yes Yes Letter 215 9 279 4 mm 8 1 2 11 in Yes Yes Legal 1 215 9 355 6 mm 8 1 2 14 in Yes Yes A5...

Page 27: ...orted 3 How to load documents 3 a Lift the document cover b Using the document guidelines on the left and top place the document face down in the upper left corner of the scanner glass 1 document cover c Close the document cover IMPORTANT If you are scanning a book or thick document DO NOT slam the cover down or press on it Loading documents 3 Length Up to 297 mm Width Up to 215 9 mm Weight Up to ...

Page 28: ... area 3 The scannable area depends on the settings in the application you are using The figures show the unscannable areas Usage Document Size Top 1 Bottom 3 Left 2 Right 4 Copy All paper sizes 3 mm 3 mm Scan 1 mm 1 mm 1 3 2 4 ...

Page 29: ...ettings temporarily for the next copy use the Copy keys You can use different combinations of settings The machine returns to its default settings one minute after it finishes copying NOTE You can save some of the copy settings you use most often by setting them as the default You can find instructions on how to do this in the section for each feature Basic User s Guide For information about chang...

Page 30: ...4 If you are copying on paper other than A4 size you will need to change the Paper Size setting You can copy only on A4 A5 Photo 10 15 cm Letter or Legal 1 paper 1 Only available for some countries a Load your document b Enter the number of copies you want c Press Copy Options and a or b to choose Paper Size Press OK d Press a or b to choose the size of paper you are using Press OK e Press Mono St...

Page 31: ...plication choose the Print command c Choose the name of your machine in the Print dialog box and click Properties or Preferences depending on the application you are using d Choose the settings you want to change in the Properties dialog box Commonly used settings include Media Type Print Quality Paper Size Orientation Colour Greyscale Ink Save Mode Scaling 2 sided Booklet e Click OK f Click Print...

Page 32: ...using the Advanced Mode of ControlCenter4 ControlCenter4 is a software utility that lets you quickly and easily access the applications you use most often Using ControlCenter4 eliminates the need to manually launch specific applications a Load your document See How to load documents on page 19 b Windows XP Windows Vista and Windows 7 Open ControlCenter4 by clicking Start All Programs Brother DCP X...

Page 33: ...How to scan to a computer 25 6 c If the ControlCenter4 Mode screen appears choose the Advanced Mode and then click OK d Make sure the machine you want to use is selected from the Model drop down list ...

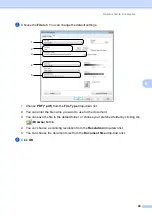
Page 34: ... Choose PDF pdf from the File Type drop down list 2 You can enter the file name you want to use for the document 3 You can save the file to the default folder or choose your preferred folder by clicking the Browse button 4 You can choose a scanning resolution from the Resolution drop down list 5 You can choose the document size from the Document Size drop down list f Click OK 1 2 4 5 3 ...

Page 35: ...How to scan to a computer 27 6 g Click the Scan tab h Click File i Click Scan The machine starts the scanning process The folder where the scanned data is saved will open automatically ...

Page 36: ...ms Brother DCP XXXX where XXXX is your model name ControlCenter4 The ControlCenter4 application will open Windows 8 Click Brother Utilities and then click the drop down list and select your model name if not already selected Click SCAN in the left navigation bar and then click ControlCenter4 The ControlCenter4 application will open b Make sure the machine you want to use is selected from the Model...

Page 37: ...t 2 You can enter the file name you want to use for the document 3 You can save the file to the default folder or choose your preferred folder by clicking the Browse button 4 You can choose a scanning resolution from the Resolution drop down list 5 You can choose the document size from the Document Size drop down list f Click OK 1 2 4 5 3 ...

Page 38: ... or b to choose Off Press OK Go to step g If you want to change the default settings go to step e e Press a or b to choose On Press OK f Choose the settings for Scan Type as required Press OK Repeat this step for the settings for Resolution File Type Scan Size and Remove Bkg Clr g Press Mono Start or Colour Start The machine starts the scanning process NOTE The following scan modes are available S...

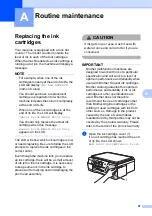
Page 39: ...to replace an ink cartridge there will be a small amount of ink left in the ink cartridge It is necessary to keep some ink in the ink cartridge to prevent air from drying out and damaging the print head assembly CAUTION If ink gets in your eyes wash it out with water at once and call a doctor if you are concerned IMPORTANT Brother multifunction machines are designed to work with ink of a particula...

Page 40: ...the colour indicated on the LCD and then take out the ink cartridge d Turn the green release lever on the orange protective packing 1 counterclockwise until it releases the vacuum seal Then remove the orange protective packing as shown IMPORTANT DO NOT shake the ink cartridges If ink gets on your skin or clothing immediately wash it off with soap or detergent 1 1 1 ...

Page 41: ...idge check that the ink cartridge is a brand new Brother Original cartridge and that it is installed correctly Remove the ink cartridge and reinstall it slowly and firmly until the cartridge lever lifts IMPORTANT DO NOT take out ink cartridges if you do not need to replace them If you do so it may reduce the ink quantity and the machine will not know the quantity of ink left in the cartridge DO NO...

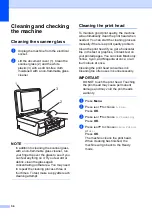
Page 42: ...To maintain good print quality the machine will automatically clean the print head when needed You can start the cleaning process manually if there is a print quality problem Clean the print head if you get a horizontal line in the text or graphics or blank text on your printed pages You can clean Black only Yellow Cyan and Magenta at once or all four colours at once Cleaning the print head consum...

Page 43: ...the quality of the four colour blocks on the sheet g The LCD asks you if the print quality is OK Do one of the following If all lines are clear and visible press a Yes to finish the Print Quality check and go to step k If you can see missing short lines as shown below press b to choose No h The LCD asks you if the print quality is OK for black and then the three colours Press a Yes or b No i The L...

Page 44: ...ing the Alignment Check Sheet f For the A pattern press a or b to choose the number of the test print that has the least visible vertical stripes 1 9 Press OK Repeat this step for the B C D and E patterns In the example number 6 is the best choice for A B C D and E g Press Stop Exit NOTE i When a print head nozzle is clogged the printed sample looks like this After the print head nozzle is cleaned...

Page 45: ...oose 1 Date Time Press OK d Press a or b to enter the last two digits of the year and then press OK e Press a or b to enter the two digits for the month and then press OK f Press a or b to enter the two digits for the day and then press OK g Press a or b to enter the two digits for the hour in 24 hour format and then press OK For example enter 1 5 for 3 00 P M h Press a or b to enter the two digit...

Page 46: ...ur problem and then go to the suggested page Paper handling and Printing problems Printing Difficulties on page 52 Print Quality Difficulties on page 54 Paper Handling Difficulties on page 55 Copying problems Copying Difficulties on page 56 Scanning problems Scanning Difficulties on page 56 Software and Network problems Software Difficulties on page 56 Network Difficulties DCP J105 on page 57 Trou...

Page 47: ...he paper type is set to Plain Paper you can make copies in monochrome Replace the ink cartridges See Replacing the ink cartridges on page 31 NOTE The machine will stop all print operations you cannot use the machine until a new ink cartridge is installed in the following cases If you unplug the machine or take out the ink cartridge If the paper type is set to anything except Plain Paper Windows If...

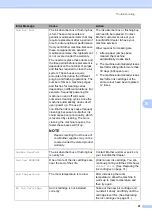
Page 48: ... closed position Firmly close the ink cartridge cover until it locks into place Cover is Open The scanner cover is not locked in the closed position Lift the scanner cover and then close it again Make sure the USB cable if used has been guided correctly through the cable channel and out the back of the machine Data Remaining Print data is left in the machine s memory Press Stop Exit The machine wi...

Page 49: ... the use of non Brother supplies may not be covered under the stated product warranty The ink absorber box or flushing box will need to be replaced Contact Brother customer service or your local Brother dealer to have your machine serviced Other reasons for cleaning are 1 After a paper jam has been cleared the machine automatically cleans itself 2 The machine automatically cleans itself after sitt...

Page 50: ...s See Advanced User s Guide Cleaning the paper pick up rollers The Jam Clear Cover is not closed correctly Make sure the Jam Clear Cover is closed evenly at both ends See Printer jam or paper jam on page 44 The paper is jammed in the machine Remove the jammed paper by following the steps in Printer jam or paper jam on page 44 If this error occurs often during 2 sided printing the paper feed roller...

Page 51: ... rollers See Advanced User s Guide Cleaning the paper pick up rollers Wrong Paper Size The Paper Size setting does not match the size of paper in the tray Or you did not set the paper guides in the tray to the indicators for the paper size you are using 1 Check that the Paper Size you choose matches the size of paper in the tray See Paper Size on page 15 2 Make sure you loaded the paper in a Portr...

Page 52: ...ctrical socket b Pull the paper tray 1 completely out of the machine c Pull the two green levers inside the machine towards you to release the jammed paper d Place both hands under the plastic tabs on both sides of the machine and lift the scanner cover into the open position e Pull the jammed paper 1 out of the machine 1 1 ...

Page 53: ... in the illustration 2 you cannot move it Re connect the power cord Hold down Stop Exit until the print head moves to the centre Then unplug the machine from the power source and take out the paper If the paper is jammed under the print head unplug the machine from the power source and then move the print head to take out the paper Hold the concave areas with the triangle marks shown in the illust...

Page 54: ...y inside the machine 1 for any pieces of paper h Look inside the machine from a lower angle and make sure there are no pieces of paper remaining i Open the Jam Clear Cover 1 at the back of the machine j Remove the jammed paper 1 1 ...

Page 55: ...lace pull out the paper support until it locks in the open position and then unfold the paper support flap Make sure you pull out the paper support until it locks into place IMPORTANT DO NOT use the paper support flap for Legal size paper Only available for some countries o Re connect the power cord NOTE If there is a repeat paper jam a small piece of paper may be stuck in the machine See Addition...

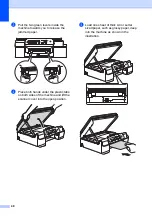
Page 56: ...elease the jammed paper d Place both hands under the plastic tabs on both sides of the machine and lift the scanner cover into the open position e Load one sheet of thick A4 or Letter sized paper such as glossy paper deep into the machine as shown in the illustration ...

Page 57: ...TANT DO NOT touch the encoder strip 1 Doing this may cause damage to the machine g Pull the thick paper out of the machine h Open the Jam Clear Cover 1 at the back of the machine i Load one sheet of thick A4 or Letter sized paper such as glossy paper deep into the machine as shown in the illustration 1 1 ...

Page 58: ...e to the machine k Pull the thick paper out of the machine l Close the Jam Clear Cover Make sure the cover is closed correctly m Lift the scanner cover 1 to release the lock Gently push the scanner cover support down 2 and close the scanner cover 3 using both hands CAUTION Be careful not to pinch your fingers when you close the scanner cover 1 2 3 1 ...

Page 59: ...Troubleshooting 51 B n Put the paper tray firmly back in the machine o Re connect the power cord ...

Page 60: ...e the printer Windows Vista and Windows Server 2008 DCP J105 Click Control Panel Hardware and Sound Printers Right click Brother DCP XXXX Printer where XXXX is your model name If the printer is offline it will show Use Printer Online Select this option to enable the printer Windows 7 and Windows Server 2008 R2 DCP J105 Click Devices and Printers Right click Brother DCP XXXX Printer where XXXX is y...

Page 61: ...he top and bottom of the page Adjust the top and bottom margins in your document to allow for this See Unprintable area on page 14 Cannot perform Page Layout printing Check that the paper size setting in the application and in the printer driver are the same Print speed is too slow Try changing the printer driver setting The highest resolution needs longer data processing sending and printing time...

Page 62: ...nal Innobella ink Try using the recommended types of paper See Acceptable paper and other print media on page 16 To prolong print head life provide the best ink cartridge economy and maintain print quality we do not recommend frequently unplugging the machine and or leaving the machine unplugged for extended periods of time We recommend using to power down the machine Using allows minimal power to...

Page 63: ...n the page Windows Check Reverse Order in the Basic tab of the printer driver The printouts are wrinkled Windows In the printer driver Advanced tab click Colour Settings and uncheck Bi Directional Printing Macintosh In the printer driver choose Print Settings click Advanced choose Other Print Options and uncheck Bi Directional Printing Make sure you are using Brother Original Innobella ink Paper H...

Page 64: ... the jam prevention settings 2 sided1 or 2 sided2 For more information see Software and Network User s Guide If paper jams occur often during 2 sided printing the paper feed rollers may be stained with ink Clean the paper feed rollers See Advanced User s Guide Cleaning the paper feed rollers Copying Difficulties Difficulty Suggestions Fit to Page does not work correctly Make sure your source docum...

Page 65: ...oftware or contact the software manufacturer Macintosh Select Other from the Model drop down list in the main screen of ControlCenter2 In the Device Selector window make sure Network is selected in Connection Type and then click Browse Reselect your network machine and press OK The Brother software cannot be installed Windows Allow network access to the following programs if your security software...

Page 66: ...ar on the LCD d Press Stop Exit Reset functions B The following reset functions are available 1 Machine Reset You can reset the machine s settings such as the Date and Time 2 Network DCP J105 You can reset the print server back to its factory settings such as the password and IP address information 3 All Settings You can restore all settings to the factory default Brother strongly recommends perfo...

Page 67: ... screen We have created step by step Settings tables so you can see all the available choices for each setting and feature at a glance You can use these tables to quickly choose your preferred settings in the machine Menu keys C Settings and features tables C Access the menu Scroll through the current menu level Go to the next menu level Accept an option Exit the menu or stop the current operation...

Page 68: ...nk 2 Copy 3 Network 4 Print Reports 5 Machine Info 0 Initial Setup c Press OK when that option appears on the LCD The LCD will then show the next menu level d Press a or b to scroll to choose the setting you want to change Press OK e Press a or b to choose the option you want Press OK The LCD will show Accepted f Press Stop Exit ...

Page 69: ...me nnnnnnn onnnnnn oonnnnn ooonnnn oooonnn ooooonn oooooon ooooooo Lets you check the available ink volume See 2 Copy 1 Paper Type Plain Paper Inkjet Paper Brother BP71 Other Glossy Transparency Sets the type of paper in the paper tray 15 2 Paper Size A4 A5 10x15cm Letter Legal Sets the size of the paper in the paper tray Legal is only available for some countries 15 3 Quality Normal Best Chooses ...

Page 70: ...ig Auto Static Chooses the WINS configuration mode 7 WINS Server Primary 000 000 000 000 Secondary 000 000 000 000 Specifies the IP address of the primary or secondary WINS server 8 DNS Server Primary 000 000 000 000 Secondary 000 000 000 000 Specifies the IP address of the primary or secondary DNS server 9 APIPA On Off Automatically allocates the IP address from the link local address range 2 WLA...

Page 71: ...ss from the control panel 8 WLAN Enable On Off Lets you use the wireless network connection 0 Network Reset Restores all network settings to the factory default Level1 Level2 Level3 Options Descriptions Page 3 Print Reports DCP J100 4 Print Reports DCP J105 1 User Settings Prints these lists and reports See 2 Network Config DCP J105 3 WLAN Report DCP J105 4 Machine Info DCP J100 5 Machine Info DCP...

Page 72: ...to the factory defaults such as the password and IP address information 2 All Settings DCP J100 3 All Settings DCP J105 a Reset b Exit Resets all the machine s settings back to the factory default 5 Auto Power Off Off 1hour 2hours 4hours 8hours When this feature is set to On the machine will turn itself off one hour after entering Sleep Mode When set to Off the machine will not power off automatic...

Page 73: ...miA4 186 10x15cmiLTR 141 A5iA4 100 97 LTRiA4 93 A4iLTR 83 69 A4iA5 47 A4i10x15cm You can choose the enlargement and reduction ratio See See Advanced User s Guide The default settings are shown in Bold with an asterisk Level1 Level2 Level3 Options Descriptions Page Normal Best Choose the Copy resolution See See Advanced User s Guide The default settings are shown in Bold with an asterisk ...

Page 74: ...l is only available for some countries 22 Density onnnn nonnn nnonn nnnon nnnno Adjusts the density See Stack Sort Stack Sort You can choose to stack or sort multiple copies Page Layout Off 1in1 2in1 P 2in1 L 2in1 ID 4in1 P 4in1 L Poster 3x3 You can make N in 1 or Poster copies Remove Bkg Clr Off Low Medium High Changes the amount of background colour that is removed See Advanced User s Guide The ...

Page 75: ...solution 100dpi 200dpi 300dpi 600dpi You can choose the scan resolution for your document File Type If you choose the Colour option in the Scan Type setting PDF JPEG If you choose the Mono option in the Scan Type setting PDF TIFF You can choose the file format for your document Scan Size A4 A5 10x15cm Business Card Letter You can choose the scan size for your document Remove Bkg Clr Off Low Medium...

Page 76: ...ution for your document File Type If you choose the Colour option in the Scan Type setting PDF JPEG If you choose the Mono option in the Scan Type setting PDF TIFF You can choose the file format for your document Scan Size A4 A5 10x15cm Business Card Letter You can choose the scan size for your document Remove Bkg Clr Off Low Medium High Changes the amount of background colour that is removed Leve...

Page 77: ...G If you choose the Mono option in the Scan Type setting PDF TIFF You can choose the file format for your document Scan Size A4 A5 10x15cm Business Card Letter You can choose the scan size for your document Remove Bkg Clr Off Low Medium High Changes the amount of background colour that is removed Web Service DCP J105 Appears when you install a Web Services Scanner which is displayed in your comput...

Page 78: ...lete and then press OK Inserting spaces C To enter a space press Number of Copies NOTE The characters that are available may differ depending on your country Making corrections C If you entered an incorrect number or letter and want to change it press Enlarge Reduce or Number of Copies several times to move the cursor under the incorrect character Then press a or b repeatedly to re enter the corre...

Page 79: ...turned off it will automatically turn itself on periodically for print head maintenance and then turn itself off Specifications D Printer Type Inkjet Print Head Mono Colour Piezo with 210 nozzles 1 Piezo with 70 nozzles 3 Memory Capacity 64 MB LCD Liquid Crystal Display 16 characters 1 line Power Source Taiwan AC 100 to 120 V 50 60 Hz For other countries AC 220 to 240V 50 60Hz Power Consumption 1 ...

Page 80: ...Operating 50 dB A Maximum 1 Temperature Operating Best Print Quality 10 to 35 C 20 to 33 C Humidity Operating Best Print Quality 20 to 80 without condensation 20 to 80 without condensation Document Size Scanner Glass Width Max 215 9 mm Scanner Glass Length Max 297 mm 161 mm 435 mm 374 mm 471 mm ...

Page 81: ...per Input Paper Tray D Paper type Plain Paper Inkjet Paper coated paper Glossy Paper 1 and Transparency 1 2 Paper size 3 A4 Legal 4 Executive Letter JIS B5 4 A5 A6 Envelopes Com 10 DL C5 Monarch Photo 10 15 cm Photo 2L 13 18 cm and Index Card 127 203 mm Width 98 mm 215 9 mm Length 148 mm 355 6 mm For more details see Paper weight thickness and capacity on page 18 Maximum paper tray capacity Approx...

Page 82: ...y D 1 When copying on A4 size paper Colour Monochrome Yes Yes Copy Width 204 mm 1 Multiple Copies Stacks Sorts up to 99 pages Enlarge Reduce 25 to 400 in increments of 1 Resolution Prints up to 1200 2400 dpi ...

Page 83: ...r Monochrome Yes Yes TWAIN Compliant Yes Windows XP 1 Windows Vista Windows 7 Windows 8 Mac OS X v10 6 8 10 7 x 10 8 x WIA Compliant Yes Windows XP 1 Windows Vista Windows 7 Windows 8 ICA Compliant Yes Mac OS X v10 6 8 10 7 x 10 8 x Colour Depth 30 bit colour Processing Input 24 bit colour Processing Output 256 levels per colour Greyscale 10 bit colour Processing Input 8 bit colour Processing Outp...

Page 84: ... each operation on page 18 3 When printing on A4 size paper 4 For detailed specifications visit http www brother com Resolution Up to 1200 6000 dpi Printing Width 3 204 mm 210 mm borderless 1 Borderless 2 A4 Letter A6 Photo 10 15 cm Index Card 127 203 mm Photo 2L 13 18 cm Print Speed 4 ...

Page 85: ...2 0 interface The machine can also be connected to a computer that has a USB 1 1 interface 2 Third party USB ports are not supported 3 DCP J105 only USB 1 2 A USB 2 0 interface cable that is no longer than 2 m Wireless LAN 3 IEEE 802 11b g n Infrastructure Ad hoc Mode ...

Page 86: ... software 1 See Computer requirements on page 79 2 Windows If you require more advanced printer management use the latest Brother BRAdmin Professional utility version that is available as a download from http solutions brother com Macintosh The latest Brother BRAdmin Light is available as a download from http solutions brother com Wireless Network Security SSID 32 characters WEP 64 128 bit WPA PSK...

Page 87: ...ows 7 1 Windows 8 1 650 MB Windows Server 2003 3 Windows Server 2003 R2 3 Windows Server 2008 3 N A Printing 50 MB N A Windows Server 2008 R2 3 Windows Server 2012 3 64bit x64 processor Macintosh Operating System Mac OS X v10 6 8 OS X v10 7 x OS X v10 8 x Printing Scanning Intel Processor 80 MB 550 MB Conditions 1 For WIA 1200 1200 resolution Using the Brother Scanner Utility enables to enhance up...

Page 88: ...539XLBK Super High Yield Yellow LC535XLY Super High Yield Cyan LC535XLC Super High Yield Magenta LC535XLM Black Approximately 2 400 pages 1 Yellow Cyan and Magenta Approximately 1 300 pages 1 1 Approx cartridge yield is declared in accordance with ISO IEC 24711 For more information about the replacement consumables visit us at http www brother com pageyield What is Innobella Innobella is a range o...

Page 89: ...nly 39 Cannot Detect 39 Cannot Print 39 Clean Unable 40 Cover is Open 40 Data Remaining 40 Init Unable 40 Ink Box Full 41 Ink Low 41 InkBox NearFull 41 No Ink Cartridge 41 No Paper Fed 42 Out of Memory 42 Paper Jam 43 Print Unable 40 Scan Unable 40 Wrong Paper Size 43 G Greyscale 75 H Help Menu Table 61 using menu keys 59 I Ink cartridges ink dot counter 31 replacing 31 Innobella 80 J Jams paper 4...

Page 90: ... 76 scan 75 S Scanning See Software and Network User s Guide Serial Number how to find See inside front cover Step by step Settings Tables 59 T Text entering 70 Transparencies 16 18 73 Troubleshooting error messages on LCD 39 if you are having difficulty copying 56 Network 57 paper handling 55 print quality 54 printing 52 scanning 56 software 56 maintenance messages on LCD 39 paper jam 44 U Unscan...

Page 91: ...om Visit us on the World Wide Web http www brother com This machine is approved for use in the country of purchase only Local Brother companies or their dealers will only support machines purchased in their own countries ...

Reviews: