background image

CHAPTER 6 TROUBLESHOOTING 


6-16

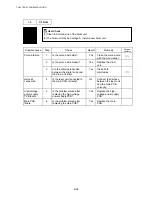
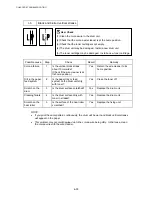
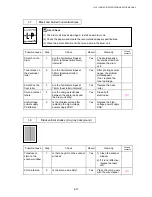
5.    SOFTWARE SETTING PROBLEMS 

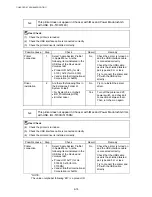
The printer may not print the data correctly if there are incorrect software settings.   


S-1 

“There was an error writing to LPT1: (or BRUSB) for the printer” error message 
appears. 


User Check 

(1)  Check that the printer cable is not damaged or broken.  Check also that the cable is connected 

to the correct interface connectors of both the printer and PC. 

(2)  Check that the correct printer is selected if you have an interface switching device. 

(3)  Check that the appropriate printer driver is selected as ‘Set as Default’.  Check also that the 

correct print port is set for the selected printer driver. 

(4)  Check that the printer is not connected to the same port which is also connected to a mass 

storage device or scanner.  Remove all other devices and connect the port to the printer only.  
Turn off the printer status monitor in the device options tab in the printer driver. 

(5)  If the print port is set as an ECP port, change it to a normal port. 

(6)  Try printing the test page referring to 

1.3 ‘INSPECTION MODE’

 in Chapter 7. 

(7)  Try resetting the factory settings. 


Possible cause 

Step

Check 

Result

Remedy


Failure inside 
the printer  

Is it possible to print the test 
page with the method of 

1.3. 

‘INSPECTION MODE’

 in  

Chapter 7?  

No 

Identify the error type, then 
refer to the specified section 
of this chapter. 

Main PCB 
failure 

Is it possible to print with 
another PC and printer cable? 

No 

Replace the main PCB. 


Yes 

This problem may appear 
under the specified system 
environment. Check the 
environment which the user 
used. 


Summary of Contents for HL-5130

Page 1: ...r Printer SERVICE MANUAL MODEL HL 5130 5140 5150D 5170DN Read this manual thoroughly before maintenance work Keep this manual in a convenient place for quick and easy reference at all times December 2003 SM PRN051 ...

Page 2: ...rks registered in the United States and other countries and TrueType is a trademark of Apple computer Inc Epson is a registered trademark and FX 80 and FX 850 are trademarks of Seiko Epson Corporation Hewlett Packard is a registered trademark and HP LaserJet is a trademark of Hewlett Packard Company IBM IBM PC and Proprinter are registered trademarks of International Business Machines Corporation ...

Page 3: ...rical circuits and their timing information CHAPTER 4 DISASSEMBLY AND RE ASSEMBLY Procedures for disassembling and re assembling the mechanical system CHAPTER 5 PERIODIC MAINTENANCE Periodical replacements parts consumable parts etc CHAPTER 6 TROUBLESHOOTING Reference values and adjustments troubleshooting image defects troubleshooting malfunctions etc CHAPTER 7 SERVICE SUPPORT SOFTWARE Test print...

Page 4: ...4 SERIAL NO DESCRIPTIONS 1 19 CHAPTER 2 INSTALLATION AND BASIC OPERATION 2 1 1 CONDITIONS REQUIRED FOR INSTALLATION 2 1 1 1 Power Supply 2 1 1 2 Environment 2 1 1 3 System Requirements for Brother Printer Solution for Windows 2 2 2 UNPACKING 2 3 3 INSTALL THE PRINTER 2 4 3 1 For All Users 2 4 3 1 1 Install the drum unit assembly 2 5 3 1 2 Load paper into the paper tray 2 5 3 1 3 Print a test page ...

Page 5: ... HL 5150D and HL 5170DN 2 35 6 NETWORK FUNCTIONS 2 36 6 1 LED functions 2 36 6 2 Network Factory default setting For HL 5170DN 2 36 7 PAPER TRAY INFORMATION FOR EUROPE ONLY 2 37 CHAPTER 3 THEORY OF OPERATION 3 1 1 ELECTRONICS 3 1 1 1 General Block Diagram 3 1 1 2 Main PCB Block Diagram 3 2 1 3 Main PCB 3 3 1 3 1 CPU 3 3 1 3 2 USB 3 5 1 3 3 IEEE 1284 3 6 1 3 4 Network Interface 3 7 1 3 5 ROM 3 8 1 ...

Page 6: ...rging 3 27 2 6 2 Exposure stage 3 28 2 6 3 Developing 3 29 2 6 4 Transfer 3 29 2 6 5 Fixing stage 3 30 CHAPTER 4 DISASSEMBLY AND RE ASSEMBLY 4 1 1 SAFETY PRECAUTIONS 4 1 2 DISASSEMBLY FLOW 4 2 3 DISASSEMBLY PROCEDURE 4 3 3 1 AC Cord 4 3 3 2 Drum Unit 4 3 3 3 Paper Tray 4 4 3 4 DX Feed ASSY 4 14 3 5 Access Cover 4 17 3 6 Rear Cover C 4 17 3 7 Outer Chute for HL 5130 5140 only 4 18 3 8 Rear Cover MP...

Page 7: ...leaning the Printer Exterior 5 14 3 2 Cleaning the Drum Unit 5 14 3 3 Cleaning the Scanner Window 5 15 3 4 Cleaning the Electrical Terminals 5 16 4 MTBF MTTR 5 17 CHAPTER 6 TROUBLESHOOTING 6 1 1 INTRODUCTION 6 1 1 1 Initial Check 6 1 1 2 Warnings for Maintenance Work 6 2 1 3 Identify the Problem 6 3 2 OPERATOR CALLS SERVICE CALLS 6 4 2 1 Operator Calls 6 4 2 2 Service Calls 6 5 3 ERROR MESSAGE 6 6...

Page 8: ...r Internet Print TCP IP Troubleshooting 6 52 9 10 Windows 95 98 Me 2000 XP IPP Troubleshooting 6 53 9 11 Novell Netware Troubleshooting 6 53 9 12 AppleTalk Troubleshooting 6 54 9 13 DLC LLC Troubleshooting 6 54 9 14 Web Browser Troubleshooting TCP IP 6 54 CHAPTER 7 SERVICE SUPPORT SOFTWARE 7 1 1 CONTROL PANEL 7 1 1 1 Test Print Mode 7 1 1 2 Service Mode 7 2 1 3 Inspection Mode 7 3 2 HOW TO KNOW DR...

Page 9: ...GRAM A 8 9 ENGINE PCB CIRCUIT DIAGRAM 1 2 A 9 10 ENGINE PCB CIRCUIT DIAGRAM 2 2 A 10 11 LOW VOLTAGE POWER SUPPLY PCB CIRCUIT DIAGRAM 120V A 11 12 LOW VOLTAGE POWER SUPPLY PCB CIRCUIT DIAGRAM 230V A 12 13 HIGH VOLTAGE POWER SUPPLY PCB CIRCUIT DIAGRAM A 13 14 HARNESS ROUTING A 14 ...

Page 10: ...fter August 2 1976 Compliance is mandatory for products marketed in the United States One of the following labels on the back of the printer indicates compliance with the FDA regulations and must be attached to laser products marketed in the United States The label for Japanese manufactured products MANUFACTURED K BROTHER INDUSTRIES LTD 15 1 Naeshiro cho Mizuho ku Nagoya 467 8561 Japan This produc...

Page 11: ... and laser unit Since the variable resistor in the laser unit is adjusted in accordance with the standards never touch it Caution Use of controls adjustments or performance of procedures other than those specified in this manual may result in hazardous radiation exposure For Finland and Sweden LUOKAN 1 LASERLAITE KLASS 1 LASER APPARAT Varoitus Laitteen käyttäminen muulla kuin tässä käyttöohjeessa ...

Page 12: ...amage the eyes Since the beam is invisible the following caution label is attached on the laser unit CAUTION INVISIBLE LASER RADIATION WHEN OPEN AND INTERLOCK DEFEATED AVOID DIRECT EXPOSURE TO BEAM CLASS 3B LASER PRODUCT ADVARSEL USYNLIG LASER STRÅLING NÅR KABINETLÅGET STÅR ÅBENT UNGDÅ DIREKTE UDSÆTTELSE FOR STRÅLING KLASSE 3B LASER VARNING OSYNLIG LASERSTRÅLNING NÄR DENNA DEL ÄR ÖPPNAD OCH SPÄRRA...

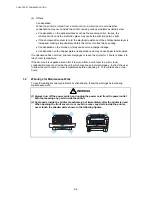
Page 13: ...low are the various kinds of WARNING messages included in this manual WARNING Always turn off the power switch and unplug the power cord from the power outlet before accessing any parts inside the printer WARNING Some parts inside the printer are extremely hot immediately after the printer is used When opening the front cover or back cover to access any parts inside the printer never touch the sha...

Page 14: ...paper size sleep mode gray scale adjustment resolution water mark and many layout functions You can easily setup these print options through the Printer Setup Menu Printer Status Monitor with Bi directional Parallel Interface The printer driver can monitor the status of your printer using bi directional parallel communications IEEE 1284 bi directional parallel printer cable is recommended The prin...

Page 15: ...btaining draft copies for proof reading You can select the toner saving economy mode through the Windows printer driver supplied with your printer Sleep Mode Power Save Mode Sleep mode automatically reduces power consumption when the printer is not in use for a certain period of time The printer consumes less than 5W HL 5130 5140 5150D 6W HL 5170DN when in sleep mode Low Running Cost Since the ton...

Page 16: ...HL 5130 5140 5150D 5170DN SERVICE MANUAL 1 3 Duplex printing HL 5150D HL 5170DN only This printer has duplex function as standard You can print on both sides of paper by using this function ...

Page 17: ...ap Face up Output Tray Front cover Control Panel HL 5170DN LED Light emitting Diode HL 5130 5140 Manual Feed Tray HL 5150D 5170DN Multi purpose Tray MP Tray Front Cover Release Button Power Switch Paper Tray Side Cover USB Interface Connector HL 5170DN 10 100Baser TX Port Parallel Interface Connector AC Power Connector Face down Output Tray Support Flap S Duplex Tray HL 5150D HL 5170DN ...

Page 18: ...mal Up to 17 pages minute A4 HL 5130 Up to 20 pages minute A4 HL 5140 5150D 5170DN Up to 18 pages minute Letter size paper HL 5130 Up to 21 pages minute Letter size paper HL 5140 5150D 5170DN Warm up Max 18 seconds at 23 C 73 4 F First print Max 10 seconds when loading A4 or Letter size paper from the standard paper tray Consumables Toner cartridge Life expectancy Standard cartridge 3 500 pages ca...

Page 19: ...intosh with USB printer driver Optional Macintosh driver available for System 6 0 7 or higher Interface Bi directional parallel Hi Speed USB 2 0 10 100 BaseTX Ethernet network interface optional for HL 5140 5150D standard for HL 5170DN Memory HL 5130 8 Mbytes HL 5140 5150D 16 Mbytes HL 5170DN 32 Mbytes Expandable up to 144 Mbytes for HL 5140 5150D and 160 Mbytes for HL 5170DN by installing an indu...

Page 20: ... 0 to 40 C 38 to 104 F Storage 20 to 40 C 4 to 104 F Humidity Operating 20 to 80 non condensing Storage 10 to 85 non condensing Dimensions 382 x 383 x 252 mm HL 5130 5140 W x D x H 15 0x 15 1 x 9 9 inches 382 x 401 x 252 mm HL 5150D 5170DN W x D x H 15 0x 15 8 x 9 9 inches When the lower tray is installed the total height printer lower tray will be 353mm Weight HL 5130 5140 Approx 10 5 kg Included...

Page 21: ... TELNET command console Web BRAdmin Firmware update Flash ROM based for Network module Can be upgraded using TFTP FTP Can be upgraded using IPX SPX Easy upgrade using Brother BRAdmin Professional Utility Supplied software BRAdmin Professional for Windows 95 98 ME Windows NT 4 0 Windows 2000 XP Port driver for Windows 95 98 ME Windows NT 4 0 Windows 2000 XP LPR port driver for Windows 95 98 ME NT4 ...

Page 22: ...r or thicker paper Transparency O Up to 10 sheets A4 or Letter O A4 or Letter O Up to 10 sheets A4 or Letter Transparencies Label O A4 or Letter O A4 or Letter Thicker paper Envelope O O Up to 3 envelopes Envelopes or Env Tick or Env Thin Card O O Thick paper or thicker paper 2 Paper size Tray 1 Manual feed tray MP tray Tray 2 Paper size A4 Letter Legal B5 ISO Executive A5 A6 B6 Width 69 9 to 215 ...

Page 23: ...r 0 08 to 0 2 mm 0 003 to 0 008 in 0 084 to 0 14 mm 0 003 to 0 005 in single thickness Moisture content 4 to 6 by weight 4 to 6 by weight 4 Recommended paper Europe USA Plain paper Xerox Premier 80 g m2 Xerox Business 80 g m2 Modo DATACOPY 80 g m2 IGEPA X Press 80 g m2 Xerox 4200DP 20 lb Hammermill Laser Paper 24 lb Recycled paper Xerox Recycled Supreme Transparency 3M CG3300 3M CG 3300 Label Aver...

Page 24: ...th holes such as organizer sheets be sure to fan the stack well Do not use organizer sheets that are stuck together The glue that is used might caused damaged to the printer When printing on the back of pre printed paper if the paper is curled be sure to straighten the paper as much as possible Different types of paper should not be loaded at the same time in the paper tray to avoid any paper jams...

Page 25: ...1 12 3 We recommend the following print methods output tray for each paper media type Paper output Media type Face down Face up Plain paper O O Thick paper O Recycled paper O O Transparency O Label O Envelope O Card O O ...

Page 26: ...shown below Physical page Printable area Logical page B Physical page length D Maximum logical page length F Distance from edge of physical page to edge of logical page NOTE Logical page shows the printable area for a PCL driver Printable area shows mechanical printable area of the machine Therefore the machine can only print within the shaded area when you use a PCL driver ...

Page 27: ...m 4 2 mm 0 16 50 dots B 5 JIS 182 0 mm 7 1 2 130 dots 257 0 mm 10 11 3 033 dots 170 0 mm 6 69 2 007 dots 257 0 mm 10 11 3 033 dots Ç 0 mm 4 2 mm 0 16 50 dots B 5 ISO 176 0 mm 6 93 2 078 dots 250 0 mm 9 84 2 952 dots 164 0 mm 6 46 1 936 dots 250 0 mm 9 84 2 952 dots Ç 0 mm 4 2 mm 0 16 50 dots B 6 125 0 mm 4 92 1 476 dots 176 0 mm 6 93 2 078 dots 164 0 mm 4 44 1 334 dots 176 0 mm 6 93 2 078 dots Ç 0...

Page 28: ...length D Maximum logical page length F Distance from edge of physical page to edge of logical page NOTE Logical page shows the printable area for a PCL driver Printable area shows mechanical printable area of the machine Therefore the machine can only print within the shaded area when you use a PCL driver ...

Page 29: ...ots 182 0 mm 7 1 2 130 dots 247 0 mm 9 72 2 916 dots 182 0 mm 7 1 2 130 dots Ç 0 mm 4 2 mm 0 16 50 dots B 5 ISO 250 0 mm 9 84 2 952 dots 176 0 mm 6 93 2 078 dots 240 0 mm 9 44 2 834 dots 176 0 mm 6 93 2 078 dots Ç 0 mm 4 2 mm 0 16 50 dots B 6 176 0 mm 6 93 2 078 dots 125 0 mm 4 92 1 476 dots 166 4 mm 6 55 1 960 dots 125 0 mm 4 92 1 476 dots Ç 0 mm 4 2 mm 0 16 50 dots COM10 241 3 mm 9 5 2 850 dots ...

Page 30: ...170DN Thicker Bond Paper Env Thick 4 ppm Smaller size than A4 or Letter Media type setting Allmodels Transparency Up to 17 18 ppm HL 5130 Up to 20 21 ppm HL 5140 5150D 5170DN Thin Paper Up to 17 18 ppm HL 5130 Up to 20 21 ppm HL 5140 5150D 5170DN Plain paper Env Thin 8 ppm Thick Paper Envelopes 8 ppm Thicker Bond Paper Env Thick 4 ppm The print speed may vary according to conditions such as paper ...

Page 31: ...ge 197 5 2 5g 142 5 2 5g Toner Cartridge Weight at Toner Near Empty 693 5 698 5g 693 5 698 5g Remain Toner Weight at Toner Near Empty 80 85g 80 85g Toner Cartridge Weight at Toner Empty 678 5 683 5g 678 5 683 5g Remain Toner Weight at Toner Empty 65 70g 65 70g You can print 500 to 600 pages with 10g toner Without yellow protector Toner cartridge weight may vary within 2 to 3g depending on the cart...

Page 32: ... Kariya Plant A Mie Brother C BIUK J Buji Nan Ling Factory 1 Printer Printed on the label attached on the rear of the main body Example U 5 2 6 8 2 A 3 J 1 1 1 1 0 1 2 Process unit Imprinted on the aluminum bag Drum unit with toner cartridge 3 A 1 1 J A 3 Drum unit Printed on the bar code label attached inside the drum unit A 3 9 5 1 0 0 1 0 4 A YEAR MONTH DATE FACTORY ID NO YEAR MONTH SERIAL NO M...

Page 33: ... 9 9 A 5 Laser unit On the laser unit 2 8 0 0 1 YEAR MONTH DATE FACTORY ID NO YEAR MONTH SERIAL NO PRODUCTION LOT NO LASER UNIT NO 8 LM2486001 Laser Unit ZL2E FACTORY ID NO FACTORY ID NO CARTRIDGE PRODUCTION INFO 1 Kariya Plant 2 Buji Nan Ling Factory TONER VOLUME TONER VOLUME PRODUCTION LINE NO DR TN REUSE The first time M The second time N The third time P ...

Page 34: ... 10 C and 32 5 C The relative humidity is maintained between 20 and 80 The printer should be used in a well ventilated room Place the printer on a flat horizontal surface Keep the printer clean Do not place the printer in a dusty place Do not place the printer where the ventilation hole of the printer is blocked Keep approximately 100 mm 4 inches between the ventilation hole and the wall Do not pl...

Page 35: ...rsion Processor Speed Minimum RAM Recommended RAM Available Hard Disk Space 95 98 98SE 486 66MHz 8MB 16MB 40MB NT Workstation 4 0 Pentium 75MHz 16MB 32MB 50MB 2000 Professional Pentium 133MHz 64MB 128MD 50MB Me Pentium 150MHz 32MB 64MB 50MB Windows Operating System XP Pentium 300MHz 128MB 128MB 50MB OS 8 6 to 9 2 32MB 64MB Apple Macintosh Operating System OS X 10 1 to 10 2 1 All base models meet m...

Page 36: ...l interface Most parallel cables support bi directional communication but some might have an incompatible pin assignment or may not be IEEE 1284 compliant Do not use a Parallel interface that is longer than 6 feet 2 meters When using a USB cable Please make sure that you use a Hi Speed USB 2 0 certified cable if your computer uses a Hi Speed USB 2 0 interface Do not connect the USB cable to the fr...

Page 37: ...d driver installation are contained on the supplied CD ROM 3 1 For All Users For Windows users 1 Turn on the PC power Insert the supplied CD ROM into the CD ROM drive The opening screen will appear automatically Follow the on screen instructions NOTE If the opening screen does not appear click Start and select Run Then enter the CD drive letter and type START EXE for example D START EXE 2 Click th...

Page 38: ...ly 4 Put the drum unit assembly into the printer Fig 2 2 5 Close the front cover of the printer 3 1 2 Load paper into the paper tray 1 Pull the paper tray completely out of the printer 2 While pressing the paper guide release lever slide the adjusters to fit the paper size Check that they locate correctly into the slots Fig 2 3 NOTE For Legal or 8 5 x 13 in paper press the universal guide release ...

Page 39: ...nnect the AC power cord to the printer Do not connect the interface cable 2 Plug the AC power cord into an AC outlet Turn the power switch on 3 After the printer has finished warming up the Status LED stops blinking and stays green Fig 2 5 4 Press the Go button The printer prints a test page Check that the test page printed correctly NOTE This function won t be available after sending a print job ...

Page 40: ...ton when the movie finishes 7 Click the Install button Follow the on screen instructions 8 Click the Finish button The setup is now complete For USB interface cable users NOTE If the Found New Hardware Wizard appears on the PC click the Cancel button 1 Make sure the USB interface cable is NOT connected to the printer and then begin installing the driver If you have already connected to the cable r...

Page 41: ...the driver on the PC refer to the following instructions once the administrator has configured the printer 1 For the administrator Install the BRAdmin Professional Utility Windows Users Only The BRAdmin Professional software utility is designed to manage your Brother network connected devices such as network ready printers and or network ready Multifunction devices in a Local Area Network LAN envi...

Page 42: ...ate an Executable file that can be sent to other network users when run the Executable file installs the appropriate printer driver and network printing software To access the Driver Deployment Wizard 1 Insert the CD ROM supplied with the printer 2 Click the Install Software icon and select the Driver Deployment Wizard 2 Installing the driver 1 Click the Connect the interface cable install the pri...

Page 43: ...nd then click the OK button Fig 2 8 3 Click the Finish button 4 The setup is now complete 4 For Brother Peer to Peer network printer users LPR recommended Peer to Peer printing method Configuring the LPR port 1 Select Search from a list of available printers or enter your printer s IP address Click the Next button Fig 2 9 NOTE Contact your Administrator about the Printer s IP Address ...

Page 44: ...indows 2000 XP users The setup is now complete For Windows 95 98 ME users After your PC has restarted setup will be complete 3 3 For Macintosh Users For USB interface cable users Connect the printer to the Macintosh and install the BR Script PPD File For Mac OS 8 6 to 9 2 Users HL 5130 5140 Users 1 Click Connect the Interface cable Install the driver utility from the Initial Setup menu 2 Follow th...

Page 45: ...ton in the USB Printer Selection Select HL 5150D series HL 5170DN series and then click the OK button 11 Click the Create button 12 Enter your printer name HL 5150D series HL 5170DN series and then click the Save button 13 Select Quit from the File menu 14 The setup is now complete Setting your printer as the Default Printer 1 Click the HL 5150D series HL 5170DN series icon on the Desktop 2 Select...

Page 46: ...1 If the Apple LaserWriter 8 Driver is not already installed on your system you can download it from http www apple com 2 xxxxxx are the last six digits of the Ethernet address 10 The setup is now complete For Mac OS X 10 1 to 10 2 Users 1 Click Connect the interface cable Install the driver utility from the Initial Setup menu 2 Select the Network interface 3 Turn off the printer power switch 4 Co...

Page 47: ...cts the printed page into the output tray For the details on paper tray loading refer to subsection 3 1 2 Load paper into the paper tray in this chapter and subsection 3 5 Paper in CHAPTER 1 4 2 Printing from manual feed tray HL 5130 5140 only 1 Select the Paper Size Media Type and paper Source etc in the printer driver 2 Send the print data to the printer NOTE A NO PAPER message is shown in the S...

Page 48: ...on in the manual feed tray before the printer is in the READY state the media may be ejected without being printed on 5 After the printed page comes out of the printer put in the next sheet of paper as in Step 4 above Repeat for each page that you want to print 4 3 Printing from Multi purpose Tray MP Tray HL 5150D 5170DN only You can feed bond paper thick paper labels envelopes or cards as well as...

Page 49: ... the leading edge of the paper first and push it gently into the tray If pre printed paper is used in the multi purpose tray the paper should be inserted top edge first with the printed side face up Make sure that the paper is straight and in the proper position on the MP tray If it is not the paper may not be fed properly resulting in a skewed printout or a paper jam 5 While pressing the paper gu...

Page 50: ... printing For proper printing you must choose the same paper size from your software application as the paper in the tray Most envelopes will be suitable for your printer However some envelopes will have feed and print quality problems because of the way they have been made A suitable envelope should have edges with straight well creased folds and the leading edge should not be thicker than two pi...

Page 51: ...2 17 4 Open the manual feed tray Slide the paper guides to fit the envelope size Fig 2 18 NOTE Envelopes that have been creased after they have been printed At the back of the printer open the back output tray and push down the blue tabs at the left and right hand sides as shown in the figure below When you have finished printing your envelopes close the back output tray to reset the two blue tabs...

Page 52: ...DY state the media may be ejected without being printed on 6 After the printed envelope comes out of the printer the printer will wait until you put in the next envelope Repeat Step 5 for each envelope you want to print 7 After you finish the print job close the back output tray NOTE Envelopes joints that are sealed by the manufacturer should be secure All sides should be properly folded without w...

Page 53: ...he maximum paper height guides on both sides of the tray Do not put more than 3 envelopes in the MP tray at any one time or it may cause a jam Fig 2 24 NOTE Make sure that the envelope are neatly stacked and in the proper position in the MP tray If they are not the envelopes may not be fed properly resulting in a skewed printout or a jam 6 Press and slide the paper width guide to fit the envelope ...

Page 54: ...ll sides should be properly folded without wrinkles or creases 4 5 Printing on transparencies You can print on transparencies from the paper tray manual feed tray or MP tray Printing on transparencies from the paper tray 1 Select the Paper Size Media Type Paper Source and other settings in the printer driver 2 Pull the paper tray completely out of the printer 3 While pressing the blue paper guide ...

Page 55: ...roller Hold the transparency in this position until the printer automatically feeds it in for a short distance and then let go of the transparency NOTE Make sure that the transparency is straight and in the proper position on the manual feed tray If it is not the transparency may not be fed properly resulting in a skewed printout or a jam Do not put more than one transparency in the manual feed tr...

Page 56: ...e tray and remain under the maximum paper height guides on both sides of the tray Do not put more than 10 transparencies in the MP tray at any one time or it may cause a jam NOTE Make sure that the transparencies are straight and in the proper position in the MP tray If they are not the transparencies may not be fed properly resulting in a skewed printout or a jam 6 While pressing the paper guide ...

Page 57: ...e to be printed on blank side face down Follow the instructions on the computer screen Fig 2 28 4 The printer will now automatically print all the odd numbered pages on the other side of the paper Manual duplex printing from the manual feed tray For HL5130 and HL 5140 CAUTION Before you put the sheets back in the manual feed tray you will have to straighten them or you may get paper jams You shoul...

Page 58: ...d not use very thin or very thick paper When you use the manual duplex function it is possible that there may be paper jams or poor print quality If there is a paper jam see 4 PAPER PROBLEMS in Chapter 6 1 Choose the Manual Duplex printing mode from the Advanced tab and from the Basic tab select the Paper Source to be MP Tray feed 2 Using both hands put the paper in the MP tray with the side to be...

Page 59: ...P tray with the heading facedown and in first To print the second side put the heading face up and in first For the upper paper tray and the optional lower tray tray 1 or tray 2 Put the side to be printed on first face down with the leading edge top of the paper at the front of the tray To print the second side put the paper face up with the leading edge top of the paper at the front of the tray I...

Page 60: ...ou use the duplex printing function the printing quality becomes worse or paper jam may occur under some circumstances 1 Load paper into the paper tray or MP tray 2 Make sure the lever on the Duplex tray is set for the proper paper size Letter or Legal size A4 size 3 Open the Properties dialog box in the printer driver In the Advanced tab select Duplex Printing mode check Duplex and make sure that...

Page 61: ...ons 5 1 1 LEDs 1 Toner LED indicates when the Toner is low or empty 2 Drum LED indicates when the Drum is nearing end of life 3 Paper LED indicates when there is a paper jam 4 Status LED will flash and change color depending on the printer status 5 1 2 Control Panel Buttons 1 Job Cancel Button will stop and cancel the print operation in progress 2 Go Button continue printing Form feed LEDs Control...

Page 62: ...ter warming up the printer will be Ready state Toner Drum Paper Status Fig 2 34 Warming up The printer is warming up Toner Drum Paper Status Fig 2 35 Ready to print The printer is ready to print Toner Drum Paper Status Fig 2 36 Receiving data The printer is either receiving data from the computer processing data in memory or printing the data Toner Drum Paper Status Fig 2 37 Data remaining in memo...

Page 63: ...ce the current one See 1 1 Drum unit in Chapter 5 The Drum LED alternates turning on for 2 seconds and off for 3 seconds alternately Paper jam Clear the paper jam referring to 4 Paper Problems Chapter 6 If the printer does not start printing press the Go button No paper Load paper in the printer Then press the Go button Misfeed Put the paper back in properly and then press the Go button The printe...

Page 64: ...ns If there is an error that can not be put right the printer will show that a service call is needed by lighting up all the LEDs as shown in the figure below Toner Drum Paper Status Fig 4 43 If you see the service call indication above follow the steps below 1 Take out the DIMM Dual Inline Memory Moduele from your printer if you have a DIMM installed 2 Turn off the power switch wait a few seconds...

Page 65: ... printing and will then eject the paper Wake up If the printer is in Sleep mode press the Go or Job Cancel button to wake the printer up and go to the Ready state Form feed If the yellow Status LED is on press the Go button The printer will print any data that is left in the printer memory Error recovery If there is an error the printer will recover automatically from some errors If an error is no...

Page 66: ...until the printer engine has cooled down The fan running time varies depending on the sleep mode timeout because the fan running conditions are defined as follows 1 The fan runs for 10 minutes whenever printing finishes 2 The fan runs while the printer is in ready status 3 The fan runs for at least 5 minutes after the printer goes into sleep mode EX If the timeout is 5 minutes the fan will be runn...

Page 67: ...iver If you are using Brother s Windows PCL printer driver open the printer folder then choose and right click the Brother s Windows PCL printer driver The Print Test Page button is in the General Tab of the Property Fig 2 45 5 5 3 Printer Settings You can print the current settings using the control panel button or printer driver Using control panel button 1 Make sure that the front cover is clos...

Page 68: ... the power switch All the LEDs light up Keep the Go button pressed down until all the LEDs except for Toner LED go off When the Drum Paper and Status LEDs go off release the Go button 4 Press and hold the Go button again until the Drum LED comes on 5 When the Drum LED comes on release the Go button The printer will print a list of the internal fonts Using the printer driver For HL 5140 HL 5150D an...

Page 69: ... IP address information please follow these steps 1 Turn off the printer 2 Make sure that the front cover is closed and the power cord is plugged in 3 Hold down the Go button as you turn on the power switch All the LEDs will light up Keep the Go button pressed down until all the LEDs except for Toner LED go off When the Drum Paper and Status LEDs go off release the Go button 4 Hold down the Go but...

Page 70: ...or HL 5140 5150D 5170DN only has a paper path as shown on the right Fig 2 48 3 For HL 5140 5150D 5170DN only When you install the LT 5000 unit to the printer it is necessary to exchange the paper tray already equipped standard tray with the LT 5000 unit and install the standard tray to the lower tray Failure to do so will cause paper jams as the paper cannot be fed from the lower tray to the print...

Page 71: ...ock Operation block Control panel Control system Low voltage power supply block High voltage power supply block Laser unit Drive block DC motor Drum unit Transfer block Drum Charging block External device External device Paper tray unit Paper tray MP tray HL 5150D 5170DN only Front cover ASSY HL 5130 5140 only Fixing unit Paper eject block Paper feed system Image generation system Interface block ...

Page 72: ...max 128MB Option for HL 5140 5150D 5170DN EEPROM HL 5130 5140 5150D 512 x 8 bit HL 5170DN 8192 x 8 bit CPU Core SPARClite 133MHz A S I C Oscillator 66 6MHz Address Decoder DRAM Control Timer FIFO CDCC Parallel I O Soft Support EEPROM I O Engine Control I O To Engine PCB BUS INT To PC USB I O To PC Network Program HL 5170DN only 1 5 MB STRAGE 0 5 MB PCI Bus Control Network Controller To PC or Hub H...

Page 73: ...k VDD3 R38 10k R34 10k R35 10k R36 10k R37 10k 0V R17 10k R18 10k R16 10k R45 10k R44 10k 0V R65 0 R68 0 3 4C SDCLK1 3 4C SDCLK2 3 4C SDCKE1 R61 0 3 2D SDCSN1 3 2D SDCSN2 R41 33 R50 33 R52 33 R48 33 3 2C SDSDA 3 2C SDSCL R53 4 7k VDD3 TP6 TP7 TP8 TP9 TP5 TP10 TP12 TP13 TP14 TP15 TP16 TP17 TP26 TP29 TP30 TP31 TP32 TP33 TP196 TP197 TP35 TP36 TP37 TP198 R19 10k R39 10k R47 10k R46 10k TP700 TP702 TP7...

Page 74: ... 10k R25 10k R29 10k R49 10k R53 10k R27 10k R26 10k R51 10k R50 10k R52 10k R48 10k VDD3 0V 0V TP6 TP7 TP8 TP9 TP5 TP2 TP3 TP35 TP36 TP37 TP10 TP11 TP12 TP13 TP14 TP15 TP16 TP17 R78 0 TP26 TP29 TP30 TP31 TP32 TP33 TP195 TP196 TP197 TP198 R33 10k R54 10k R62 10k TP700 TP701 TP702 TP703 TP705 R61 10k R79 4 7k R76 4 7k 0V TP722 TP723 TP724 TP725 TP726 TP727 TP728 TP729 TP730 TP731 U7 Aurora DATA00 4...

Page 75: ...23 USB_HSDP 187 USB_HSDM 188 USB_FSDP 190 USB_FSDM 191 USBRPU 186 USBEXT12 183 R28 39 R27 39 0V IF_FG3 0V R23 22k R24 1M C34 C101 CN4 1 VCC 2 DATA 3 DATA 4 GND 5 FG UBR23 4K5200 6 FG L20 1 2 3 4 TP1010 TP1011 TP1012 TP1013 TP1014 USB Fig 3 5 HL 5170DN 2C USBVCC 1C USBVCC X2 AT 49 12 000MHZ 1 2 R102 680 R99 1M C85 C270 C86 C270 0V R56 1 5k R57 12k C57 C103 TP718 0V VDD3 USBVCC U7 Aurora 195 UCKOUT ...

Page 76: ... 10 ACK 11 BUSY 12 PE 13 SELECT 32 FLT 14 ATFEED 36 SELIN 31 INPRIM 1 STB 2 DI1 3 DI2 4 DI3 5 DI4 6 DI5 7 DI6 8 DI7 9 DI8 15 NC 33 NC 34 NC 35 NC 37 FG 38 FG RA7 10k 2 7 1 8 3 6 4 5 VDD3 TP1008 TP1015 TP1016 TP1017 TP1018 TP1019 TP1020 TP1021 TP1022 TP1023 TP1024 TP1025 TP1026 TP1027 TP1028 TP1029 TP1030 NC NC NC NC Fig 3 7 HL 5170DN CDCC_D 2 CDCC_D 3 CDCC_D 4 CDCC_D 5 CDCC_D 6 CDCC_D 7 CDCC_D 0 C...

Page 77: ...10W U3 DP83816 X2 18 X1 17 NC34 34 NC42 42 NC43 43 RESERVED48 48 RESERVED41 41 RESERVED50 50 RESERVED127 127 COL MA16 28 CRS 29 MDIO 4 RXCLK 6 RXD3 MA9 12 RXD2 MA8 11 RXD1 MA7 10 RXD0 MA6 7 RXDV MA11 15 RXER MA10 14 TXCLK 31 TXD3 MA15 25 TXD2 MA14 24 TXD1 MA13 23 TXD0 MA12 22 VREF 40 PMEN 59 PWRGOOD 123 3VAUX 122 TPTDP 54 TPTDM 53 TPRDP 46 TPRDM 45 MA0 LEDACTN 142 MA1 LED10N 143 MA2 LED100N 144 EE...

Page 78: ...OKI non page Vss NC 16M 8M A21 Byte A19 WP 13 36 A19 RY BY NC FUJITSU Mirror 8M A20 NC 32M NC 32M A20 11 Byte 64M RY BY ACC A19 47 RY BY Fig 3 10 A 64Mbit ROM x 16bit is fitted HL 5170DN HL 5170DN ADR 1 ADR 2 ADR 3 ADR 4 ADR 5 ADR 6 ADR 7 ADR 8 ADR 9 ADR 10 ADR 11 ADR 12 ADR 13 ADR 14 ADR 15 ADR 16 ADR 17 ADR 18 ADR 19 ADR 21 DATA 0 DATA 1 DATA 2 DATA 3 DATA 4 DATA 5 DATA 6 DATA 7 DATA 8 DATA 9 DA...

Page 79: ... 1 8C 3 2A 3 7D DQ 31 0 C134 C103 VDD3 R133 0 R134 0 R132 0 R136 0 R135 0 VDD3 VDD3 0V TP150 TP151 TP152 MBM29LV160BE TN U12 CE 26 OE 28 WE 11 BYTE 47 RESET 12 NC13 13 NC14 14 A0 25 A1 24 A2 23 A3 22 A4 21 A5 20 A6 19 A7 18 A8 8 A9 7 A10 6 A11 5 A12 4 A13 3 A14 2 A15 1 A16 48 A17 17 A18 16 A19 9 NC10 10 VCC 37 VSS27 27 VSS46 46 RY BY 15 DQ0 29 DQ1 31 DQ2 33 DQ3 35 DQ4 38 DQ5 40 DQ6 42 DQ7 44 DQ8 3...

Page 80: ...A0 6F 7A 7C 7F 3 2D 3 2E ADR 16 BA1 VDD3 0V C37 C103 C10 C103 C13 C103 C12 C103 C11 C103 C9 C103 C38 C103 R40 0 TP303 SDRAM Fig 3 13 A 256Mbit SDRAM x 16bit is used as the RAM HL 5170DN HL 5170DN ADR 4 ADR 9 ADR 5 ADR 2 ADR 8 ADR 6 ADR 13 ADR 10 ADR 7 ADR 3 ADR 12 ADR 11 DQ 8 DQ 10 DQ 15 DQ 6 DQ 11 DQ 0 DQ 7 DQ 2 DQ 3 DQ 13 DQ 1 DQ 9 DQ 4 DQ 5 DQ 12 DQ 14 ADR 14 5F 6A 7F 3 2E 3 3D 4 6E 3 3C 7A 7B ...

Page 81: ...A 2E ADR 18 CASN 0V 0V 0V 0V C30 C19 C104 C74 C51 C103 C103 C103 C103 C103 C103 C103 C103 C85 C75 C55 C103 C92 18 A10 AP A10 14 A2 60 DQ15 43 DQ20 3 DQ1 38 DQ16 49 SCL 66 A7 58 DQ13 67 A9 68 BA0 A11 13 A0 54 DQ10 53 DQ9 79 SN1 RASN1 E1 91 DQ27 99 SA1 40 DQ18 94 DQ29 20 A12 NotUse A14 70 A13 NotUse A15 69 A11 A13 4 DQ2 10 DQ7 100 SA2 90 DQ26 17 A8 9 DQ6 30 SN2 RASN2 E2 CN5 2 DQ0 41 DQ19 64 A3 16 A6...

Page 82: ...C51 C47 C131 C97 C79 C114 C98 C81 C103 C103 C103 C103 C103 C103 C103 C103 C103 C117 18 A10 AP A10 14 A2 60 DQ15 43 DQ20 3 DQ1 38 DQ16 49 SCL 66 A7 58 DQ13 67 A9 68 BA0 A11 13 A0 54 DQ10 53 DQ9 79 SN1 RASN1 E1 91 DQ27 99 SA1 40 DQ18 94 DQ29 20 A12 NotUse A14 70 A13 NotUse A15 69 A11 A13 4 DQ2 10 DQ7 100 SA2 90 DQ26 17 A8 9 DQ6 30 SN2 RASN2 E2 CN4 2 DQ0 41 DQ19 64 A3 16 A6 57 DQ12 65 A5 95 DQ30 89 D...

Page 83: ...h a 8192 x 8bit configuration HL 5170DN R77 100 R74 100 0V VDD3 0V C68 C103 R71 4 7k VDD3 TP58 TP59 TP67 TP68 EESCL 203 U7 Aurora EESDA 202 U6 M24C64 WMN6 8 VCC 4 VSS 1 A0 2 A1 3 A2 5 SDA 7 TEST 6 SCL Fig 3 18 1 3 10 Reset Circuit The reset IC is a R3112N281C The reset voltage is 2 8V typ and the LOW period of reset is 22 4ms typ HL 5130 5140 5150D R43 68 C43 C101 0V TP4 U3 R3112N281C 5 CD 2 VCC 1...

Page 84: ...3 22 1 3 12 Panel I O The interface with the panel PCB is by full duplex synchronous serial method HL 5130 5140 5150D 3D LED0 3D LED1 3D LED2 3E LED3 3E LED4 3E SW0 3E SW1 C111 C101 C101 C101 C101 C101 C101 C101 C107 0V L15 BLM18BD102 BLM18BD102 BLM18BD102 BLM18BD102 BLM18BD102 L17 L16 L13 L14 C109 C108 C113 C112 C110 TP210 TP211 CN9 1 SW1 2 LED3 3 LED4 4 LED0 PNLRSTN 5 SW0 PNLDI 6 LED2 PNLDO 7 LE...

Page 85: ...V 0V C6 C103 C3 C103 C8 C101 C5 C270 1 BD CN3 5 DATA1 2 ENB1 3 5V 4 GND R6 0 R8 0 TP230 TP231 TP232 TP233 TP234 TP235 U1 TC7SH08FU 1 B 4 Y 5 VCC 2 A 3 GND VDD3 R111 330 1 10W Fig 3 25 HL 5170DN 1D BDN 2D VDON0 2D ENBN0 VDD5 L7 0 VDD5 L6 0 R21 680 C22 C102 VDD5 R7 220k R13 100 C27 C471 Q3 C3735 C B E R8 1k VDD3 R19 680 0V 0V L5 0 0V L3 BLM18RK221 L4 0 VDD3 R16 680 R15 330 1 10W 0V 0V C21 C103 C18 C...

Page 86: ...5 C220 6 3V 6V VDD3 B3B EH 1 3V CN7 2 7V 3 0V VDD7 D2 RB751V 40 0V VDD5 Q3 NJM2391DL1 05 OUT VCC GND C114 C22 16V C116 C104 FG1 OT1 C103 C10 16V C122 C104 0V VDD1 8 Q2 NJU7223DL1 19 1 OUT 2 VCC 3 GND C100 C104 C89 C10 16V D1 RB751V 40 C101 C220 6 3V 6V VDD3 C93 C104 LVPS Fig 3 27 HL 5170DN VDD7 D2 RB751V 40 0V VDD5 Q6 NJM2391DL1 19 OUT VCC GND C157 C22 16V C151 C104 FG1 OT1 C140 C10 16V C158 C104 ...

Page 87: ...age power supply Lower cassette exit sensor Toner sensor Paper eject sensor Cover sensor Fixing unit cover sensor Front registration sensor Multi purpose tray paper exit sensor Rear registration sensor DX sensor Solenoid DX rear cover sensor For the circuit diagram of the engine PCB see APPENDIX 9 and 10 ENGINE PCB CIRCUIT DIAGRAM in this manual Sensor configuration varies according to machine typ...

Page 88: ...de of each power supply are listed below Regulated Output Production Code 3 3V 1 5A 8V 0 4A 24V 2 2A 100V MPW5806 200V MPW5706 For the circuit diagram of the low voltage power supply PCB see APPENDIX 11 or 12 LOW VOLTAGE POWER SUPPLY PCB CIRCUIT DIAGRAM in this manual Heater Circuit Thermal Fuse Feedback Line Filter Fuse Rectifier Oscillator 24V Regulation Circuit 24V 3 3V Lamp Heater Engin Circui...

Page 89: ...For the circuit diagram of the high voltage power supply PCB see APPENDIX 13 HIGH VOLTAGE POWER SUPPLY PCB CIRCUIT DIAGRAM in this manual Transfer Roller Supply Roller Photosensitive Drum Development Roller Corona Unit Current Regulator Current Regulator Voltage Regulator Voltage Regulator B1 B201 Q205 B251 Q253 Voltage Regulator Z101 VR101 VR52 24VI GND VR251 Voltage Regulator VR102 Cleaning Brus...

Page 90: ...ar actuator Separation pad Pressure roller Paper pick up roller DRUM UNIT Scanner motor LASER UNIT Corona wire Heat roller Second Eject roller Outer chute MP Pressure roller Pressure plate Paper Feed roller Paper feed pinch roller Rear cover FIXING UNIT First feed roller First feed pinch roller Regist front actuator Supply roller Development roller Blade Upper auger Y DUPLEX UNIT ...

Page 91: ...egist front actuator and the paper top position absence of paper is detected by sensing the motion of the actuator Paper particles generated by friction between the separation pad and the paper feed roller are removed by the pressure roller of the paper tray The removed paper particles are gathered to the dust collecting space of the paper tray Paper particles generated at the paper feeding path a...

Page 92: ...2 2 3 Paper eject After the printing image on the photosensitive drum is transferred onto the paper the paper is fed to the fixing unit to fix unfixed toner onto the paper Afterwards the paper is ejected from the fixing unit by the first eject roller in the fixing unit The paper eject actuator detects whether the paper is ejected correctly or not After the paper exits from the first eject roller t...

Page 93: ... Afterwards the paper is ejected from the duplex tray to the path through the paper feed roller and the transfer roller to the transfer block in the drum unit again for process of printing on the back of sheet Fig 3 35 Second eject roller Hear roller Photosensitive drum Paper feed pinch roller Regist front sensor lever Regist rear sensor lever Paper feed roller Transfer roller Duplex tray Pressure...

Page 94: ...cartridge The toner sensor at the left side emits light through the window on the left side of the toner cartridge then the toner sensor at the right side receives it when the toner is low They also detect whether or not the drum unit is installed The toner cartridge is installed in the drum unit Fig 3 37 Toner sensor Light emission Toner sensor Light reception Front cover sensor ...

Page 95: ...140 5150D 5170DN Detect if the paper tray is installed They also detect if there is paper in the paper tray Fig 3 38 2 3 4 Paper eject sensor Detects if paper is ejected from the fixing unit Fig 3 39 Paper empty sensor Eject sensor PCB ASSY Fixing unit Cassette sensor PCB ASSY Cassette sensor ...

Page 96: ...TER 3 THEORY OF OPERATION 3 26 2 3 5 MP PE sensor HL 5150D 5170DN Detects if there is paper in the MP tray Fig 3 40 2 3 6 DX sensor HL 5150D 5170DN Fig 3 41 Feed MP unit MP PE sensor PCB ASSY DX sensor PCB ...

Page 97: ...HL 5130 5140 5150D 5170DN SERVICE MANUAL 3 27 2 3 7 Regist sensor Fig 3 42 2 3 8 Rear cover sensor HL 5150D 5170DN Fig 3 43 Regist sensor Engine PCB ASSY Rear cover sensor ...

Page 98: ...Charging The drum is charged to approximately 870V by an ion charge which is generated by the primary charger The charge is generated by ionization of the corona wire which has a DC bias from the high voltage power supply applied to it The flow of the ion charge is controlled by the grid to ensure it is distributed evenly on the drum surface The aluminum drum sleeve in the photosensitive drum is g...

Page 99: ...ted The surface potential of the exposed area is reduced forming the electrostatic image to be printed Fig 3 46 Drum Lens Laser beam Polygon mirror Paper Laser detector Laser diode Motor Laser beam f θ lens 3 Primary charging Laser beam exposure and developing a Unexposed area Non image area b Exposed area Image area Transfer the image to paper Time Drum sleeve 0 2 1 1 2 3 a b 150 400 870 Surface ...

Page 100: ...ctrostatic potential to attract toner particles from the development roller to the latent image area on the drum surface Fig 3 47 2 6 4 Transfer 1 Transfer process After the drum has been charged and exposed and has received a developed image the toner formed is transferred onto the paper by applying a negative charge to the back of the paper The negative charge applied to the paper causes the pos...

Page 101: ...at and pressure when passing through the heat roller and the pressure roller in the fixing unit The thermistor keeps the surface temperature of the heat roller constant by detecting the surface temperature of the heat roller and turning on or off the halogen heater lamp Fig 3 48 First eject roller Thermistor Pressure roller Heat roller ...

Page 102: ... When using soldering irons or other heat generating tools take care not to accidentally damage parts such as wires PCBs and covers 4 Before handling any PCBs touch a metal portion of the equipment to discharge any static electricity charge on your body or the electronic parts or components may be damaged 5 When transporting PCBs be sure to wrap them in the correct protective packaging 6 Be sure t...

Page 103: ...Sensor HL 5150D 5170DN 15 5 Access Cover 4 DX Feed ASSY Side Cover L R Rear Cover L R 10 Top Cover 11 Base Plate LV Insulation Sheet 18 Main PCB 17 Fixing Unit 14 Front Cover ASSY HL 5130 5140 12 MP Unit HL 5150D 5170DN 13 Engine PCB 20 Frame L Drive Unit 24 Fan Motor 60 Unit LV 25 DX Sensor PCB ASSY HL 5150D 5170DN 19 Frame R 26 Paper Feeder 23 High voltage PS PCB ASSY 21 Low voltage PS PCB ASSY ...

Page 104: ... 5150DN Service Manual 4 3 3 DISASSEMBLY PROCEDURE 3 1 AC Cord 1 Disconnect the AC cord from the printer Fig 4 1 3 2 Drum Unit 1 Open the front cover and remove the drum unit Fig 4 2 AC cord Printer Drum unit Front cover ...

Page 105: ... Tray 1 Close the front cover and pull out the paper tray 2 Remove the paper from the paper tray Fig 4 3 3 Remove the pad holder and the separation pad spring from the paper tray Fig 4 4 Front cover Paper tray Pad holder Separation pad spring Paper tray ...

Page 106: ...and apply a suitable amount of grease referring to the figure below Fig 4 5 4 Remove the four bind B M4x12 Taptite screws and then remove the paper tray front cover Fig 4 6 Paper tray Paper pick up roller Grease Molykote PG 662 4 mm dia ball Taptite bind B M4x12 Taptite bind B M4x12 Paper tray front cover Paper tray Hook Hook ...

Page 107: ...ove the two Taptite cup B M3x10 and then remove the paper tray cover Fig 4 7 6 Remove the pressure roller holder ASSY Fig 4 8 Paper tray Tpatite cup B M3x10 Paper tray cover Flat screwdriver Pressure roller holder ASSY Paper tray Tpatite cup B M3x10 ...

Page 108: ...ch spongy holder ASSY from the pressure roller holder ASSY 10 Remove the two scratch spongy springs 11 Remove the scratch spongy from the scratch spongy holder ASSY Fig 4 10 Pressure roller collar Pressure roller shaft Pressure roller holder ASSY Scratch spongy Scratch spongy holder ASSY Pressure roller holder ASSY Scratch spongy springs 1 2 ...

Page 109: ... and then unhook the catches of the two side guide racks Fig 4 11 14 Remove the side guides right and left from the paper tray Fig 4 12 Taptite cup M2 6x5 Taptite cup M2 6x5 Side guide rack Lock lever Paper tray Catches Paper tray Side guide L Side guide R Side guide L Side guide L 2 2 1 2 1 2 1 Side guide rack ...

Page 110: ...he other two catches B of the plate while pulling the plastic frame outwards to remove the pressure plate ASSY Fig 4 13 16 Unhook the pressure plate spring from the plastic hook to remove the two pressure plate springs Fig 4 14 Pressure plate ASSY Plastic frame Catches A Paper tray Paper tray Pressure plate spring Pressure plate spring Catch B Hook ...

Page 111: ...te do not bend the pressure plate gently ease the plastic cover If the pressure plate is deformed paper feeding problems may occur 17 Remove the herical extension spring 18 Remove the lock lever Fig 4 15 NOTE When re assembling the lock lever insert it upwards from underneath the paper tray and rotate it until the two catches lock into place Herical extension spring Lock lever 1 2 3 Paper tray Pap...

Page 112: ...x8 Taptite screw and then remove the side guide gear and the friction spring 20 Remove the two side guide racks Fig 4 16 21 Remove the paper indicator Fig 4 17 Side guide rack Side guide rack Paper tray Paper indicator Taptite cup B M3x8 Side guide gear Friction spring ...

Page 113: ...e assembling the paper tray remove the old grease and apply a suitable amount of grease onto both sides of the paper tray referring to the figure below Fig 4 18 22 Remove the pan B M3x8 Taptite screw and then remove the tray lock lever 23 Unhook the four hooks to remove the paper tray rear from the paper tray Fig 4 19 Taptite pan B M3x8 Tray lock lever Paper tray Hook Paper tray rear Paper tray Gr...

Page 114: ...HL 5130 5140 5150D 5150DN Service Manual 4 13 24 Remove the paper rear guide Fig 4 20 Paper tray Paper rear guide 2 1 1 ...

Page 115: ...ve the four bind B M3x8 Taptite screws and then remove the DX roller holder and three pressure rollers 3 Remove the three pressure roller springs Fig 4 22 DX feed ASSY Tray feed ZL2 Pressure roller Pressure roller spring Taptite bind B M3x8 Taptite bind B M3x8 Pressure rollers Pressure roller springs DX roller holder ...

Page 116: ...ig 4 23 4 Remove the two bind B M3x8 Taptite screws and then remove the guide plate stopper 5 Remove the two left guide spring 2 Fig 4 24 Left guide spring 2 Taptite bind B M3x8 Taptite bind B M3x8 Guide plate stopper Guide plate stoller Left guide spring 2 Left guide spring 2 Tray feed ZL2 Tray feed ZL2 Pressure roller Pressure roller spring ...

Page 117: ...4 25 8 Remove the DX feed roller drive gear 14 two side regist rollers T belt S and ground wire 9 Remove the guide actuator and T belt L Fig 4 26 Tray feed ZL2 DX paper switch pull arm Left guide plate ASSY Side regist guide DX feed roller T belt S T belt L Drive gear 14 Tray feed ZL2 Hooks 1 2 3 Guide actuator Ground wire Side regist rollers ...

Page 118: ...50DN Service Manual 4 17 3 5 Access Cover 1 Remove the access cover Fig 4 27 3 6 Rear Cover C 1 Remove the bind B M4x12 Taptite screw and then remove the rear cover C Fig 4 28 Access cover Taptite bind B M4x12 Rear cover C ...

Page 119: ...CHAPTER 4 DISASSEMBLY AND RE ASSEMBLY 4 18 3 7 Outer Chute HL 5130 5140 1 Remove the outer chute Fig 4 29 Hook Outer Chute ...

Page 120: ...D 5150DN Service Manual 4 19 3 8 Rear Cover MP ASSY Outer Chute MP ASSY HL 5150D 5170DN 1 Remove the rear cover MP ASSY Fig 4 30 2 Remove the outer chute MP ASSY Fig 4 31 Outer chute MP ASSY Rear cover MP ASSY Hook Hook ...

Page 121: ...R 1 Remove the two bind B M4x12 Taptite screws and then remove the rear cover L 2 Remove the two bind B M4x12 Taptite screws and then remove the rear cover R Fig 4 33 Rear cover MP ASSY Rear cover MP tray Taptite bind B M4x12 Rear cover L Taptite bind B M4x12 Hook Hook Rear cover R Taptite bind B M4x12 ...

Page 122: ...he three bind B M4x12 Taptite screws and then remove the side cover R Fig 4 34 2 Remove the four bind B M4x12 Taptite screws and then remove the side cover L Fig 4 35 Side cover R Taptite bind B M4x12 Side cover L Taptite bind B M4x12 Hook Hooks Hooks Hook Taptite bind B M4x12 ...

Page 123: ...top cover ASSY 2 Disconnect the panel PCB harness from the panel PCB ASSY Fig 4 36 3 Remove the paper stopper and the support flap S from the top cover ASSY Fig 4 37 Paper stopper Support flap S Top cover ASSY Hook Hook Hook Top cover ASSY Hooks Taptite bind B M4x12 Taptite bind B M4x12 Panel PCB ASSY Panel PCB harness Hook ...

Page 124: ...SSY 5 Remove the SW key A the SW key B and the panel light guide from the top cover ASSY Fig 4 38 6 Remove the panel light guide 2 and the diffusion film from the panel guide Fig 4 39 Taptite cup B M3x8 Panel light guide 2 Diffusion film SW key B Panel light guide Panel light guide SW key A Top cover ASSY Panel PCB ASSY ...

Page 125: ...ws and then remove the inner chute Fig 4 40 8 Remove the corrugation pinch roller L R and pinch roller holder Fig 4 41 Taptite bind B M4x12 Hooks Taptite bind B M4x12 Taptite bind B M4x12 Inner chute Hook Top cover printed ASSY Corrugation pinch roller L R Pinch roller holder Inner chute ...

Page 126: ...HL 5130 5140 5150D 5150DN Service Manual 4 25 3 12 Front Cover ASSY HL 5130 5140 1 Release the link 2 Remove the front cover ASSY Fig 4 42 Frame Front cover ASSY Link ...

Page 127: ... screws 4 Remove the MP solenoid holder unit Fig 4 43 5 Remove the cup S M3x6 Taptite screw and then open the MP chute ASSY cover 6 Remove the paper pick up roller ASSY from the shaft Fig 4 44 MP ground spring Paper pick up roller ASSY Taptite cup S M3x6 MP chute ASSY cover MP sensor harness Hook Shaft Engine PCB connector Taptite bind B M3x10 MP solenoid holder unit Taptite cup S M3x6 ...

Page 128: ...essure plate remove the separation plate ASSY Fig 4 45 NOTE When replacing with the new separation plate ASSY attach it after peeling the cover paper of double faced tape Fig 4 46 Separation plate ASSY MP chute ASSY MP pressure plate Separation plate ASSY Double faced tape ...

Page 129: ...ease link and then remove the MP front cover ASSY from the MP chute ASSY Fig 4 47 9 Remove the bosses from the guide at 2 spots in the MP tray ASSY and then remove the MP paper guide ASSY Fig 4 48 MP tray ASSY MP front cover ASSY Drive release link MP chute ASSY MP chute ASSY MP paper guide ASSY Shaft Shaft ...

Page 130: ...150DN Service Manual 4 29 10 Remove the MP tray ASSY Fig 4 49 11 Remove the MP paper guide 2 and the MP paper guide 3 from the MP tray ASSY Fig 4 50 MP paper guide 3 MP paper guide 2 MP tray ASSY MP tray ASSY MP chute ASSY ...

Page 131: ...12 Open the MP chute ASSY cover 13 Remove the MP PE actuator Fig 4 51 14 Remove the four bind B M4x12 Taptite screws and then remove the MP chute ASSY Fig 4 52 MP PE actuator Taptite bind B M4x12 Taptite bind B M4x12 MP chute ASSY MP chute ASSY ...

Page 132: ...HL 5130 5140 5150D 5150DN Service Manual 4 31 15 Remove the MP PE sensor PCB ASSY Fig 4 53 MP PE sensor PCB ASSY MP chute ASSY Hook Hooks Hooks ...

Page 133: ...e the bind B M4x12 Taptite screw and the shoulder screw and then remove the fixing unit Fig 4 54 3 Remove the three cup B M3x10 Taptite screws and then remove the FU paper guide Fig 4 55 Pin Pin FU paper guide Taptite cup B M3x10 Fixing unit Fixing unit Thermistor harness Heater harness Taptite bind B M4x12 Shoulder screw ...

Page 134: ...g 4 56 5 Remove the cup B M3x12 Taptite screw 6 Release the thermistor ASSY harness from the four hooks 7 Remove the thermistor ASSY Fig 4 57 Thermistor relay PCB ASSY Taptite cup B M3x10 Fixing unit Pin Pin Star wheel holder Taptite cup B M3x12 Fixing unit Thermistor ASSY Hook Hook Thermistor relay PCB ASSY Thermistor ASSY harness ...

Page 135: ...of the thermistor is correct referring to the figure below Fig 4 58 8 Remove the two cup B M3x20 Taptite screws 9 Remove the FU frame upper from the FU frame lower Fig 4 59 Thermistor Thermistor Taptite cup B M3x12 FU frame upper FU frame lower Hook Hook Pin FU frame upper Hook Pin Hook Taptite cup B M3x20 Taptite cup B M3x20 ...

Page 136: ...he halogen heater lamp When securing the screw to assemble the halogen lamp connector plate ensure you use the plastic jig as shown in the figure below to avoid damaging the edge of the halogen heater lamp Fig 4 61 Screw pan S P washer M26x8 Plastic jig Halogen lamp connector plate Halogen heater lamp Screw pan S P washer M26x8 Heat roller 25 FU frame upper Heat roller 25 Halogen lamp Halogen lamp...

Page 137: ...R bearing 25 Fig 4 62 CAUTION Never touch the surface of the heat roller NOTE When re assembling the heat roller 25 to the FU frame upper place the two projections onto the bosses on the frame as shown in the figure below Fig 4 63 HR gear 34 HR retaining ring 25 Heat roller 25 HR bearing 25 Heat roller 25 projection HR gear 34 HR bearing 25 boss Heat roller washer 25 HR bearing 25 ...

Page 138: ...FU frame upper ensure you do not damage the heat roller 25 with the four separate claw ASSY on the FU frame upper Fig 4 64 18 Remove the pressure roller 25 Fig 4 65 Separate claw ASSY FU frame upper Separate claw ASSY Heat roller 25 Pressure roller 25 FU frame lower FU jam remove cover 2 3 1 ...

Page 139: ... direction of the roller is correct referring to the figure above Ensure that the both springs are seated correctly in the locating channel and does not protrude from either end Ensure also that the proper spring is fixed to the each cleaner pinch roller ASSY because the both springs are NOT identical with each other Fig 4 67 FU frame lower Cleaner pinch roller ASSY S Cleaner pinch roller ASSY S C...

Page 140: ...ptite screw and then remove the eject sensor PCB ASSY 26 Remove the bind B M3x10 Taptite screw and then remove the thermistor relay PCB ASSY Fig 4 68 27 Remove the paper eject actuator and eject actuator spring Fig 4 69 Taptite bind B M3x10 Taptite bind B M3x10 FU frame lower Thermistor relay PCB ASSY Eject sensor PCB ASSY FU frame lower Eject actuator spring Paper eject actuator hook Hooks Hook E...

Page 141: ...rrectly in the locating channel referring to the figure below Fig 4 70 28 Disconnect the heater harness 29 Remove the four cup B M3x6 Taptite screws 30 Remove the four claw holder plate 31 Remove the four separate claw ASSY Fig 4 71 Paper eject actuator Eject actuator spring FU frame lower Separate claw ASSY Separate claw ASSY Heater harness Claw holder plate Taptite cup B M3x6 Tweezers ...

Page 142: ...ensor HL 5150D 5170DN 1 Disconnect the connector and then remove the rear cover sensor Fig 4 72 3 16 Laser Unit 1 Remove the filter and then remove the cup S M3x8 Taptite screw and the air duct Fig 4 73 Rear cover sensor Connector Filter Air duct Taptite cup S M3x6 ...

Page 143: ...ect the polygon motor harness and remove the sponge from the laser unit 4 Remove the six cup S M3x8 Taptite screws and then remove the laser unit Fig 4 74 5 Remove the shutter arm C Fig 4 75 Taptite cup S M3x8 Taptite cup S M3x8 LD harness 5P Laser unit Shutter arm C Frame L Polygon motor harness Sponge ...

Page 144: ... 2 Remove the access plate Fig 4 76 3 Disconnect the LD harness 5P from the Main PCB ASSY 4 Disconnect the three connectors from the Main PCB ASSY Fig 4 77 LD harness 5P Main PCB ASSY Engine PCB connector Panel PCB connector Access plate Access plate screws Hook Hooks Hooks Hook LVPS connector 1 2 ...

Page 145: ...SEMBLY AND RE ASSEMBLY 4 44 5 Remove the three pan M3x6 screws 6 Remove the four cup S M3x6 Taptite screws and then remove the main PCB ASSY Fig 4 78 Main PCB ASSY Taptite cup S M3x6 Taptite cup S M3x6 Screw pan M3x6 ...

Page 146: ...ite screw and then remove the ground wire 4 Remove the base plate Fig 4 79 5 Remove the two bind B M4x12 Taptite screws and then remove the LV insulation sheet 1 2 3 Fig 4 80 Taptite cup S M3x6 Taptite bind B M4x12 Taptite bind B M4x12 Taptite bind B M4x12 Taptite cup S M3x6 Base plate Screw pan washer M3 5x6 Ground wire LV insulation sheet 2 Taptite bind B M4x12 LV insulation sheet 1 LV insulatio...

Page 147: ...RE ASSEMBLY 4 46 3 19 DX Sensor PCB ASSY HL 5150D 5170DN 1 Disconnect the connector 2 Remove the bind B M3x10 Taptite screws and then remove the DX sensor PCB ASSY Fig 4 81 Taptite bind B M3x10 DX sensor PCB ASSY Engine PCB ASSY ...

Page 148: ... ASSY Toner sensor light reception connector Thermistor relay PCB connector Main motor connector Main PCB connector MP tray PCB connector FR solenoid connector PF solenoid connector Fan motor 60 unit connector LT connector Polygon motor connector Fan motor 60 connector LVPS connector Cassette sensor PCB connector Toner sensor light emission connector HVPS connector DX rear cover connector DX solen...

Page 149: ... flat cable from the high voltage PS PCB ASSY Fig 4 84 3 22 Low voltage PS PCB ASSY 1 Remove the bind B M4x12 Taptite screw 2 Disconnect the two connectors from the low voltage PS PCB and then remove the low voltage PS PCB Fig 4 85 Main PCB Engine PCB Connector Heater Connector Taptite bind B M4x12 Low voltage PS PCB Taptite bind B M4x12 Flat cable High voltage PS PCB ASSY ...

Page 150: ...emove the low voltage PS PCB from the frame Fig 4 86 NOTE Procedures of reassembling inlet harness 1 Assemble the inlet 2 Assemble the fan motor 60 LV 3 Pull the inlet harness backside of the fan motor 60 LV toward the SW holder to take up the slack of the fan motor 60 backside harness Important 4 Assemble the SW holder Taptite bind B M4x12 Inlet holder Inlet SW holder Taptite bind B M4x12 Fan mot...

Page 151: ...the two roller collars from the paper pick up roller ASSY Fig 4 87 4 Remove the bind B M3x10 Taptite screw and then remove the PE sensor cover 5 Remove the cassette sensor PCB ASSY from the frame Fig 4 88 Roller collar Roller collar Paper pick up roller ASSY Bearing R Taptite bind B M3x10 PE sensor cover Cassette sensor PCB ASSY 1 2 ...

Page 152: ... CA actuator from the frame Fig 4 89 7 Remove the spring extension P R from the gear 63P R 8 Remove the gear 63P R 9 Remove the ground wire from the conductor bearing Fig 4 90 Gear 63P R Spring extension P R Ground wire PE actuator CA actuator Frame Hooks Conductor Bearing Hooks ...

Page 153: ...the frame Fig 4 91 12 Remove the idle gear 22 13 Remove the middle roller gear 14 Remove the bind B M3x10 taptite screw and the conductor bearing 15 Remove the 1st F R shaft from the frame Fig 4 92 Bearing L P R shaft 1st F R shaft Conductor bearing Taptite bind B M3x10 Idle gear 22 Frame Hook 1 2 Middle roller gear ...

Page 154: ...he front chute guide assy from the front chute assy 20 Remove the front tray chute assy ZL2 21 Remove the roller 6 pressure roller shaft and roller 6 guide Fig 4 94 Front chute ASSY Taptite bind B M4x12 Taptite bind B M4x12 Taptite cup S M3x6 Taptite cup S M3x6 Front chute ASSY Front tray chute ASSY Taptite shoulder bind B M3x7 5 Front chute guide ASSY Taptite shoulder bind B M3x7 5 Roller 6 guide...

Page 155: ... Taptite screws and then remove the chute 3 Fig 4 95 23 Remove the feed roller gear 24 Remove the bearing F R 25 Remove the feed roller gear shaft from the frame Fig 4 96 Taptite bind B M4x12 Chute 3 Feed roller gear shaft Feed roller gear Bearing F R Bearing F R Hook Frame ...

Page 156: ...r ASSY in the direction of the arrow 27 Remove the feed roller ASSY 28 Remove the joint 5 and the bearing 5 from the feed roller ASSY Fig 4 97 NOTE Be careful that the different direction installation causes jam when you install joint 5 Fig 4 98 Bearing 5 Joint 5 Feed roller ASSY Hook 1 2 3 4 5 Bearing 5 Joint 5 ...

Page 157: ... 4 99 30 Remove the regist front actuator and regist front actuator spring 31 Remove the regist rear actuator and regist rear actuator spring Fig 4 100 Regist front actuator Regist front actuator spring Regist rear actuator Regist rear actuator spring Chute cover Hook Hook ...

Page 158: ...l 4 57 NOTE When assembling the regist front actuator and the regist rear actuator set the spring as shown in the figure Fig 4 101 Regist front actuator spring Regist rear actuator Regist rear actuator spring Regist front actuator Hole Hole ...

Page 159: ...r bind B M4x12 Taptite screws 3 Remove the two bind B M3x10 Taptite screws and then remove the frame L Fig 4 102 4 Remove the back up plate ground spring HL 5130 5140 Fig 4 103 Taptite bind B M4x12 Taptite bind B M3x10 Taptite bind B M3x10 Under bar Under bar Main PCB sheet Frame L Frame L Back up plate ground spring Drive unit ...

Page 160: ... M3x6 Taptite screw and then remove the sub gear plate 10 Remove the LD harness 5P from the drive unit 11 Remove the drive unit 12 Disconnect the connector for the main motor harness from the main motor ASSY Fig 4 104 Taptite bind B M4x12 Taptite bind B M4x12 Taptite cup S M3x6 Taptite cup S M3x6 Main motor harness Taptite cup S M3x6 Sub gear plate Frame L Drive unit Main motor ASSY Ground spring ...

Page 161: ...ive unit 15 Release the two hooks from the develop joint and remove the joint stopper Fig 4 105 16 Remove the gear 40 54Y gear 17 planetary gear 45 arm F R and gear 20 center F R from the main frame L Fig 4 106 Taptite cup S M3x6 Main motor ASSY Drive unit Taptite cup S M3x6 Joint spring Gear 40 54Y Gear 17 planetary Gear 45 arm F R Gear 20 center F R Joint stopper Develop joint ...

Page 162: ...onnect the connector from the front cover sensor 22 Remove the bind B M3x10 Taptite screw 23 Remove the toner LED PCB unit ASSY 24 Remove the sensor clip 25 Remove the front cover sensor from the main frame L Fig 4 108 Taptite bind B M3x10 F R solenoid ASSY Solenoid release spring P R P R solenoid ASSY Toner LED PCB unit ASSY Sensor clip Front cover sensor Sensor clip P R solenoid lever Solenoid r...

Page 163: ...tor 60 Unit 1 Remove the fan motor 60 unit LV and the fan motor 60 unit from the main frame R Fig 4 109 NOTE When you attach the fan motor 60 unit LV or fan motor 60 unit make sure that its label faces outside of the printer Main frame R Fan motor 60 unit Fan motor 60 unit LV ...

Page 164: ...ptite screws 2 Remove the two cup S M3x6 Taptite screws 3 Remove the cup S M3x16 Taptite screw 4 Remove the main frame R unit Fig 4 110 Taptite bind B M4x12 Taptite cup S M3x6 Under bar Main frame R unit Under bar Taptite cup S M3x6 Taptite bind B M4x12 Taptite bind B M4x12 Taptite cup S M3x16 ...

Page 165: ...he cup S M3x6 Taptite screw 7 Remove the drum spring R 8 Remove the FG plate Fig 4 111 9 Remove the toner sensor PCB unit Light reception Fig 4 112 Toner sensor PCB unit Light reception Pin Drum spring R Taptite bind B M4x12 Taptite bind B M4x12 FG plate Taptite cup S M3x6 Main frame R Main frame R ...

Page 166: ...HL 5130 5140 5150D 5150DN Service Manual 4 65 4 PACKING Fig 4 113 AC cords Accessory bag Pad Pad Printer Pad Carton Accessory carton Drum unit ...

Page 167: ...PG4 PG4 PG4 PG4 PG4 PG4 PG4 PG4 PG4 PG4 Shaft idle gear 16 Idle gear 16A Shaft idle gear 16 Idle gear 16A Drive unit Gear 58 88 Pendulum gear 22 Pendulum gear 22 Gear 40 54Y Gear 45 arm F R Gear 17 planetary Gear 20 center F R Frame L PG4 Molykote PG 662 4 mm dia Ball Gear 58 88 ...

Page 168: ...HL 5130 5140 5150D 5150DN Service Manual 4 67 EM3 Duplex Tray Duplex tray Side regist roller Side regist roller DX feed roller EM3 Molykote EM D110 3 mm dia Ball ...

Page 169: ... C Relatively poor solder wettability and spread difficult to wet and spread and hard Appearance dull and grainy surface different from that of conventional solder Relatively poor wettability rough surface bumps are likely to be formed and solder dragging Poor solder elevation Poor thermal conductivity and heat resistant difficult to melt 2 Metal composition wire solder The metal composition of le...

Page 170: ... soldering iron for exclusive use with lead free solder must only be used a soldering iron used for soldering with tin lead solder must not be used with lead free solder The use of soldering irons designed for lead free solder is desirable see 7 Soldering iron below 4 The requirement for the temperature of the soldering iron s tip is the same as that for soldering using conventional solder the tem...

Page 171: ...ee solder is higher than that of conventional solder so productivity will decrease with conventional soldering irons Some tool manufacturers sell soldering irons designed for lead free solder and that can maintain the productivity of the soldering operations The soldering irons used at BIL are model no 941 manufactured by HAKKO and M6 SIC 40 manufactured by BONKOTE The prices of these soldering ir...

Page 172: ...es When printing A4 or Letter size paper at 5 print coverage The actual number of printed pages will vary depending on the average type of print job and paper NOTE There are many factors that determine the actual drum life such as temperature humidity type of paper type of toner used number of pages per print job and so on Under ideal conditions the average drum life is estimated at up to 20 000 p...

Page 173: ...UTION While removing the drum unit handle it carefully because it may contain toner Replacement Procedure 1 Press the cover release button and then open the front cover of the printer 2 Pull out the drum unit assembly Fig 5 2 Fig 5 2 CAUTION We recommend that you place the drum unit assembly on a piece of disposable paper or cloth in case you accidentally spill or scatter toner To prevent damage t...

Page 174: ...s now off CAUTION Only unpack a drum unit immediately before you need to install it into the printer If an unpacked drum unit is subjected to excessive direct sunlight or room light the unit may be damaged Handle the drum unit and toner cartridge carefully If toner scatters on your hands or clothes wipe or wash it off with cold water immediately Discard the used drum unit according to local regula...

Page 175: ...ait to unpack the toner cartridge until immediately before you install it in the printer Toner Low message The Toner LED alternates turning on for 2 seconds and off for 3 seconds Toner Drum Paper Status Fig 5 6 If the LED shows this message the toner cartridge has nearly run out of toner Buy a new toner cartridge and have it ready before you get a Toner Empty message NOTE The Toner LED will blink ...

Page 176: ... the toner cartridge out of the drum unit assembly 4 Unpack the new toner cartridge Hold the cartridge level with both hands and gently rock it from side to side five or six times to spread the toner evenly inside the cartridge Fig 5 10 Fig 5 10 5 Remove the protective cover Fig 5 11 Fig 5 11 6 Put the new toner cartridge firmly into the drum unit until you hear it lock into place If you put it in...

Page 177: ... a Brother genuine toner cartridge which is specially formulated to ensure top print quality Printing with a 3rd party toner or toner cartridge may reduce not only the printing quality but also the quality and life of the printer itself It may also cause serious damage to the performance and life of a genuine Brother drum unit Warranty cover is not applied to problems caused by the use of 3rd part...

Page 178: ...HL 5130 5140 5150D 5170DN SERVICE MANUAL 5 7 NOTE It is recommended to clean the printer when you replace the toner cartridge Refer to subsection 3 PERIODICAL CLEANING in this Chapter ...

Page 179: ...he procedures to replace these parts refer to CHAPTER 4 DISASSEMBLY AND RE ASSEMBLY Parts Name Part No Qty Service life number of prints Replacement Procedure Fixing Unit 230V SP LM2578001 1 80 000 pages Fixing Unit 115V SP LM2579001 1 80 000 pages See subsection 3 14 in CHAPTER 4 Paper Feeding Kit Pad holder ZL2 Paper pick up roller ASSY ZL2 LJ7920001 1 50 000 pages See subsection 3 3 and 3 21 in...

Page 180: ...0D 5170DN SERVICE MANUAL 5 9 2 1 Fixing Unit Replacement procedure 1 Disconnect the AC cord from the printer Fig 5 15 2 Close the front cover and pull out the paper tray Fig 5 16 Front cover AC cord Paper Tray Printer ...

Page 181: ...R 5 PERIODIC MAINTENANCE 5 10 3 Remove the bind B M4x12 Taptite screw and then remove the rear cover C Fig 5 17 4 Remove the rear cover outer chute Fig 5 18 Outer Chute Hook Rear Cover C Taptite bind B M4x12 ...

Page 182: ...the rear cover R Fig 5 19 7 Disconnect the heater harness and thermistor harness 8 Remove the bind B M4x12 Taptite screw and the shoulder screw and then remove the fixing unit Fig 5 20 Taptite bind B M4x12 Rear cover R Rear cover L Hook Taptite bind B M4x12 Taptite bind B M4x12 Hook Taptite bind B M4x12 Fixing unit Shoulder screw Heater harness Taptite bind B M4x12 Thermistor harness ...

Page 183: ...ODIC MAINTENANCE 5 12 2 2 Paper Feeding Kit Replacement procedure 1 Disconnect the AC cord from the printer Fig 5 21 2 Close the front cover and pull out the paper tray Fig 5 22 Printer AC cord Front cover Paper tray ...

Page 184: ...ation pad spring from the paper tray Fig 5 23 4 Remove the bearing R 5 Remove the paper pick up roller ASSY 5 Remove the two roller collars from the paper pick up roller ASSY Fig 5 24 Pad holder Separation pad spring 1 Paper pick up roller ASSY Bearing R Roller collar Roller collar 2 ...

Page 185: ... Turn off the power switch and unplug the power cord 2 Wipe dirt and dust away from the printer exterior with a damp cloth and allow the printer to dry completely before turning the power on again 3 Plug in the power cord CAUTION Use water or neutral detergents for cleaning Cleaning with volatile liquids such as thinner or benzene will damage the surface of the printer Do not use cleaning material...

Page 186: ...rinter 6 Close the front cover 3 3 Cleaning the Scanner Window When replacing the drum unit or toner cartridge with a new one be sure to clean the scanner window 1 Turn off the power switch and unplug the power cord 2 Press the cover release button and then open the front cover 3 Pull the drum unit assembly out of the printer CAUTION It is recommended to place the drum unit assembly on a piece of ...

Page 187: ...he scanner window with your fingers Do not wipe the scanner window with isopropyl alcohol 3 4 Cleaning the Electrical Terminals To obtain the best print performance be sure to clean the electrical terminals inside the printer body 1 Turn off the power switch and unplug the power cord 2 Remove the drum unit from the printer 3 Wipe the electrical terminals as shown in the figure below with a soft dr...

Page 188: ...eantime between failure MTBF and the meantime to repair MTTR for this printer are as follows MTBF Up to 4 000 hours MTTR Average 30 minutes except the periodical maintenance parts the Paper Feeding Kit and the printer control boards whose MTTR is average 10 minutes ...

Page 189: ...ight The room is well ventilated The printer is not placed where the ventilation hole of the printer is blocked 2 Print paper Check if A recommended type of print paper is being used If the paper is too thick or too thin or tends to curl paper jams or paper feed problems may occur or printed images may be blurred The print paper is damp If so use fresh paper and check whether the print quality imp...

Page 190: ...ndensation has occurred print several pages or leave the printer for 2 hours to allow it to reach room temperature If the drum unit is unpacked soon after it is moved from a cold room to a warm room condensation may occur inside the unit which may cause incorrect images Instruct the user to allow the unit to come to room temperature before unpacking it This will take one or two hours 1 2 Warnings ...

Page 191: ...e printer does not start printing Status monitor error message appears 2 1 Operator Calls 3 1 Error message in the Status Monitor Error message is printed The printer does not load paper 3 2 Error message printouts Turn off and on the printer power switch The same error appears 2 2 Service Calls 4 1 Paper Loading Problems 5 Software Setting Problems 9 Network Problems 4 2 Paper Jams 6 Malfunctions...

Page 192: ... Jam clear cover Close the jam clear cover of the fuser unit Paper jam Clear the jammed paper inside the printer Press the panel button if the printer does not automatically resume printing No paper HL 5130 Load paper into the printer Press the go button No paper HL 5140 5150D 5170 DN Load paper into the printer No tray 1 Install the tray 1 Only when the LT is installed If the tray 1 is not set co...

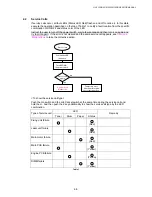
Page 193: ...call appears see Section 6 Malfunctions to take the corrective action Error occurs Confirm the LED indication Turn OFF ON the power switch Error occurs again See Section 6 Malfunction Temporary error Use the printer with out corrective action NO YES To show the service call type Push the Go switch and the Job Cancel switch at the same time during the service call and hold them And then push the 2 ...

Page 194: ...ut a new stack of paper in the paper tray For HL 5130 put paper in the paper tray and then press the Go button If there is paper in the paper tray make sure it is straight If the paper is curled straighten it before printing Sometimes it is helpful to remove the paper turn the stack over and put it back in the paper tray Reduce the amount of paper in the paper tray and then try again Make sure you...

Page 195: ...the printer memory by adding a commercially available DIMM PRINT OVERRUN Press the Go button to print the data left in the printer Press the Job Cancel button if you want to delete the data left in the printer If this does not clear the error reduce the complexity of your document or reduce the print resolution Expand the printer memory by adding a commercially available DIMM Set page protection t...

Page 196: ...d slot Re insert the paper firmly one sheet at a time Make sure that manual feed mode is selected in the printer driver The printer will not feed envelopes The printer can feed envelopes from the manual feed tray or multi purpose tray Your application software must be set up correctly to print on the envelope size you are using This is usually done in the page setup or document setup menu of your ...

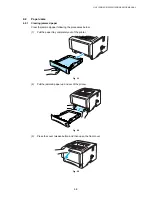
Page 197: ...1 Clearing jammed paper Clear the jammed paper following the procedures below 1 Pull the paper tray completely out of the printer Fig 6 1 2 Pull the jammed paper up and out of the printer Fig 6 2 3 Press the cover release button and then open the front cover Fig 6 3 ...

Page 198: ... of the printer If you cannot remove the drum unit assembly easily at this time do not use extra force Instead pull the edge of the jammed paper from the paper tray Fig 6 4 CAUTION To prevent damage to the printer caused by static electricity do not touch the electrodes shown in Figure 6 5 Fig 6 5 ...

Page 199: ...dirty with toner powder and it may scatter on the next printouts Refer to 3 1 3 Print a test page in Chapter 2 then print a few copies of the test page until the scattering of toner stops CAUTION After you have just used the printer some internal parts of the printer are extremely hot Wait for the printer to cool down before you touch the internal parts of the printer Fig 6 7 6 Open the jam clear ...

Page 200: ...tput tray 8 Push the lock lever down and take the toner cartridge out of the drum unit assembly Take out the jammed paper if there is any inside the drum unit Fig 6 9 9 Put the drum unit assembly back in the printer 10 Put the paper tray in the printer 11 Close the front cover ...

Page 201: ...sfer roller Jam caused by paper length detected as shorter than 80mm The front registration sensor was turned off early Malfunction of actuator or hardware noise Check the front registration sensor referring to 1 3 Inspection Mode in Chapter 7 Top of paper stopped between the paper feed roller and the pick up roller Jam caused by a paper feed delay Paper was not fed in at the proper timing due to ...

Page 202: ... specifications Refer to 3 5 Paper in Chapter 1 3 Try printing using the straight through output path 4 Turn over the stack of paper in the tray or try rotating the paper 180 in the tray Possible cause Step Check Result Remedy Paper 1 Is the problem solved if new paper is used Yes Instruct the user how to store paper so that it does not absorb moisture Fixing unit entrance guide 2 Is the entrance ...

Page 203: ... cause paper to curl 2 If the printer is used infrequently the paper may have sat for too long in the paper tray Turn over the stack of paper in the paper tray Also try rotating the paper 180 in the paper tray 3 Try printing using the straight through output path NOTE For no paper supplied as the cause of a malfunction see M 4 No paper supplied in 6 MALFUNCTIONS in this Chapter ...

Page 204: ...not connected to the same port which is also connected to a mass storage device or scanner Remove all other devices and connect the port to the printer only Turn off the printer status monitor in the device options tab in the printer driver 5 If the print port is set as an ECP port change it to a normal port 6 Try printing the test page referring to 1 3 INSPECTION MODE in Chapter 7 7 Try resetting...

Page 205: ...ver 2 Try to connect the printer directly to the computer if it is connected through a USB hub Possible cause Step Check Result Remedy Computer Operating System 1 Windows 95 or Windows NT4 0 Yes The operating system does not support USB Computer settings 2 Does Universal Serial Bus Controllers appear in the Device Manager tab of System Properties in Control Panel No This problem can be caused by y...

Page 206: ...ons Folder of System Folder No Try to re install the printer driver For System 8 6 or higher BR_PrintMoniter USB Brother Laser Yes Turn off the printer and PC power switch and check all connections between them Then turn them on again S 4 This printer does not appear in Chooser with iMac and Power Macintosh G3 G4 with USB HL 5150D 5170DN User Check 4 Check the printer is turned on 5 Check the USB ...

Page 207: ...Unplug the power supply plug Is there a broken wire between the AC input connector of the low voltage power supply and the power plug Yes Replace the AC power cord M 2 No DC power supplied Possible cause Step Check Result Remedy AC power supply 1 Is AC power supplied between connectors CN1 L and CN1 N when the power plug is plugged into the outlet No Follow the same check procedure of M 1 No AC po...

Page 208: ...in PCB M 4 No paper supplied Possible cause Step Check Result Remedy Separation pad pick up roller failure 1 Is the surface of the separation pad or the pick up roller dirty or worn out Yes 1 Clean the surface of the separation pad or pick up roller 2 Replace the separation pad or pick up roller Failure of connector 1 Is the contact of the solenoid connector on the engine PCB good No Reconnect the...

Page 209: ...tor CN7 on the engine PCB good No Reconnect the connector Blown thermal fuse 2 Remove the fixing unit and measure the resistance of the thermal fuse Is it open circuit Yes Replace the fixing unit Thermistor failure 3 Is the thermistor installed properly Yes Replace the fixing unit No Reinstall the thermistor properly Halogen heater lamp failure 4 Remove the fixing unit and measure the resistance o...

Page 210: ...nnection failure 5 Is the heater harness connector connected to the low voltage power supply PCB and fixing unit secure No Reconnect the connectors securely NOTE This problem will be cleared if leaving the printer power ON for ten minutes If the heater is cooled down sufficiently this problem may be cleared by turning on the printer power switch while pressing the Job Cancel button Be warned howev...

Page 211: ...tor CN8 HL 5130 5140 5150D CN9 HL 5170DN on the main PCB and connector CN10 on the engine PCB secure No Reconnect the connectors securely Engine PCB 3 Is the problem solved by replacing the engine PCB Yes Replace the engine PCB Main PCB 4 Is the problem solved by replacing the main PCB Yes Replace the main PCB M 14 DIMM failure Possible cause Step Check Result Remedy DIMM failure 1 Try installing ...

Page 212: ... n t o u t t e s t P r i n t o u t t e s t p r i n t o P r i n t o u t t e s t p r i n t o P r i n t o u t t e s t p r i n t o u t t e s t p r i n t o u t t e s t P r i n t o u t t e s t p r i n t o P r i n t o u t t e s t p r i n t o u t t e s t p r i n t o u t t e s t P r i n t o u t t e s t p r i n t o P r i n t o u t t e s t p r i n t o P r i n t o u t t e s t p r i n t o u t t e s t p r i n t...

Page 213: ...he toner cartridge is replaced with a full one Yes The wiper of the toner cartridge is defective Replace the toner cartridge Drum connection failure 3 Are all the contacts between the drum unit and printer body connected correctly No Clean contact electrodes both on the drum unit and in the printer body 1 4 5 6 High voltage power supply PCB failure 4 Is the harness connection between the high volt...

Page 214: ... one High voltage power supply PCB failure 4 Is the connections of the connector between the high voltage power supply PCB and the engine PCB secured correctly Yes Replace the high voltage power supply PCB Main PCB failure 5 Are there any disconnected connectors No Replace the main PCB Engine PCB failure 6 Are there any disconnected connectors No Replace the engine PCB User Check 1 Check the paper...

Page 215: ...3 Is the problem solved after replacing the drum unit Yes Replace the drum unit Toner cartridge failure 4 Is the problem solved after replacing the toner cartridge Yes Replace the toner cartridge with a new one Scanner harness connection failure 5 Is the scanner harness connected securely Check if there is any play in the connection No Reconnect the connector correctly Main PCB failure 6 Are print...

Page 216: ...lean both electrodes 3 Harness connection 4 Is the laser unit connected to the main PCB correctly No Connect the harness between the laser unit and the main PCB correctly High voltage power supply PCB failure 5 Is the problem solved after replacing the high voltage power supply PCB Yes Replace the high voltage power supply PCB Main PCB failure 6 Is the problem solved after replacing the main PCB Y...

Page 217: ...e power supply PCB NOTE This problem may disappear after printing approximately 10 pages of completely blank sheets How to clean the pressure roller Clean the pressure roller as follows 1 Set three or more sheets of paper in the paper tray 2 Open the front cover and turn on the power switch while holding down the Go button 3 Release the panel button when the Toner LED is on 4 Close the front cover...

Page 218: ...e drum surface dirty with toner in streaks Yes Replace the drum unit Scratch on the heat roller 5 Is the surface of the heat roller scratched Yes Replace the fixing unit NOTE If you print the same pattern continuously the drum will be worn and black vertical streaks will appear on the paper This problem may occur with noise due to the corona wire being dirty In that case clean the corona wire with...

Page 219: ...lure 4 Are the charge electrodes between the printer body and the drum unit dirty Yes Clean both electrodes 3 High voltage power supply PCB failure 5 Is the problem solved after replacing the high voltage power supply PCB Yes Replace the high voltage power supply PCB I 8 Black vertical streaks in a gray background Possible cause Step Check Result Remedy Ground contacts Translucent stain on the sca...

Page 220: ...electrodes at both sides 4 User Check 1 Try to wipe the scanner window with a soft cloth 2 The toner cartridge may be damaged Install a new toner cartridge 3 Check the printer s environment High temperature and high humidity conditions can cause this problem 4 Damp wet paper might be used Try to change to freshly unpacked paper User Check 1 Check the paper used meets the recommended paper specific...

Page 221: ...ar registration sensor normal No Reposition the sensor to the correct position I 12 Poor fixing Possible cause Step Check Result Remedy Print paper 1 Is thick paper of more than 43lb being used Yes Recommend to use the specified types of paper Toner sensing failure When printing is faint 2 Is the problem solved by replacing the drum unit or the toner cartridge Yes 1 Toner is empty 2 The toner sens...

Page 222: ...u t t e s t p r i n t o P r i n t o u t t e s t p r i n t o P r i n t o u t t e s t p r i n t o u t t e s t p r i n t o u t t e s t P r i n t o u t t e s t p r i n t o P r i n t o u t t e s t p r i n t o P r i n t o u t t e s t p r i n t o u t t e s t p r i n t o u t t e s t P r i n t o u t t e s t p r i n t o P r i n t o u t t e s t p r i n t o P r i n t o u t t e s t p r i n t o u t t e s t p r ...

Page 223: ...er cartridge almost empty Yes Replace the toner cartridge with a new one Print paper 4 Is the problem solved after changing to specified freshly unpacked paper Yes Damp wet paper might be used Recommend to change freshly unpacked paper Environment 5 Does the problem still appear after the printer has warmed up Yes 1 Replace the drum unit 2 Advise the user of the specified print environment User Ch...

Page 224: ... at the surface of the photosensitive drum Fig 6 12 3 Wipe the surface of the photosensitive drum with a cotton swab until the dust or paper powder on the surface comes off Fig 6 13 CAUTION Do not wipe the surface of the photosensitive drum with something sharp ball point pen etc Use cleaning liquid which is a 50 50 mixture of ethyl alcohol and pure water Position of smudge on the drum 94mm interv...

Page 225: ...rrectly No Clean contact electrode both on the drum unit and in the printer body 8 Fixing unit 3 Are the spots at 79mm intervals The problem is not solved after printing a few pages Yes 1 Check and clean the heat roller with a cloth dampened with alcohol 2 Replace the fixing unit High voltage power supply PCB failure 4 Is the problem solved after replacing the high voltage power supply PCB Yes Rep...

Page 226: ...esult Remedy Ground contacts Corona failure 1 Is the wire cleaner at its home position No Return the wire cleaner to its home position 2 Corona failure 2 Is the corona wire dirty Yes 1 Clean the corona wire 2 If the problem still appears after cleaning replace the drum unit 2 ...

Page 227: ... cartridge Be sure to close the cover after removing the drum unit and toner cartridge Yes Toner sensor failure Clean the toner sensor and check the toner sensor connection Toner cartridge failure 3 Is the problem solved after replacing the toner cartridge Yes Replace the toner cartridge Drum unit failure 4 Is the problem solved after replacing the drum unit Yes Replace the drum unit No Replace th...

Page 228: ...artridge failure 1 Is the problem solved after replacing the toner cartridge Yes Replace the toner cartridge High voltage power supply PCB failure 2 Is the problem solved after replacing the high voltage power supply PCB Yes Replace the high voltage power supply PCB User Check 1 Check the paper used meets the recommended paper specifications 2 Select the Thick paper mode in the printer driver or u...

Page 229: ...eed roller 1 Are the feed roller shaft and the ground contact connected correctly No Check the connection between the shaft and the ground contact Also check the ground contact on the back of the feed roller Paper tray contacts 2 Are the ground contacts on the back side of the paper tray connecting correctly No Clean the contacts 7 ...

Page 230: ...g 1 Is thin paper such as 64g m2 used under the thick paper mode Yes 1 Change the current mode to the normal mode from the driver setting 2 Print 5 or 6 blank pages if this problem occurs Drum unit failure 2 Is the problem solved after replacing the drum unit Yes Replace the drum unit High voltage power supply PCB failure 3 Is the problem solved after replacing the high voltage power supply PCB Ye...

Page 231: ...eck 1 Check the paper used meets the recommended paper specifications A rough surfaced paper may cause the problem 2 The toner cartridge may be damaged Install a new toner cartridge 3 The drum unit may be damaged or may be nearly at the end of life Install a new drum unit ...

Page 232: ...rum unit Fig 6 14 7 4 2 Printer body Paper tray Fig 6 15 Drum Unit Paper Tray 2 Wire cleaner 3 Charge 1 Photosensitive drum 7 Ground 5 Grid 5 Grid 3 Charge 1 Photosensitive drum 6 Transfer roller 6 Transfer roller 4 Development roller 4 Development roller 8 Cleaner 8 Cleaner ...

Page 233: ... to the same port which is also connected to a mass storage device or scanner Remove all other devices and connect the port to the printer only Turn off the printer status monitor in the device options tab in the printer driver 6 If the print port is set as an ECP port change it to a normal port 7 Try printing the test page referring to 1 1 Test Print Mode in Chapter 7 8 Try resetting the factory ...

Page 234: ...it will be impossible to print such data under the printer specifications P 3 Unable to print full pages of a document with the MEMORY FULL message User Check 1 Press the Go switch on the control panel to print the data remaining in the printer 2 Reduce the complexity of your document or reduce the printer resolution 3 Expand the printer memory by adding a commercially available DIMM except for HL...

Page 235: ... prints a couple of characters and then ejects the page User Check For DOS environment only The application printer emulation setting and the printer s emulation do not match Check in the application software which printer you have selected to make sure the printer is set up correctly Remember that the printer emulates widely used printer selections HL 5140 HP Laser Jet 6P HL 5150D 5170DN HP Laser...

Page 236: ...with the command ping ipaddress Where ipaddress is the print server IP address note that in some instances it can take up to two minutes for the print server to load its IP address after setting the IP address If a successful response is received then proceed to the UNIX TCP IP Windows NT LAN Server Windows98 95 Me Peer to Peer LPR Internet Printing or Web Browser troubleshooting section Otherwise...

Page 237: ...ing the print server on a different port or on the other hub or multi port repeater 5 If you have a bridge or router located between the print server and host computer make sure that the device is set up to allow the print server to send and receive data from the host For example a bridge can be set up to only allow certain types of Ethernet addresses to pass through a process known as filtering t...

Page 238: ... etc ethers file contains the correct Ethernet address and that the print server name matches the name in the etc hosts file 5 If you used bootp make sure that you started the bootp daemon on any UNIX workstation and bootp is enabled i e the is removed from the bootp entry in the etc bootptab file is correctly configured 6 Also verify that host computer and the print server are either on the same ...

Page 239: ...B add the line mx 0 to your etc printcap file entry 11 If you cannot print from DEC TCP IP Service for VMS UCX make sure that you haave version 2 0B or later of this software because earlier versions will not work with Brother print servers 9 5 Windows NT LAN Server TCP IP Troubleshooting If you are having trouble printing with Windows NT or LAN Server check the following 1 Make sure that TCP IP a...

Page 240: ...played This happens on some Windows 95 98 Me NT 4 0 2000 XP computers Press the ALT and TAB keys to make it appear 2 Make sure that the print server is configured to be in the same workgroup or domain as the test of your computers It may take several minutes for the print server to appear in the network neighborhood 9 9 Brother Internet Print TCP IP Troubleshooting 1 The first step in troubleshoot...

Page 241: ...int server does not appear in the list of attached servers then check the following NOTE It is always a good idea to try followings in order to eliminate the possibility of setup errors Turn the printer off and then on again to force the printer to rescan the Netware queue Delete and recreate the print server and create a new print queue in order to eliminate the possibility of setup errors 1 If y...

Page 242: ...se the print server gets its zone information from router broadcasts it may not be in the zone you expect and will therefore not show up in the Chooser If this is the case you may need to force the zone name using BRAdmin a web browser or the SET APPLETALK ZONE command from TELNET 9 13 DLC LLC Troubleshooting If you are having trouble printing with DLC LLC check the following 1 Make sure that the ...

Page 243: ...cute the selected option LED Type of mode Function Toner Test Sample Page The printer prints a test sample page The printer returns to the ready status after printing This function won t be available after sending a print job from your PC In order to print a test page even after sending a print job follow the steps from 1 to 9 written on page 7 17 in this chapter PIT3 Drum Print Fonts HL 5140 5150...

Page 244: ... You can print the information helpful for maintenance such as error history jam cycle and so on Drum Print setting You can print the current settings of the printer The printer returns to the ready status after printing Paper Sleep Mode Indication OFF Dimmed You can select Sleep Mode Indication be either OFF or Dimmed When you do not execute this option the status LED is OFF while the printer is ...

Page 245: ...odes are assigned to the respective LEDs as shown below LED Type of inspection Toner Factory inspection mode 1 Drum Continuous grid pattern print mode Paper 3 patterns print mode grid zip black Status NV RAM value dump mode Toner Drum ROM code reprogramming mode only when flash memory is fitted Drum Paper RAM check Paper Status 4 density pattern print mode NOTE To print the test pattern tests in t...

Page 246: ...gistration sensor HL 5150D 5170DN After checking of all 6 sensors Toner LED is lit if no unusual states are detected Front registration sensor Rear registration sensor Paper eject sensor Front cover sensor Fixing unit cover sensor Toner sensor After checking of all 6 sensors Drum LED is lit if no unusual states are detected Tray 1 paper loading sensor Tray 1 cassette sensor MP paper loading sensor...

Page 247: ...If you want to know the drum unit life or the number of printed pages you should print out the Print Settings 1 Printing out the Print Settings 1 Press the Go switch three times 2 Print the Print Settings NOTE The descriptions printed in Print Configuration vary depending on the countries ...

Page 248: ...the following order 1 Printer information The following terms are indicated in the order Controller version CONT ROM VERSION Equipped network version NET ROM VERSION RAM SIZE Mbyte 2 Maintenance information 1 Consumable information The printable pages remained for each consumable part is indicated Also the percentage of life remained over the total printable pages is indicated in numerical value a...

Page 249: ...um unit life Printing time for 1 page job in discontinuous printing 10 seconds Page counter reduced by the number of drum rotations Time of motor rotation 0 89 8 4 Example The number of pages calculated from drum rotations Cold start page Hot start page 1 page job 5 8 4 8 4 1 60 8 4 8 4 1 2 pages job 5 8 4 3 3 8 4 1 99 8 4 3 3 8 4 1 39 18 pages job 5 8 4 3 3 x 17 8 4 8 27 8 4 3 3 x 17 8 4 7 68 If ...

Page 250: ...uipped The maximum count for each item is 255 times Replace count Number of times which the Drum Toner PF Kit1 and 2 MP Tray Fuser and Laser are replaced The maximum count for each item is 255 times Error history The latest 10 errors are indicated However the cover open error is excluded 2 3 Page 3 HL 5170DN only This page includes various network settings information of the printer ...

Page 251: ... below Get the information The items like Printer s ID Version Serial No and Page Counter are displayed 1 Open the Maintenance Information utility then select Get the Information in the menu 2 Select the LPT port USB you are using 3 Choose the model name HL 5130 5140 5150D and click the OK button Fig 7 2 4 Click the Exit button 5 The dialog box will appear and show the frequencies of drum unit cha...

Page 252: ...instructs you how to clear the problem such as The printer can t print or The printer prints garbage or incorrect fonts 1 When you start the program the Help dialog box shown below appears Fig 7 4 2 Select the problem you have had then the specified window appears 3 Follow the instructions that appear on the PC screen If the problem cannot be solved start the Diagnostics tool to create a log file ...

Page 253: ...er you have to check if you can clear the problem using the Troubleshooting for printer won t print tool described in the previous section 1 When you start the program the dialog box shown below appears Follow the steps described in the box then click the OK button Fig 7 5 2 The message below appears click the OK button if you want to check whether there is any incorrect data or not If you do not ...

Page 254: ... 4 Check the result that the printer reported and click the A B or C button depending on the result 5 The created log file is shown on the PC screen The software will ask whether you wish to print the log file or not Send the log file created with this tool to investigate the problem to the authorized service center ...

Page 255: ...o shows the printer information such as printer version or page counter for all models only when the printer is connected to a parallel port or USB 1 When you start the program the dialog box shown below appears Fig 7 8 2 Select the LPT port or USB you are using and click the OK button 3 The dialog box below appears and indicates the printer information printer ID version drum unit life page count...

Page 256: ...witched from 400V to 300V when 7 000 pages are printed It is switched to 400V again when the toner cartridge is replaced following the LED error message Toner LED ON Status LED ON Red Counted from the number of the drum rotation in non continuous printing Fixing temperature Transparencies 170 C Thin paper 195 C Plain paper 213 C Thick paper 220 C Thicker Bond paper 220 C in non continuous printing...

Page 257: ...M x 1 Production 64 Mbit MASK ROM x 1 16 Mbit FLASH ROM x 1 HL 5170DN Spares 64 Mbit FLASH ROM x 1 16 Mbit FLASH ROM x 1 Working contents 1 Rewrite a Main firmware 2 Set the serial number 3 Rewrite a Network firmware ROM 1 Object parts HL 5130 LJ9565001 MAIN PCB ASSY 5130 FLASH LZ0198001 FW MAIN CONTROLLER 5130 HL 5140 LJ9560001 MAIN PCB ASSY 5140 FLASH LZ0197001 FW MAIN CONTROLLER 5140 HL 5150D L...

Page 258: ...cessory Command Prompt Since the DOS window is opened move the ZL2E folder Type c ENTER CD ZL2E ENTER b Enter a batch file name and press Enter type DRV51 ENTER HL 5130 5140 5150D 5170DN kensa drivers USB will be installed 8 PIT3SPFX EXE Set up by country Download PIT3SPFX EXE from Utility DB then copy it to PIT3 folder in C drive Extract the EXE file PrUt030006 1 Batch file FW5130 BAT Rewrite a m...

Page 259: ...and Drum LEDs light up 3 Type Batch file name and AVA file name then press ENTER key Example FW5170DN LZ0011_A AVA ENTER Data is sent to the printer via the USB cable and start writing While the data is sent to the printer Status LED orange blinking While writing the firmware Status LED red blinking Even if the batch file is completed the data is still transmitted or the writing procedure continue...

Page 260: ...xed to 987654321 Wait until the Status LED green turns on from blinking The printer is now READY status 4 Type Batch file name and BLF file name then press ENTER key Example FW51NET LZ0004_A BLF ENTER Data is sent to the printer via the USB cable and start writing While the data is sent to the printer Status LED orange blinking While writing the firmware Status LED red blinking Even if the batch f...

Page 261: ...ars in the PIT3 status window accordingly 6 SER VVVVVVVVVVVVVVVVVV message appears in the PIT3 control window and PASS message appears in ERR CODE section READY message appears in the PIT3 status window READY is displayed in about 3 seconds When the error occurs The error generated step appears in the PIT3 control window error code appears in ERR CODE section ERROR message appears in the PIT3 stat...

Page 262: ...01 USA X O O O 00102 Canada X O O O 00103 German O O O O 00104 UK O O O O 00106 Australia X O O O 00107 Norway X X X X 00110 Switzerland O O O O 00112 Finland O O O O 00113 Denmark O O O O 00115 Spain O O O O 00116 Italy O O O O 00117 Israel X O O O 00124 South Africa O O O O 00126 Sweden X X X O 00136 Chile X O O O 00143 GULF X O O O 00151 PAN NORDIC O O O X 00160 France Belgium Netherlands O O O...

Page 263: ...36 TP37 TP198 TP48 TP49 TP50 TP303 R19 10k R39 10k R47 10k R46 10k TP700 TP702 TP703 TP705 R62 4 7k R58 4 7k SDCKE 0V TP726 TP727 TP728 TP729 TP730 TP731 TP732 TP733 TP734 U5 Aurora DATA00 40 DATA01 41 DATA02 42 DATA03 43 DATA04 44 DATA05 45 DATA06 46 DATA07 47 DATA08 48 DATA09 49 DATA10 53 DATA11 54 DATA12 55 DATA13 56 DATA14 57 DATA15 58 DATA16 IO 59 DATA17 IO 60 DATA18 IO 61 DATA19 IO 62 DATA20...

Page 264: ... 253 ENGDO 255 LED0 PNLRST 3 LED1 PNLCLK 6 LED2 PNLDO 5 LED3 256 LED4 2 PNLSW0 PNLDI 4 PNLSW1 1 HSTXD IO 207 HSRTS IO 209 R55 10k 0V FG8 FG8 TP100 IF_FG3 R28 39 R27 39 0V IF_FG3 0V R23 22k R24 1M C34 C101 CN4 1 VCC 2 DATA 3 DATA 4 GND 5 FG UBR23 4K5200 6 FG 0V 0V 0V 6A D 7 0 0V R99 33 ZD1 UDZS6 8B R78 33 R85 33 R81 33 VDD5 6B HBUSY_IN 6B SELINN_IN 6B INITN_IN 6B STBN_IN 0V VDD5 VDD3 C86 C103 C98 C...

Page 265: ... 58 DQ13 67 A9 68 BA0 A11 13 A0 54 DQ10 53 DQ9 79 SN1 RASN1 E1 91 DQ27 99 SA1 40 DQ18 94 DQ29 20 A12 NotUse A14 70 A13 NotUse A15 69 A11 A13 4 DQ2 10 DQ7 100 SA2 90 DQ26 17 A8 9 DQ6 30 SN2 RASN2 E2 CN5 2 DQ0 41 DQ19 64 A3 16 A6 57 DQ12 65 A5 95 DQ30 89 DQ25 52 DQ8 29 SN0 RASN0 E0 39 DQ17 59 DQ14 8 DQ5 48 SDA 80 SN3 RASN3 E3 15 A4 63 A1 46 DQ23 19 BA1 A12 7 DQ4 44 DQ21 45 DQ22 96 DQ31 55 DQ11 5 DQ3...

Page 266: ...R50 10k R52 10k R48 10k VDD3 0V 0V TP6 TP7 TP8 TP9 TP5 TP4 TP2 TP3 TP35 TP36 TP37 TP10 TP11 TP12 TP13 TP14 TP15 TP16 TP17 R78 0 TP26 TP29 TP30 TP31 TP32 TP33 TP49 TP48 TP50 TP51 TP52 TP195 TP196 TP197 TP198 TP303 R33 10k R54 10k R62 10k TP700 TP701 TP702 TP703 TP705 R61 10k VDD3 VDD3 0V 0V 0V 0V VDD1 8 VDD1 8 R79 4 7k R76 4 7k 0V TP722 TP723 TP724 TP725 TP726 TP727 TP728 TP729 TP730 TP731 U7 Auror...

Page 267: ...R113 33 R119 33 R115 33 VDD5 CDC cir 2B HBUSY_IN CDC cir 2B SELINN_IN CDC cir 2B INITN_IN CDC cir 2B STBN_IN 0V VDD5 VDD3 C121 C103 C135 C103 C120 C103 C136 C103 CDC cir 1B INITN_IN CDC cir 1B SELINN_IN CDC cir 1B STBN_IN CDC cir 1B HBUSY_IN C115 C101 C116 C101 C118 C101 C119 C101 0V CDC cir 3C D 7 0 C123 C101 C127 C101 C129 C101 C133 C101 C124 C101 0V C132 C101 C130 C101 C126 C101 RA6 33 2 7 1 8 ...

Page 268: ...DQ 31 0 1 8C 7D 4 7E DQ 31 0 0V 0V 0V 0V C51 C47 C103 C103 C103 C103 C103 C103 C103 C103 C103 C131 C97 C79 C114 C98 C81 C117 18 A10 AP A10 14 A2 60 DQ15 43 DQ20 3 DQ1 38 DQ16 49 SCL 66 A7 58 DQ13 67 A9 68 BA0 A11 13 A0 54 DQ10 53 DQ9 79 SN1 RASN1 E1 91 DQ27 99 SA1 40 DQ18 94 DQ29 20 A12 NotUse A14 70 A13 NotUse A15 69 A11 A13 4 DQ2 10 DQ7 100 SA2 90 DQ26 17 A8 9 DQ6 30 SN2 RASN2 E2 CN4 2 DQ0 41 DQ...

Page 269: ...1 15 RXER MA10 14 TXCLK 31 TXD3 MA15 25 TXD2 MA14 24 TXD1 MA13 23 TXD0 MA12 22 VREF 40 PMEN 59 PWRGOOD 123 3VAUX 122 TPTDP 54 TPTDM 53 TPRDP 46 TPRDM 45 MA0 LEDACTN 142 MA1 LED10N 143 MA2 LED100N 144 EESEL 128 MA4 EECLK 2 MA3 EEDI 1 MD4 EEDO 138 MD1 CFGDISN 133 MDC 5 RXOE 13 TXEN 30 MCSN 129 MD7 141 MD6 140 MD5 139 MD3 135 MD2 134 MD0 132 MA5 3 MWRN 131 MRDN 130 R6 0 VDD3 DA1 DF5A6 8LF C3 C1 C2 A ...

Page 270: ...C3 EJECT EJECT_JAM GND THERM CN1 1 2 CN2 1 2 3 VCC3 THERM VCC3 GND EJECT CHG PWM_DEV GND24 VCC24 VERSION VCLN PCB PCB PROCESS UNIT LASER SCANNER MOTOR THERMISTER EJECT SENSOR 2 CN b 1 2 3 4 5 BD_n ENB1_n 5V GND DATA1_n CN1 1 2 3 4 5 DATA_n GND 5V ENB_n BD_n P2 4 5 6 1 2 3 SOL TRAY2 VCC24 GND24 T2REG T2PAPER P1 1 2 24V T2SOL PCB CN2 1 3 AC THERMISTOR RELAY PCB HEATER UNIT LIVE NEUTRAL CHG DEV VCLN ...

Page 271: ...APPENDIX A 9 Appendix 9 Engine PCB Circuit Diagram 1 2 NAME CODE B512153CIR 1 2 LJ923001 A 9 ...

Page 272: ...APPENDIX A 10 Appendix 10 Engine PCB Circuit Diagram 2 2 NAME CODE B512153CIR 2 2 LJ923001 A 10 ...

Page 273: ...APPENDIX A 11 Appendix 11 Low voltage Power Supply PCB Circuit Diagram 120V NAME Low voltage PS Circuit 120V A 11 ...

Page 274: ...APPENDIX A 12 Appendix 12 Low voltage Power Supply PCB Circuit Diagram 230V NAME Low voltage PS Circuit 230V A 12 ...

Page 275: ...APPENDIX A 13 Appendix 13 High voltage Power Supply PCB Circuit Diagram NAME High voltage PS Circuit A 13 ...

Page 276: ...ensor PCB Toner sensor PCB Fan motor 60 unit LV Fan motor 60 unit Laser unit Engine PCB Main PCB Main PCB Panel PCB Laser unit Core Engine PCB Engine PCB MP solenoid holder unit MP PE sensor PCB Engine PCB 1 3 Laser unit Polygon motor harness 4 Fan motor 60 unit 2 5 Panel PCB 6 MP PE sensor PCB 7 ...

Reviews: