3 - 30
Main unit
Feed unit
7
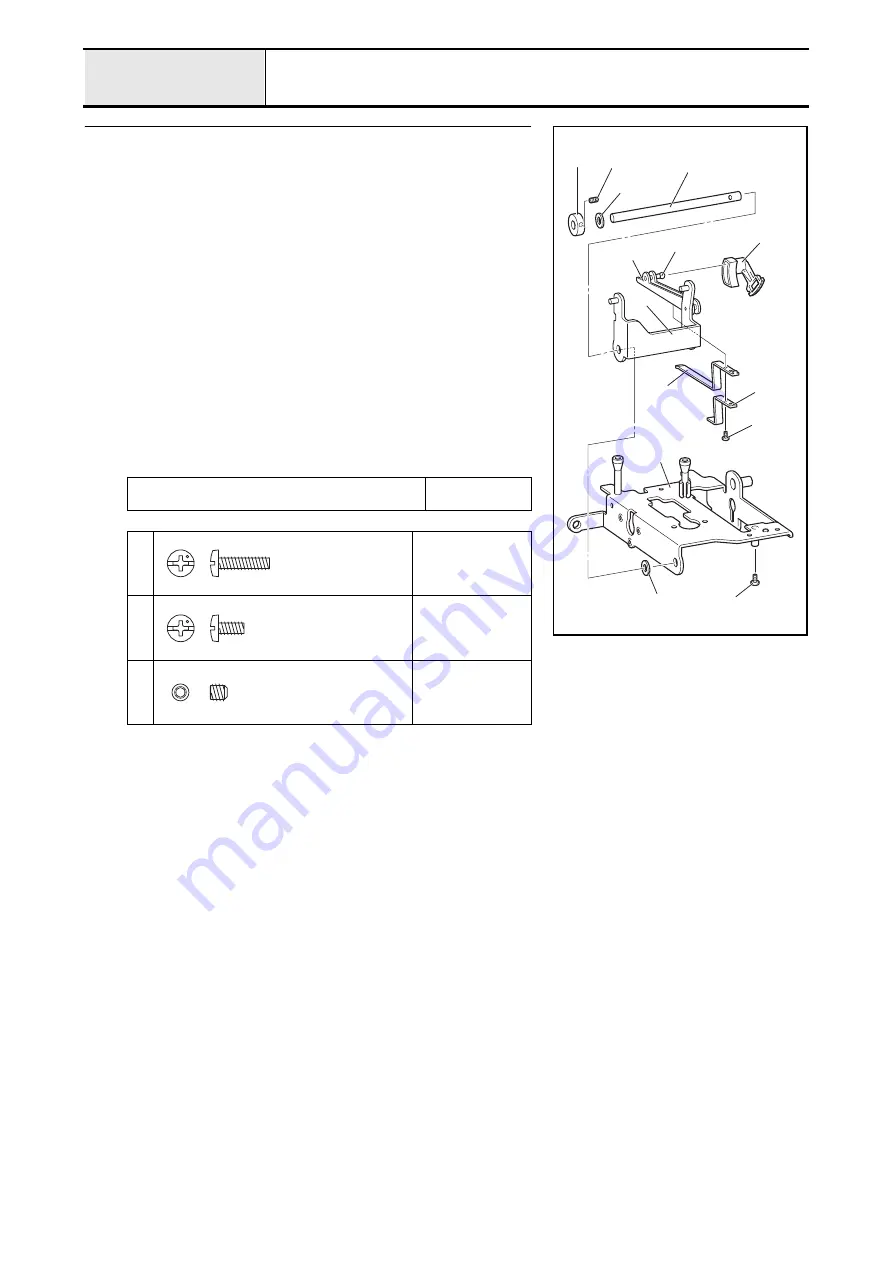
Feed arm A assy. attachment
1. Insert the feed arm A assy.
1
from the rear of the base plate assy.
2
, and
then insert the square shaft
4
of the feed arm B assy.
3
into the feed
adjuster
5
.
2. Insert the thrust washer
7
between the feed arm A assy.
1
and the base
plate assy.
6
.
3. Apply a bead of EPCON AP(N) 0 to the hole on the feed arm A assy.
1
and the hole on the base plate assy.
6
.
4. Insert the horizontal feed shaft
8
into the feed arm A assy.
1
, and secure
them with the screw
1
.
*Key point
• Insert the horizontal feed shaft
8
through the feed arm A
assy.
1
so that the hole on the shaft faces FPM, and align this
hole with the hole on the base plate assy.
6
.
5. Attach the feed supporting plate
9
and feed supporting plate B
8
to the
feed arm B assy.
3
with the screw
2
.
6. Insert the thrust washer
7
and the set collar
9
into the horizontal feed
shaft
8
, and then secure them with the screw
3
.
Apply EPCON AP(N) 0 to the hole on the feed arm A
assy. and the hole on the base plate assy..
Bead
XC8387***
1
Torque
0.78 — 1.18 N
·
m
2
Torque
0.78 — 1.18 N
·
m
3
Torque
0.78 — 1.18 N
·
m
6
2
8
9
4
1
3
7
0
6
5
1
2
3
Screw, Bind
M
3X12
Screw, Bind
M
3X6
Set Screw, Socket (CP)
M4X4
Summary of Contents for HS-3000
Page 1: ......
Page 2: ......
Page 3: ......
Page 9: ...vi ...
Page 16: ...2 1 2 Disassembly Main parts 2 2 Feed unit 2 22 Needle presser unit 2 30 ...
Page 17: ...2 2 Main parts Main parts location diagram Main unit ...
Page 37: ...2 22 Feed unit location diagram Main unit ...
Page 45: ...2 30 Needle presser unit location diagram Main unit ...
Page 55: ...3 2 Main parts Main parts location diagram Main unit ...
Page 77: ...3 24 Main unit Main parts 36 Accessory table attachment 1 Attach the accessory table 1 1 ...
Page 78: ...3 25 Assembly Feed unit Feed unit location diagram Main unit ...
Page 90: ...3 37 Assembly Needle presser unit Needle presser unit location diagram Main unit ...
Page 163: ...7 12 ...
Page 164: ......


