Scan Using the Control Panel
192
7
Scan Using Scan to Network Profiles
7
(ADS-2400N / ADS-3000N)
1
Load your document.
2
Press
,
or
to which you have assigned the Network Scan feature.
The machine starts scanning.
(ADS-2800W / ADS-3600W)
1
Load your document.
2
Swipe left or right, or press
d
or
c
to display
Scan 1
.
3
Press
to Network
.
4
Press
a
or
b
to choose one of Network server profiles listed.
If the Touchscreen prompts you to enter a PIN number, enter the 4-digit PIN number for the profile on
the Touchscreen.
Press
OK
.
Do one of the following:
If the Scan to Network profile is complete, go to
If the Scan to Network profile is not complete, go to
.
5
Press
Options
.
6
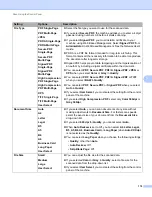
Configure the following settings as needed. To configure more detailed settings, press
Advanced
Settings
. For more information, see page 227. Press
OK
.
2-sided Scan
Scan Type
Resolution
File Type
Document Size
File Name
File Name Style
File Size
Auto Deskew
Skip Blank Page
User Name
Advanced Settings
Summary of Contents for ImageCenter ADS-2400N
Page 37: ...General Information 21 1 3 Select Initial Setup in the folder tree Windows ...
Page 41: ...General Information 25 1 3 Select General Setup in the folder tree Windows ...
Page 45: ...General Information 29 1 3 Select Language in the folder tree Windows ...
Page 256: ...Routine Maintenance 240 9 4 Firmly push the Output Tray into the machine ...


