SEWING THE STITCHES
124
■
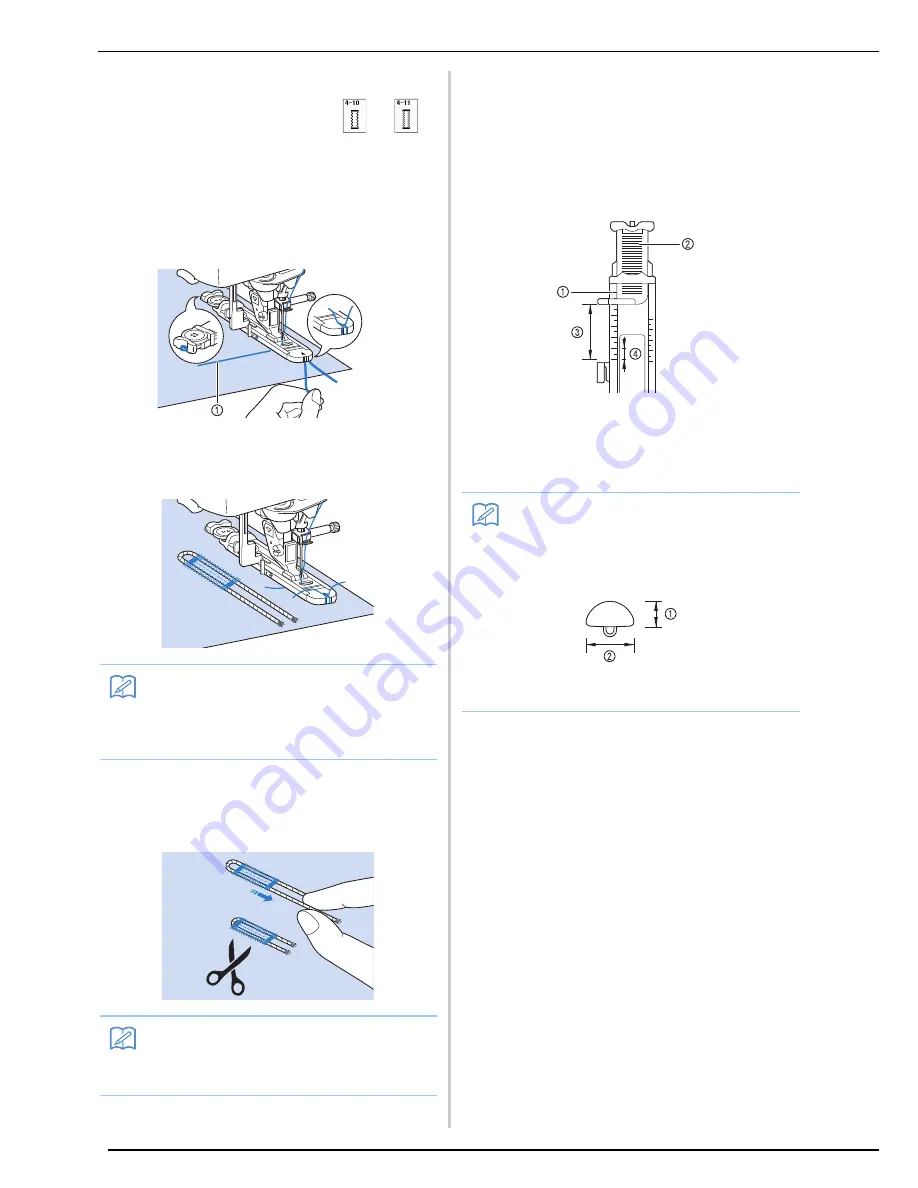
Sewing Stretch Fabrics
When sewing on stretch fabric with
or
,
sew the buttonhole stitches over a gimp thread.
a
Hook the gimp thread onto the back of
presser foot “A”. Insert the ends into the
grooves at the front of the presser foot, and
then temporarily tie them there.
a
Upper thread
b
Lower the presser foot and start sewing.
c
Once sewing is completed, gently pull the
gimp thread to remove any slack, and trim
off any excess.
■
Odd Shaped Buttons/Buttons that do
Not Fit into the Button Holder Plate
Use the markings on the presser foot scale to set the
size of the buttonhole. One mark on the presser foot
scale equals 5 mm (approx. 3/16 inch).
Add the button diameter and thickness together, and
then set the plate at the calculated value.
a
Presser foot scale
b
Button holder plate
c
Completed measurement of di thickness
d
5 mm (approx. 3/16 inch)
Memo
• Set the width of the satin stitches to the
width of the gimp thread, and set the button-
hole width to be 2-3 times the width of the
gimp thread.
Memo
• After using the seam ripper to cut open the
threads over the buttonhole, trim off the
threads.
Memo
• For example, for a button with a diameter of
15 mm (approx. 9/16 inch) and a thickness
of 10 mm (approx. 3/8 inch), the scale
should be set at 25 mm (approx. 1 inch).
a
10 mm (approx. 3/8 inch)
b
15 mm (approx. 9/16 inch)
Summary of Contents for Innov-is NV6000D
Page 1: ...Computerized Embroidery and Sewing Machine ...
Page 14: ...CONTENTS xii ...
Page 35: ...LCD SCREEN Getting Ready 21 1 ...
Page 90: ...USEFUL FUNCTIONS 76 ...
Page 269: ...USING THE MEMORY FUNCTION Embroidery 255 5 f Press o The sewing screen is displayed ...
Page 302: ...EDITING PATTERNS 288 ...
Page 326: ...PRINT AND STITCH COMBINING EMBROIDERY PATTERNS AND PRINTED DESIGNS 312 ...
Page 338: ...USING STORED CUSTOM STITCHES 324 ...
Page 373: ......
Page 374: ......
Page 375: ......


