background image

Troubleshooting    

143

GETTING READ

Y

CONTENTS

SEWING BASICS

U

T

IL

IT

Y

 S

T

ITCHES

APPENDIX

INDEX

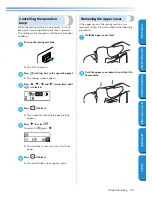
Cancelling the operation 
beep

When the sewing machine is purchased, it is set to 
beep each time an operation panel key is pressed. 
This setting can be changed so that the machine does 
not beep.

1

Turn on the sewing machine.

X

The LCD comes on.

2

Press 

 (settings key) in the operation panel.

X

The settings screen appears.

3

Press , ,  

and  

(arrow 

keys) 

until 

 is selected.

4

Press  

(OK 

key).

X

The screen for changing the beep setting 
appears.

5

Press  

to 

select .

To return to 

, press 

.

X

The machine is now set so that it will not 
beep.

6

Press  

(OK 

key).

X

The initial stitch screen appears again.

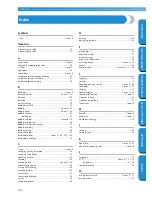
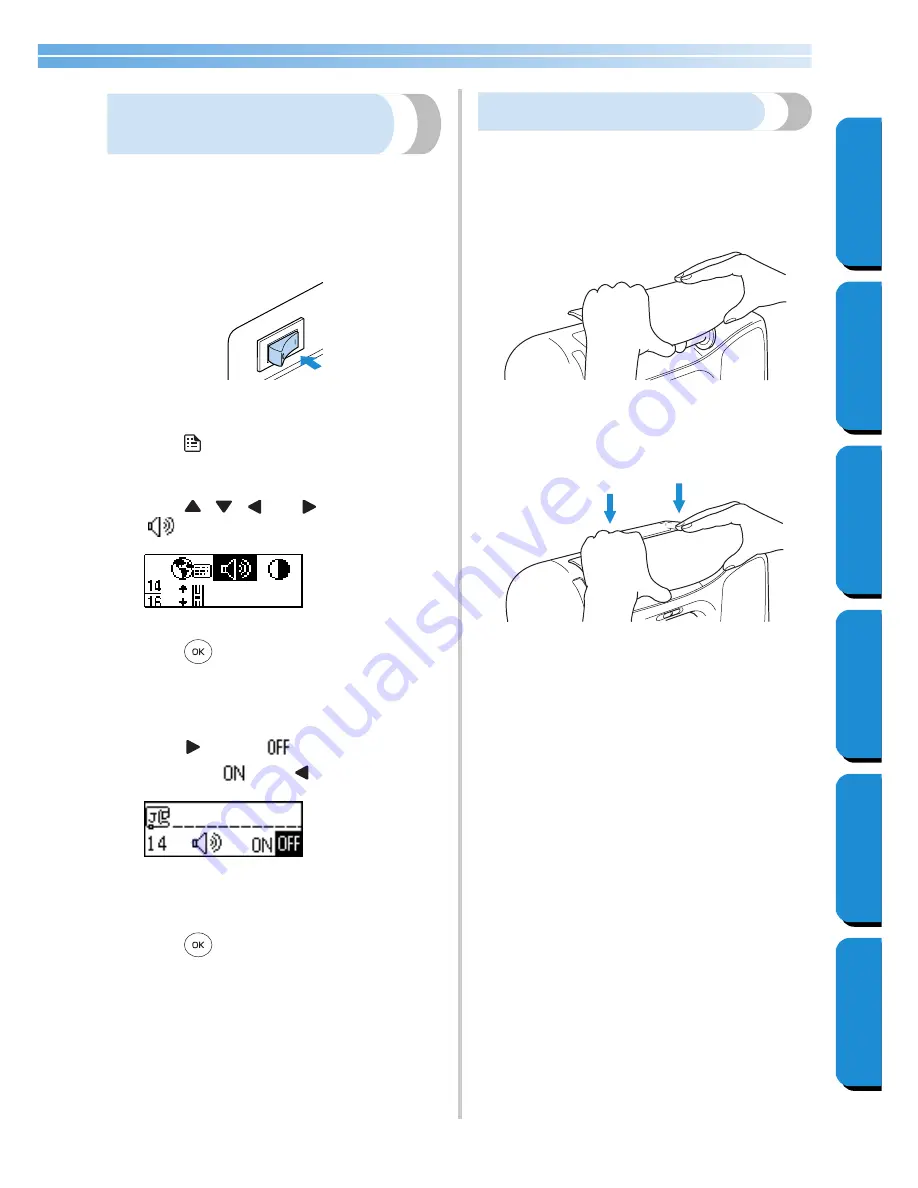
Removing the upper cover

If the upper cover of the sewing machine was 
removed, re-attach it as described in the following 
procedure.

1

Hold the upper cover level.

2

Push the upper cover down to re-attach it to 
the machine.

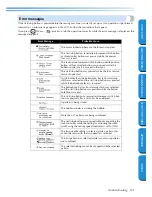
Summary of Contents for Innov-is PC420

Page 1: ......

Page 2: ...09 051 22 Spool cap large 130012 054 7 Button fitting foot M 130489 001 23 Spool cap medium 2 X55260 153 8 Walking foot SA140 XC2214 002 24 Spool cap small 130013 154 9 Quilting foot SA129 XC1948 002 25 Extra spool pin XC4654 051 10 Stitch guide foot P SA160 XA8839 002 26 Spool net XA5523 050 11 Adjustable zipper piping foot SA161 XC1970 002 27 Foot controller XC1154 051 12 Non stick foot SA114 XC...

Page 3: ...winder Use the bobbin winder when winding the bobbin 7 Operation panel Select a stitch from those that appear in the operation panel page Cover E 8 Sewing speed controller Use the sewing speed controller to adjust the sewing speed 9 Knee lifter mounting slot Plug the knee lifter into the knee lifter mounting slot 0 Operation buttons Use the operation buttons to start the sewing machine and automat...

Page 4: ...ed stitching 8 Presser foot holder The presser foot is installed onto the presser foot holder Right side rear view 1 Presser foot dial Use the presser foot dial to adjust the amount of pressure that the presser foot applies to the fabric 2 Handle Carry the sewing machine by its handle when transporting the machine 3 Balance wheel Turn the balance wheel toward you to raise and lower the needle to s...

Page 5: ...o sew in the opposite direction Reinforcement stitches are sewn by sewing 3 to 5 stitches on top of each other For details refer to Securing the stitching page 51 3 Needle position button Press the needle position button to raise or lower the needle Pressing the button twice sews one stitch 4 Thread cutter button Press the thread cutter button after stopping sewing to cut both the upper and the bo...

Page 6: ...be displayed 3 Stitch selection key Press this key to select the desired type of stitch 4 key Press this key to add a pattern when sewing combinations of characters or decorative stitches 5 C key Press this key to remove an added pattern when sewing combinations of characters or decorative stitches 6 Arrow keys Use these keys to move in the indicated direction when selecting an item displayed on t...

Page 7: ...re available as optional accessories 1 Side cutter Part code SA177 XC3879 002 2 Quilting guide Part code SA132 XC2215 002 3 Wide table Part code SA537 XC4541 051 Memo To obtain optional accessories or parts contact your sales representative or the nearest authorized service center 1 2 3 Enclosed Accessories ...

Page 8: ...d In addition the needle can be threaded with a simple operation page 24 2 Automatic thread cutting The sewing machine can be set to automatically cut the thread at the end of the stitching page 58 3 One touch lower threading You can start sewing without pulling up the bobbin thread page 22 4 Simple bobbin winding The bobbin can quickly and easily be wound with thread page 18 5 Built in stitches Y...

Page 9: ...hine Settings 14 Changing the settings 14 Changing the needle stop position 16 Adjusting the brightness of the LCD 16 Changing the screen language 17 Winding Installing the Bobbin 18 Bobbin precautions 18 Winding the bobbin 18 Installing the bobbin 22 Upper Threading 24 Threading the upper thread 24 Threading the needle 27 Using the twin needle 28 Using thread that winds off quickly 31 Pulling up ...

Page 10: ...ics 64 Sewing stretch fabrics 64 Sewing leathers or vinyl fabrics 64 Sewing an even seam allowance 64 UTILITY STITCHES 67 Selecting Stitching 68 Stitch types 68 Selecting stitching 68 Overcasting Stitches 70 Sewing overcasting stitches using overcasting foot G 70 Sewing overcasting stitches using zigzag foot J 71 Sewing overcasting stitches using the optional side cutter 72 Basic Stitching 74 Bast...

Page 11: ...t sewing patterns 115 Checking the selected pattern 116 Changing the pattern size 117 Changing the stitch density 118 Changing the pattern length 118 Mirror imaging the pattern 119 Storing a pattern 120 Realigning the pattern 121 Designing a Pattern 123 Drawing a sketch of the pattern 123 Entering the pattern data 124 Design exampled 126 APPENDIX 127 Stitch Settings 128 Utility stitches 128 Other ...

Page 12: ...the accumulation of lint dust and loose cloth 5 Never drop or insert any object into any opening 6 Do not use outdoors 7 Do not operate where aerosol spray products are being used or where oxygen is being administered 8 To disconnect turn the main switch to the symbol position which represents off then remove plug from outlet 9 Do not unplug by pulling on cord To unplug grasp the plug not the cord...

Page 13: ... use a fuse approved by ASTA to BS 1362 i e carrying the mark rating as marked on plug Always replace the fuse cover never use plugs with the fuse cover omitted WARNING DO NOT CONNECT EITHER WIRE TO THE EARTH TERMINAL WHICH IS MARKED WITH THE LETTER E BY THE EARTH SYMBOL OR COLOURED GREEN OR GREEN AND YELLOW The wires in this main lead are colored in accordance with the following code Blue Neutral...

Page 14: ... the machine directly into the wall Do not use extension cords For a longer service life 1 When storing this machine avoid direct sunlight and high humidity locations Do not use or store the machine near a space heater iron halogen lamp or other hot objects 2 Use only neutral soaps or detergents to clean the case Benzene thinner and scouring powders can damage the case and machine and should never...

Page 15: ...ions required before starting to sew are described in this chapter Turning the Machine On Off 10 Understanding the LCD Screens 12 Changing the Machine Settings 14 Winding Installing the Bobbin 18 Upper Threading 24 Replacing the Needle 33 Replacing the Presser Foot 37 Sewing Cylindrical or Large Pieces 42 ...

Page 16: ...During electrical storms Do not use extension cords or multi plug adapters with many other appliances plugged in to them Fire or electric shock may result Do not touch the plug with wet hands Electric shock may result When unplugging the machine always turn off the main power first Always grasp the plug to remove it from the outlet Pulling on the cord may damage the cord or lead to fire or electri...

Page 17: ...ess the left side of the main power switch on the right side of the machine set it to X The sewing lamp goes off when the machine is turned off 3 Unplug the power supply cord from the electrical outlet Grasp the plug when unplugging the power supply cord 4 Unplug the power supply cord from the power supply jack Note When the sewing machine is turned off all stitch settings are cancelled If a power...

Page 18: ...he selected stitch and error messages if operations are performed incorrectly When the sewing machine is turned on the LCD comes on and the following screen appears 1 Presser foot that should be used 2 Single or twin needle 3 Selected stitch 4 Stitch length mm 5 Stitch width mm Memo For details on the error messages that appear when an operation is performed incorrectly refer to Error messages pag...

Page 19: ... sewing machine help screen appears 3 Press and arrow keys until the image illustrating desired topic is selected 1 Replacing the presser foot 2 Threading the upper thread 3 Winding the bobbin 4 Installing the bobbin 4 Press OK key X The first screen describing the procedure for the selected topic appears 5 To display the next screen press To return to the previous screen press Example Upper threa...

Page 20: ... is described below 1 Turn on the sewing machine X The LCD comes on 2 Press settings key in the operation panel X The settings screen appears 3 Press and arrow keys until the stitch or machine attribute that you wish to set is selected 4 Press OK key X A screen containing settings for the selected attribute appears 5 Press and arrow keys until the desired setting is selected X The setting is chang...

Page 21: ...es page 118 Pattern size Sets the size of patterns to be large or small page 117 Repeated single sewing Specifies whether the pattern will be sewn once or repeatedly page 115 Stitching density Specifies the sewing density of the stitching page 118 Save settings Allows adjusted pattern widths and lengths to be saved page 60 Needle position Specifies where the needle is positioned when the sewing ma...

Page 22: ... X The screen for changing the needle stop position appears 3 Press to select To return to press X The machine is now set to stop with the needle in the raised position 4 Press OK key X The initial stitch screen appears again Adjusting the brightness of the LCD The brightness of the LCD can be adjusted 1 Press settings key in the operation panel and then press and arrow keys until is selected 2 Pr...

Page 23: ...sh 1 Press settings key in the operation panel and then press and arrow keys until is selected 2 Press OK key X The screen for changing the language of the screens appears 3 Press or until the desired language is selected The language can be changed to one of the available English German French Italian Dutch Spanish Danish Norwegian Swedish Finnish Portuguese Russian Korean Japanese or others X Th...

Page 24: ...that the machine should be threaded for winding the bobbin is indicated by a broken line on the sewing machine Be sure to thread the machine as indicated Only use the bobbin part code SA156 XA5539 151 designed specifically for this sewing machine Use of any other bobbin may result in injuries or damage to the machine The enclosed bobbin was designed specifically for this sewing machine If bobbins ...

Page 25: ...pool If the spool is not positioned so that the thread unrolls correctly the thread may become tangled around the spool pin 7 Slide the spool cap onto the spool pin With the rounded side of the spool cap positioned toward the left slide the spool cap onto the spool pin as far as possible until the right side of the spool touches the right end of the spool pin Three spool cap sizes are available la...

Page 26: ...nd of the thread that wraps around the thread guide for bobbin winding use your right hand to wind the free end of the thread clockwise around the bobbin four or five times b Pull the thread to the right and pass it through the slit in the bobbin winder seat 1 Slit in bobbin winder seat with built in cutter X The thread is cut to a suitable length If the spool or the spool cap is not positioned co...

Page 27: ...shaft to the left h Remove the bobbin from the shaft i Slide the sewing speed controller back to its original position Memo When the sewing machine is started or the balance wheel is turned after winding the thread around the bobbin the machine will make a clicking sound this is not a malfunction Be sure to cut the thread as described on the previous page If the bobbin is wound without cutting the...

Page 28: ... the bobbin into the shuttle so that the thread unrolls to the left Be sure to insert the bobbin correctly 5 Lightly hold down the bobbin with your right hand and then guide the thread as shown with your left hand 6 Pass the thread through the slot as shown and then pull the thread out toward the front 1 Cutter X The cutter cuts the thread Use a bobbin thread that has been correctly wound otherwis...

Page 29: ...xt thread the upper thread Continue with the procedure in Upper Threading on the next page Memo You can begin sewing without pulling up the bobbin thread If you wish to pull up the bobbin thread before starting to sew pull up the thread according to the procedure in Pulling up the bobbin thread page 31 Be sure to hold down the bobbin with your finger and unroll the bobbin thread correctly otherwis...

Page 30: ...t the machine should be threaded is indicated by a solid line on the sewing machine Be sure to thread the machine as indicated Threading the upper thread 1 Turn on the sewing machine 2 Raise the presser foot lever 1 Presser foot lever X The presser foot is raised When threading the upper thread carefully follow the instructions If the upper threading is not correct the thread may become tangled or...

Page 31: ...to the spool pin Slide the spool onto the pin so that the spool is horizontal and the thread unrolls from the bottom front of the spool If the spool is not positioned so that the thread unrolls correctly the thread may become tangled around the spool pin 7 Slide the spool cap onto the spool pin With the rounded side of the spool cap positioned toward the left slide the spool cap onto the spool pin...

Page 32: ...he shutter is closed when the presser foot is lowered the machine cannot be threaded Be sure to raise the presser foot so that the shutter is open in order to thread the machine 1 Shutter a Pass the thread through the thread hook at the base of the needle bar 1 Thread hook Next use the needle threader to thread the needle Continue with the procedure in Threading the needle on the next page If the ...

Page 33: ...thread through the thread guide discs from the front 1 Thread guide discs 2 Pass to the back 3 Pass through the slit 2 Cut the thread with the cutter on the left side of the machine 1 Thread cutter 3 Lower the presser foot lever 1 Presser foot lever X The presser foot is lowered 4 Lower the needle threader lever until it clicks 1 Needle threader lever X The thread is passed through the eye of the ...

Page 34: ...ils refer to Using the twin needle at the right Using the twin needle With the twin needle you can sew two parallel lines of the same stitch with two different threads Both upper threads should have the same thickness and quality Be sure to use the twin needle the extra spool pin and the spool cap For details on the stitches that can be sewn with the twin needle refer to Stitch Settings page 128 1...

Page 35: ... the spool cap The thread should unroll from the top front of the spool 1 Spool cap 2 Spool 7 Thread the upper thread in the same way that the upper thread for the left side was threaded 1 Thread guide cover For details refer to step 8 through 0 of Threading the upper thread page 26 8 Without passing the thread through the needle bar thread hook manually thread the right needle Pass the thread thr...

Page 36: ...h For details on selecting a stitch refer to Selecting stitching page 68 For details on the stitches that can be sewn with the twin needle refer to Stitch Settings page 128 g Start sewing For details on starting to sew refer to Starting to sew page 49 X Two lines of stitching are sewn parallel to each other When using the twin needle be sure to select the twin needle setting otherwise the needle m...

Page 37: ...l pin Pulling up the bobbin thread When making gathers or before free motion quilting first pull up the bobbin thread as described below 1 Insert the bobbin into the shuttle Refer to steps 1 through 5 of Installing the bobbin page 22 2 Pass the bobbin thread through the slot Do not cut the thread with the cutter 3 While lightly holding the upper thread with your left hand press needle position but...

Page 38: ...TITCHES APPENDIX INDEX 5 Pull out about 5 cm 2 inch of the bobbin thread under the presser foot toward the rear of the machine 6 Reattach the bobbin cover Insert the tab in the lower left corner of the bobbin cover and then lightly press down on the right side 2 1 ...

Page 39: ...or the fabric that you wish to sew Only use home sewing machine needles Use of any other needle may bend the needle or damage the machine Never use bent needles Bent needles can easily break possibly resulting in injuries Fabric Type Application Thread Size of Needle Type Size Medium weight fabrics Broadcloth Cotton thread 60 80 75 11 90 14 Taffeta Synthetic thread Flannel Gabardine Silk thread 50...

Page 40: ...the machine is being operated Before using the needle place the flat side of the needle on a flat surface and check that the distance between the needle and the flat surface is even 1 Flat side 2 Needle type marking Correct needle 1 Flat surface Incorrect needle If the distance between the needle and the flat surface is not even the needle is bent Do not use a bent needle 1 Flat surface The approp...

Page 41: ...rewdriver to turn the needle clamp screw counterclockwise to remove the needle 1 Screwdriver 2 Needle clamp screw Do not apply a strong force when loosening or tightening the needle clamp screw otherwise certain parts of the sewing machine may be damaged 5 With the flat side of the needle toward the rear of the machine insert the needle until it touches the needle stopper 6 While holding the needl...

Page 42: ...TS SEWING BASICS UTILITY STITCHES APPENDIX INDEX Be sure to insert the needle until it touches the needle stopper and securely tighten the needle clamp screw with the screwdriver otherwise the needle may break or damage may result CAUTION ...

Page 43: ...twice to raise the needle 1 Needle position button X The needle is raised 2 Turn off the sewing machine 3 Raise the presser foot lever 1 Presser foot lever X The presser foot is raised Use the presser foot appropriate for the type of stitch that you wish to sew otherwise the needle may hit the presser foot causing the needle to bend or break Only use presser feet designed specifically for this sew...

Page 44: ...resser foot pin snaps into the notch in the presser foot holder 1 Presser foot lever X The presser foot is attached 7 Raise the presser foot lever to check that the presser foot is securely attached Note When a stitch is selected the icon for the presser foot that should be used appears in the screen Check that the correct presser foot is attached before starting to sew If the wrong presser foot i...

Page 45: ...ished sewing reset the dial to 3 standard Removing the presser foot holder Remove the presser foot holder when cleaning the sewing machine or when installing a presser foot that does not use the presser foot holder such as the quilting foot Use the screwdriver to remove the presser foot holder Removing the presser foot holder 1 Remove the presser foot For details refer to Replacing the presser foo...

Page 46: ... hard to feed such as vinyl and leather and when sewing fabrics that easily slip such as velvets or when quilting Use the screwdriver to attach the walking foot Attaching the walking foot 1 Remove the presser foot holder For details refer to Removing the presser foot holder on the previous page 2 Hook the connecting fork of the walking foot onto the needle clamp screw 1 Connecting fork 2 Needle cl...

Page 47: ...esser foot holder screw and then remove the walking foot 5 Attach the presser foot holder For details refer to Removing the presser foot holder page 39 Memo Only the straight stitch with reinforcement stitching and the zigzag stitch can be used with the walking foot For details on the stitches refer to Stitch Settings page 128 Be sure to securely tighten the screw with the screwdriver otherwise th...

Page 48: ... 2 Slide the part that you wish to sew onto the arm and then sew from the top 3 When you are finished with free arm sewing install the flat bed attachment back in its original position Sewing large pieces of fabric The optional wide table makes sewing large pieces of fabric easier 1 Open up the legs at the bottom of the wide table Pull out the four legs until they snap into place 2 Pull the flat b...

Page 49: ...e table remove it While slightly lifting up the wide table pull it off to the left 6 Install the flat bed attachment back in its original position Memo With the legs folded up the wide table can be stored attached to the hard case The knee lifter can be stored attached to the bottom of the wide table Do not move the sewing machine while the wide table is attached otherwise damage or injuries may o...

Page 50: ...GETTING READY 44 GETTING READY CONTENTS SEWING BASICS UTILITY STITCHES APPENDIX INDEX ...

Page 51: ... UTILITY STITCHES APPENDIX INDEX SEWING BASICS The necessary preparations for sewing are described in this chapter Sewing 46 Adjusting the Thread Tension 54 Adjusting the Stitch Width and Length 55 Useful Functions 57 Useful Sewing Tips 62 ...

Page 52: ...al attention to the needle location In addition keep your hands away from all moving parts such as the needle and balance wheel otherwise injuries may occur Do not pull or push the fabric too hard while sewing otherwise injuries may occur or the needle may break Never use bent needles Bent needles can easily break possibly resulting in injuries Make sure that the needle does not strike basting pin...

Page 53: ...ser foot appropriate for the stitch For details on replacing the presser foot refer to Replacing the presser foot page 37 4 Position the fabric Place the area to be sewn under the presser foot Be sure that the fabric pieces are sewn in the correct order and that the right and wrong sides of the fabric are aligned correctly For details on positioning the fabric refer to Positioning the fabric page ...

Page 54: ...e position button 3 Place the fabric under the presser foot If the seam allowance is positioned on the right side sewing in a straight line is easier and the extra fabric does not get in the way 4 While holding the end of the thread and the fabric with your left hand turn the balance wheel toward you with your right hand to lower the needle to the starting point of the stitching 5 Lower the presse...

Page 55: ... to hold the start stop button pressed immediately after the sewing starts the machine will sew at a slow speed 3 When the end of the stitching is reached press start stop button once X The machine stops sewing with the needle down in the fabric 4 When you are finished sewing raise the needle and then cut the threads For details refer to Cutting the thread page 53 Using the foot controller Sewing ...

Page 56: ... end of the stitching is reached completely release the foot controller X The machine stops sewing with the needle lowered in the fabric 7 When you are finished sewing raise the needle and then cut the threads For details refer to Cutting the thread page 53 Memo When the foot controller is plugged in the start stop button cannot be used to start or stop sewing When sewing is stopped the needle rem...

Page 57: ...sewing 3 After sewing 3 to 5 stitches press reverse reinforcement stitch button Keep the reverse reinforcement stitch button held down until you reach the beginning of the stitching 1 Reverse reinforcement stitch button X While the reverse reinforcement stitch button is held pressed reverse stitches are sewn 4 After sewing back to the beginning of the stitching release the reverse reinforcement st...

Page 58: ... After sewing to the end of the stitching the sewing machine stops Release the start stop button or foot controller 1 Beginning of stitching 2 End of stitching Sewing reinforcement stitches When sewing stitches other than straight or zigzag stitches that are secured with reverse stitching pressing reverse reinforcement stitch button sews reinforcement stitches 3 to 5 stitches on top of each other ...

Page 59: ... details on setting the machine so that the threads are cut automatically refer to Automatically cutting the thread page 58 Using the manual thread cutter When sewing with thread thicker than 30 nylon or metallic threads or other special threads use the thread cutter on the side of the machine to cut the threads 1 When you wish to finish the stitching and the sewing machine is stopped press needle...

Page 60: ...ad should cross near the center of the fabric Only the upper thread should be visible from the right side of the fabric and only the bobbin thread should be visible from the wrong side of the fabric 1 Wrong side of fabric 2 Right side of fabric 3 Upper thread 4 Bobbin thread Upper thread is too tight If the bobbin thread is visible from the right side of the fabric the upper thread is too tight 1 ...

Page 61: ...ress X The stitch width is changed If the setting is changed the highlighted value is erased Memo To reset the stitch width to its standard setting select the same stitch again or change the setting to the highlighted value If the straight stitch left needle position or triple stretch stitch was selected changing the stitch width changes the needle position Increasing the width moves the needle to...

Page 62: ...hted appear 3 To make the stitch length shorter press To make the stitch length longer press X The stitch length is changed If the setting is changed the highlighted value is erased Memo To reset the stitch length to its standard setting select the same stitch again or change the setting to the highlighted value The settings can be saved so that they will always be specified each time the utility ...

Page 63: ...ls on selecting a stitch refer to Selecting stitching page 68 3 Press settings key in the operation panel X The settings screen appears 4 Press and arrow keys until is selected 5 Press OK key X The screen for specifying automatic reverse reinforcement stitching appears 6 Press to select To return to press X The machine is now set to automatically sew reverse reinforcement stitches 7 Press OK key X...

Page 64: ... Be sure to press the reverse reinforcement stitch button at the end of the stitching Automatically cutting the thread The sewing machine can be set to automatically cut the threads at the end of the stitching This is called programmed thread cutting If programmed thread cutting is set automatic reverse reinforcement stitching is also set This setting is convenient if a stitch for sewing buttonhol...

Page 65: ... X After reverse reinforcement stitches are sewn the machine starts sewing 9 After reaching the end of the stitching press reverse reinforcement stitch button once This step is not necessary if a stitch such as those for sewing buttonholes and bar tacks is selected where reinforcement stitches are automatically sewn X After reverse reinforcement stitches are sewn the sewing machine stops and cuts ...

Page 66: ...and For details on selecting a stitch refer to Selecting stitching page 68 X The stitch width and length are changed 2 Press settings key in the operation panel X The settings screen appears 3 Press and arrow keys until is selected 4 Press OK key X The screen for saving the settings appears 5 Check the is selected and then press OK key X The settings for the stitch width and length are saved The n...

Page 67: ...the notches in the jack and then insert the knee lifter as far as possible Note If the knee lifter is not fully inserted into its jack it may fall out while the sewing machine is operating Using the knee lifter 1 Stop the sewing machine Do not use the knee lifter while the sewing machine is operating 2 With your knee press the knee lifter to the right Keep the knee lifter pressed to the right X Th...

Page 68: ... thread tension and stitch length and width Since the results differ depending on the type of stitching and the number of layers of fabric sewn perform the trial sewing under the same conditions that will be used with your project Changing the sewing direction 1 When the stitching reaches a corner stop the sewing machine Leave the needle lowered in the fabric If the needle remained up when the mac...

Page 69: ... foot J is equipped with a feature that keeps the presser foot level 1 Sewing direction 1 When you encounter a seam that is too thick to feed under the foot raise the presser foot lever 2 Press the black button on the left side of the foot Keep the button held in and lower the presser foot 3 Release the button The foot will lock in place level with the seam allowing the fabric to feed X Once the t...

Page 70: ...g the fabrics that may stick to the presser foot such as leathers or coated fabrics change the presser foot to the non stick foot 1 Leather Sewing an even seam allowance To sew an even seam start sewing so that the seam allowance is to the right of the presser foot and the edge of the fabric is aligned with either the right edge of the presser foot or a marking on the needle plate Aligning the fab...

Page 71: ...om the needle position of a seam sewn with the straight stitch left needle position Sew while keeping the edge of the fabric aligned with a marking in the needle plate The distance between the markings in the upper scale is 1 8 inch 3 mm and the distance between the markings in the grid is 5 mm 3 16 inch 1 Seam 2 Presser foot 3 Centimeters 4 Inches 5 Needle plate 6 16 mm 5 8 inch 6 1 2 5 4 3 ...

Page 72: ...SEWING BASICS 66 GETTING READY CONTENTS SEWING BASICS UTILITY STITCHES APPENDIX INDEX ...

Page 73: ...hing 68 Overcasting Stitches 70 Basic Stitching 74 Blind Hem Stitching 76 Buttonhole Stitching 78 Zipper Insertion 85 Zipper piping Insertion 89 Sewing Stretch Fabrics and Elastic Tape 91 Appliqué Patchwork and Quilt Stitching 93 Reinforcement Stitching 100 Eyelet Stitching 104 Decorative Stitching 105 Sewing the Various Built In Decorative Patterns 113 Designing a Pattern 123 ...

Page 74: ...aracters including letters symbols and numbers in the Script font Character stitch Outline style There are 55 characters including letters symbols and numbers in the outline style Selecting stitching Using the operation panel keys select the desired stitch from those shown in the LCD Twelve of the most often used utility stitches can quickly be selected with the stitch keys When the sewing machine...

Page 75: ...vious screen Press to display the next screen 9 Press OK key X The stitch is selected 0 If necessary specify the setting for automatic reverse reinforcement stitching and adjust the stitch length etc For details on sewing with each of the utility stitches refer to the following pages Note When a stitch is selected the icon for the presser foot that should be used appears in the screen Check that t...

Page 76: ...with the edge of the fabric against the guide of the presser foot and then lower the presser foot lever 1 Guide 4 Sew with the edge of the fabric against the presser foot guide 1 Needle drop point Stitch Name Pattern Stitch Key Application Stitch Width mm inch Stitch Length mm inch Presser Foot Auto Manual Auto Manual Overcasting stitch 11 Preventing fraying in medium weight and thin fabrics 3 5 1...

Page 77: ...n Stitch Width mm inch Stitch Length mm inch Presser Foot Auto Manual Auto Manual Zigzagstitch center needle position 7 Preventing fraying center baseline reverse stitching 3 5 1 8 0 0 7 0 0 1 4 1 4 1 16 0 0 4 0 0 3 16 J Zigzagstitch rightneedle position 8 Preventing fraying right baseline reinforcement stitching 3 5 1 8 2 5 5 0 3 32 3 16 1 4 1 16 0 3 4 0 1 64 3 16 2 point zigzag stitch 9 Preventi...

Page 78: ...crew 5 Position the side cutter so that side cutter pin is aligned with the notch in the presser foot holder and then slowly lower the presser foot lever 1 Notch in presser foot holder 2 Pin X The side cutter is attached Stitch Name Pattern Application Stitch Width mm inch Stitch Length mm inch Presser Foot Auto Manual Auto Manual Overcasting stitch 63 Sewing straight stitches while cutting the fa...

Page 79: ...ric is not positioned correctly the fabric will not be cut a Lower the presser foot lever and then start sewing X A seam allowance is cut while the stitching is sewn If the stitching is sewn in a straight line the seam allowance will be about 5 mm 3 16 inch 1 5 mm 3 16 inch Memo The side cutter can cut as much as one layer of 13 oz denim After using the side cutter clean it by removing any lint or...

Page 80: ...fer to Selecting stitching page 68 4 Lower the needle into the fabric at the beginning of the stitching Stitch Name Pattern Stitch Key Application Stitch Width mm inch Stitch Length mm inch Presser Foot Auto Manual Auto Manual Basting stitch 6 Temporarily securing 0 0 0 0 0 7 0 0 1 4 J Straight stitch left needle position 1 Basic stitching and sewing gathers or pintucks left baseline reverse stitc...

Page 81: ...Straight stitch center needle position When the stitch width of the straight stitch left needle position is set to its standard setting 0 0 mm the distance from the needle position to the right side of the presser foot is 12 mm 1 2 inch If the stitch width is changed between 0 and 7 mm 1 4 inch the needle position will also change By changing the stitch width and sewing with the right side of the ...

Page 82: ...on the fabric with the wrong side facing up 1 Wrong side of fabric 2 Basting 3 Attach blind hem foot R For details refer to Replacing the presser foot page 37 4 Select a stitch For details refer to Selecting stitching page 68 5 Position the fabric with the edge of the folded hem against the guide of the presser foot and then lower the presser foot lever 1 Wrong side of fabric 2 Fold of hem 3 Guide...

Page 83: ... the needle does not catch the hem fold The needle is too far to the right Press of the arrow keys to increase the stitch width so that the needle slightly catches the fold of the hem 1 Wrong side of fabric 2 Right side of fabric For details on changing the stitch width refer to Adjusting the Stitch Width and Length page 55 7 Sew with the fold of the hem against the presser foot guide 8 Remove the...

Page 84: ...les on thick fabrics 5 0 3 16 3 0 5 0 1 8 3 16 0 4 1 64 0 2 1 0 1 64 1 16 45 Buttonholes with bar tacks on both ends for stabilized fabrics 5 0 3 16 3 0 5 0 1 8 3 16 0 4 1 64 0 2 1 0 1 64 1 16 46 Buttonholes for stretch or knit fabrics 6 0 15 64 3 0 6 0 1 8 15 64 1 0 1 16 0 5 2 0 1 32 1 16 47 Buttonholes for stretch fabrics 6 0 15 64 3 0 6 0 1 8 15 64 1 5 1 16 1 0 3 0 1 16 1 8 48 Bound buttonholes...

Page 85: ... as shown below The names of parts of buttonhole foot A which is used for sewing buttonholes are indicated below 1 Button guide plate 2 Presser foot scale 3 Pin 4 Marks on buttonhole foot 5 5 mm 3 16 inch 1 Use chalk to mark on the fabric the position and length of the buttonhole 1 Marks on fabric 2 Pull out the button guide plate of buttonhole foot A and then insert the button that will be put th...

Page 86: ... stitch For details refer to Selecting stitching page 68 5 Position the fabric with the front end of the buttonhole mark aligned with the red marks on the sides of the buttonhole foot and then lower the presser foot lever 1 Mark on fabric 2 Red marks on buttonhole foot Pass the upper thread down through the hole in the presser foot When lowering the presser foot do not push in the front of the pre...

Page 87: ... fabric Changing the density of the stitching Adjust the stitch length For details refer to Adjusting the stitch length page 56 If the fabric does not feed for example if it is too thick increase the density of the stitching Changing the stitch width Adjust the stitch width For details refer to Adjusting the stitch width page 55 Memo Before sewing buttonholes check the stitch length and width by s...

Page 88: ...thread to the wrong side of the fabric and then tie it 8 With a seam ripper cut the middle part of the gimp thread remaining at the top end of the buttonhole Trim off any excess of the gimp thread Button sewing Buttons can be sewn on with the sewing machine Buttons with 2 or with 4 holes can be attached 1 Raise the presser foot lever and then slide the drop feed lever located at the rear of the ma...

Page 89: ...ust the stitch width to the distance between the button holes 6 Start sewing X The sewing machine automatically stops after sewing reinforcement stitches If additional strength is needed to secure the button perform the button sewing operation twice Do not press the thread cutter button 7 Pull the upper thread at the end of the stitching to the wrong side of the fabric and then tie it with the bob...

Page 90: ... securely 1 Place the button into button sewing foot M and then pull the shank lever toward you 1 Shank lever 2 After sewing is finished cut the upper thread with plenty of excess wind it around the thread between the button and the fabric and then tie it to the upper thread at the beginning of the stitching Tie together the ends of the bobbin thread at the end and at the beginning of the stitchin...

Page 91: ...titching page 74 2 Using a basting stitch continue sewing to the edge of the fabric 1 Basting stitching 2 Reverse stitches 3 Wrong side of fabric 4 End of zipper opening 3 Press open the seam allowance from the wrong side of the fabric 1 Wrong side of fabric 4 Align the seam with the center of the zipper and then baste the zipper in place 1 Wrong side of fabric 2 Basting stiching 3 Zipper 5 Attach...

Page 92: ...he zipper opening With the right sides of the fabric facing each other sew reverse stitches after reaching the zipper opening For details refer to Basic Stitching page 74 2 Using a basting stitch continue sewing to the edge of the fabric 1 Basting stitching 2 Reverse stitches 3 Wrong side of fabric 4 End of zipper opening 3 Press open the seam allowance from the wrong side of the fabric 1 Wrong si...

Page 93: ... details refer to Replacing the presser foot page 37 7 Select stitch 3 For details refer to Selecting stitching page 68 8 Sew the zipper to the piece of fabric with the extra 3 mm 1 8 inch starting from the base of the zipper 9 When you are about 5 cm 2 inch from the end of the zipper stop the sewing machine with the needle lowered in the fabric raise the presser foot lever and then open the zippe...

Page 94: ... left pin 1 Pin on the left side 2 Needle drop point b Topstitch around the zipper Sew reverse stitches at the end of the zipper opening and align the zipper teeth with the side of the presser foot 1 Right side of fabric 2 End of zipper opening 3 Reverse stitches 4 Beginning of stitching 5 Basting stitching c When you are about 5 cm 2 inch from the end of the zipper stop the sewing machine with th...

Page 95: ...break and cause injures 3 Select stitch 1 4 Loosen the positioning screw on the back of the presser foot 1 Positioning screw 5 Slide the presser foot over either the left or right feed dog Left sewing position Right sewing position 6 Change the needle position so that the needle does not touch the presser foot For details refer to Adjusting the stitch width page 55 1 Needle drop point Stitch Name ...

Page 96: ...ng stitching 4 End of zipper opening 9 Remove the basting stitching Inserting a piping 1 Place the piping between two fabrics inside out as shown below 1 Fabric 2 Piping 3 Fabric 2 Refer to the steps of attaching the adjustable zipper piping foot on the previous page 3 Sew along the piping 4 After sewing turn them over When sewing be sure that the needle does not touch the zipper otherwise the nee...

Page 97: ...stic tape Therefore it is necessary that a suitable length of the elastic tape be used 1 Pin the elastic tape to the wrong side of the fabric Pin the elastic tape to the fabric at a few points to make sure that the tape is uniformly positioned on the fabric 1 Elastic tape 2 Pin 2 Attach zigzag foot J For details refer to Replacing the presser foot page 37 Stitch Name Pattern Stitch Key Application...

Page 98: ... the elastic tape to the fabric while stretching the tape so that it is the same length as the fabric While pulling the fabric behind the presser foot with your left hand pull the fabric at the pin nearest the front of the presser foot with your right hand When sewing be sure that the needle does not touch any pins otherwise the needle may bend or break CAUTION ...

Page 99: ...ng free motion quilting satin stitching 3 5 1 8 0 0 7 0 0 1 4 1 4 1 16 0 0 4 0 0 3 16 Appliqué stitch 19 Attaching appliqués 3 5 1 8 2 5 5 0 3 32 3 16 2 5 3 32 1 6 4 0 1 16 3 16 61 Attaching appliqués and binding 1 5 1 16 0 5 5 0 1 32 3 16 1 2 1 16 1 0 4 0 1 16 3 16 Piecing straight stitch 57 Piecing straight stitching with a seam allowance of 6 5 mm from the right edge of the presser foot 5 5 7 3...

Page 100: ...placing the presser foot page 37 5 Select a stitch For details refer to Selecting stitching page 68 6 Turn the balance wheel toward you and then begin sewing around the edge of the appliqué making sure that the needle drops just outside of the appliqué When sewing around corners stop the machine with the needle in the fabric just outside of the appliqué raise the presser foot lever and then turn t...

Page 101: ...om either the right side or the left side of the presser foot 1 Baste or pin along the seam allowance of the fabric that you wish to piece together 2 Attach zigzag foot J For details refer to Replacing the presser foot page 37 3 Select stitch 57 or 58 For details refer to Selecting stitching page 68 4 Sew with the side of the presser foot aligned with the edge of the fabric For a seam allowance on...

Page 102: ...bric is called quilting Quilts can easily be sewn using the walking foot and the quilting guide 1 Baste the fabric to be quilted 2 Attach the walking foot For details refer to Using the walking foot page 40 3 Select a stitch For details refer to Selecting stitching page 68 4 Place one hand on each side of the presser foot and then evenly stretch the fabric while sewing Note When sewing with the wa...

Page 103: ... the feed dogs can be lowered using the drop feed lever so that the fabric can be moved freely in any direction The quilting foot is needed for free motion quilting 1 Remove the presser foot and the presser foot holder Refer to Removing the presser foot holder page 39 2 Align the quilting foot with the lower left side of the presser bar The pin on the quilting foot should be positioned over the ne...

Page 104: ...he feed dogs are lowered 5 Turn on the sewing machine and then select a stitch For details refer to Selecting stitching page 68 6 Use both hands to stretch the fabric taut and then move the fabric to follow the pattern Reinforcement stitches are sewn at the beginning and end of sewing 1 Pattern 7 After sewing is finished slide the drop feed lever to to the left as seen from the front of the machin...

Page 105: ...ress OK key X The screen for specifying that the stitch width can be controlled with the sewing speed controller appears 6 Press to select To return to press X The machine is now set so that the stitch width can be controlled with the sewing speed controller 7 Press OK key X The initial stitch screen appears again 8 Select stitch 60 For details refer to Selecting stitching page 68 9 While sewing s...

Page 106: ...bed below 1 Determine the desired length of the bar tack Set the button guide plate on buttonhole foot A to the desired length The distance between the markings on the presser foot scale is 5 mm 3 16 inch 1 Presser foot scale 2 Length of bar tack 3 5 mm 3 16 inch A bar tack with a maximum length of about 28 mm 1 1 8 inch can be sewn Stitch Name Pattern Stitch Key Application Stitch Width mm inch S...

Page 107: ... the front of the presser foot otherwise the bar tack will not be sewn with the correct size 1 Do not reduce the gap 5 Pull down the buttonhole lever as far as possible 1 Buttonhole lever The buttonhole lever is positioned behind the bracket on the buttonhole foot 1 Buttonhole lever 2 Bracket 6 Gently hold the end of the upper thread in your left hand and then start sewing X Once sewing is complet...

Page 108: ...tack with a maximum length of about 28 mm 1 1 8 inch can be sewn 2 Attach buttonhole foot A For details refer to Replacing the presser foot page 37 3 Select stitch 52 or 53 For details refer to Selecting stitching page 68 4 Position the fabric so that the needle is 2 mm 1 16 inch in front of the area to be darned and then lower the presser foot lever 1 Tear 2 2 mm 1 16 inch Pass the upper thread d...

Page 109: ...Bracket 6 Gently hold the end of the upper thread in your left hand and then start sewing X Once sewing is completed the machine automatically sews reinforcement stitches then stops 7 Cut the threads raise the presser foot lever and then remove the fabric 8 Raise the buttonhole lever to its original position Memo If the fabric does not feed for example because it is too thick increase the stitch l...

Page 110: ... beginning of the stitching and then lower the presser foot lever 5 Start sewing X Once sewing is completed the machine automatically sews reinforcement stitches then stops 6 Use the eyelet punch to cut a hole in the center of the eyelet When using the eyelet punch place thick paper or some other protective sheet under the fabric before punching the hole in the fabric Memo If thin thread is used t...

Page 111: ... 5 0 3 16 0 0 7 0 0 1 4 1 6 1 16 1 0 4 0 1 16 3 16 26 5 0 3 16 0 0 7 0 0 1 4 2 5 3 32 1 0 4 0 1 16 3 16 27 5 0 3 16 2 5 7 0 3 32 1 4 2 5 3 32 1 0 4 0 1 16 3 16 Scallop stitch 21 Satin scallop stitching 5 0 3 16 2 5 7 0 3 32 1 4 0 5 1 32 0 1 1 0 1 64 1 16 N Decorative stitch 33 Lace sewing decorative hemming heirloom stitching etc 3 5 1 8 1 5 7 0 1 16 1 4 2 5 3 32 1 6 4 0 1 16 3 16 34 6 0 15 64 1 5...

Page 112: ...For details refer to Replacing the presser foot page 37 4 Select stitch 26 or 27 For details refer to Selecting stitching page 68 5 Set the stitch width to 7 0 mm 1 4 inch For details refer to Adjusting the stitch width page 55 6 Sew with the center of the presser foot aligned along the center of the two pieces of fabric 7 After sewing is finished remove the paper Decorative stitch 29 Decorative s...

Page 113: ...is sewn 4 Trim along the stitches Be careful not to cut the stitches Smocking The decorative stitch created by stitching or embroidering over gathers is called smocking It is used to decorate the front of blouses or cuffs The smocking stitch adds texture and elasticity to fabric 1 Attach zigzag foot J For details refer to Replacing the presser foot page 37 2 Select the straight stitch and then adj...

Page 114: ...itching The gathers that look like shells are called shell tucks They are used to decorate trims the front of blouses or cuffs made of thin fabrics 1 Fold the fabric along the bias 2 Attach zigzag foot J For details refer to Replacing the presser foot page 37 3 Select stitch 20 and then increase the thread tension For details refer to Selecting stitching page 68 4 Sew while making sure that the ne...

Page 115: ...h zigzag foot J For details refer to Replacing the presser foot page 37 2 Sew together the right sides of the two pieces of fabric and then open up the seam allowances 1 Wrong side of fabric 2 6 5 mm 1 4 inch seam allowance 3 Straight stitch 3 Select stitch 22 23 or 24 For details refer to Selecting stitching page 68 4 Turn the fabric over so that the right side faces up and then sew over the seam...

Page 116: ...wing needle otherwise the sewing machine may be damaged Manually pass the thread through the eye of the needle from the front 2 Attach monogramming foot N For details refer to Replacing the presser foot page 37 3 Select a stitch The stitches that can be used are 33 34 35 36 37 38 39 40 or 41 For details refer to Selecting stitching page 68 Select a stitch width of 6 0 mm 15 64 inch or less 4 Start...

Page 117: ...3 Select stitch 33 For details refer to Selecting stitching page 68 4 With the right side of the fabric facing up sew along the right edge of the frayed section 5 Press settings key in the operation panel X The settings screen appears 6 Press and arrow keys until is selected 7 Press OK key X The screen for mirror imaging the pattern appears 8 Press to select To return to press X The pattern is fli...

Page 118: ...everal threads from two sections of the fabric separated by an unfrayed section of about 4 mm 3 16 inch 1 4 mm 3 16 inch 2 Attach monogramming foot N For details refer to Replacing the presser foot page 37 3 Select stitch 36 For details refer to Selecting stitching page 68 4 Sew along the center of the unfrayed section 1 N ...

Page 119: ...e sewn be sure to affix stabilizer material to the fabric Needles and threads When sewing thin mediumweight or stretch fabrics use the ball point needle When sewing thick fabrics use a 90 14 home sewing machine needle In addition 75 11 to 90 14 thread should be used Trial sewing Depending on the type and thickness of the fabric being sewn and whether or not stabilizer material is used the desired ...

Page 120: ...Multiple patterns can be combined and sewn together 1 Select the first pattern and then press OK key X The first pattern is selected and appears in the LCD When the sewing is started the selected pattern is sewn repeatedly until the sewing machine is stopped 2 Press the key in the operation panel X The screen for selecting a pattern appears again 3 Select the next pattern and then press OK key To ...

Page 121: ...rn can be stored for later use For details refer to Storing a pattern page 120 Repeat sewing patterns To repeatedly sew the combined pattern follow the procedure described below 1 Select the pattern For details refer to Combining patterns on the previous page 2 Press settings key in the operation panel X The settings screen appears 3 Press and arrow keys until is selected 4 Press OK key X The scre...

Page 122: ...tting Checking the selected pattern Up to 70 patterns can be combined If all of the selected patterns cannot be displayed in the LCD at the same time the pattern can be checked according to the following procedure 1 Press settings key in the operation panel X The settings screen appears 2 Press and arrow keys until is selected 3 Press OK key X The screen for checking the pattern appears 4 Press an...

Page 123: ...tyle 2 Press settings key in the operation panel X The settings screen appears 3 Press and arrow keys until is selected 4 Press OK key X The screen for changing the pattern size appears 5 Press and until the desired size is selected Select for the small size or select for the large size X The pattern size is changed 6 Press OK key X The initial stitch screen appears again Memo The large pattern si...

Page 124: ...iner stitching 6 Press OK key X The initial stitch screen appears again and the stitching density is changed Changing the pattern length The length of one part of a satin stitch can be set to one of five sizes 1 Select a satin stitch 2 Press settings key in the operation panel X The settings screen appears 3 Press and arrow keys until is selected 4 Press OK key X The screen for changing the length...

Page 125: ... the operation panel X The settings screen appears 3 Press and arrow keys until is selected 4 Press OK key X The screen for mirror imaging the pattern appears 5 Press to select To return to press X The pattern is mirror imaged 6 Press OK key X The initial stitch screen appears again 1 Normal 2 Mirror imaged Memo Some of the utility and decorative patterns can be mirror imaged Mirror imaged pattern...

Page 126: ...Press and until the pocket 1 through 5 where you wish to store the pattern is selected indicates an empty pocket indicates a pocket where a pattern is already stored 6 Press OK key X The contents of the selected pocket are displayed 7 Check the contents and then press OK key The contents stored in the pocket are overwritten X Saving appears while the pattern is being stored in the pocket Do not tu...

Page 127: ...correctly depending on the type of fabric being sewn or the sewing speed If this occurs adjust the pattern while sewing on a piece of scrap fabric that is the same as that used for your project 1 Attach monogramming foot N For details refer to Replacing the presser foot page 37 2 Press stitch selection key in the operation panel X The screen containing the various types of stitches appears 3 Press...

Page 128: ...gs key in the operation panel X The settings screen appears 7 Press and arrow keys until is selected 8 Press OK key X The screen for adjusting the pattern appears 9 Press or X Make the necessary adjustments according to how the pattern is sewn Press to increase the adjustment setting Press to decrease the adjustment setting 0 Start sewing again and then check the pattern Continue adjusting the pat...

Page 129: ...id sheet set Draw the pattern as one continuous line and with the start point and the end point of the design at the same height 2 If the pattern will be repeated determine the space between the repeating patterns 3 Mark the points in the pattern that are positioned at intersections in the grid and then link those points with a continuous straight line 4 Determine the sewing order For a more attra...

Page 130: ...of the first point Press and to select the horizontal coordinate and press and to select the vertical coordinate and then press OK key 6 Specify the coordinates of the second point and then press OK key X A screen appears allowing you to specify the settings for the stitching between the two points 7 Specify whether single stitching or triple stitching will be sewn between the points Press and to ...

Page 131: ...g in the same way as with other stitches With this screen displayed pressing back key allows you to add or remove points Memo To store the entered pattern data store it from the embroidery screen For details refer to Storing a pattern page 120 The pattern in the LCD will appear different from the pattern drawn in the grid sheet set and the actual sewn stitch Also refer to these when entering the d...

Page 132: ... 7 6 5 33 12 25 12 6 6 35 11 26 6 3 7 35 8 27 10 2 8 37 12 28 5 0 9 35 14 29 10 2 10 32 14 30 16 1 11 30 11 31 19 0 12 30 5 32 23 0 13 29 3 33 22 6 14 26 8 34 17 10 15 24 10 35 22 6 16 18 13 36 23 0 17 13 14 37 19 0 18 12 14 38 42 0 19 13 12 Point Point 0 0 0 20 16 10 1 3 5 21 18 12 2 5 8 22 21 13 3 8 11 23 25 14 4 12 13 24 28 14 5 17 14 25 33 13 6 20 14 26 37 11 7 24 13 27 41 8 8 27 12 28 43 5 9 ...

Page 133: ...Y CONTENTS SEWING BASICS UTILITY STITCHES APPENDIX INDEX APPENDIX The various maintenance and troubleshooting procedures are described in this chapter Stitch Settings 128 Maintenance 135 Troubleshooting 137 Index 144 ...

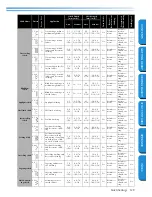
Page 134: ...g stretch fabrics and dec orative stitching 0 0 0 0 0 7 0 0 1 4 2 5 3 32 1 5 4 0 1 16 3 16 Yes Reinforce ment Reinforce ment thread cut ting No Stretch stitch 5 J Sewing stretch fabrics and decorative stitch ing 1 0 1 16 1 0 3 0 1 16 1 8 2 5 3 32 1 0 4 0 1 16 3 16 Yes Reinforce ment Reinforce ment thread cut ting No Basting stitch 6 J Temporarily securing 0 0 0 0 0 7 0 0 1 4 No Reinforce ment Rein...

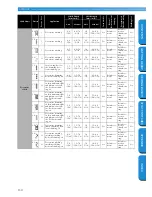
Page 135: ...tch 20 J Shell tuck stitching 4 0 3 16 0 0 7 0 0 1 4 2 5 3 32 0 2 4 0 1 64 3 16 Yes Reinforce ment Reinforce ment thread cut ting No Satin scallop stitch 21 N Scallop stitching 5 0 3 16 2 5 7 0 3 32 1 4 0 5 1 32 0 1 1 0 1 64 1 16 Yes Reinforce ment Reinforce ment thread cut ting No Joining stitch 22 J Patchwork stitching and decorative stitch ing 4 0 3 16 0 0 7 0 0 1 4 1 2 1 16 0 2 4 0 1 64 3 16 Y...

Page 136: ...nt thread cut ting No 36 N Decorative hemming on thin mediumweight and plain weave fab rics heirloom stitch ing etc 5 0 3 16 1 5 7 0 1 16 1 4 4 0 3 16 1 5 4 0 1 16 3 16 Yes Reinforce ment Reinforce ment thread cut ting No 37 N Decorative hemming on thin mediumweight and plain weave fab rics heirloom stitch ing etc 5 0 3 16 1 5 7 0 1 16 1 4 2 5 3 32 1 5 4 0 1 16 3 16 Yes Reinforce ment Reinforce me...

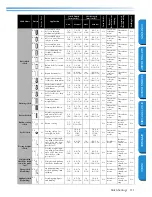
Page 137: ...2 1 4 2 0 1 16 0 4 2 5 1 64 3 32 No Automatic reinforce ment Thread cut ting No 53 A Darning thick fabrics 7 0 1 4 2 5 7 0 3 32 1 4 2 0 1 16 0 4 2 5 1 64 3 32 No Automatic reinforce ment Thread cut ting No Bar tack stitch 54 A Reinforcing openings and areas where the seam easily comes loose 2 0 1 16 1 0 3 0 1 16 1 8 0 4 1 64 0 3 1 0 1 64 1 16 No Automatic reinforce ment Thread cut ting No Button s...

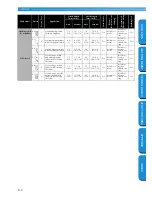
Page 138: ...inforce ment thread cut ting No 65 S Overcasting on thin and mediumweight fabrics while cutting the fabric 3 5 1 8 3 5 5 0 1 8 3 16 2 0 1 16 1 0 4 0 1 16 3 16 No Reinforce ment Reinforce ment thread cut ting No 66 S Overcasting on thick fabrics while cutting the fabric 5 0 3 16 3 5 5 0 1 8 3 16 2 5 3 32 1 0 4 0 1 16 3 16 No Reinforce ment Reinforce ment thread cut ting No 67 S Overcasting on medi ...

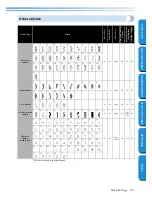
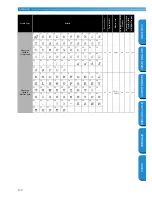
Page 139: ... 12 13 14 15 16 17 18 19 20 21 22 23 24 25 26 27 28 29 30 31 Satin stitches 1 2 3 4 5 6 7 8 9 10 N Yes Large No Yes Yes 11 12 13 14 15 16 Cross stitches 1 2 3 4 5 N No Large No Yes Yes Decorativesatin stitches 1 2 3 4 5 6 7 8 9 10 N No Large Yes Yes length only Yes Character stitches Gothic font 1 2 3 4 5 6 7 8 9 10 N No Large Small No No Yes 11 12 13 14 15 16 17 18 19 20 21 22 23 24 25 26 27 28 2...

Page 140: ...33 34 35 36 37 38 39 40 41 42 43 44 45 46 47 48 49 50 51 52 53 54 55 Character stitches Outline style 1 2 3 4 5 6 7 8 9 10 N No Large Small No No Yes 11 12 13 14 15 16 17 18 19 20 21 22 23 24 25 26 27 28 29 30 31 32 33 34 35 36 37 38 39 40 41 42 43 44 45 46 47 48 49 50 51 52 53 54 55 Stitch Type Pattern Presser Foot Twin Needle Pattern Size Adjustable Stitching Density Adjustable Pattern Length wi...

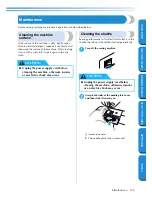
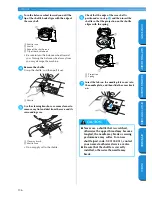
Page 141: ... a wet cloth wipe it again with a dry cloth Cleaning the shuttle Sewing performance will suffer if dust collects in the shuttle therefore it should be cleaned periodically 1 Turn off the sewing machine 2 Grasp both sides of the needle plate cover and then slide it toward you 1 Needle plate cover X The needle plate cover is removed Unplug the power supply cord before cleaning the machine otherwise ...

Page 142: ...dust from the race and its surrounding area 1 Cleaning brush 2 Shuttle race Do not apply oil to the shuttle 6 Check that the edge of the race shelf is positioned as in step 3 and then insert the shuttle so that the projection on the shuttle aligns with the spring 1 Projection 2 Spring 7 Insert the tabs on the needle plate cover into the needle plate and then slide the cover back on 3 1 2 4 1 1 2 N...

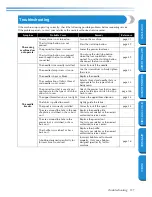
Page 143: ...place the needle The combination of fabric thread and needle is not correct Select a thread and needle that are appropriate for the type of fabric being sewn page 33 The presser foot that is used is not appropriate for the type of stitch that you wish to sew Attach the presser foot that is appro priate for the type of stitch that you wish to sew page 128 The upper thread tension is too tight Loose...

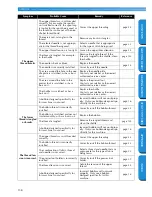
Page 144: ... a burr on it Replace the shuttle Contact your retailer or the nearest authorized service center A bobbin designed specifically for this machine is not used Incorrect bobbins will not work prop erly Only use a bobbin designed spe cifically for this machine page 18 The lower thread is tangled or breaks The bobbin thread is incorrectly installed Correctly install the bobbin thread page 22 The bobbin...

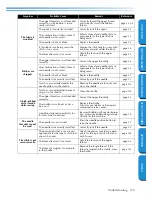
Page 145: ...nstall the needle page 35 Dust has accumulated under the needle plate or in the shuttle Remove the needle plate cover and clean the shuttle page 135 A high pitched noise is made while sewing Dust has accumulated in the feed dogs or in the shuttle Clean the shuttle page 135 The upper thread was not threaded correctly Correct the upper threading page 24 The shuttle is scratched or has a burr on it R...

Page 146: ...at you wish to sew page 128 The pressure of the presser foot is weak Turn the presser foot pressure dial to the right to increase the pressure of the presser foot page 39 The thread is tangled for example in the shuttle Remove the tangle thread If the thread is tangled in the shuttle clean the shuttle page 135 The sewing lamp does not come on The sewing lamp is damaged Contact your retailer or the...

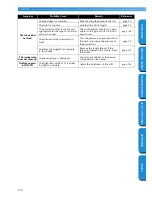
Page 147: ... The start stop button was pressed while the foot control ler was connected A stitch other than the buttonhole bar tack or darning stitch was selected and the start stop button was pressed while the buttonhole lever is lowered The buttonhole bar tack or darning stitch was selected and the start stop button was pressed while the button hole lever is raised The start stop button or reverse reinforce...

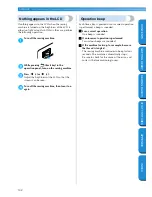
Page 148: ... machine 3 Press or Adjust the brightness of the LCD so that the screens can be seen 4 Turn off the sewing machine then turn it on again Operation beep Each time a key is pressed or an incorrect operation is performed a beep is sounded For a correct operation One beep is sounded If an incorrect operation is performed Two or four beeps are sounded If the machine locks up for example because the thr...

Page 149: ... settings key in the operation panel X The settings screen appears 3 Press and arrow keys until is selected 4 Press OK key X The screen for changing the beep setting appears 5 Press to select To return to press X The machine is now set so that it will not beep 6 Press OK key X The initial stitch screen appears again Removing the upper cover If the upper cover of the sewing machine was removed re a...

Page 150: ...78 C C key Cover E changing sewing direction 62 changing the needle 35 checking patterns 116 cleaning 135 cleaning brush Cover A 136 combining patterns 114 crazy quilt stitching 95 creating patterns 123 cross stitch 113 cross wound thread 19 curves 62 cylindrical pieces 42 D darning 102 designing patterns 123 E elastic tape 91 electrical outlet 11 error messages 141 even seam allowance 64 extra sp...

Page 151: ... D S satin stitch 113 satin stitching 99 saving patterns 120 saving stitch settings 60 scallop stitching 107 screen language 17 screwdriver Cover A 35 seam ripper Cover A 81 selecting stitching 68 settings 14 settings key Cover E 14 sewing machine help key Cover E 13 sewing machine needles 33 sewing speed 49 sewing speed controller Cover B Cover D 99 shell tuck stitch 108 shutter 26 shuttle 22 135...

Page 152: ...APPENDIX 146 GETTING READY CONTENTS SEWING BASICS UTILITY STITCHES APPENDIX INDEX W walking foot Cover A 40 96 wide table 1 42 wing needle 110 Z zipper stitching 85 89 ...

Page 153: ...F1_brotherE_cover DIC181p K ...

Reviews: