background image

18

b

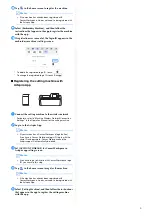
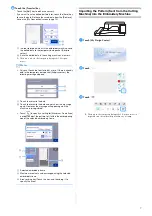
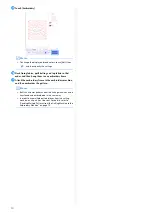
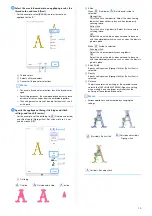
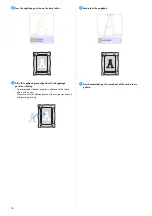
Sew the appliqué position on the base fabric.

c

Affix the appliqué piece aligned with the appliqué 
position stitching.

*

If double-sided stabilizer material is attached to the fabric, 
affix it with an iron.
Otherwise, affix the appliqué piece with craft glue or attach it 
with basting stitching.

d

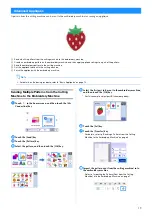
Embroider the appliqué.

e

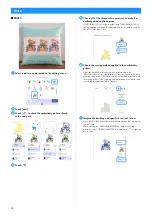
Finish embroidering the remainder of the embroidery 
pattern.

Summary of Contents for Innov-IS XP Series

Page 1: ... My Connection Operation Manual For Innov is XP series ...

Page 2: ... Cutting Machine 12 Basic Appliqués 14 Applying Appliqué Settings to Part of an Embroidery Pattern 14 Sending an Appliqué Pattern to the Cutting Machine 16 Cutting an Appliqué Pattern Sent from the Embroidery Machine with the Cutting Machine 17 Finishing the Appliqué with the Embroidery Machine 17 Advanced Appliqués 19 Sending Multiple Patterns from the Cutting Machine to the Embroidery Machine 19...

Page 3: ...ettings first in order to use the My Connection function page 3 This document provides details on the cutting machine and embroidery machine functions that can be combined For details on other functions refer to the Operation Manuals for the cutting machine and embroidery machine Memo Of the patterns built into the cutting machine and embroidery machine some copyrighted patterns cannot be transfer...

Page 4: ...hat appears f Review the Terms on Certification of Upgrade KIT and then touch I Agree to accept g Type in the 16 digit number written on the activation card and then touch Set The actual activation card may differ from the illustration that appears on the screen Open the activation card to see the 16 digit number The activation code is valid for only one embroidery machine Once it has been used it...

Page 5: ...ira App setting screen Registering the embroidery machine with Artspira App a Touch Register in the settings screen Note If this screen does not appear update the software of the embroidery machine to the latest version b After the following screen appears leave the screen displayed and then continue with the next step a Machine number 11 digit Note Do not touch Next yet Use the number displayed b...

Page 6: ...tails refer to Machine Wireless Network Connection Settings in the Operation Manual for the cutting machine b Log in to the Artspira App Memo If your screen has a CanvasWorkspace login button If you have a CanvasWorkspace login ID log in with the same ID and password CanvasWorkspace and the Artspira app will automatically be linked c Set ACCOUNT LINKAGE for CanvasWorkspace in Artspira app setting ...

Page 7: ...y Connection key before proceeding with the operation Edited data cannot be sent to the embroidery machine without using the My Connection function b Touch the Send key c Touch the Pattern key a Touch when selecting a built in pattern b Touch when retrieving a pattern saved in cutting machine s memory using My Connection function d Select a pattern e Touch the OK key or the Set key to continue to ...

Page 8: ...Artspira server the following message appears a Touch to overwrite the data b Touch to overwrite the data and not show this message again However the message will appear again if the machine is re registered Touch to specify a setting for Maximum Frame Area in order to adjust the pattern to fit within the embroidering area of the selected embroidery frame a Selected embroidery frame b Maximum area...

Page 9: ...operty and then select the stitch type of lines Touch OK For this example touch to select the triple stitch c Touch and then touch all lines in the screen to apply the settings to them d Touch and then select to add a square Touch OK e Touch and then change the size of the square Touch OK For this example specify a square of 215 1 215 1 mm f Touch Line Property and then select the stitch type Touc...

Page 10: ... Touch Next k Specify detailed settings for the decorative fill pattern For this example set Size to 125 If KIT 1 has been activated set Thickness to Decorative light fill l Touch to select the outline of the turtle For this example touch in order to specify settings for all lines of the turtle shell at the same time m Specify detailed settings for the triple stitch For this example set Run Pitch ...

Page 11: ...roidery frame q Attach the embroidery frame to the embroidery machine and then embroider the pattern Memo Built in character patterns from the cutting machine can be transferred and embroidered in the same way In order to use multiple pattern pieces from the cutting machine each part must be sent For details refer to Sending Multiple Patterns from the Cutting Machine to the Embroidery Machine on p...

Page 12: ...pattern if necessary b Touch c Touch to send the data to the cutting machine via the wireless network Memo Touch to save data on a USB flash drive For details on the procedure for retrieving data saved on a USB flash drive in the cutting machine refer to Retrieving Embroidery Data for Cutting Compatible Models Only in the Operation Manual for the cutting machine Cutting an Embroidery Machine Patte...

Page 13: ...the Embroidery Machine with the Cutting Machine a Touch in the home screen and then touch the My Connection key b Touch the Retrieve key c Touch the Wireless LAN Device key a Retrieve data that is in the temporary data pocket Artspira server b Retrieve data that was edited with the My Connection function and saved in the cutting machine s memory d Touch a Converts the embroidery data to cutting dr...

Page 14: ...othing After specifying the settings touch the OK key For this example select Low j If necessary edit the pattern For this example touch to flip the pattern since it will be cut from iron on transfer material k Touch the OK key to continue to the preview screen Touch the Save key to save the data as necessary The saved data can be retrieved from the Machine s Memory key of the screen in step c l A...

Page 15: ...f an Embroidery Pattern a Select an embroidery pattern on the embroidery machine and then touch Set b Touch Edit and then touch c Select the appliqué type For this example select a a Applies appliqué settings to part of an embroidery pattern to create an appliqué b Adds an outline to the embroidery pattern in order to create an appliqué piece For details refer to Creating an Appliqué Piece in the ...

Page 16: ...wing fabric that does not easily fray or when temporarily securing fabric Satin stitch This stitch has a high density Select this for securely stitching fabric OFF Select this when the fabric does not need to be sewn with the embroidery machine such as when the fabric is glued in place When Inside is selected Running stitch Select this when temporarily securing fabric OFF Select this when the fabr...

Page 17: ...iqué piece will be attached APPLIQUE Sews the appliqué piece in place on the base fabric b Thread color with appliqué settings applied c Specifies that the selected thread color is to be sewn not to be sewn If specified not to be sewn the thread color will not be displayed on the embroidering screen You will be able to prevent accidental sewing with the embroidery machine is displayed on the threa...

Page 18: ... Using Appliqués in the Operation Manual for the embroidery machine a Touch Embroidery The embroidering screen appears Note Before beginning to embroider check the embroidering order to confirm that appliqué pieces are sewn in appropriate sequence Some embroidery pattern may sew hidden stitches on the appliqué material Check the embroidery order before starting embroidering and rearrange it so tha...

Page 19: ... the appliqué position stitching If double sided stabilizer material is attached to the fabric affix it with an iron Otherwise affix the appliqué piece with craft glue or attach it with basting stitching d Embroider the appliqué e Finish embroidering the remainder of the embroidery pattern ...

Page 20: ...age 14 Sending Multiple Patterns from the Cutting Machine to the Embroidery Machine a Touch in the home screen and then touch the My Connection key b Touch the Send key c Touch the Pattern key d Select the pattern and then touch the OK key e Select the first part to be sent to the embroidery machine and then touch the OK key For this example select part B strawberry body f Touch the Set key g Touc...

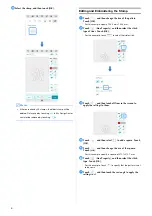
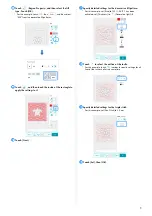
Page 21: ...to it d Touch Region Property and then select the thread color and fill type For this example select red touch to select the fill stitch pattern e Touch and then touch the strawberry body to apply the settings to it f As before specify the thread color and fill stitch pattern for the strawberry seeds g Touch Next h Touch Set and then touch OK to display the pattern editing screen i Touch Edit touc...

Page 22: ...lect moss green touch and then select the fill stitch pattern e Touch and then touch the strawberry stem to apply the settings to it f Touch Next g Touch Set and then touch OK to display the pattern editing screen h Adjust the position of the strawberry stem i Touch Edit touch and then touch Appliqué patch for selected colors j Select the area to be made into an appliqué piece by the thread color ...

Page 23: ...r details refer to Cutting an Appliqué Pattern Sent from the Embroidery Machine with the Cutting Machine on page 17 a Touch the My Connection key on the home screen of the cutting machine b Touch the Retrieve key c Touch the Wireless LAN Device key d Touch e Select the pattern and then touch the OK key f Touch the OK key or the Set key to continue to the next screen arrange the patterns in the mat...

Page 24: ...l For details on how to change the embroidering order refer to the FAQ on the Brother support website https s brother cfdka a While checking the screen of the embroidery machine finish the appliqué a Sews the appliqué position for the strawberry body on the base fabric After sewing is finished affix the appliqué piece aligned with the sewn lines b Sews the appliqué piece in place on the base fabri...

Page 25: ...e the sewing method applied to the embroidery pattern Since the outlines in this pattern are embroidered with PRUSSIAN BLUE the appliqué piece does not need to be sewn with the satin stitch The fabric can be temporarily attached with the zigzag stitch or the stitching can be turned off to omit the step for sewing the appliqué fabric in place g Imagine the finishing and specify to sew not to sew Si...

Page 26: ...specify not to sew Before beginning to embroider check the embroidering order a Decorative fill stitch with Outline turned ON b Satin stitch c Satin stitch a RED b BLUE c PINK 1 to 3 are region settings Specify settings not to sew any lines 1 Specify PINK as an appliqué outside Satin stitch 2 Specify RED as an appliqué outside sewing OFF Change the settings for RED to be sewn and for BLUE not to b...

Page 27: ...ding the data again page 7 page 11 Previously sent data cannot be retrieved The period that data is saved in the temporary data pocket has expired After a certain period of time the data is deleted from the temporary data pocket After the data is sent immediately retrieve the data on the receiving machine page 2 The saved data in cutting machine can not be retrieved The data saved using My Connect...

Page 28: ...English Version A ...

Reviews: