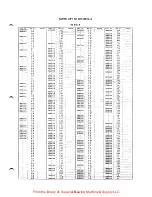
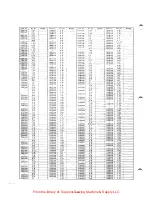
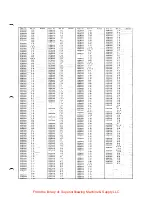
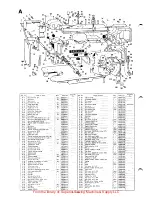
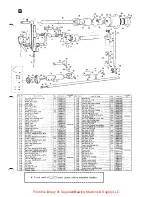
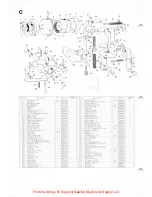
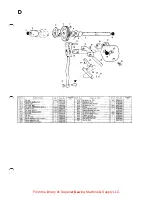
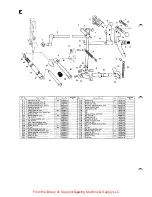
background image

From the library of: Superior Sewing Machine & Supply LLC

Summary of Contents for LH4-B814-4

Page 1: ...INSTRUCTION MANUAL FOR BROTHER MODEL LH4 B814 4 Gimp buttonholer for knit wear BROTHER INDUSTRIES LTD NAGOYA JAPAN From the library of Superior Sewing Machine Supply LLC ...

Page 2: ...needle 3 Adjusting the width of buttonhole and position of buttonhole 8 8 4 Buttonhole slot and length 9 5 Number of stitches 9 6 Setting position of cutter 10 7 Position and adjustment of gimp guide 10 8 Gimp and zigzag width 11 9 Durability of blades 11 10 Work clamp lift 11 11 Synthetic thread 11 12 Placing gimp end 12 13 Single cycle use 12 14 Bar tacking 12 15 Safety device for work clamp lif...

Page 3: ... It can raise up the producti vity as it ensures less thread breaks and thread off 5 Viele working space can ensure easy sewing operati on 6 A specially selected belt makes no fine adj ustment of belt tension 7 An automatic k nife lock ing ck ice enables to prevent the materials from damage in case of the thread breakage 8 Specially designed speed reduction mechanism enables noiseless and less vib...

Page 4: ...ion Secondly put the motor to table lop At that time please make sure to insert the ashers between table top and motor mounting bracket and fasten securely with set bolts T he correct motor rota tion 1s counter clockwise viewed I rom the pulley side and if not please get the correct rotation 2 Setting the machine head on table top I Set the base Fig 4 Put the base on the table top as per Fig 4 and...

Page 5: ...of thread guide 7 Put the belt cover ith flat head screws S Put the flat belt to the machine pull e and push the tension lewr and release it at the position 111 line with indicator Fig 8 Fig 9 9 All the above procedures are completed then pour oil into the oil reservoir and oil to the sliding parts taking off the face plate side cover and belt cover Please also make sure to wipe out all the dusts ...

Page 6: ...never you may recogni r e the necessity 2 Needle and its setting Model Lll4 B8l4 4 is used with DP x 5 needle Use the needle as thin as possible It must be matching the thickness of thread and needle eye so that the thread may pass through the needle eye smoothly In general for purl stitch the recommended needle size is upto j 11 herea for hip stitch upto 9 To set the needle to the needle bar plea...

Page 7: ...ads as well To wind the thread in bobbin please refer to Fig 14 Wind 4 S times around the empty bobbin counter clockwise and push the lever to start to wind_ When sufficient amount of threads will be wnund the bobbin winder will stop auto matically The amount of threads to be wound is adjusted by the screw To thread on the bobbin case please refer to Fig 15 a b c d Fig 15a Fig 15b Fig 15c Fig 15d ...

Page 8: ... the motor Fig 20 The best way to comprehend the machine mechanism thoroughly please start the machine by hand dri ving the pulley slowly to observe the respective movements At first remove thread needle bobbin case and cutter then start to run With left treadle pedal you can lift the clamping foot and with right treadle ped tl you can start the machine T his machine is designed with safety device...

Page 9: ...utter being operated to drop at the machine starting to run This can be avoided by starting the machine from normal stop position or depressing the cutter stop lever as shown in Fig 19 2 T he manual feeding handle should be used when the needle is apart from the material s It is safe to operate the manual feeding handle at that position that stop cam stops at the correct angle 4 ADJUSTMENT 1 Upper...

Page 10: ...e top of needle eye f ig 2 1 Fig 26 I T o make adjustment of timing the hook loosen the set screw as per Fig 2 1 2 T o make adj ustment of needle bar height loosen the needle bar clamp screw f ig 26 3 Adjusting the w idth of buttonhole and position of buttonhole Forward l r WI A line Boo kwa d I WI WI B line W2 Fig 27 line Fig 28 Fig 29 I Needle swinging fhis machine swings the needle from right t...

Page 11: ...ay set the zigzag width of 4mm or more on bar tacl ing portions or a fter the removal of position lines on both backward and forward zigzag width of parallel portions fter turning the pulley by hand please make sure to use the emergency stop lever and set the machine to the normal slop position namely the stopper cam being po sitioned in the stopper Then start the machine 4 Buttonhole slot and len...

Page 12: ... 2mm below the needle plate surface on its way clown Fig 35 7 Position and adjustment of g1mp guide Fig 36 gu de Adjusting screw left Fig 37 Adj usting screw right In case you may change the idth of buttonhole and zigzag considerably there causes that gimp will not be sewn correctly with zigzag sewing at that time it is necessary to adjust the position of the gimp guide Adjustment is done as follo...

Page 13: ...at the machine should be stopped at the left zigzag sewing position In case of changing the blades take the following steps 1 Set the machine at left zigzag sewing position 2 Turn the manual handle so that the stud screw for work clamp will be positioned to remove by the screw driver That is the position that the screw driver may not touch the needle 3 After loosening the screw for the pressure sp...

Page 14: ...to be automatic double cycling at the shipment however if you wish to use this machine with single cycle adjust the machine as follows 1 Put the stop cam Contained in the accessory box 2 Put the cutter cam Contained in the accessory box 3 Furthermore remove the gimp guide swinging cam A which is located under the cutter cam and put the gimp guide swinging cam B which is contained in the accessory ...

Page 15: ... per Fig 43 on the condition of correct threading and correct tensions This relation can be obta ined by adjusting the fastening screw as per Fig 44 loosened Also the correct relation between cutter preventor and cutter preventor lever must be adjusted so as to be 0 5mm clearance as per Fig 44 when the cutter clutch bar moves to the direction shown arrow mark and cutter lever removes from cutter c...

Page 16: ...screw driver and if you will turn clockwise the oil feeds less and vice versa Please make sure to adjust to lubricate to all necessar y points with proper amount of oil feeding in order to avoid oil leakage due to much oil or seizing up due to less oil 2 Adjusting oiling to hook can be done by moving the screw located in front of machine Less oil to the hook is recom mendable Fig 47 When sewmg ela...

Page 17: ...24 I 25 I 45 I 4 1 1 25 M t7 J 52 M 54 E 4 C I 25 K 1 1 K 50 j 41 26 I 51 I ill A iii A l ll A 90 11 36 A 24 E t 9 z 5 1 B 62 fl B l9 n 24 n 26 11 H 3 1 B 15 B 46 n 55 H S8 n 64 n 75 9 59 1 5 E 27 E 11 F 6 F 10 Rcmurk 011 400 14 22 011 101 fi 22 021400 1 0 1 02l lllo I Clfi 021710 2 02 o J7f cJ cl l 021780 3 02 02171lll l o 021860 2 02 021910 3 0 PARTS LIST for LH4 B814 4 INDEX 15 l nrts l o Rd l ...

Page 18: ... IJI B 12 1_ 1 z 16 _ __ _ i4H7ii J IIi n j3 11 li4i O OI r I II l J II277 11 00 1 H 2i Q iJI1 t oo l w 27H o ill c tlr 93 Q _ _ l n9 o iT c 1 llf l9 l 0 02 6 1 1 112110 11 01 c 6 IJ550 i Q i J 11 11 f4t2ifl o iiT c I I z 33 1 11494 0 m J 62 1 11 1_ 11 _ _ v 3 ___ J 7 3 z J l j J 77 l 11 0 l F 3 141495 0 01 7j l l 1 ll lll l 0 1 F 1 141519 0 01 K 61 z 13 I 141520 0 01 K 54 ul s l O il z 33 3 TT_ 1...

Page 19: ...7 7 27 A 5 A Wi I 15 A 5 B 77 B 1 1 z 32 1 511 1 1 c 15 c n J 2 l 21i 1 1 1 1 16 C 37 1 24 11 42 24 z 5 1 L 11 A In Hem uk arts Xu J4371 i il iJJ 14 i7i5 0 0I 143716 6 111 14 i73 i ili 14 7 i9 0 0I J4 174l O III J4 i742 1 11I 14 J741 0 0J J la7o l u ul 143750 0 01 143765 0 01 143767 0 01 14 71 0 11 01 14 lll90 o o1 14 11 9 lJ III 14 1914 1 01 1 13915 11 01 143917 IJ III J l n o ot 1439 1 0 01 14 9...

Page 20: ...t l ere Sl 13 57 iOxlif f A H jJ ackinJir rA 29 __ ro a29 l iuW TI aCklillt lsmalll A 1 Ten iun bracket I 1447 IITI oi A _ H6 _j Sh lll sc_rc _ _ _r if A H 9 _ _ _ 1 10 Sel Cr r r A l f I i O i J 11 021 A X7 Oil cap A 11 St t srrt fur A 2 1 I 103H51 H J A ill lli Tisu u ash _ r fur A 16 A 12 Thn ad lltkt iiJl SJlrillg I 100399 11 01 A l Cal pl itt A 1 rensiun st ui I l 454 1f O OI 10 __i i Crl w S...

Page 21: ... 74 3 I 82 81 80 79 1 r 71 I I t cJ 86 75 78 77 _ 6 87 0 88 I I _______ j Hd lin ID l arts n Asst mhl No l t f Nn 3l 32 36 45 Nmnt of l arts 461 48 l JQ4 Q ty If you need of mark please advise assembly number 19 47 From the library of Superior Sewing Machine Supply LLC ...

Page 22: ...d l c 1 Cl l l II l l lli l 17 l IH C PI jl t C i C t l t t c c 57 C f C 5 1 I Cfil fl i i tj CtiiJ t ti7 Cti l Ill Cin c 71 c C71 CT i C 7ti l ii C i Ci t t MI I 20 19 20 45 I 1 I I I I I J ante of Part a h r fur C Ci 1St t huh S l6 t u 5 fur C 11 Stoppt r lll lllJ I ul S H I 5 b for C l7 Clul h lt vcr sh 1h S topJit r har 1 IUJliM f bar cla1_ lJ StupJk r _pn n fdt t ht r fur c Slu l lk r pnng un...

Page 23: ...rt Nu 3 pes 112657 0 03 1 pee 104821 0 0I 1 141322 0 01 1 141328 0 01 2 pes 100541 0 01 1 pee 100541 0 01 I 142788 0 01 I 141329 0 01 I 141344 0 01 1 106147 0 01 Assembh Nn From the library of Superior Sewing Machine Supply LLC ...

Page 24: ...Jo 41 E 19 Set screw SM5 95 28X6 for E 111 I 013760 6 12 E 42 E 20 Zigzag adjusting lever screw pin I 1413 12 0 0I E 43 E 21 Nut for E 20 I 106588 0 01 E 44 E 22 Spring for E 10 I 141333 0 01 E 45 E 23 Spring hook I 1413 14 0 1 E 46 22 18 Name of Parts Spring hook Spring for E 26 Stopper for E 15 Set screw SM5 95 211X6 for E 26 Zigzag eccentric shaft Stud screw for E 5 Clip I Felt I Zigzag ecet ll...

Page 25: ... _ 1 _ 2 PeS 014760 6 22 Too F J_ 1 146130 t _ __ J 11 Free wheel cam __ _____ _ _ _pee 141391 0 01 5 Set screw 4 37X 10 ______ 2 pes _009681 0 12 P E Spring for F 1_1 _c s _141392 141 9 11 01 F 52 Gimp tension bracket _________ I pee 1454 0 l _ _____ f l J Pin for F ll __1__ _ _ 141393 0 01 _j _ F 53_ I Set screw_ _ _ ____ _ 00968c 1 0 I4 l 14 I Free wh l lgear j__ _ e j__l_41390 0 __ F 5 _ Stopp...

Page 26: ... G 39 G 40 G 41 G 42 Length feedadjusting lever haft 1 141417 0 01 Set t erew for G 38 1 UKKl62 0 03 Packing fur G 38 1 14169i O KI Bushing for G 38 2 pes 14Z Ii2 0 Kl Feed guide shaft I pee 141429 0 01 G 43 Fec d lever B I 145445 0 0J Fec d lever joint I 141424 11 01 Nut fur G 44 1 ll0140 11 01 141 155 11 lll 1 G 46 t V_us h e_r fo r_C i_ 4 3______ 1 107175 0 02 Spring pin 1c t Oc 4i 4 0I J 11 4 ...

Page 27: ...H 13 20 i14 cJ C J 19 11 27 Q n j ttmm 28 25 From the library of Superior Sewing Machine Supply LLC ...

Page 28: ...ll IX 26 59 mw uf l 1r1 lutch t utinR _ t Stuvtwr bolt ful 1 1 Clutc h tarti nR lc L f hall Sc l M 10 6 fur I 1 Clutc h t trtin lt_ vcr NU IIlH St t l leTl W SI 16 J5 1 6 fur I u Clutch tartin hft lt c r SvrmH huok Spr m t for 1 61 Set n w S 1 15 9j 2K 1 S tt IIJ l r fur I 4R I Stuvr r lx ltfor I HI BushmH for 1 61 u1 S 17 9 t 18 fur I 5 1 S l n w S 16 35 10 6 fnr 1 5i 1 Bd l slufl lc er pm I Sci ...

Page 29: ...f n8 Spring T4543i n lll J f 9 Washer T J 19 Stud sere 1 fi67SS O Ol Stop ring 1 18060 3 42 J 20 Work clamp lifter stopper _ _Iii Joint 1 141492 0 01 J 21 Bolt I 111048 0 02 T62 Stud screw 1 141494 0 01 J 2 l Spring 110173 0 01 J 6 1 Washer 1 141 143 0 02 J 2 l Spring h k 1 107640 0 01 J 64 Set screw I 112657 0 03 J 24 Gimp trimming detach lever 1 14S414 0 01 J 65 Thread release pi 1 145673 0 01 J...

Page 30: ...OUOI Uj j l II U J IJ t IIIII Jlt Hl liiO fi 67 66 56 62 r l 63 49 60 59 57 50 51 52 53 5 1 43 44 42 A _ mh h I d lUll r l tr b tfl l trt n lllhh Su K r h lfl u pp nrtt r I IK t 111 J II Ol K u St t en JW IIUitii II Ill K fi SprinJ fur I JI I lk t tat u unt K J 1 11 t f lhrt ul t runnllllK tutfl ann t t IIJ 1 H fll 1 1 1 St t o Li fl l X Ill fur K t7 UUHitil Ill I I Ill S lti t X fur 1 11 171 1 tO...

Page 31: ...s f r X Tuii hulclt r 1 in l tnh h ll J lo ili l tuht lx 2 111 J ij Vinyl tuh huld r J J S r SCrt fur J J I J J j Fl lt fur 1 11 J J J Tuht siUJllll r_ 1 15 St t Sl l l W fur J J J J Jtj in l luht I HI J J7 l ubt h lder f r J JX J Jx Oil t itK fur rutary huuk 1 1 1 S t s n w fur J Ji J c j Oil ft t din Jlitlt J f 1 Vinyl tube I IIi Tuht st l l r J a St l sat w fur 1 5 J t St t s rt w J 1 55 Tuht s...

Page 32: ... lliiil n j 1 lli21iiHI I fill 1 ll i7 i n nl I pt s IHI IIiiill 1 12 l I JIC c Jl l il l fl l_l_ I IIUii 11 11 111 JlC lli iiMI 7 611 l _ 1 0l t 1 1 es f nn llifin ll l2_ l I I IX t l l i72 n II J __ 2 Ill llll lill 1 1 I J e 1 72 iiNJ I iO I i iif l n J llCS INJ Itifill l l jl l f I 11 II IKI I I 1 lli m u ot 1 I J I l l o c l I l f ifii ____ i li2 u n rll j r I iJii I O Ill 1 111115 11 11 111 F...

Page 33: ... IX II u l F IX St t cn w I lllnJ Ii llll 1 J l9 l t n th_ 1 guidt pilltt I n JXIltiO I I J J St t screw I I IOi ll lll I J Jf Tapt uar_l F I 11 1 tHll l 4 asht r 11 l iNI 11 t IHI J I St t Tl 1 IJ Ii li O Ol p f j St t Crt 1 lfi II IHII 1 15 16 Cf n1ping f t _ 1 1 unl 1 1 nt6ff f tl lll _ P 1 _7 1 cs l 1m ri fo l 12 ___ I 117 11 111 qo JK s llit Hil 111 _ _ 1 J l _TGiltll stn1JIH I z _ I J li XX ...

Page 34: ... l t t i l U Ull 43 c e 44 48 46 _ 45 47 49 55 51 J mhl j f Xo llllt u l art o tt dl X I tl Ill II IH Ill z u Xut z x Ssun1 z t ht r z t i L tp md r hrOil l d z X 1 1 IUcft r wht t l tldl z 1 T tpt IIICil r ht t l lrt lll l z If St rt z II St t Z t lamptn fuul f t 111ml il l lllhl Z a 1 m ahll knif fur tlllljj Z II F t tl ktuft fur tllllll z l t t ull tr e Z lfi ltl thlt kmf11 Z 17 F t l kn h lk l...

Page 35: ...118 814 4 192814 0 31 Printed in Japan 750318005 From the library of Superior Sewing Machine Supply LLC ...

Reviews: