IV
- 37
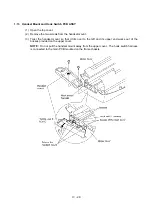
(4) Disassemble the ink empty sensor PCB ASSY according to the steps below:
- Pull up the latch of the sensor cover (in the direction of arrow
•
) and slide the sensor cover
in the direction of arrow
‚
to separate the sensor cover from the sensor holder.
- Remove the ink empty sensor PCB.
- Remove the star wheels and their springs.
n
n
Reassembling Notes
•
When setting the ink empty sensor PCB to the sensor holder, face the device-mounting side
down.
•
When setting the sensor cover to the sensor holder, fit hole "A" of the sensor cover over tab "a"
of the sensor holder and then insert "B" into "b" as shown above.
Summary of Contents for MFC-7050C
Page 1: ...FACSIMILE EQUIPMENT SERVICE MANUAL MODEL MFC7050C ...
Page 4: ...CHAPTER I GENERAL DESCRIPTION ...
Page 10: ...CHAPTER II INSTALLATION ...
Page 11: ...CONTENTS 1 INSTALLING THE UPDATE DATA TO THE FACSIMILE EQUIPMENT II 1 ...
Page 14: ...CHAPTER III THEORY OF OPERATION ...
Page 16: ...III 1 1 OVERVIEW ...
Page 27: ...III 12 Location of Sensors and Actuators ...
Page 30: ...III 15 ...
Page 35: ...CHAPTER IV DISASSEMBLY REASSEMBLY AND LUBRICATION ...
Page 41: ...IV 4 n n Disassembly Order Flow ...
Page 93: ...IV 56 1 33 Ink Foam 1 Take up the ink foam from the lower cover ...
Page 94: ...IV 57 1 34 Harness Routing ...
Page 96: ...IV 59 2 Control panel locks 3 Scanner frame ASSY and separation roller gear ...
Page 97: ...IV 60 4 Top cover lock spring 5 Gear plate ASSY ...
Page 98: ...IV 61 6 Hinges 7 Frame chassis ASSY ...
Page 99: ...IV 62 8 Idle pulley holder 9 Maintenance ASSY ...
Page 100: ...IV 63 10 Exit roller ASSY 11 Large feed roller ASSY ...
Page 101: ...CHAPTER V MAINTENANCE MODE ...
Page 108: ...V 6 Scanning Compensation Data List ...
Page 123: ...CHAPTER VI ERROR INDICATION AND TROUBLESHOOTING ...
Page 135: ...May 99 SM8XD115 Printed in Japan ...
Page 136: ...MFC7050C Appendix 1 EEPROM Customizing Codes ...
Page 153: ...E Power Supply PCB ...


