3-66
Confidential
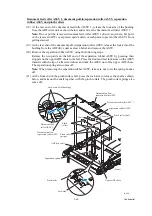
Document feed roller ASSY 1, document pull-in/separation roller ASSY, separation
rubber ASSY and pinch rollers
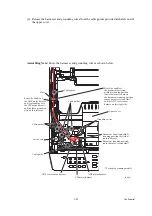
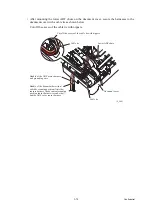
(18) At the rear end of the document feed roller ASSY 1, release the lock arm of the bushing
from the ADF drive unit as shown below and remove the document feed roller ASSY 1.
Note:
Do not put the removed document feed roller ASSY 1
directly
anywhere, but put it
on the removed ADF cover placed upside down or such place to prevent the ASSY 1 from
getting stained.
(19) At the rear end of the document pull-in/separation roller ASSY, release the lock arm of the
bushing from the ADF drive unit as shown below and remove the ASSY.
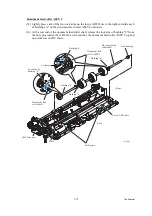
(20) Remove the separation rubber ASSY, using the following steps.
Release the two pawls on the left end of the separation rubber ASSY by pressing their
stoppers on the upper ADF chute to the left. Press the front and rear lock arms on the ASSY
inwards with the tip of a flat screwdriver and take the ASSY out of the upper ADF chute.
The separation spring also comes off.
Note:
When removing the separation rubber ASSY, take care not to let the spring bounce
off.
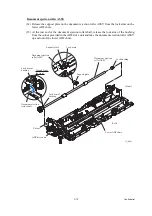
(21) At the front end of the pinch roller shaft, press the lock arm to release the shaft as shown
below and take out the shaft together with the pinch rollers. The pinch roller springs also
come off.
(3_033)
Document pull-in/
separation roller ASSY
Lock arms of the bushings
Document feed
roller ASSY 1
Document pull-in/
separation roller ASSY
Pinch
rollers
Pinch roller
springs
ADF drive unit
Separation spring
Pinch roller
Lock arm
Upper ADF chute
(Front)
Pinch roller shaft
Pawls
Lock arm
Separation rubber ASSY
Document feed roller ASSY 1
Summary of Contents for MFC-J6510DW
Page 15: ...xii Confidential ...
Page 16: ...xiii Confidential ...
Page 17: ...xiv Confidential ...
Page 18: ...xv Confidential ...
Page 19: ...xvi Confidential ...
Page 128: ...3 3 Confidential 3 2 PACKING For models with paper tray 2 ...
Page 273: ...4 13 Confidential EXIT Adjust Check Pattern 1 ...
Page 274: ...4 14 Confidential EXIT Adjust Check Pattern 2 ...
Page 275: ...4 15 Confidential EXIT Adjust Check Pattern 3 ...
Page 276: ...4 16 Confidential KEISEN2 LF300 EXIT ADJUST PATTERN ...
Page 278: ...4 18 Confidential KEISEN GAP EXIT ADJUST PATTERN Line 1 Line 2 Line 3 ...
Page 280: ...4 20 Confidential Vertical Alignment Check Patterns ...
Page 283: ...4 23 Confidential Left Right and Bottom Margin Check Pattern ...
Page 286: ...4 26 Confidential Print Pattern for Creating Head Calibration Data ...
Page 302: ...4 42 Confidential ADF Copy Chart C A B D ...
Page 312: ...5 8 Confidential Print Pattern for Creating Head Calibration Data ...
Page 314: ...5 10 Confidential Scanning Compensation Data List ...
Page 317: ...5 13 Confidential Nozzle Test Pattern ...
Page 320: ...5 16 Confidential Configuration List ...
Page 337: ...5 33 Confidential EXIT Adjust Check Pattern 1 ...
Page 338: ...5 34 Confidential EXIT Adjust Check Pattern 2 ...
Page 339: ...5 35 Confidential EXIT Adjust Check Pattern 3 ...
Page 340: ...5 36 Confidential KEISEN2 LF300 EXIT ADJUST PATTERN ...
Page 346: ...5 42 Confidential Vertical Alignment Check Pattern ...
Page 349: ...5 45 Confidential Left Right and Bottom Margin Check Pattern ...
Page 383: ...6 4 Confidential Power supply PCB 100 V series ...
Page 384: ...6 5 Confidential Power supply PCB 200 V series ...
Page 385: ...6 6 Confidential Wiring diagrams ...

