6
h
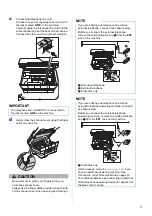
Take care to match the sticker color
a
with the
cartridge color
b
as shown in the diagram
below.
Install each ink cartridge in the direction of the
arrow on the label.
i
Gently push the back of the ink cartridge
marked “PUSH” until it latches. After all the ink
cartridges are installed, close the ink cartridge
cover.
NOTE
The machine will prepare the ink tube system for
printing. This process will take approximately four
minutes. Do not turn off the machine. We
recommend you perform the next step while
waiting.
2
1
IMPORTANT
• DO NOT take out ink cartridges if you do not
need to replace them. If you do so, it may
reduce the ink quantity and the machine will not
know the quantity of ink left in the cartridge.
• DO NOT repeatedly insert and remove the
cartridges. If you do so, ink may seep out of the
cartridge.
• Once you open an ink cartridge, install it in the
machine and use it up within six months of
installation. Use unopened ink cartridges by
the expiration date written on the cartridge
package.
• DO NOT dismantle or tamper with the ink
cartridge, this can cause the ink to leak out of
the cartridge.
• Brother strongly recommends that you do not
refill the ink cartridges provided with your
machine. We also strongly recommend that
you continue to use only Genuine Brother
Brand replacement ink cartridges. Use or
attempted use of potentially incompatible ink
and/or cartridges in the Brother machine may
cause damage to the machine and/or may
result in unsatisfactory print quality. Our
warranty coverage does not apply to any
problem that is caused by the use of
unauthorized third party ink and/or cartridges.
To protect your investment and obtain premium
performance from the Brother machine, we
strongly recommend the use of Genuine
Brother Supplies.


