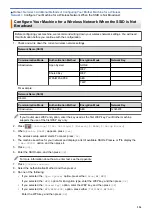
•
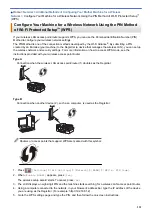
If you configure your machine using EAP-TLS authentication, you must install the client certificate
issued by a CA before you start configuration. Contact your network administrator about the client
certificate. If you have installed more than one certificate, we recommend writing down the certificate
name you want to use.
•
If you verify your machine using the common name of the server certificate, we recommend writing
down the common name before you start configuration. Contact your network administrator about the
common name of the server certificate.
2. Press
[Settings]
>
[All Settings]
>
[Network]
>
[WLAN]
>
[Setup Wizard]
.
3. When
[Enable WLAN?]
appears, press
[Yes]
.
The wireless setup wizard starts. To cancel, press
[No]
.
4. The machine searches for your network and displays a list of available SSIDs. Press
a
or
b
to display the
[<New SSID>]
option, and then press it.
5. Press
[OK]
.
6. Enter the SSID name, and then press
[OK]
.
For more information about how to enter text, see the
Appendix
.
7. Press
[Infrastructure]
.
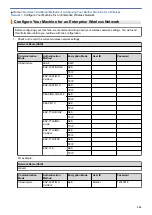
8. Select the Authentication Method, and then press it.
9. Do one of the following:
•
If you selected the
[LEAP]
option, enter the user ID, and then press
[OK]
. Enter the Password, and then
press
[OK]
.
•
If you selected the
[EAP-FAST]
,
[PEAP]
or
[EAP-TTLS]
option, select the Inner Authentication method
[NONE]
,
[CHAP]
,
[MS-CHAP]
,
[MS-CHAPv2]
,
[GTC]
or
[PAP]
.
Depending on your Authentication method, the Inner Authentication method selections differ.
Select the encryption type
[TKIP+AES]
or
[AES]
.
Select the verification method
[No Verification]
,
[CA]
or
[CA + Server ID]
.
-
If you selected the
[CA + Server ID]
option, enter the server ID, user ID and password (if
required), and then press
[OK]
for each option.
-
For other selections, enter the user ID and Password, and then press
[OK]
for each option.
If you have not imported a CA certificate into your machine, the machine displays
[No Verification]
.
•
If you selected the
[EAP-TLS]
option, select the encryption type
[TKIP+AES]
or
[AES]
.
The machine will display a list of available Client Certificates, and then select the certificate.
Select the verification method
[No Verification]
,
[CA]
or
[CA + Server ID]
.
-
If you selected the
[CA + Server ID]
option, enter the server ID and user ID, and then press
[OK]
for each option.
-
For other selections, enter the user ID, and then press
[OK]
.
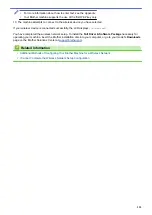
10. The machine attempts to connect to the wireless device you have selected.
If your wireless device is connected successfully, the LCD displays
[Connected]
.
You have completed the wireless network setup. To install
Full Driver & Software Package
necessary for
operating your device, insert the Brother installation disc into your computer or go to your model's
Downloads
page on the Brother Solutions Center at
Related Information
•
Additional Methods of Configuring Your Brother Machine for a Wireless Network
337
Summary of Contents for MFC-J995DW
Page 1: ...Online User s Guide MFC J995DW 2018 Brother Industries Ltd All rights reserved ...
Page 16: ... Near Field Communication NFC 9 ...
Page 27: ...Related Information Introduction to Your Brother Machine 20 ...
Page 28: ...Home Paper Handling Paper Handling Load Paper Load Documents 21 ...
Page 38: ...2 1 Related Information Load Paper in the Paper Tray 31 ...
Page 61: ... Copy a Document Error and Maintenance Messages Telephone and Fax Problems Other Problems 54 ...
Page 64: ...Home Print Print Print from Your Computer Windows Print from Your Computer Mac 57 ...
Page 98: ... Change the Print Setting Options When Having Printing Problems 91 ...
Page 173: ...Related Information Scan Using ControlCenter4 Advanced Mode Windows 166 ...
Page 180: ... WIA Driver Settings Windows 173 ...
Page 201: ...Related Information Copy 194 ...
Page 287: ...Home Fax PC FAX PC FAX PC FAX for Windows PC FAX for Mac 280 ...
Page 307: ...Related Information Receive Faxes Using PC FAX Receive Windows 300 ...
Page 367: ...Home Security Security Network Security Features 360 ...
Page 416: ...Related Information Configure an IPsec Template Using Web Based Management 409 ...
Page 442: ...Related Information Set Up Brother Web Connect 435 ...
Page 545: ... My Brother Machine Cannot Print Scan or PC FAX Receive over the Network 538 ...
Page 557: ... Telephone and Fax Problems Other Problems 550 ...
Page 560: ... Clean the Print Head from Your Brother Machine 553 ...
Page 566: ...Related Information Clean Your Brother Machine Paper Handling and Printing Problems 559 ...
Page 645: ...Home Appendix Appendix Specifications Enter Text on Your Brother Machine Brother Numbers 638 ...
Page 654: ...Related Information Appendix 647 ...
Page 655: ...Visit us on the World Wide Web www brother com USA CAN Version 0 ...


