background image

Chapter 2

36

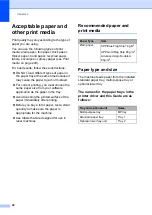
Labels

2

The machine will print on most types of labels 
designed for use with a laser machine. Labels 
should have an adhesive that is acrylic-based 
since this material is more stable at the high 
temperatures in the fuser unit. Adhesives 
should not come in contact with any part of 
the machine, because the label stock may 
stick to the drum unit or rollers and cause 
jams and print quality problems. No adhesive 
should be exposed between the labels. 
Labels should be arranged so that they cover 
the entire length and width of the sheet. Using 
labels with spaces may result in labels 
peeling off and causing serious jams or print 
problems.

All labels used in this machine must be able 
to withstand a temperature of 200 

C for a 

period of 0.1 seconds.

Labels can only be fed through the multi-
purpose tray.

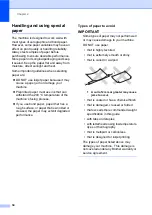
Types of labels to avoid

2

Do not use labels that are damaged, curled, 
wrinkled or an unusual shape.


IMPORTANT

• DO NOT feed part used label sheets. The 

exposed carrier sheet will damage your 
machine.

• DO NOT reuse or insert labels that have 

previously been used or are missing a few 
labels on the sheet.

• Label sheets should not exceed the paper 

weight specifications described in this 
User’s Guide. Labels exceeding this 
specification may not feed or print 
correctly and may cause damage to your 
machine.


Summary of Contents for MFC-L8650CDW

Page 1: ...Basic User s Guide MFC L8650CDW CAUTION Before using this product read carefully these instructions for correct operation Keep the User s Guide in a secure place for future reference Version 0 CHN ENG ...

Page 2: ...ng parts for the maintenance and repair please discard used circuit boards used electrical parts and products as disposed electrical materials 4 The power consumption is 0 W after you turn off the machine and unplug it from the AC outlet 5 Some parts in the machine can be used on the same series model machines which are produced in the same factory Note If you want to replace the parts please cont...

Page 3: ...s For Chinese Printed In the box For English Windows PDF file CD ROM In the Box Macintosh PDF file Brother Solutions Center 1 Advanced User s Guide Learn more advanced operations Fax Copy security features printing reports and performing routine maintenance Windows PDF file CD ROM In the Box Macintosh PDF file Brother Solutions Center 1 Software and Network User s Guide This Guide provides instruc...

Page 4: ... for Brother iPrint Scan This Guide provides useful information about printing from your mobile device and scanning from your Brother machine to your mobile device when connected on a Wi Fi network PDF file Brother Solutions Center 1 Which Guide What s in it Where is it ...

Page 5: ... Adding Fax Shortcuts 14 Adding Scan Shortcuts 15 Changing Shortcuts 16 Editing Shortcut Names 17 Deleting Shortcuts 17 Recalling Shortcuts 17 Set the date and time 18 Enter personal information Station ID 18 Volume settings 19 Ring volume 19 Beeper volume 20 Speaker volume 20 2 Loading paper 21 Loading paper and print media 21 Loading paper in the standard paper tray and the optional lower tray 2...

Page 6: ...ng Time Fax Tel mode only 44 Fax Detect 45 Fax Preview Black and White only 46 How to preview a received fax 46 Turning off Fax Preview 48 6 Using PC FAX 49 How to use PC FAX 49 PC FAX Receive Windows only 49 PC FAX Send 50 7 Telephone and external devices 51 Connecting an external TAD 51 Connections 51 Recording an outgoing message OGM 52 Multi line connections PABX 52 External and extension tele...

Page 7: ...s 59 Copy Settings and Options 60 10 Printing from a USB flash drive or digital camera supporting mass storage 61 Creating a PRN file for direct printing 61 Printing directly from the USB flash drive or digital camera supporting mass storage 62 Changing the default settings for direct print 64 11 How to print from a computer 65 Printing a document 65 12 How to scan to a computer 66 Before scanning...

Page 8: ...ment is jammed in the top of the ADF unit 130 Document is jammed under the document cover 130 Removing small documents jammed in the ADF 131 Document is jammed at the output tray 131 Paper Jams 132 Paper is jammed in the multi purpose tray 132 Paper is jammed in the Paper Tray 1 or Tray 2 133 Paper is jammed at the back of the machine 134 Paper is jammed inside the machine 136 Paper is jammed unde...

Page 9: ...17 Document Size 219 Print media 220 Fax 221 Copy 222 Scanner 223 Printer 224 Interfaces 225 Network 226 Direct Print feature 227 Computer requirements 228 Supplies 229 Important information for the toner cartridge life 230 E Index 232 ...

Page 10: ...ls only 3 Sending a fax MFC models only Additional sending options Additional sending operations 4 Receiving a fax MFC models only Memory Receive Options Remote retrieval Additional receiving operations 5 Dialling and storing numbers MFC models only Additional dialling operations Additional ways to store numbers 6 Printing reports Fax reports MFC models only Reports 7 Making copies Copy settings A...

Page 11: ...OTE Notes tell you how you should respond to a situation that may arise or give tips about how the current operation works with other features Follow all warnings and instructions marked on the product General information 1 Electrical Hazard icons alert you to a possible electrical shock Fire Hazard icons alert you to the possibility of fire Hot Surface icons warn you not to touch machine parts th...

Page 12: ...t All Programs Brother Brother Utilities Windows 8 Tap or click Brother Utilities either on the Start screen or the desktop Windows 8 1 Move your mouse to the lower left corner of the Start screen and click if you are using a touch based device swipe up from the bottom of the Start screen to bring up the Apps screen When the Apps screen appears tap or click Brother Utilities b Select your machine ...

Page 13: ...User s Guides Windows 8 Click Brother Utilities and then click the drop down list and select your model name if not already selected Click Support in the left navigation bar and then click User s Guides If you have not installed the software you can find the documentation on the CD ROM by following these steps a Turn on your computer Insert the CD ROM into your CD ROM drive NOTE If the Brother scr...

Page 14: ...etup instructions see Quick Setup Guide Connection to a wireless access point or router supports Wi Fi Protected Setup or AOSS see Software and Network User s Guide More information about network setup see Software and Network User s Guide How to access the User s Guides for Advanced Features 1 You can view and download these Guides from the Brother Solutions Center at http solutions brother com C...

Page 15: ...news and product support information click Brother Solutions Center To visit our website for original Brother Supplies click Supplies Information To access the Brother CreativeCenter for FREE photo projects and printable downloads click Brother CreativeCenter To return to the Top Menu click Back or if you have finished click Exit Accessing Brother Support Macintosh 1 You can find all the contacts ...

Page 16: ...iew 1 MFC L8650CDW has a 3 7 in 93 4 mm Touchscreen LCD and Touchpanel 1 Touchscreen LCD Liquid Crystal Display This is a Touchscreen LCD You can access the menus and options by pressing them when they are displayed on this screen 1 ...

Page 17: ...eady screen on page 12 Cancel Press to cancel an operation Dial Pad Press the numbers on the Touchpanel to dial telephone and fax numbers or to enter the number of copies 3 Power On Off Press to turn on the machine Press and hold down to turn off the machine The Touchscreen LCD displays Shutting Down and stays on for a few seconds before going off 4 The Wi Fi light is on when your Brother machine ...

Page 18: ...i setup Toner levels Setup and the Shortcuts screens When the Home screen is displayed the machine is in Ready mode When Secure Function Lock 1 is turned on an icon will be displayed When Active Directory Authentication 1 is enabled the machine s control panel will be locked 1 See Advanced User s Guide More1 screen The More1 screen provides access to the Shortcuts screen and additional features su...

Page 19: ...etwork User s Guide 3 Toner See the remaining toner life Press to access the Toner menu NOTE The remaining toner life will vary depending on the types of documents printed and customer s usage 4 Settings Press to access the main settings for more information see Settings screen on page 11 5 Date and Time See the date and time that has been set in the machine 6 Shortcuts Press to set up Shortcuts Y...

Page 20: ...2 Warning icon The warning icon appears when there is an error or maintenance message press Detail to view it and then press to return to Ready mode For details see Error and maintenance messages on page 120 NOTE This product adopts the font of ARPHIC TECHNOLOGY CO LTD MascotCapsule UI Framework and MascotCapsule Tangiblet developed by HI CORPORATION are used MascotCapsule is a registered trademar...

Page 21: ...ess to set up a network connection A four level indicator on the screen shows the current wireless signal strength if you are using a wireless connection 4 Date Time See the date and time Press to access the Date Time menu 5 Fax Preview See the Fax Preview status Press to access the Fax Preview setting 6 All Settings Press to access the full settings menu 7 Tray Setting See the selected paper size...

Page 22: ...e will go to your chosen Home screen Basic Operations 1 Press your finger on the Touchscreen to operate it To display and access all the screen menus or options swipe left right up down or press d c or a b to scroll through them IMPORTANT DO NOT press the Touchscreen with a sharp object such as a pen or stylus It may damage the machine The following steps explain how to change a setting in the mac...

Page 23: ... following settings can be included in a copy Shortcut Quality Enlarge Reduce Density Contrast Stack Sort Page Layout Colour Adjust 2 sided Copy 2 sided Copy Page Layout Tray Use Remove Background Colour a Press b Press a tab from 1 to 8 c Press where you have not added a Shortcut d Press Copy e Read the information on the Touchscreen and then confirm it by pressing OK f Swipe up or down or press ...

Page 24: ...ng the dial pad on the Touchpanel the Address Book or the Call History on the Touchscreen When you have finished go to step g NOTE You can enter up to 20 digits for a fax number If the Shortcut is to be used for broadcasting press Options and select Broadcasting in step h before entering the fax or telephone number in step f You can enter up to 20 fax numbers if the Shortcut is for broadcasting Th...

Page 25: ...ot added a Shortcut d Press Scan e Swipe up or down or press a or b to display the type of scan you want and then press it f Do one of the following If you pressed to USB read the information on the Touchscreen and then press OK to confirm it Go to step i If you pressed to E mail Server read the information on the Touchscreen and then press OK to confirm it Go to step g If you pressed to OCR to Fi...

Page 26: ...to display the available options for the setting and then press the option you want Repeat steps j and k until you have selected all the settings for this Shortcut Press OK l Review the settings you have selected If you need to make additional changes return to step i If you are satisfied with your changes press Save as Shortcut m Review your settings on the Touchscreen and then press OK n Enter a...

Page 27: ...Shortcut e Press Edit Shortcut Name f To edit the name hold down to delete the current name and then enter a new name using the keyboard on the machine s Touchscreen To help you enter letters see Entering text on page 215 Press OK Deleting Shortcuts 1 You can delete a Shortcut a Press b Press a tab from 1 to 8 to display the Shortcut you want c Press NOTE You can also press All Settings and Shortc...

Page 28: ...the numbers on the Touchscreen and then press OK i Press Enter personal information Station ID 1 Set the machine s Station ID if you want the date and time to appear on each fax you send a Press b Press All Settings c Swipe up or down or press a or b to display Initial Setup Press Initial Setup d Swipe up or down or press a or b to display Station ID Press Station ID e Press Fax f Enter your fax n...

Page 29: ...ou want If you entered a character incorrectly and want to change it press d or c to move the cursor to the incorrect character then press To enter a space press Space For more details see Entering text on page 215 k Press Volume settings 1 Ring volume 1 You can choose from a range of ring volume levels a Press b Press All Settings c Swipe up or down or press a or b to display General Setup d Pres...

Page 30: ...display General Setup d Press General Setup e Swipe up or down or press a or b to display Volume f Press Volume g Press Beep h Press Off Low Med or High i Press Speaker volume 1 You can choose from a range of speaker volume levels a Press b Press All Settings c Swipe up or down or press a or b to display General Setup d Press General Setup e Swipe up or down or press a or b to display Volume f Pre...

Page 31: ... or by pressing the buttons on the Touchscreen Loading paper in the standard paper tray and the optional lower tray 2 You can load up to 250 sheets in the standard paper tray Tray 1 You can also load up to 500 sheets in the optional lower tray Tray 2 Paper can be loaded up to the maximum paper mark on the right side of the paper tray for recommended paper see Acceptable paper and other print media...

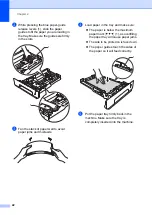
Page 32: ...paper well to avoid paper jams and misfeeds d Load paper in the tray and make sure The paper is below the maximum paper mark 1 as overfilling the paper tray will cause paper jams The side to be printed on is face down The paper guides touch the sides of the paper so it will feed correctly e Put the paper tray firmly back in the machine Make sure the tray is completely inserted into the machine 1 1...

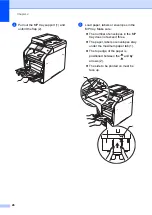
Page 33: ...velopes one sheet of glossy paper other special print media or up to 50 sheets of plain paper in the MP tray Use this tray to print or copy on thick paper bond paper labels envelopes or glossy paper For the recommended paper to use see Acceptable paper and other print media on page 32 Printing on plain paper thin paper recycled paper bond paper or glossy paper from the MP tray 2 a Open the MP tray...

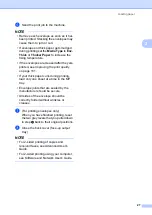
Page 34: ... with the leading edge top of the paper in first The paper guides touch the sides of the paper so it will feed correctly NOTE When you are using glossy paper put only one sheet at a time in the MP tray to avoid a paper jam d Lift up the support flap to prevent paper from sliding off the face down output tray or remove each page as soon as it comes out of the machine e Send the print job to the mac...

Page 35: ...u want to print on thick paper labels or envelopes For recommended paper to use see Acceptable paper and other print media on page 32 and Envelopes on page 35 Before loading press the corners and sides of the envelopes to make them as flat as possible a Open the back cover face up output tray b For printing envelopes only Pull down the two grey levers one on the left side and one on the right side...

Page 36: ...abels or envelopes in the MP tray Make sure The number of envelopes in the MP tray does not exceed three The paper labels or envelopes stay under the maximum paper tab 1 The top edge of the paper is positioned between the and arrows 2 The side to be printed on must be face up 2 1 2 1 ...

Page 37: ...e 151 If your thick paper curls during printing load only one sheet at a time in the MP tray Envelope joints that are sealed by the manufacturer should be secure All sides of the envelope should be correctly folded without wrinkles or creases g For printing envelopes only When you have finished printing reset the two grey levers that you pulled down in step b back to their original positions h Clo...

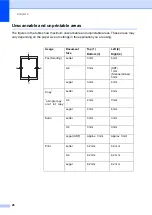
Page 38: ...n the application you are using Usage Document Size Top 1 Bottom 3 Left 2 Right 4 Fax Sending Letter 3 mm 4 mm A4 3 mm ADF 1 mm Scanner Glass 3 mm Legal 3 mm 4 mm Copy Letter 4 mm 4 mm a single copy or a 1 in 1 copy A4 4 mm 3 mm Legal 4 mm 4 mm Scan Letter 3 mm 3 mm A4 3 mm 3 mm Legal ADF Approx 3 mm Approx 3 mm Print Letter 4 2 mm 4 2 mm A4 4 2 mm 4 2 mm Legal 4 2 mm 4 2 mm 1 3 2 4 ...

Page 39: ...f Press 1 Tray 2 appears only if the optional lower tray is installed 2 MP Tray only 3 MP Tray and Tray 1 only NOTE When an appropriate size is not in the tray received faxes will be stored in the machine s memory and Size mismatch will appear on the Touchscreen for more information see Error and maintenance messages on page 120 If the tray is out of paper and received faxes are in the machine s m...

Page 40: ...e 2 You can change the default tray that the machine will use for printing received faxes When you choose Tray 1 Only MP Only or Tray 2 Only 1 the machine pulls the paper only from that tray If the selected tray is out of paper No Paper will appear on the Touchscreen Insert the paper in the empty tray When you choose MP T1 T2 1 the machine pulls paper from the MP tray until it is empty then from T...

Page 41: ...onal lower tray is installed Tray Use in Print mode 2 You can change the default tray the machine will use for printing from your computer and for Direct Print a Press b Press Tray Setting c Swipe up or down or press a or b to display Tray Use Print d Press Tray Use Print e Swipe up or down or press a or b to choose Tray 1 Only Tray 2 Only 1 MP Only MP T1 T2 1 MP T2 T1 1 T1 T2 MP 1 or T2 T1 MP 1 a...

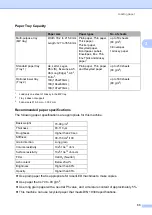
Page 42: ... application as the paper in the tray Avoid touching the printed surface of the paper immediately after printing Before you buy a lot of paper test a small quantity to make sure the paper is appropriate for the machine Use labels that are designed for use in laser machines Recommended paper and print media 2 Paper type and size 2 The machine feeds paper from the installed standard paper tray multi...

Page 43: ... tray Width 76 2 to 215 9 mm Length 127 to 355 6 mm Plain paper Thin paper Thick paper Thicker paper Recycled paper Bond paper Labels Envelopes Env Thin Env Thick and Glossy paper 1 up to 50 sheets 80 g m2 3 Envelopes 1 Glossy paper Standard paper tray Tray 1 A4 Letter Legal B5 JIS Executive A5 A5 Long Edge 2 A6 2 Folio 3 16K 195x270mm 16K 184x260mm 16K 197x273mm Plain paper Thin paper and Recycle...

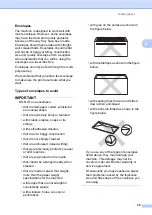
Page 44: ...e s fusing process If you use bond paper paper that has a rough surface or paper that is wrinkled or creased the paper may exhibit degraded performance Types of paper to avoid 2 IMPORTANT Some types of paper may not perform well or may cause damage to your machine DO NOT use paper that is highly textured that is extremely smooth or shiny that is curled or warped 1 A curl of 2 mm or greater may cau...

Page 45: ...or tie strings with self adhesive closures that are of a baggy construction that are not sharply creased that are embossed raised writing that were previously printed by a laser or LED machine that are pre printed on the inside that cannot be arranged neatly when stacked that are made of paper that weighs more than the paper weight specifications for the machine with edges that are not straight or...

Page 46: ...abels with spaces may result in labels peeling off and causing serious jams or print problems All labels used in this machine must be able to withstand a temperature of 200 C for a period of 0 1 seconds Labels can only be fed through the multi purpose tray Types of labels to avoid 2 Do not use labels that are damaged curled wrinkled or an unusual shape IMPORTANT DO NOT feed part used label sheets ...

Page 47: ...r taped DO NOT use cardboard newspaper or fabric To avoid damaging your machine while using the ADF DO NOT pull on the document while it is feeding NOTE To scan documents that are not appropriate for the ADF see Using the scanner glass on page 38 It is easier to use the ADF if you are loading a multiple page document Make sure documents with correction fluid or written with ink are completely dry ...

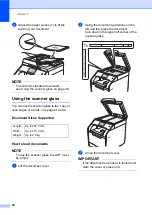
Page 48: ...page at a time Document Sizes Supported 3 How to load documents 3 NOTE To use the scanner glass the ADF must be empty a Lift the document cover b Using the document guidelines on the left and top place the document face down in the upper left corner of the scanner glass c Close the document cover IMPORTANT If the document is a book or is thick do not slam the cover or press on it Length Up to 297 ...

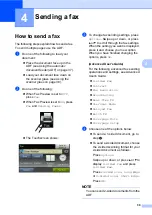
Page 49: ...gh the fax settings When the setting you want is displayed press it and choose your new option When you have finished changing the options press OK Advanced User s Guide For the following advanced fax sending operations and settings see Advanced User s Guide 2 sided Fax Contrast Fax Resolution Broadcasting Real Time TX Overseas Mode Delayed Fax Batch TX Coverpage Note Coverpage Setup d Choose one ...

Page 50: ...t To send more than one page press Yes and place the next page on the scanner glass Press OK The machine starts scanning the page Repeat this step for each additional page Stop faxing 4 To stop faxing press Faxing Letter size documents from the scanner glass 4 When faxing Letter size documents you must set the scan glass size to Letter otherwise a portion of your faxes will be missing a Do one of ...

Page 51: ...e to a transmission error Off is the factory setting Off Image Prints a report if your fax is unsuccessful due to a transmission error A portion of the fax s first page appears on the report No Report Does not print a report at all a Press b Press All Settings c Swipe up or down or press a or b to display Fax d Press Fax e Swipe up or down or press a or b to display Report Setting f Press Report S...

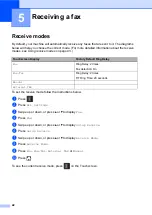
Page 52: ...ll Settings c Swipe up or down or press a or b to display Fax d Press Fax e Swipe up or down or press a or b to display Setup Receive f Press Setup Receive g Swipe up or down or press a or b to display Receive Mode h Press Receive Mode i Press Fax Fax Tel External TAD or Manual j Press To see the current receive mode press on the Touchscreen Receiving a fax 5 Touchscreen Display Factory Default Ri...

Page 53: ...st double ring to inform you answer the phone Factory setting of Ring Delay is 2 0 10 times available see Ring Delay on page 41 F T ring time a fast double ring is 20 seconds According to incoming call after the fax machine rings 2 times 1 For the fax call send fax received signal 2 For the telephone call make a fast double ring waiting for you answer the phone Tip If your machine is connecting an...

Page 54: ...y i Press to choose how many times the line rings before the machine answers j Press F T Ring Time Fax Tel mode only 5 When somebody calls your machine you and your caller will hear the normal telephone ring sound The number of rings is set by the Ring Delay setting If the call is a fax then your machine will receive it however if it is a voice call the machine will sound the F T ring pseudo doubl...

Page 55: ... Start and then press Receive If you answered at an extension telephone press l51 see Operation from external or extension telephones on page 53 NOTE If this feature is set to On but your machine does not connect a fax call when you lift an extension telephone handset press the fax receive code l51 If you send faxes from a computer on the same telephone line and the machine intercepts them set Fax...

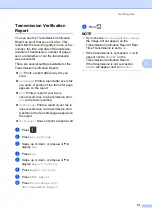
Page 56: ...review 5 When you receive a fax you will see a pop up message on the Touchscreen For example New Fax es 01 View a Press View The Touchscreen displays the fax list NOTE Although printed faxes show the received date and time when Fax Receive Stamp is turned on the Fax Preview screen will not display the received date and time The fax list includes the old faxes and the new fax The new fax is indicat...

Page 57: ... have printed Press No to save the fax you have printed g Press How to print or delete all faxes in the list 5 a Press Fax b Press Received Faxes c Press Print Delete d Do one of the following Press Print All New Faxes to print all faxes you have not yet viewed Press Print All Old Faxes to print all faxes you have viewed Press Delete All New Faxes to delete all faxes you have not yet viewed Press ...

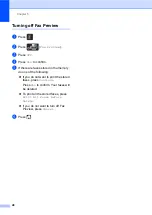
Page 58: ...e If there are faxes stored in the memory do one of the following If you do not want to print the stored faxes press Continue Press Yes to confirm Your faxes will be deleted To print all the stored faxes press Print All Faxes Before Delete If you do not want to turn off Fax Preview press Cancel f Press ...

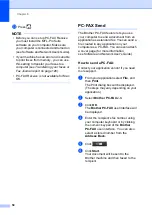
Page 59: ...he left navigation bar and then click Receive Windows 8 Click Brother Utilities and then click the drop down list and select your model name if not already selected Click PC FAX Receive in the left navigation bar and then click Receive On your machine complete the following steps a Press b Press All Settings c Swipe up or down or press a or b to display Fax d Press Fax e Swipe up or down or press ...

Page 60: ... You can send a file created in any application on your computer as a PC FAX You can even attach a cover page for more information see Software and Network User s Guide How to send a PC FAX 6 Contact your application vendor if you need more support a From your application select File and then Print The Print dialog box will be displayed The steps may vary depending on your application b Select Bro...

Page 61: ... tones until the external TAD has picked up the call The sending machine will send CNG tones for only eight to ten seconds longer We do not recommend using the toll saver feature on your external TAD if it needs more than four rings to activate it NOTE If you have problems receiving faxes reduce the Ring Delay setting on your external TAD Connections 7 The external TAD must be connected as shown i...

Page 62: ...elephone system Brother recommends that all our Fax MFC machines be connected to a discreet dedicated line Although a particular PABX may appear to work with a particular model of fax machine we cannot guarantee that the unit will operate correctly While it is often relatively simple to connect a fax machine to a PABX Private Automatic Branch Exchange we suggest that you contact the company that i...

Page 63: ...call back to the machine by pressing l51 Using a non Brother cordless external handset 7 If your non Brother cordless telephone is connected to the telephone line cord see page 52 and you typically carry the cordless handset elsewhere it is easier to answer calls during the Ring Delay If you let the machine answer first you will have to go to the machine so you can press Pickup to transfer the cal...

Page 64: ...1 The preset Remote Deactivation Code is 51 If you are always disconnected when accessing your External TAD try changing the three digit remote codes for example and 555 a Press b Press All Settings c Swipe up or down or press a or b to display Fax d Press Fax e Swipe up or down or press a or b to display Setup Receive f Press Setup Receive g Swipe up or down or press a or b to display Remote Code...

Page 65: ...r the first letter of the name and press OK e Press the number or the name you want f To send a fax press Apply g Press Fax Start The machine scans and sends the fax LDAP search 8 If the machine is connected to your LDAP server you can search for information such as fax numbers and E mail addresses from your server See Software and Network User s Guide Fax redial 8 If you are sending a fax automat...

Page 66: ...have finished with the call the machine will return to the Pulse dialing service Storing numbers 8 You can set up your machine to do the following types of easy dialling Address Book and Groups for broadcasting faxes When you dial an Address Book number the Touchscreen displays the number NOTE If you lose electrical power the Address Book numbers that are in the memory will not be lost Storing a p...

Page 67: ...n h Enter the pinyin using the keyboard on the machine s Touchscreen up to 15 characters To help you enter letters see Entering text on page 215 Press OK i Press Address j Enter the fax or telephone number using the keyboard on the machine s Touchscreen up to 20 digits Press OK NOTE If you downloaded Internet Fax If you want to store an E mail address to use with Internet Fax or Scan to E mail ser...

Page 68: ...ber you want f Press the number you want g Do the following To change the name press Name Enter the new name up to 10 characters for Chinese or 20 characters for alphanumeric using the keyboard on the machine s Touchscreen To help you enter letters see Entering text on page 215 Press OK To change the pinyin press pinyin Enter the new pinyin up to 15 characters using the keyboard on the machine s T...

Page 69: ...rt Stop copying 9 To stop copying press Copy preset settings 9 You can copy with a variety of settings that are already set up for you in the machine simply by pressing them The following preset settings are available Receipt Normal 2in1 ID 2in1 2 sided 1 2 2 sided 2 2 Paper Save a Load your document b Press Copy c Swipe left or right to display Receipt Normal 2in1 ID 2in1 2 sided 1 2 2 sided 2 2 ...

Page 70: ...following settings see Paper settings on page 29 Tray Setting Paper Size and Type Tray Use Copy Press Copy and then press Options Swipe up or down or press a or b to scroll through the copy settings When the setting you want is displayed press it and choose your option When you have finished changing the options press OK Advanced User s Guide For more information about changing the following setti...

Page 71: ...ay vary depending on your application and operating system a From the menu bar of an application click File then Print b Choose Brother MFC XXXX Printer 1 and check the Print to file box 2 Click Print c Choose the folder you want to save the file to and enter the file name if prompted If you are prompted for a file name only you can also specify the folder you want to save the file in by entering ...

Page 72: ...the machine The Touchscreen will automatically display the USB menu to confirm the USB device is correctly connected NOTE If an error occurs the USB menu will not appear on the Touchscreen When the machine is in Deep Sleep mode the Touchscreen does not display any information even if you connect a USB flash drive to the USB direct interface Press the Touchscreen to wake up the machine To prevent d...

Page 73: ...tings if you want to change them Go to step e If you do not want to change the current settings go to step h e Swipe up or down or press a or b to display the setting you want f Press the option you want NOTE You can choose the following settings Paper Type Paper Size Multiple Page Orientation 2 sided Collate Tray Use Print Quality PDF Option Depending on the file type some of these settings may n...

Page 74: ...r USB flash drive or digital camera to the USB direct interface on the front of the machine b Press Direct Print c Press DefaultSettings d Swipe up or down or press a or b to display the setting you want Press the setting e Press the new option you want f Repeat steps d and e for each setting you want to change g Press OK h Press ...

Page 75: ...ns Center at http solutions brother com see Quick Setup Guide b From your application choose the Print command c Choose the name of your machine in the Print dialog box and click Properties or Preferences depending on the application you are using d Choose the settings you want to change in the Properties dialog box and then click OK Paper Size Orientation Copies Media Type Print Quality Color Mon...

Page 76: ...twork configure it with a TCP IP address Install the scanner drivers from the CD ROM or Brother Solutions Center at http solutions brother com see Quick Setup Guide Configure the machine with a TCP IP address if network scanning does not work see Software and Network User s Guide How to scan to a computer 12 ...

Page 77: ...ystem you are using Windows XP Windows Vista and Windows 7 Open ControlCenter4 by clicking Start All Programs Brother Brother Utilities Click the drop down list and select your model name if not already selected Click SCAN in the left navigation bar and then click ControlCenter4 The ControlCenter4 application will open Windows 8 Click Brother Utilities and then click the drop down list and select ...

Page 78: ...Chapter 12 68 e Click File f Press Scan The machine starts the scanning process The folder where the scanned data is saved will open automatically ...

Page 79: ...hted in blue d Press OK When the machine is connected to a network press the computer name Do one of the following If you want to use the default settings go to step h If you want to change the default settings go to step e e Press Options Scan Settings will change to Set at Device f Choose the settings for 2 sided Scan Scan Type Resolution File Type Scan Size and Remove Background Colour as neede...

Page 80: ...modes are available to USB to Network Windows to FTP SFTP to E mail Server to E mail to Image to OCR to File WS Scan 1 Web Services Scan 1 Windows only Windows Vista SP2 or later Windows 7 and Windows 8 See Software and Network User s Guide ...

Page 81: ... supplies Make sure both are installed If the toner cartridge is placed in the machine without the drum unit the message Drum may be displayed Routine maintenance A Toner cartridge Drum unit See Replacing the toner cartridges on page 75 Model Name TN 376BK TN 376C TN 376M TN 376Y TN 379BK TN 379C TN 379M TN 379Y See Replacing the drum unit on page 81 Model Name DR 371CL Belt unit Waste toner box S...

Page 82: ... 5 High yield toner cartridge 6 Super high yield toner cartridge 7 5 pages per job Touchscreen messages Supply to prepare Approximate life How to replace Model name Toner Low X Toner cartridge X BK C M Y BK Black C Cyan M Magenta Y Yellow Black 4 000 pages 1 2 5 6 000 pages 1 2 6 Cyan Magenta Yellow 3 500 pages 1 2 5 6 000 pages 1 2 6 See page 75 TN 376BK 5 TN 376C 5 TN 376M 5 TN 376Y 5 TN 379BK 6...

Page 83: ... 6 Cyan Magenta Yellow 3 500 pages 1 2 5 6 000 pages 1 2 6 See page 75 TN 376BK 5 TN 376C 5 TN 376M 5 TN 376Y 5 TN 379BK 6 TN 379C 6 TN 379M 6 TN 379Y 6 Replace Drum Drum unit 25 000 pages 1 3 4 See page 81 DR 371CL Drum Stop Drum unit Replace Belt Belt unit 50 000 pages 1 7 20 000 pages 1 3 See page 87 BU 320CL Replace WT Box Waste toner box 50 000 pages 1 See page 92 WT 320CL Replace Fuser Fuser...

Page 84: ...cidentally spilling or scattering the material inside If you use paper that is not a direct equivalent for the recommended paper the life of supply items and machine parts may be reduced The projected life for each of the toner cartridges is based on ISO ICE 19798 Frequency of replacement will vary depending on the print volume percentage of coverage types of media used and powering on off the mac...

Page 85: ...ge It is a good idea to keep a new toner cartridge ready for use when you see the Toner Low warning To ensure high quality printing we recommend that you use only Brother Original toner cartridges When you want to buy toner cartridges contact Brother customer service or your local Brother dealer We recommend that you clean the machine when you replace the toner cartridge see Cleaning and Checking ...

Page 86: ...ing the toner cartridges A a Make sure the machine is turned on b Press the front cover release button and pull open the front cover c Hold the blue handle of the drum unit Pull the drum unit out until it stops ...

Page 87: ...he toner cartridges WARNING DO NOT put a toner cartridge into a fire It could explode resulting in injuries DO NOT use flammable substances any type of spray or an organic solvent liquid containing alcohol or ammonia to clean the inside or outside of the machine Doing so could cause a fire or electrical shock Instead use only a dry lint free cloth See Product Safety Guide ...

Page 88: ...tightly in a bag so that toner powder does not spill out of the cartridge Discard the used supplies according to local regulations keeping it separate from domestic waste If you have questions contact your local waste disposal office see Product Safety Guide Be sure to reseal the used supplies tightly so that the material inside does not spill e Clean the corona wire inside the drum unit by gently...

Page 89: ...s optimum performance if toner or toner cartridges of other specifications are used Brother does not therefore recommend the use of cartridges other than Brother Original cartridges with this machine or the refilling of empty cartridges with toner from other sources If damage is caused to the drum unit or other parts of this machine as a result of the use of toner or toner cartridges other than Br...

Page 90: ...Repeat this for all the toner cartridges BK Black C Cyan M Magenta Y Yellow NOTE Make sure you installed the toner cartridge correctly or it may separate from the drum unit i Push the drum unit in until it stops j Close the front cover of the machine NOTE After replacing a toner cartridge DO NOT turn off the machine or open the front cover until the Touchscreen clears the Please wait message and r...

Page 91: ...n Buy a new drum unit DR 371CL and have it ready before you get a Replace Drum message Replace Drum A The drum unit has exceeded its rated life Replace the drum unit with a new one We recommend a Brother Original drum unit be installed at this time When you replace the drum unit with a new one you must reset the drum counter Instructions of how to do this can be found in the box your new drum unit...

Page 92: ...82 b Press the front cover release button and pull open the front cover c Hold the blue handle of the drum unit Pull the drum unit out until it stops ...

Page 93: ...rum unit lift the front of the drum unit and remove it from the machine IMPORTANT We recommend that you place the drum unit on a clean flat surface with a piece of disposable paper underneath it in case you accidentally spill or scatter toner To prevent damage to the machine from static electricity DO NOT touch the electrodes shown in the illustration 2 1 ...

Page 94: ...r outside of the machine Doing so could cause a fire or electrical shock Instead use only a dry lint free cloth See Product Safety Guide IMPORTANT Handle the toner cartridge carefully If toner scatters on your hands or clothes immediately wipe or wash it off with cold water To avoid print quality problems DO NOT touch the shaded parts shown in the illustrations We recommend that you place the tone...

Page 95: ...disposal office see Product Safety Guide Be sure to reseal the used supplies tightly so that the material inside does not spill f Unpack the new drum unit and remove the protective cover g Hold the handle of the toner cartridge and slide it into the appropriate coloured section of the drum unit until it clicks into place BK Black C Cyan M Magenta Y Yellow NOTE Make sure you install the toner cartr...

Page 96: ... as shown in the illustration i Gently slide the drum unit into the machine until it stops at the blue lock lever j Turn the blue lock lever 1 clockwise to the lock position k Push the drum unit in until it stops l Close the front cover of the machine 2 1 1 2 2 2 1 ...

Page 97: ...the belt unit is near the end of its life Buy a new belt unit and have it ready before you get a Replace Belt message To replace the belt unit see Replacing the belt unit on page 87 Replace Belt A When the Replace Belt message appears on the Touchscreen you must replace the belt unit When you replace the belt unit with a new one you must reset the belt unit counter Instructions of how to do this c...

Page 98: ...88 b Press the front cover release button and pull open the front cover c Hold the blue handle of the drum unit Pull the drum unit out until it stops ...

Page 99: ...the drum unit lift the front of the drum unit and remove it from the machine IMPORTANT We recommend that you place the drum unit on a clean flat surface with disposable paper underneath it in case you accidentally spill or scatter toner To prevent damage to the machine from static electricity DO NOT touch the electrodes shown in the illustration 2 1 ...

Page 100: ...ft the belt unit up then pull it out IMPORTANT To avoid print quality problems DO NOT touch the shaded parts shown in the illustrations f Unpack the new belt unit and install the new belt unit in the machine Make sure the belt unit is level and fits firmly into place ...

Page 101: ...se position as shown in the illustration h Gently slide the drum unit into the machine until it stops at the blue lock lever i Turn the blue lock lever 1 clockwise to the lock position j Push the drum unit in until it stops k Close the front cover of the machine 2 1 1 2 2 2 1 ...

Page 102: ... Letter size single sided pages 1 1 Waste toner box life is approximate and may vary by type of use WT Box End Soon A If the Touchscreen displays WT Box End Soon it means the waste toner box is near the end of its life Buy a new waste toner box and have it ready before you get a Replace WT Box message Replace WT Box A When the Replace WT Box message appears on the Touchscreen you must replace the ...

Page 103: ...Routine maintenance 93 A b Press the front cover release button and pull open the front cover c Hold the blue handle of the drum unit Pull the drum unit out until it stops ...

Page 104: ...it lift the front of the drum unit and remove it from the machine IMPORTANT We recommend that you place the drum unit on a clean flat surface with disposable paper underneath it in case you accidentally spill or scatter toner To prevent damage to the machine from static electricity DO NOT touch the electrodes shown in the illustration 2 1 ...

Page 105: ...O NOT touch the shaded parts shown in the illustrations f Remove the two pieces of orange packing material and discard them NOTE This step is only necessary when you are replacing the waste toner box for the first time and is not required for the replacement waste toner box The orange packing pieces are installed at the factory to protect your machine during shipment ...

Page 106: ...ent liquid containing alcohol or ammonia to clean the inside or outside of the machine Doing so could cause a fire or electrical shock Instead use only a dry lint free cloth See Product Safety Guide NOTE Be sure to seal up the waste toner box tightly in an appropriate bag so that toner powder does not spill out of the waste toner box Discard the used waste toner box according to local regulations ...

Page 107: ...oner box and install the new waste toner box in the machine using the blue handle Make sure the waste toner box is level and fits firmly into place i Slide the belt unit back into the machine Make sure the belt unit is level and fits firmly into place ...

Page 108: ... as shown in the illustration k Gently slide the drum unit into the machine until it stops at the blue lock lever l Turn the blue lock lever 1 clockwise to the lock position m Push the drum unit in until it stops n Close the front cover of the machine 2 1 1 2 2 2 1 ...

Page 109: ...to a fire It could explode resulting in injuries DO NOT use flammable substances any type of spray or an organic solvent liquid containing alcohol or ammonia to clean the inside or outside of the machine Doing so could cause a fire or electrical shock Instead use only a dry lint free cloth See Product Safety Guide IMPORTANT Use neutral detergents Cleaning with volatile liquids such as thinner or b...

Page 110: ...o turn the machine off b Clean the Touchscreen with a dry soft lint free cloth c Turn on the machine Cleaning the outside of the machine a Press and hold down to turn the machine off b Wipe the outside of the machine with a dry lint free cloth to remove dust c Pull the paper tray completely out of the machine d If paper is loaded in the paper tray remove it ...

Page 111: ...free cloth to remove dust g Re load the paper and put the paper tray firmly back in the machine h Turn on the machine Cleaning the scanner glass A a Press and hold down to turn the machine off b Lift the document cover 1 Clean the white plastic surface 2 and scanner glass 3 underneath it with a soft lint free cloth gently moistened with water 3 2 1 ...

Page 112: ...ter run your finger tip over the glass to see if you can feel anything on it If you feel dirt or debris clean the glass again concentrating on that area You may need to repeat the cleaning process three or four times To test make a copy after each cleaning d Close the document cover e Turn on the machine Cleaning the laser scanner windows A a Press and hold down to turn the machine off b Press the...

Page 113: ...e drum unit Pull the drum unit out until it stops d Turn the blue lock lever 1 at the left of the machine counterclockwise to the release position Holding the blue handles of the drum unit lift the front of the drum unit and remove it from the machine 2 1 ...

Page 114: ...in case you accidentally spill or scatter toner To prevent damage to the machine from static electricity DO NOT touch the electrodes shown in the illustration Hold the blue handles of the drum unit when you carry it DO NOT hold the sides of the drum unit e Wipe the four scanner windows 1 with a dry lint free cloth 1 ...

Page 115: ... as shown in the illustration g Gently slide the drum unit into the machine until it stops at the blue lock lever h Turn the blue lock lever 1 clockwise to the lock position i Push the drum unit in until it stops j Close the front cover of the machine k Turn on the machine 2 1 1 2 2 2 1 ...

Page 116: ...roblems or the Touchscreen shows Drum clean the corona wires as follows a Make sure that the machine is turned on b Press the front cover release button and pull open the front cover c Hold the blue handle of the drum unit Pull the drum unit out until it stops ...

Page 117: ...or cloth in case you accidentally spill or scatter toner Handle the toner cartridge carefully If toner scatters on your hands or clothes immediately wipe or wash it off with cold water e Clean the corona wire inside the drum unit by gently sliding the blue tab from left to right and right to left several times NOTE Be sure to return the tab to the home position 1 If you do not printed pages may ha...

Page 118: ... you until you hear it click into place Make sure that you match the toner cartridge colour to the same colour label on the drum unit Repeat this for all the toner cartridges BK Black C Cyan M Magenta Y Yellow h Push the drum unit in until it stops i Close the front cover of the machine BKTN BK TN C TN M TN Y BK BK C M Y ...

Page 119: ...ess All Settings d Swipe up or down or press a or b to display Print Reports e Press Print Reports f Swipe up or down or press a or b to display Drum Dot Print g Press Drum Dot Print h The machine will display Press OK Press OK i The machine will print the Drum Dot Check Sheet Then press j Press and hold down to turn the machine off k Press the front cover release button and pull open the front co...

Page 120: ... Pull the drum unit out until it stops m Turn the blue lock lever 1 at the left of the machine counterclockwise to the release position Holding the blue handles of the drum unit lift the front of the drum unit and remove it from the machine 2 1 ...

Page 121: ...the blue handles of the drum unit when you carry it DO NOT hold the sides of the drum unit n Hold the handle of the toner cartridge and gently push it forward to unlock it Then pull it out of the drum unit Repeat this for all the toner cartridges IMPORTANT Handle the toner cartridges carefully If toner scatters on your hands or clothes immediately wipe or wash it off with cold water To avoid print...

Page 122: ...our of printed dots is the colour of the drum you should clean Dot location The sheet has eight numbered columns The number of the column with the printed dot in it is used to find the dot position on the drum q Use the numbered markers next to the drum roller to find the mark For example a cyan dot in column 2 on the check sheet would mean that there is a mark in the 2 region of the cyan drum 1 B...

Page 123: ...ANT To avoid print quality problems DO NOT touch the surface of the drum unit with your bare hands DO NOT clean the surface of the photosensitive drum with a sharp object or any liquids s When you have found the mark on the drum that matches the drum dot check sheet wipe the surface of the drum gently with a cotton swab until the mark on the surface comes off IMPORTANT DO NOT clean the surface of ...

Page 124: ...t you match the toner cartridge colour to the same colour label on the drum unit Repeat this for all the toner cartridges BK Black C Cyan M Magenta Y Yellow u Make sure the blue lock lever 1 is in the release position as shown in the illustration v Gently slide the drum unit into the machine until it stops at the blue lock lever BKTN BK TN C TN M TN Y BK BK C M Y 2 1 1 2 2 ...

Page 125: ...aning the paper pick up rollers A Cleaning the paper pick up roller periodically may prevent paper jams by ensuring correct paper feeding If you have paper feed problems clean the pick up rollers as follows a Press and hold down to turn the machine off b Pull the paper tray completely out of the machine c If paper is loaded in the paper tray remove it d Remove anything that is stuck inside the pap...

Page 126: ...ine Colour Calibration A The output density for each colour may vary depending on the machine s environment such as temperature and humidity Calibration helps you to improve the colour density a Press b Press Calibration c Press Calibrate d Press Yes to confirm e The machine will display Completed f Press You can reset the calibration parameters back to the factory settings a Press b Press Calibra...

Page 127: ... then select Color Calibration from the Control menu see Software and Network User s Guide Colour Registration A If solid areas of colour or images have cyan magenta or yellow fringes you can use the auto registration feature to correct the problem a Press b Press Registration c Press Yes to confirm d The machine will display Completed e Press Auto Correction A You can set if the colour correction...

Page 128: ...een removed Paper is inserted correctly in the paper tray The interface cables are securely connected to the machine and the computer or the wireless connection is set up on both the machine and your computer Touchscreen Messages See Error and maintenance messages on page 120 If you did not solve the problem with the above checks identify the problem and go to the page suggested below Paper handli...

Page 129: ...Troubleshooting 119 B Scanning problems Scanning difficulties on page 147 Software and Network problems Software difficulties on page 147 Network difficulties on page 148 ...

Page 130: ... 2 sided Disabled Reload paper then press Retry Although the size of paper in the paper tray matches the paper size that was selected from the control panel or printer driver the machine has stopped printing when it encountered an additional different size of paper in the tray Make sure the paper tray contains only the size of paper you select in either the control panel or printer driver then pre...

Page 131: ...hine to another telephone line If the problem continues contact the telephone company and ask them to check your telephone line Condensation One of the issues that can cause this error is that condensation may form inside the machine after a room temperature change Leave the machine turned on Wait for 30 minutes with the front cover fully opened Then turn off the machine and close the cover Turn i...

Page 132: ...hine on again If this error message appears again replace the DIMM with a new one See Advanced User s Guide Disconnected The other person or other person s fax machine stopped the call Try to send or receive again Document Jam The document was not inserted or fed correctly or the document scanned from the ADF was too long See Document is jammed in the top of the ADF unit on page 130 or Using the a...

Page 133: ... installed correctly Reinstall the belt unit see the steps in Replacing the belt unit on page 87 No Drum Unit The drum unit is not installed correctly Reinstall the drum unit see the steps in Replacing the drum unit on page 81 No HUB Support A USB hub device is connected to the USB direct interface Disconnect the USB hub device from the USB direct interface No Paper The machine is out of paper in ...

Page 134: ...page 92 Out of Memory The machine s memory is full Fax sending or copy operation in progress Do one of the following Press Send Now Partial Print or Quit to send or copy the scanned pages Press and wait until the other operations in progress finish and then try again Clear the faxes from the memory Print the faxes that are stored in the memory to restore the memory to 100 Then turn off Fax Storage...

Page 135: ... the belt unit on page 87 Replace Drum It is time to replace the drum unit Replace the drum unit see Replacing the drum unit on page 81 The drum unit counter was not reset when a new drum was installed Reset the drum unit counter by following the instructions included with the new drum unit Replace Fuser It is time to replace the fuser unit Contact Brother customer service or your local Brother de...

Page 136: ...y Size Error The paper size defined in the printer driver is not supported by the defined tray Choose a paper size which is supported by each tray see Paper type and size on page 32 Size Error 2 sided The paper size defined in the printer driver and the Touchscreen menu is not available for automatic 2 sided printing Press Choose a paper size that is supported by 2 sided printing The paper size yo...

Page 137: ...lower part of the Touchscreen and its frame Insert a piece of stiff paper between the lower part of the Touchscreen and its frame and slide it back and forth to push out the debris Tray2 Error The optional lower tray is not installed correctly Reinstall the optional lower tray Unusable Device Remove the Device Turn the power off and back on again A defective USB device or a high power consumption ...

Page 138: ...age on the Touchscreen after the faxes have been transferred disconnect the machine from the power source for several minutes and then reconnect it Transferring faxes to another fax machine B If you have not set up your Station ID you cannot enter fax transfer mode see Enter personal information Station ID on page 18 a Press to interrupt the error temporarily b Press c Press All Settings d Swipe u...

Page 139: ...r and then click Receive c Make sure you have set PC Fax Receive on the machine see PC FAX Receive Windows only on page 49 If faxes are in the machine s memory when you set up PC Fax Receive the Touchscreen will ask if you want to transfer the faxes to your computer d Do one of the following To transfer all faxes to your computer press Yes If Fax Preview is set to Off you will be asked if you want...

Page 140: ...ps or tears be sure you remove all small paper scraps to prevent future jams d Close the ADF cover e Press Document is jammed under the document cover B a Remove any paper from the ADF that is not jammed b Lift the document cover c Pull the jammed document out to the right If the document rips or tears be sure you remove all small paper scraps to prevent future jams d Close the document cover e Pr...

Page 141: ...t cover b Insert a piece of stiff paper such as cardstock into the ADF to push any small paper scraps through c Close the document cover d Press Document is jammed at the output tray B a Remove any paper from the ADF that is not jammed b Pull the jammed document out to the right c Press ...

Page 142: ...aper jams Paper is jammed in the multi purpose tray B If the Touchscreen displays Jam MP Tray follow these steps a Remove the paper from the MP tray b Remove any jammed paper from in and around the MP tray c Fan the paper stack and then put it back in the MP tray d When loading paper in the MP tray make sure that the paper stays under the maximum paper height guides 1 on both sides of the tray e P...

Page 143: ...For Jam Tray2 b Use both hands to slowly pull out the jammed paper NOTE Pulling the jammed paper downward allows you to remove the paper more easily c Make sure the paper is below the maximum paper mark in the paper tray While pressing the blue paper guide release lever slide the paper guides to fit the paper size Make sure the guides are firmly in the slots d Put the paper tray firmly back in the...

Page 144: ...the machine turned on for 10 minutes for the internal fan to cool the extremely hot parts inside the machine b Open the back cover WARNING HOT SURFACE After you have just used the machine some internal parts of the machine will be extremely hot Wait for the machine to cool down before you touch the internal parts ...

Page 145: ...d down to the envelope position lift these levers to the original position before pulling the blue tabs 1 down d Use both hands to gently pull the jammed paper out of the fuser unit e Close the fuser cover 2 NOTE If you print on envelopes pull down the envelope levers 3 to the envelope position again before closing the back cover f Close the back cover 2 1 3 1 3 2 3 3 ...

Page 146: ...side the machine B If the Touchscreen displays Jam Inside follow these steps a Press the front cover release button and pull open the front cover b Hold the blue handle of the drum unit Pull the drum unit out until it stops ...

Page 147: ...ndles of the drum unit lift the front of the drum unit and remove it from the machine IMPORTANT We recommend that you place the drum unit on a piece of disposable paper or cloth in case you accidentally spill or scatter toner To prevent damage to the machine from static electricity DO NOT touch the electrodes shown in the illustration 2 1 ...

Page 148: ...ake sure the blue lock lever 1 is in the release position as shown in the illustration f Gently slide the drum unit into the machine until it stops at the blue lock lever g Turn the blue lock lever 1 clockwise to the lock position 2 1 1 2 2 2 1 ...

Page 149: ...r when it is turned on Before you turn on the machine delete the job from your computer s print spooler Paper is jammed underneath the paper tray B If the Touchscreen displays Jam 2 sided follow these steps a Leave the machine turned on for 10 minutes for the internal fan to cool the extremely hot parts inside the machine b Pull the paper tray completely out of the machine c Make sure the jammed p...

Page 150: ...SURFACE After you have just used the machine some internal parts of the machine will be extremely hot Wait for the machine to cool down before you touch the internal parts f Use both hands to gently pull the jammed paper out of the back of the machine g Close the back cover until it locks in the closed position h Put the paper tray firmly back in the machine ...

Page 151: ... Use Printer Online is not listed If it is listed click this option to set the driver Online Windows XP and Windows Server 2003 Click the Start button Printers and Faxes Right click Brother MFC XXXX Printer Make sure Use Printer Online is not listed If it is listed click this option to set the driver Online Windows 8 and Windows Server 2012 Move your mouse to the lower right corner of your desktop...

Page 152: ... speed is too slow Try changing the printer driver setting The highest resolution needs longer data processing sending and printing time If the machine is in Quiet mode print speed is slower Check the Quiet mode setting see Advanced User s Guide The machine does not print from Adobe Illustrator Try to reduce the print resolution see Software and Network User s Guide Poor print quality See Improvin...

Page 153: ...LINE socket of the machine Change Tone Pulse setting see Advanced User s Guide If an external phone is connected to the machine send a manual fax by lifting the handset of the external telephone and dialling the number using the external telephone Wait to hear the fax receiving tones before pressing Fax Start If there is no dial tone connect a known working telephone and telephone line cord direct...

Page 154: ...utomatically answer any incoming faxes you should select the Manual mode In Manual mode you must answer every incoming call and activate the machine to receive faxes Another device or service at your location may be answering the call before your Brother machine answers To test this lower the ring delay setting If the answer mode is set to Fax or Fax Tel reduce the ring delay to 1 ring see Ring De...

Page 155: ...e a fax even if you have answered the call on an external or extension telephone see Fax Detect on page 45 If you often get transmission errors due to possible interference on the telephone line try changing the Compatibility setting to Basic for VoIP see Telephone line interference VoIP on page 150 Contact your administrator to check your Secure Function Lock Settings Sending faxes Difficulty Sug...

Page 156: ...Fax Detect to Off see Fax Detect on page 45 Sending a Fax Call to the machine If you answered on an external or extension telephone press your Remote Activation Code default setting is l51 When your machine answers hang up Custom features on a single line If you have Call Waiting Call Waiting Caller ID Caller ID Voice Mail an answering machine an alarm system or other custom feature on a single te...

Page 157: ...eManager click File Select Source and choose the Brother TWAIN driver Macintosh can also scan documents using the ICA Scanner Driver see Software and Network User s Guide OCR does not work Try increasing the scanning resolution Macintosh Presto PageManager must be downloaded and installed before use For further instructions see Accessing Brother Support Macintosh on page 5 Network scanning does no...

Page 158: ... Selector window from the Model pop up menu in the main screen of ControlCenter2 The network PC FAX Receive feature does not work Windows only It is necessary to set the third party Security Firewall Software to allow PC FAX Rx To add port 54926 for Network PC FAX Rx enter the information below In Name Enter any description for example Brother PC FAX Rx In Port number Enter 54926 In Protocol Make ...

Page 159: ...o the following a Windows 7 and Windows Server 2008 R2 Click the Start button Devices and Printers Windows Vista and Windows Server 2008 Click the Start button Control Panel Hardware and Sound Printers Windows XP and Windows Server 2003 Click the Start button Printers and Faxes Windows 8 and Windows Server 2012 Move your mouse to the lower right corner of your desktop When the menu bar appears cli...

Page 160: ...nce on the telephone line we recommend that you adjust the Equalization for compatibility to reduce the modem speed for fax operations a Press b Press All Settings c Swipe up or down or press a or b to display Initial Setup d Press Initial Setup e Swipe up or down or press a or b to display Compatibility f Press Compatibility g Press High Normal or Basic for VoIP Basic for VoIP reduces the modem s...

Page 161: ...other print media on page 32 b Check that the drum unit and toner cartridges are installed correctly Examples of poor print quality Recommendation Printed pages are compressed horizontal stripes appear or characters in the top bottom left and right margins are cut off Adjust the print margins on your application and reprint the document Coloured letters and thin letters in the original document ar...

Page 162: ...nside the machine or around the drum unit and toner cartridge Examples of poor print quality Recommendation ABCDEFGHIJKLMNOPQRSTUVWXYZ 0123456789 abcdefghijklmnopqrstuvwxyz ABCDEFGHIJKLMNOPQRSTUVWXYZ 0123456789 abcdefghijklmnopqrstuvwxyz ABCDEFGHIJKLMNOPQRSTUVWXYZ 0123456789 abcdefghijklmnopqrstuvwxyz ABCDEFGHIJKLMNOPQRSTUVWXYZ 0123456789 abcdefghijklmnopqrstuvwxyz ABCDEFGHIJKLMNOPQRSTUVWXYZ 01234...

Page 163: ...toner cartridge visit http solutions brother com to view our FAQs and troubleshooting tips Put in a new drum unit see Replacing the drum unit on page 81 Examples of poor print quality Recommendation ABCDEFGHIJKLMNOPQRSTUVWXYZ 0123456789 abcdefghijklmnopqrstuvwxyz ABCDEFGHIJKLMNOPQRSTUVWXYZ 0123456789 abcdefghijklmnopqrstuvwxyz ABCDEFGHIJKLMNOPQRSTUVWXYZ 0123456789 abcdefghijklmnopqrstuvwxyz ABCDEF...

Page 164: ...g the drum unit on page 109 Put in a new drum unit see Replacing the drum unit on page 81 Examples of poor print quality Recommendation ABCDEFGHIJKLMNOPQRSTUVWXYZ 0123456789 abcdefghijklmnopqrstuvwxyz ABCDEFGHIJKLMNOPQRSTUVWXYZ 0123456789 abcdefghijklmnopqrstuvwxyz ABCDEFGHIJKLMNOPQRSTUVWXYZ 0123456789 abcdefghijklmnopqrstuvwxyz ABCDEFGHIJKLMNOPQRSTUVWXYZ 0123456789 abcdefghijklmnopqrstuvwxyz ABCD...

Page 165: ...u are copying see Advanced User s Guide Make sure Toner Save mode is off in the Touchscreen or the printer driver see Software and Network User s Guide If the print quality is poor clear the Improve Gray Color check box in the printer driver see Software and Network User s Guide If the print quality of the black portion is not what you expected select the Enhance Black Printing check box in the pr...

Page 166: ... in a new drum unit see Replacing the drum unit on page 81 Missing thin lines in images Make sure Toner Save mode is off in the Touchscreen or the printer driver see Software and Network User s Guide Change the print resolution Examples of poor print quality Recommendation ABCDEFGHIJKLMNOPQRSTUVWXYZ 0123456789 abcdefghijklmnopqrstuvwxyz ABCDEFGHIJKLMNOPQRSTUVWXYZ 0123456789 abcdefghijklmnopqrstuvw...

Page 167: ...ing in the driver matches the type of paper you are using see Acceptable paper and other print media on page 32 Examples of poor print quality Recommendation ABCDEFGHIJKLMNOPQRSTUVWXYZ 0123456789 abcdefghijklmnopqrstuvwxyz ABCDEFGHIJKLMNOPQRSTUVWXYZ 0123456789 abcdefghijklmnopqrstuvwxyz ABCDEFGHIJKLMNOPQRSTUVWXYZ 0123456789 abcdefghijklmnopqrstuvwxyz ABCDEFGHIJKLMNOPQRSTUVWXYZ 0123456789 abcdefghi...

Page 168: ... new drum unit see Replacing the drum unit on page 81 Examples of poor print quality Recommendation ABCDEFGHIJKLMNOPQRSTUVWXYZ 0123456789 abcdefghijklmnopqrstuvwxyz ABCDEFGHIJKLMNOPQRSTUVWXYZ 0123456789 abcdefghijklmnopqrstuvwxyz ABCDEFGHIJKLMNOPQRSTUVWXYZ 0123456789 abcdefghijklmnopqrstuvwxyz ABCDEFGHIJKLMNOPQRSTUVWXYZ 0123456789 abcdefghijklmnopqrstuvwxyz ABCDEFGHIJKLMNOPQRSTUVWXYZ 0123456789 ab...

Page 169: ...twork User s Guide If the problem is not solved choose Plain Paper in the media type setting If you are printing an envelope choose Env Thin in the media type setting If you do not use the machine often the paper may have been in the paper tray too long Turn over the stack of paper in the paper tray Also fan the paper stack and then rotate the paper 180 in the paper tray Store the paper where it w...

Page 170: ...tray on page 23 NOTE When you have finished printing open the back cover and reset the two grey levers back to their original positions 1 by lifting them up until they stop If creases occur with the envelope levers in the envelope position print with the back cover opened and feed one envelope at a time from the MP tray Examples of poor print quality Recommendation ABCDEFG EFGHIJKLMN 1 ...

Page 171: ...achine Reset You can reset the machine partially back to its factory settings The settings that will not be reset are Station ID Address Book Reports Setting Lock Secure Function Lock and the Network settings 2 Network You can reset the internal print server back to the factory settings by resetting only the network information such as the password and IP address 3 Address Book Fax This operation ...

Page 172: ... f Press Reset g Swipe up or down or press a or b to display Machine Reset Network Address Book Fax All Settings or Factory Reset and then press the option you want h Do one of the following To reset the settings press Yes and go to step i To exit without making changes press No and go to step j i You will be asked to reboot the machine Do one of the following To reboot the machine press Yes for 2...

Page 173: ...ngs and options you want to set as they are displayed on the Touchscreen See the step by step Settings Tables and Features Tables for all the available choices for each setting and feature You can use these tables to quickly set up your preferred settings in the machine Settings and features tables C ...

Page 174: ...dings of faxes you send 18 Time Time Zone UTCXXX XX Set the time zone for your country See Toner See Toner on page 207 Access the Toner menus 207 Network Wired LAN See Wired LAN on page 178 Access the Wired LAN setting menus 178 WLAN See WLAN on page 180 Access the WLAN setting menus 180 Fax Preview On Off View faxes you receive on the Touchscreen 46 Receive Mode See Receive Mode on page 174 Choos...

Page 175: ...in Paper Recycled Paper Tray 2 This menu only appears if you installed Tray 2 Thin Plain Paper Recycled Paper Paper Size MP Tray A4 Letter B5 JIS B5 ISO A5 A5 Long Edge A6 Executive Legal Folio Com 10 Monarch C5 DL 16K 195x270mm 16K 184x260mm 16K 197x273mm Set the size of paper in the paper tray 29 Level 1 Level 2 Level 3 Options Descriptions See Page Advanced User s Guide The factory settings are...

Page 176: ... you installed Tray 2 A4 Letter B5 JIS A5 Executive Legal Folio 16K 195x270mm 16K 184x260mm 16K 197x273mm Set the size of paper in the paper tray 29 Check Size On Off Choose whether to display the message to check that the size of the paper in the machine matches and the machine s Paper Size setting Level 1 Level 2 Level 3 Options Descriptions See Page Advanced User s Guide The factory settings ar...

Page 177: ...Tray 1 Only Tray 2 Only MP Only MP T1 T2 MP T2 T1 T1 T2 MP T2 T1 MP Tray 2 Only and T2 appear only if you installed Tray 2 30 Tray Use Print Tray 1 Only Tray 2 Only MP Only MP T1 T2 MP T2 T1 T1 T2 MP T2 T1 MP Tray 2 Only and T2 appear only if you installed Tray 2 31 All Settings See All Settings on page 168 Select your default settings 168 Level 1 Level 2 Level 3 Options Descriptions See Page Adva...

Page 178: ... Paper Thick Thicker Recycled Paper Bond Paper Label Envelope Env Thin Env Thick Glossy Paper Set the type of paper in the paper tray 29 Tray 1 Thin Plain Paper Recycled Paper Tray 2 This menu only appears if you installed Tray 2 Thin Plain Paper Recycled Paper Advanced User s Guide The factory settings are shown in Bold with an asterisk ...

Page 179: ...l Folio Com 10 Monarch C5 DL 16K 195x270mm 16K 184x260mm 16K 197x273mm Set the size of paper in the paper tray 29 Tray 1 A4 Letter B5 JIS A5 A5 Long Edge A6 Executive Legal Folio 16K 195x270mm 16K 184x260mm 16K 197x273mm Level 1 Level 2 Level 3 Level 4 Options Descriptions See Page Advanced User s Guide The factory settings are shown in Bold with an asterisk ...

Page 180: ...ppears if you installed Tray 2 A4 Letter B5 JIS A5 Executive Legal Folio 16K 195x270mm 16K 184x260mm 16K 197x273mm Set the size of paper in the paper tray 29 Level 1 Level 2 Level 3 Level 4 Options Descriptions See Page Advanced User s Guide The factory settings are shown in Bold with an asterisk ...

Page 181: ...ly and T2 appear only if you installed Tray 2 Choose the tray that will be used for Copy Fax or Print mode 30 Tray Use Fax Tray 1 Only Tray 2 Only MP Only MP T1 T2 MP T2 T1 T1 T2 MP T2 T1 MP Tray 2 Only and T2 appear only if you installed Tray 2 30 Tray Use Print Tray 1 Only Tray 2 Only MP Only MP T1 T2 MP T2 T1 T1 T2 MP T2 T1 MP Tray 2 Only and T2 appear only if you installed Tray 2 31 Level 1 Le...

Page 182: ...n backlight stays on for after the last button press Button Settings Home Button Settings Home More1 More2 Set the screen that is displayed when you press Home on the Touchpanel 12 Ecology Toner Save On Off Increase the page yield of the toner cartridge If your machine has been set to Toner Save On you cannot set Quiet Mode to On See Sleep Time Range varies depending on the model 3 Mins Conserve p...

Page 183: ...oner Save to On See Setting Lock Set Password Verify Stop unauthorized users from changing the machine s settings Lock Off On Shortcut Settings Choose shortcut button Edit Shortcut Name Change the shortcut name 17 Delete Delete the shortcut 17 Level 1 Level 2 Level 3 Level 4 Options Descriptions See Page Advanced User s Guide The factory settings are shown in Bold with an asterisk ...

Page 184: ...ow you to answer all calls at an extension or external phone and use codes to turn the machine on or off You can personalize these codes 53 Auto Reduction On Off Reduce the size of incoming faxes See PC Fax Receive On Off Set the machine to send faxes to your computer 49 Backup Print On Off If you chose On you can turn on the Backup Print safety feature Memory Receive Off Fax Forward Fax Storage S...

Page 185: ...maximum three times after five minutes 55 Destination Display Hidden Set the machine to display the destination information on the Touchscreen during fax sending See Report Setting Transmission On On Image Off Off Image No Report Choose the initial setup for the Transmission Verification Report 41 Journal Period Journal Period Off Every 50 Faxes Every 6 Hours Every 12 Hours Every 24 Hours Every 2 ...

Page 186: ...ce On Off Set the machine to restrict dialling when using the dial pad Address Book Enter Twice On Off Set the machine to restrict the dialling when using the Address Book Shortcuts Enter Twice On Off Set the machine to restrict the dialling when using a Shortcut LDAP Server Supported only after IFAX is downloaded Enter Twice On Off Set the machine to restrict the dialling of LDAP server numbers R...

Page 187: ...s and to use the paper in the tray Output Colour Auto Colour Black and White Choose colour or black white for printed documents If you choose Auto the machine selects an appropriate option for the document colour or black white Reset Printer Yes No Restore the printer settings to the factory settings Colour Correction Calibration Calibrate Yes No Adjust the colour density 116 Reset Yes No Return t...

Page 188: ...55 000 255 000 255 000 255 Enter the IP address Subnet Mask 000 255 000 255 000 255 000 255 Enter the Subnet mask Gateway 000 255 000 255 000 255 000 255 Enter the Gateway address Node Name BRNXXXXXXXXX XXX Enter the Node name up to 32 characters WINS Configuration Auto Static Choose the WINS configuration mode WINS Server Primary 000 255 000 255 000 255 000 255 Specify the IP address of the prima...

Page 189: ...v6 protocol visit http solutions brother com for more information Ethernet Auto 100B FD 100B HD 10B FD 10B HD Choose the Ethernet link mode Wired Status Active 100B FD Active 100B HD Active 10B FD Active 10B HD Inactive Wired OFF You can see the current wired status MAC Address View the MAC address of the machine Set to Default Yes No Restore the wired network setting to the factory setting Wired ...

Page 190: ...5 000 255 000 255 Enter the Gateway address Node Name BRWXXXXXXXXX XXX Enter the Node name up to 32 characters WINS Configuration Auto Static Choose the WINS configuration mode WINS Server Primary 000 255 000 255 000 255 000 255 Specify the IP address of the primary or secondary WINS server Secondary 000 255 000 255 000 255 000 255 DNS Server Primary 000 255 000 255 000 255 000 255 Specify the IP ...

Page 191: ...rd You can configure your internal print server WPS AOSS You can configure your wireless network settings using the one button push method WPS w PIN Code You can configure your wireless network settings using WPS with a PIN code WLAN Status Status Active 11b Active 11g Active 11n Wired LAN Active WLAN Off AOSS Active Connection Failed You can see the current wireless network status Signal Strong M...

Page 192: ...ethod PIN Code You can easily configure your Wi Fi Direct network settings using WPS with a PIN code Manual You can manually configure your Wi Fi Direct network settings Group Owner On Off Set your machine as the Group Owner Device Information Device Name You can see the device name of your machine SSID My SSID Connected to other party s SSID Not Connected View the SSID of the Group Owner When the...

Page 193: ...ail IFAX Supported only after IFAX is downloaded Mail Address Enter the mail address up to 60 characters Setup Server SMTP Server 000 255 000 255 000 255 000 255 Name Enter the SMTP server address or name up to 64 characters Port 25 1 65535 Enter the SMTP port number Auth for SMTP None SMTP AUTH Select the Security method for E mail notification SSL TLS None SSL TLS Send or receive an E mail via a...

Page 194: ...pecified Choose the mail folder If you choose Specified enter the folder name up to 60 characters SSL TLS None SSL TLS You can send or receive an E mail via an E mail server that requires secure SSL TLS communication Verify Cert On Off Verify the POP3 or IMAP4 Server Certificate automatically APOP On Off Enable or disable APOP Setup Mail RX Auto Polling Auto Polling On Off Automaticallycheck the s...

Page 195: ... of E mail documents Notification On Off Send notification messages Setup Relay Relay Broadcast On Off Relay a document to another fax machine Relay Domain Register the Domain name Relay Report On Off Print the Relay Broadcast Report Manual Receive Manually check the POP3 or IMAP4 server for new messages Fax to Server Supported only after IFAX is downloaded Fax to Server On Off You can store a pre...

Page 196: ...rnal List information about your last 200 incoming and outgoing faxes TX means Transmit RX means Receive User Settings List your settings Printer Settings List your Printer settings Network Configuration List your Network settings Drum Dot Print Print the Drum Dot Check Sheet 109 WLAN Report Print the result of wireless LAN connectivity diagnosis See Advanced User s Guide Software and Network User...

Page 197: ...pages the machine has printed during its life See Fax List Colour Black and White Copy Colour Black and White Print Colour Black and White Parts Life Drum Check the remaining life of a machine part Belt Unit Fuser Laser Unit PF Kit MP PF Kit 1 PF Kit 2 Reset Menu Appears only when the drum unit or belt unit has exceeded its rated life Drum Reset the drum unit life Appears when you replace the drum...

Page 198: ...ransmission difficulties VoIP service providers offer fax support using various standards If you regularly experience fax transmission errors choose Basic for VoIP 150 Reset Machine Reset Yes No Restore the machine settings to the factory settings except for network settings station ID and Address Book 161 Network Yes No Restore all network settings to the factory settings Address Book Fax Yes No ...

Page 199: ...e a pause when you set up addresses Hook Press before dialing when you want to listen to make sure a fax machine has answered and then press Fax Start Address Book Search Search within the Address Book 55 Edit Add New Address Store Address Book numbers so you can dial by pressing Address Book on the Touchscreen and Fax Start 57 Setup Groups Set up Group numbers for Broadcasting See Change Change A...

Page 200: ...he lightness or darkness of faxes you send Broadcasting Add Number Add Number Send the same fax message to more than one fax number Add from Address book Search in Address book Delayed Fax Delayed Fax On Off Set the time of day that delayed faxes will be sent Set Time Real Time TX On Off Send a fax without using the memory Coverpage Setup Coverpage Setup On Off Automatically send a cover page you ...

Page 201: ...eal Time TX Coverpage Setup Overseas Mode Options Yes No Save your fax settings as the default settings See Factory Reset Yes No Restore all the fax settings you changed back to the factory settings Save as Shortcut Address Fax Resolution 2 sided Fax Contrast Broadcasting Real Time TX Coverpage Setup Overseas Mode Glass Scan Size Register the current settings as a shortcut Level 1 Level 2 Level 3 ...

Page 202: ...w Faxes Print the new received faxes 47 Print All Old Faxes Print the old received faxes Delete All New Faxes Delete the new received faxes Delete All Old Faxes Delete the old received faxes Address Book See Fax When Fax Preview is Off on page 189 Call History See Fax When Fax Preview is Off on page 189 Advanced User s Guide The factory settings are shown in Bold with an asterisk Fax ...

Page 203: ...t items 59 Options Quality Auto Text Photo Receipt When you select 2in1 ID in Page Layout Auto Lighter Choose the Copy resolution for your type of document See Enlarge Reduce 100 Enlarge 200 141 A5 A4 104 EXE LTR Choose an enlargement ratio for the next copy Reduce 97 LTR A4 94 A4 LTR 91 Full Page 85 LTR EXE 83 LGL A4 78 LGL LTR 70 A4 A5 50 Choose a reduction ratio for the next copy Advanced User ...

Page 204: ...efault setting is 1 Contrast Adjust the contrast for copies Stack Sort Stack Sort Choose to stack or sort multiple copies Page Layout Off 1in1 2in1 P 2in1 L 2in1 ID 4in1 P 4in1 L Make N in 1 and 2 in 1 ID copies Colour Adjust Red Adjust the red colour for copies Level 1 Level 2 Level 3 Options Descriptions See Page Advanced User s Guide The factory settings are shown in Bold with an asterisk 2 1 0...

Page 205: ...2 sided Short Edge Flip 2 sided 1 sided Short Edge Flip Enable or disable 2 sided copying and choose long edge or short edge 2 sided Copy Page Layout LongEdge LongEdge LongEdge ShortEdge ShortEdge LongEdge ShortEdge ShortEdge Choose a page layout option when you make 2 sided N in 1 copies from a 2 sided document Level 1 Level 2 Level 3 Options Descriptions See Page Advanced User s Guide The factor...

Page 206: ...nd Colour Off Change the amount of background colour that is removed Low Medium High Save as Shortcut Quality Enlarge Reduce Density Contrast Stack Sort Page Layout Red Green Blue 2 sided Copy 2 sided Copy Page Layout Tray Use Remove Background Colour Add the current settings as a shortcut Level 1 Level 2 Level 3 Options Descriptions See Page Advanced User s Guide The factory settings are shown in...

Page 207: ...ns See Options to File to Image and to E mail on page 200 Save as Shortcut PC Select Add the current settings as a shortcut Start Start scanning to USB Options See Options to USB on page 201 Save as Shortcut 2 sided Scan Scan Type Resolution File Type Glass Scan Size File Name File Size Remove Background Colour Add the current settings as a shortcut Start Start scanning to E mail PC Select Options...

Page 208: ...o FTP SFTP and to Network on page 205 Save as Shortcut Profile name Add the current settings as a shortcut Start Start scanning to Network Profile name Options See Options to FTP SFTP and to Network on page 205 Save as Shortcut Profile name Add the current settings as a shortcut Start Start scanning WS Scan Appearsif you have installed the scanner driver for your network connected machine via Web ...

Page 209: ...s set to Set at Device Colour Grey Black and White Choose the scan type for your document Resolution Appears when Scan Settings is set to Set at Device 100 dpi 200 dpi 300 dpi 600 dpi Choose the scan resolution for your document File Type Appears when Scan Settings is set to Set at Device Text HTML RTF Choose the file format for your document Scan Size Appears when Scan Settings is set to Set at D...

Page 210: ...00 dpi 200 dpi 300 dpi 600 dpi Choose the scan resolution for your document File Type Appears when Scan Settings is set to Set at Device When you select Colour or Grey in Scan Type PDF JPEG When you select Black and White in Scan Type PDF TIFF Choose the file format for your document Scan Size Appears when Scan Settings is set to Set at Device A4 Letter Legal Choose the scan size for your document...

Page 211: ...olour Grey Black and White Choose the scan type for your document Resolution When you select Colour in Scan Type 100 dpi 200 dpi 300 dpi 600 dpi Auto When you select Grey in Scan Type 100 dpi 200 dpi 300 dpi Auto When you select Black and White in Scan Type 200 dpi 300 dpi 200x100 Choose the scan resolution for your document Software and Network User s Guide The factory settings are shown in Bold ...

Page 212: ... for the scanned data File Size Small Medium Large Choose the file size for colour or greyscale scanning Remove Background Colour Off Low Medium High Change the amount of background colour that is removed Set New Default 2 sided Scan Scan Type Resolution File Type Glass Scan Size File Size Remove Background Colour Save your scan settings as the default settings Factory Reset Yes No Restore all the...

Page 213: ...ype Colour Grey Black and White Choose the scan type for your document Resolution When you select Colour in Scan Type 100 dpi 200 dpi 300 dpi 600 dpi Auto When you select Grey in Scan Type 100 dpi 200 dpi 300 dpi Auto When you select Black and White in Scan Type 200 dpi 300 dpi 200x100 Choose the scan resolution for your document Software and Network User s Guide The factory settings are shown in ...

Page 214: ...ment you must change the Glass Scan Size setting File Size Small Medium Large Choose the file size for colour or greyscale scanning Set New Default 2 sided Scan Scan Type Resolution File Type Glass Scan Size File Size Save your scan settings as the default settings Factory Reset Yes No Restore all the scan settings you changed back to the factory settings Level 1 Level 2 Options Descriptions See P...

Page 215: ... Colour Grey Black and White Choose the scan type for your document Resolution When you select Colour in Scan Type 100 dpi 200 dpi 300 dpi 600 dpi Auto When you select Grey in Scan Type 100 dpi 200 dpi 300 dpi Auto When you select Black and White in Scan Type 200 dpi 300 dpi 200x100 Choose the scan resolution and file format for your document Software and Network User s Guide The factory settings ...

Page 216: ...ame BRNXXXXXXXXXXXX Estimate Report Order sheet Contract sheet Check Receipt Manual Choose preset file names If you choose Manual you can name the file as you like XXXXXXXXXXXX is your machine s MAC Address Ethernet Address File Size Small Medium Large Choose the file size for colour or greyscale scanning Remove Background Colour Off Low Medium High Change the amount of background colour that is r...

Page 217: ...istration Yes No Adjust the print position of each colour automatically 117 Advanced User s Guide The factory settings are shown in Bold with an asterisk Level 1 Level 2 Options Descriptions See Page Setup Wizard Configure your internal print server See WPS AOSS Easily configure your wireless network settings using the one button push method WLAN Assistant Windows only You can configure your wirel...

Page 218: ...ong Edge 2 sided Scan Short Edge Choose the 2 sided fax scan mode 14 Contrast Auto Light Dark Change the lightness or darkness of faxes you send 14 Broadcasting Add Number Options Add Number Add from Address book Search in Address book You can send the same fax message to more than one fax number 14 Real Time TX On Off Send a fax without using the memory 14 Coverpage Setup Coverpage Setup Coverpag...

Page 219: ... into a USB flash drive 15 to E mail PC Select Scan a black white or a colour document into your E mail application 15 to E mail Server Supported only after IFAX is downloaded Address 2 sided Scan Scan Type Resolution File Type Glass Scan Size File Size Scan a black white or a colour document into your E mail Server 15 to Network Profile name Send scanned data to a CIFS server on your local networ...

Page 220: ...in1 ID on page 193 Choose the desired settings from the preset items 59 The factory settings are shown in Bold with an asterisk Level 1 Level 2 Options Descriptions See Page 2 sided 1 2 See 2 sided 1 2 on page 193 Choose the desired settings from the preset items 59 The factory settings are shown in Bold with an asterisk ...

Page 221: ...icker Recycled Paper Bond Paper Label Envelope Env Thin Env Thick Glossy Paper Set the print media type when printing directly from the USB flash drive 62 Paper Size A4 Letter B5 JIS B5 ISO A5 A5 Long Edge A6 Executive Legal Folio Com 10 Monarch C5 DL 16K 195x270mm 16K 184x260mm 16K 197x273mm Set the paper size when printing directly from the USB flash drive 62 Software and Network User s Guide Th...

Page 222: ...e 62 Collate On Off Enable or disable page collation when printing directly from the USB flash drive 62 Tray Use Auto MP Only Tray 1 Only Tray 2 Only Tray 2 Only appears only if you installed Tray 2 Choose the tray that will be used for printing directly from the USB flash drive 62 Print Quality Normal Fine Set the print quality option when printing directly from the USB flash drive 62 PDF Option ...

Page 223: ...efault media type when printing directly from the USB flash drive 64 Paper Size A4 Letter B5 JIS B5 ISO A5 A5 Long Edge A6 Executive Legal Folio Com 10 Monarch C5 DL 16K 195x270mm 16K 184x260mm 16K 197x273mm Set the default paper size when printing directly from the USB flash drive 64 Level 1 Level 2 Level 3 Level 4 Options Descriptions See Page Software and Network User s Guide The factory settin...

Page 224: ...he default page collation when printing directly from the USB flash drive 64 Print Quality Normal Fine Set the default print quality option when printing directly from the USB flash drive 64 PDF Option Document Document Markup Document Stamps Set the default USB direct print setting to print comments Markup or stamps in the PDF file along with the text 64 Index Print Simple Details Set the default...

Page 225: ...tions If you entered an incorrect character and want to change it use the arrow buttons to move the cursor under the incorrect character Press and then enter the correct character You can also insert letters by moving the cursor and entering a character If the screen does not display d press repeatedly until you have erased the incorrect character Enter the correct characters NOTE The characters a...

Page 226: ...nese can be converted from Pinyin entry NOTE If appears on the Touchscreen conversion of Pinyin to Chinese characters is available For example if you want to enter follow the procedures a Press G o o d and then press b Press g o n g s i and then press Some candidate Chinese characters and phrases will appear on the Touchscreen c Swipe up or down or press a or b to display d Press e Press OK to com...

Page 227: ...Standard 256 MB Optional 1 slot DDR2 SO DIMM 144 pin up to 256 MB LCD liquid crystal display 3 7 in 93 4 mm TFT Colour Touchscreen LCD 1 and Touchpanel Power Source 220 240 V AC 50 60 Hz Power Consumption 2 Average Peak Approx 1200 W Printing Approx 565 W at 25 C Printing Quiet Mode Approx 355 W at 25 C Copying Approx 565 W at 25 C Copying Quiet Mode Approx 355 W at 25 C Ready Approx 65 W at 25 C ...

Page 228: ...iet Mode LpAm 52dB A Ready LpAm 28 dB A Sound Power Printing Colour LWAd 6 73 B A Printing Monochrome LWAd 6 70 B A Printing Quiet Mode LWAd 6 40 B A Ready LWAd 4 05 B A Temperature Operating 10 to 32 C 1 Storage 0 to 40 C Humidity Operating 20 to 80 without condensation Storage 10 to 90 without condensation ADF automatic document feeder Up to 35 pages For best results we recommend Temperature 20 ...

Page 229: ...del MFC L8650CDW Document Size 1 sided ADF Width 147 3 to 215 9 mm ADF Length 147 3 to 355 6 mm Scanner Glass Width Max 215 9 mm Scanner Glass Length Max 297 0 mm Document Size 2 sided ADF Width 147 3 to 215 9 mm ADF Length 147 3 to 355 6 mm ...

Page 230: ...el Envelope Env Thin Env Thick Glossy Paper Paper Size Width 76 2 to 215 9 mm Length 127 0 to 355 6 mm Paper Weight 60 to 163 g m2 Maximum Paper Capacity Up to 50 sheets of 80 g m2 Plain paper Paper Tray 2 Optional Paper Type Plain Paper Thin Paper Recycled Paper Paper Size A4 Letter B5 JIS A5 Executive Legal Folio 16K 195x270mm 16K 184x260mm 16K 197x273mm Paper Weight 60 to 105 g m2 Maximum Paper...

Page 231: ...m Speed 33 600 bps with Automatic Fallback 2 sided Print Receiving Yes Automatic 2 sided Sending Yes from ADF Scanning Width Max 208 mm Printing Width Max 208 mm Greyscale 8 bit 256 levels Resolution Standard 203 98 dpi Fine 203 196 dpi Superfine 203 392 dpi Photo 203 196 dpi Address Book 300 entries Groups Up to 20 Broadcasting 350 300 Address Book 50 Manual Dial Automatic Redial 3 times at 5 min...

Page 232: ... Max 210 mm Automatic 2 sided Copy Yes from ADF Multiple Copies Stacks or Sorts up to 99 pages Reduce Enlarge 25 to 400 in increments of 1 Resolution Up to 1200 600 dpi First Copy Out Time 1 Monochrome Less than 18 seconds at 23 C 230 V Colour Less than 20 seconds at 23 C 230 V ...

Page 233: ...N Compliant Yes Windows XP Windows Vista Windows 7 Windows 8 Mac OS X v10 7 5 10 8 x 10 9 x 1 WIA Compliant Yes Windows XP Windows Vista Windows 7 Windows 8 ICA Compliant Yes Mac OS X v10 7 5 10 8 x 10 9 x Colour Depth Colour 48 bit colour processing Input 24 bit colour processing Output Greyscale 16 bit colour processing Input 8 bit colour processing Output Resolution Up to 19200 19200 dpi interp...

Page 234: ...cript3 PostScript 3 Resolution 600 600 dpi Print Speed 2 sided Monochrome Up to 14 sides minute Up to 7 sheets minute A4 size 1 Colour Up to 14 sides minute Up to 7 sheets minute A4 size 1 Print Speed Monochrome Up to 28 pages minute A4 size 1 Colour Up to 28 pages minute A4 size 1 First Print Time 2 Monochrome Less than 15 seconds at 23 C 230 V Colour Less than 15 seconds at 23 C 230 V ...

Page 235: ...etailed network specifications see Network on page 226 and Software and Network User s Guide Model MFC L8650CDW USB Hi Speed USB 2 0 1 2 It is recommended you use a USB 2 0 cable Type A B that is no more than 2 0 metres long Ethernet 3 10BASE T 100BASE TX Use a straight through Category 5 or greater twisted pair cable Wireless LAN 3 IEEE 802 11b g n Infrastructure mode Ad hoc mode IEEE 802 11g Wi ...

Page 236: ...rotocols IPv4 ARP RARP BOOTP DHCP APIPA Auto IP WINS NetBIOS name resolution DNS Resolver mDNS LLMNR responder LPR LPD Custom Raw Port Port9100 POP3 SMTP Client IPP IPPS FTP Client and Server CIFS Client TELNET Server SNMPv1 v2c v3 HTTP HTTPS server TFTP client and server ICMP Web Services Print Scan SNTP Client LDAP 4 IMAP4 IPv6 NDP RA DNS resolver mDNS LLMNR responder LPR LPD Custom Raw Port Por...

Page 237: ...G2 image file a JPEG2000 image file or a transparency file is not supported Model MFC L8650CDW Compatibility PDF version 1 7 1 JPEG Exif JPEG PRN created by Brother printer driver TIFF scanned by all Brother MFC or DCP models XPS version 1 0 Interface USB direct interface ...

Page 238: ...X Ethernet Wireless 802 11b g n For Drivers For Applications Windows Operating System Windows XP Home 1 4 Windows XP Professional 1 4 Printing PC FAX 3 Scanning 32bit x86 or 64bit x64 processor 150 MB 500 MB Windows XP Professional x64 Edition 1 4 64bit x64 processor Windows Vista 1 4 32bit x86 or 64bit x64 processor 500 MB 1 2 GB Windows 7 1 4 650 MB 1 2 GB Windows 8 1 4 Windows Server 2003 N A P...

Page 239: ...nuine Brother supplies Model MFC L8650CDW Model Name Toner Cartridge In the box Black Approx 4 000 pages A4 or Letter page 1 Cyan Magenta Yellow Approx 3 500 pages A4 or Letter page 1 High Yield Black Approx 4 000 pages A4 or Letter page 1 TN 376BK Cyan Magenta Yellow Approx 3 500 pages A4 or Letter page 1 TN 376C TN 376M TN 376Y Super High Yield Black Cyan Magenta Yellow Approx 6 000 pages A4 or ...

Page 240: ...greyscale text and or objects If your document contains colour this mode prints the document in 256 levels of grey using the black toner NOTE If either the Cyan Magenta or Yellow toner reaches the end of its life while printing a colour document the print job cannot be completed You can cancel your print job and choose to start the print job again in Mono mode as long as Black toner is available F...

Page 241: ...of the developer unit and temperature and humidity levels in the device When calibration occurs the density level adjustment test patterns are printed on the belt unit Calibration is mainly performed at the following times When you manually select calibration from the operation panel or the printer driver Please perform calibration if colour density needs to be improved When a used toner cartridge...

Page 242: ...1 external telephone 52 Control panel overview 6 ControlCenter2 Macintosh See Software and Network User s Guide ControlCenter4 Windows See Software and Network User s Guide Cordless telephone non Brother 53 D Dialling a pause 56 Address Book 55 automatic fax redial 55 manual 55 Dimensions 217 Direct print 61 62 specification 227 Document how to load 37 38 Drum unit cleaning 106 109 replacing 81 E ...

Page 243: ... 223 H Help Settings Tables 164 Touchscreen messages 163 Home 7 Hook 53 L Labels 23 33 36 M Machine information firmware version 161 how to reset the machine 162 Reset operations 161 serial number 161 Macintosh See Software and Network User s Guide Maintenance routine 99 replacing belt unit 87 drum unit 81 toner cartridges 75 waste toner box 92 Manual dialling 55 receive 43 Memory 217 Mode enterin...

Page 244: ... specifications 224 Printing See Software and Network User s Guide Programming your machine 163 Q Quality printing 151 R Redial 55 Remote Setup See Software and Network User s Guide Replacing belt unit 87 drum unit 81 toner cartridges 75 waste toner box 92 Reports Transmission Verification 41 Resolution copy 222 fax standard fine superfine photo 221 print 224 scan 223 Ring Delay setting 44 S Scan ...

Page 245: ... messages on Touchscreen 120 if you are having difficulty copy quality 146 incoming calls 146 network 148 paper handling 142 print quality 151 printing 141 143 receiving faxes 143 scanning 147 sending faxes 145 software 147 telephone line 150 maintenance messages on Touchscreen 120 paper jam 132 133 134 136 139 V VoIP 150 Volume setting beeper 20 ring 19 speaker 20 W Waste toner box replacing 92 W...

Page 246: ...ᒼᐸ㩞ቊഴ ѣй䐥 ਭ ቊ 唇嗏 ݿ ь㓠 〇ᢶᔶਇᴿ䲆 ޢ ਮ ቊ ᐸ ው 䙐ཝ 㺍 ਭ㡯㡬 ᆆཝь ѣ ᇚ ቊ ቊ ᶴ仌ి 儎〇ᢶᴿ䲆 ޢ ਮ 唇嗏 ⴷ ቊ ᐸ ው 䙐ཝ㺍 ਭ ቊ 唇嗏 〇ᢶ ᔶਇᴿ䲆 ޢ ਮ ቊ ᐸ ው жᴲ㺍 ࢥ ਭ ኧ ᆆค ᇚ ቊ ቊ ి䪡ⴑ〇 ᢶਇኋᴿ䲆 ޢ ਮ ቊ ᐸ ው жᴲ㺍 ࢥ ਭ ኧ ᆆค ᇚ ѯ ѯ ᐸ ཟ㘊 ᆆᴿ䲆 ޢ ਮ ѯ ᐸའᒩ䐥 ਭ ろ ᮦ ᒵ ᇚ 喆喆 ቊ 喆喆 ቊཟᲰ 䍮ᴿ䲆 ޢ ਮ 嗏 Ⲵ㝇 㝇คࣔ ޢ ᾲ ᾲ 䮵ᱛ 䮵ᱛᐸᢢ᱄ުѐ 〇ᢶᴿ䲆䍙Ա ޢ ਮ ਿ ⴷ䮵ᱛᐸ ީ Ӱ ཝ㺍 ਭ ᆙ䱩 ݿ ቅ пਭᾲ ᇚ 䮵ᱛ 䮵ᱛᐸ 㚐㤧 〇ᢶᴿ䲆 ޢ ਮ 䮵 䐥㔅 ᔶਇ Ӱ ཝ㺍 ਭ䮵ᱛ〇ᢶค ᾲ 䮵ᱛ ਿ Ფ䗴 㝇〇ᢶᴿ䲆 ޢ ਮ 䮵ᱛᐸᵓ䱩 ᐛߒཝ䐥 ਭⲴ㝇 ᇚ ਿ ਿ ᐸ䙐㚊〇䍮 ᴿ䲆 ޢ ਮ ਿ ᐸṹⓆ䐥 ਭ ਭ㖇 ᒩ ᒩᐸђᯯ...

Page 247: ... ѯђᐸᥥު 䶈ᒪཝ㺍 ਭ ऻཪ ऻཪᐸ ݺ ᕕ〇ᢶ ᴿ䲆䍙Ա ޢ ਮ ऻཪᐸ ަ䚉 ਭ 䎚ጦ 䎚ጦᐸѣީค 㝇ᴿ䲆 ޢ ਮ 䎚ጦᐸ㓘ኧ 䗴㺍ѣ ᵓ㚐 〇ॱ䲘㾵 ਭ લૂ લૂ ᐸ᱕䴽 ᚈ 䍮ᴿ䲆䍙 Ա ޢ ਮ 㫏ਚલૂ ᐸ ค ѣኧђ䐥 ਭ㢴ঐ〇 ཝড় ᇚ 䙐䗳 䙐䗳ᐸ᱄ ᆆ 䍮ᴿ䲆 ޢ ਮ 䙐䗳ᐸ〇ቊ ཝ㺍ѣ འᒩ 㝇ค ᱄ 䍮 ަᐔ ަᐔѦᆿ 䍮ᴿ 䲆 ޢ ਮ ަᐔᐸ〇ᢶ㺍 ਭ ަᐔ ަᐔᙓⓆ〇ᢶਇ ኋᴿ䲆 ޢ ਮ 㚹ⴷަᐔᐸคީ 〇 ᢶ㺍 ਭ 劷ᵞ喆 劷ᵞ喆 ᱣ䙐 ؗ 䇴 ᴿ䲆 ޢ ਮ 劷ᵞ喆ᢢᆆ 䐥 ਭ㓘ॷᴾ㣧ണђж ਭ ᾲ ঋ ݹ ᇚ 懻 劷ᵞ喆 劷ᵞ喆ẇড়ᇔ ѐᴿ䲆 ޢ ਮ 劷ᵞ喆ᐸ哺 䐥 ਭйж䞧ണ ᓝ 䬬ᐓ ᆷཅ㤧༡䗴ࣔ ޢ 䇴 ᴿ䲆 ޢ ਮ 䬬ᐓᐸᮽौђ㺍 ਭ 䬬ᐓ ᆷཅউ䏀 ᆆᢶ ᵥᵃࣗᴿ䲆 ޢ ਮ ᆷཅ䬬ᐓᐸᮽौђ㺍 ਭ ᆷཅ 㫏ਚ 㚹 䗳ᆷ ...

Page 248: ...㤇ᓋ жቸ 㾵ᡭ འ འ ުѐ〇 ᢶਇኋᴿ䲆 ޢ ਮ འ ᐸቅᓍ 㺍 ਭᚈ൦ཝড় ቸ 䘆ค 䘆คᐸ 䗴 ᆆ〇ᢶᴿ䲆 ޢ ਮ 䘆คᐸ㓘ᰍ㾵㺍 㝇ค жᾲ ਭ 㾵ᆿ 䲋㾵ᓭঐᵰ ᴿ 䲆 ޢ ਮ 㾵ᆿᐸ䳷ຊ䐥ѣ ਭ Ⲵ㝇 ቸ ᇚ 㾵ᆿ 㾵ᆿ䎑ቐ ᆆ〇 ᢶਇኋᴿ䲆 ޢ ਮ 㾵ᆿᐸ 䳷ຊ䐥ѣ ᗹᲪ䳻㤇 ᇓ呗 䲋㾵䲼䖿 ؗ ᚥӝ ѐਇኋᴿ䲆 ޢ ਮ 䲋㾵ⴷᇓ呗ᐸ 䐥 ਭ ਭᾲжᾲ ਭ䰞ᓍ ᇬᒺ ਿ 䍮ᴿ 䲆 ޢ ਮ ᇬᒺᐸẛ㾵 ቅ㺍 䠇ь 䍮 䠇ᛜ ޢ 侼 ᡵ ᇬᒺ ᇬᒺ䠇ѐ ૂ ࣔ ޢ 䇴 ᴿ䲆 ޢ ਮ ᇬᒺᐸૂᒩђ䐥 ਭ 䰞 䜳ӂᵕ ѐ ਭ 䬰 ؓᇐ ؓᇐᐸⲼࠥ ޡ ᯯ ࣔ ޢ 䇴 ᴿ䲆 ޢ ਮ ؓᇐᐸ ѐ 䐥 ѐ пቸ ਭ ኧ ኧп Օѐ 䍮ᴿ䲆 ޢ ਮ ኧᐸ ђ䚉ᔶ 㛨侼ђ ם 䐥 䛘ਦ 䛘ਦᐸ ь㓠 〇ᢶᴿ䲆 ޢ ਮ 䛘ਦᐸ〇ᢶཝড়ᓋ ᮽ ᆆ Ѫ䜣ᆾᮢ 䐥 䶈 ኧ㾵 䲋㾵 ...

Page 249: ...п㺍жਭᾲᓋ Ӣ Ӣ᱉ 㖇 㔒 ࣗᴿ䲆 ޢ ਮ Ӣᐸ ѣީᶇཝ 㺍 ਭѣ〇ཝড় ᇚ ཟ ཟ ཟ ᐸঅකࣔ ޢ 䇴 ᴿ䲆 ޢ ਮ ཟ ᐸ ᔶ ⲳ 䐥俞 䗴ണ ਭᾲ 䰞 ᇚ ᆿ䱩 ᆿ䱩 㡠〇ᢶᴿ 䲆䍙Ա ޢ ਮ ᆿ䱩ᐸ㠠 䐥 䱨䱕ཝ 䰞㾵 ם ᐸ䪡 ؗ ᆆ䇴 ᴿ䲆 ޢ ਮ ᐸ䀙 ༡㺍 ݿ Ⓠ 㝇ค 䐥 䜇ᐔ 䜇ᐔ ૂ ᆆᴿ 䲆 ޢ ਮ 䜇ᐔᐸђ伄䐥 ਭ ཝ 䞈ᓍ㾵 ם ᾲ 䜇ᐔ 䜇ᐔ ؗ ᆆᴿ 䲆䍙Ա ޢ ਮ 䜇ᐔᐸᮽौ䐥 ਭ 〇ᢶᐸ ᾲ 䱩 䱩 ᮽ ᆆ〇 ᢶᴿ䲆 ޢ ਮ 䱩ᐸѣᐔѣ䐥 ਭь㓠 㝇ค ᒩ京ኧ ᱕ ᆆᴿ 䲆 ޢ ਮ ᒩ京ኧᐸᔰ䇴䐥ѣ ᆆᰬԙᒵ ᾲ ᇚ 䱩 䱩ᐸᥥު䐥ॹ 㝇 ᮦ ᒵ 䠇 咅㜒ࣔ ޢ 㙍ᶆ㔅 㩛䜞 ⴷ 䱩ᐸ 嗏 ᥥ ު䐥ॹ㝇 㝇คжᾲ ѣ 䰞ਙ Ӣ ...

Page 250: ... 㝇㔅㩛 䜞 ঐᐸ 㾵 ޣ 䐥喆䎑〇 ᢶᐸ 㘷 108ᇚ ᓭᛜ ᆆᴿ 䲆 ޢ ਮ ᐸ ᮽ 㜒 ђ㺍 ਭ〇ᢶᐸ ਭ ᐸ ᆆ㺍䊠 Ֆⵕᵰᙱ ᐸ ᒩ䐥 ᆆ㺍 ਭ Ѫ Ѫ ਇคᆽἤ ࣔ ޢ 䇴 䬶 䜞 ኧђⴷѪ ᐸѪ㾵ӊ䐥 ф ᆿ䐥Ӛ 㾵 ਦ ਦпㄏ ཟ呵 ࣔ ޢ 䇴 㺂 ኧђⴷ ਦᐸ㣓㖎እ䐥 ਭ ᾲ ᇚ ᐸཝ䙐 䇥 䇴 ᴿ䲆 ޢ ਮ ᐸ ਙ 䐥 䍘Ⓠཝড় 䱺 ਭ 㽺䱩 㽺䱩ᐸпૂ ԙ ࣔ ޢ 䇴 ᴿ䲆 ޢ ਮ ⴷ㽺䱩ᐸᱛണ䐥 ਭδ ཝড় 䐥 ਭሯ䶘 ε 䪡ᇓѦⴑ〇 ᢶᴿ䲆 ޢ ਮ ᐸ ኧ 䐥 ѣᮦ ค 㥼ᐔ 㥼ᐔᐸ㔪ᑂᮦ ࣔ ޢ 䇴 ᴿ䲆䍙 Ա ޢ ਮ 㥼ᐔᐸ ᐸ 㓘䰞䐥ⴀ ണ 䰞䶘 ॷ ॷ 䠇䬣〇䍮ᴿ 䲆 ޢ ਮ ॷ ᐸᵓ䱩 䐥 ਭ ᕎ 㝇ค ኧђ ⴷ คᐸ 㔪 ؤ ㄏ 〦 㔪 ؤ ㄏ൦ ਭ 䈓 ...

Page 251: ...ᐸѣኧ䐥 ਭ᱄ ཝড় ਭᾲ ᇚ 䖢 ᰖ䭗 ᰖ䭗ᯯђ䙐 ؗ 䇴 ᴿ䲆 ޢ ਮ ᰖ䭗ᐸ 䮵 ӊ ᒵ ཪ ਭδ䘇Ⲵ㝇 ε Ӣ Ӣཟཐࣔ ޢ 䇴 ᵃࣗᴿ䲆 ޢ ਮ Ӣᐸ 䐥ђཝᖧ ਭ䲘 Ӣ ӢⲴ 䙐 ؗ 䇴 ᴿ䲆 ޢ ਮ Ӣᐸ嗏㸖ѣ䐥 ਭ 䐥䜳ᐸ㔅 ണ〇ᆜᾲ ᇚ ᑮᐔ ᑮᐔᐸ ؗ ᡆࣔ ޢ 䇴 ᴿ䲆 ޢ ਮ ᑮᐔᐸཟᆷ ࣩࣞѣ䐥 ਭᓒ ቻ 䬰 ᑮᐔ ᑮᐔ 䘠ࣔ ޢ ᴿ䲆 ޢ ਮ ᑮᐔᐸ 䘑 ᑮ 䐥 ਭ 䍮ᒵ ਭ ᾲ ⴆค ⴆคᐸള䙐ᮦ 㖇㔒ᴿ䲆 ޢ ਮ ⴆคᐸ㓧Ӌཪ ਭᾲ ਭ 㤅 ⴷ คᐸ 㔪 ؤ ㄏ 〦 㔪 ؤ ㄏ൦ ਭ 䈓 ...

Page 252: ... ਭ ᆿ ᆿᐸ ࣔ ޢ 䇴 ᴿ䲆 ޢ ਮ ᆿᐸ 䐥 ਭ䍘ሂ ᒵ ኧ ኧн㜳䗴ࣔ ޢ 䇴 ᴿ䲆 ޢ ਮ ኧᐸᐸ 㺍ੂᗹᇼਁ ᶇ ਭ 䘔Ӈ 䘔Ӈ ཟᵓ〇ᢶ ᴿ䲆 ޢ ਮ 䘔Ӈ ᐸ 䙐 䐥ളᆿ ค ਭ ᑮ ᑮ ᐸ䠇ަ䙐䇥 ಞᶆᴿ䲆䍙Ա ޢ ਮ ᑮ ᐸᤑ คቅ ᐸ ᾲ ਭ 䭽 䭽 䗦 ᆆᴿ 䲆 ޢ ਮ 䭽 ᐸ ڛ ᓭ䐥 ਭӊ ཝ ᾲжᾲ㾵 ᢢᐔ ᢢᐔᐸᚈ啄 䍮 ᴿ䲆 ޢ ਮ ᢢᐔᐸᮽ᱂ѣ䐥 ਭ δ 㣧㿸㾵ᔀ ε ᢢᐔ ᢢᐔު ᆆᴿ 䲆 ޢ ਮ 㤅ᢢᐔཝᆜ 䐥 ਭ ᐔ ᐔᐸ 䲫 㬓 䍮᱉ᴿ䲆 ޢ ਮ 㤅ⴷ ᐔᐸ 䲫 䶈 ᒪ 䐥 ਭ䠇㤸ཝড় ᇚ 㤅 ⴷ คᐸ 㔪 ؤ ㄏ 〦 㔪 ؤ ㄏ൦ ਭ 䈓 ...

Page 253: ... ᔺ ਭ р р ѣ㓰 ᆆ 㔕ᴿ䲆 ޢ ਮ р ᐸᔬᆿ㾵䐥 ਭ ᐔ ᐔ〇ᮏᮦ ᴿ 䲆 ޢ ਮ ᐔᐸ唄᱄㾵䐥 ਭ 㷰ཝᾲ ᾲ ᇚ ᐔ ᐔᐸ ᆿᮦ ᴿ䲆 ޢ ਮ 唄᱄㾵䐥 ᔺ ਭᑮ ᱛ ޢ ሉ ᇚ ᆷ ᆷ ѣ䇥ᮦ ӝ ᴿ䲆 ޢ ਮ ᆷ ᐸ䭽᱄䐥 ਭ ᆷ ᆷ ᴏ㬓 䍮ᴿ䲆 ޢ ਮ ᆷ ᐸ ᴏ 㦥㺂㺍 ਭ ẛᒵ ᾲ ᇚ ਦᐔ ਦᐔᐸ䐥ẛཟ㲯 ࣔ ޢ 䇴 㺂 ਦᐔᐸ䐥ẛ 㞴䗴䐥 ᆆᮦ คӂᾲ ਭ ь㓠ᒵ 㾵 ם ѿ ѿ ᐸࢇ䗴䙐䇥 ಞᶆᴿ䲆 ޢ ਮ ᇴ 䐥ᮽौᐸ 㺍 ਭδᇴ ᇘ䘆ѣᗹ ሯ 䶘ε ᶣᐔ ᶣᐔⴑ ࣔ ޢ ᴿ䲆 ޢ ਮ ᶣᐔᐸᮏᐛ䐥 ਭ 䰞 ࣗѣᗹ ᇚ р ⴷ คᐸ 㔪 ؤ ㄏ 〦 㔪 ؤ ㄏ൦ ਭ 䈓 ...

Page 254: ... 䇴 ᓍ 㔃ުᐸ䮵ẛ 㺍 ਭ ిު ిުᐸ ᜩ 䍮 〇ᢶᴿ䲆 ޢ ਮ ిުᐸ䏀 䐥 ਭ ᆿ ᆿᐸ ݺ ᕕࣔ ޢ 䙐䇥䇴 㔪 ؤ ѣ ᗹ ᆿᐸ ݿ ཝ䚉 ਭ ᆿᒼ ᆿᒼঐ ؗ 㖇㔒ᐛ ぁᴿ䲆 ޢ ਮ ᆿᒼᐸᔶਇ 䎑Ṳᮦ ค ਭ 懻 ਾ㛛 ਾ㛛ᇓ嗏 ࠥ ؗ ᚥ〇ᢶᴿ䲆 ޢ ਮ ਾ㛛ᐸऻ 㔟ⓠ䐥ᇒ 䍣㗄伕ᒵ ᾲ 㣒 㣒 ᐸ ݾ 䙐䙐䇥 ಞᶆ㔅㩛䜞 㣒 ᐸ Ӣ㾵䐥 ਭ 䱒䱩 䱒䱩ᐸ䈐 ؗ 㝇 ᴿ䲆 ޢ ਮ 䱒䱩ᐸ仃ᐔ 䐥 ਭ δള䍮 ε ᐔ ᐔᐸ伔呵 ᆆ 〇ᢶᴿ䲆 ޢ ਮ ᐔᐸ 㮽 䐥 ਭ 䖜ㄏ㾵ཝ䰞 ޣ ᆿ ޣ ᆿᆽᚈᮦ 〇 ᢶᴿ䲆 ޢ ਮ ޣ ᆿᐸ啉ᾲ㺍 ਭ ᆿᗳ ⴷ คᐸ 㔪 ؤ ㄏ 〦 㔪 ؤ ㄏ൦ ਭ 䈓 ...

Page 255: ... ᾲ ᱂ 㾵ᙗૂᰛр〇 ᢶᴿ䲆 ޢ ਮ ᱂ᐸ䶈ኧ 䜳ѣ ཝ䚉 ਭ呵䳷 ᆆᐸ 1 ਭ ᱂ ᱂ⴑ ࣔ ޢ ᴿ䲆 ޢ ਮ ᱂ᐸ 䜳ѣཝ䚉 ਭ 呵䳷 ᆆཝᐸ ᇚ р侬 р侬ᐸ ӵ䙐䍮 ᱉ᴿ䲆 ޢ ਮ р侬ᐸѣኧ㾵䐥 ਭ ᇒᱛ 㺷ᐔ ค Օ䗴 ࣔ ޢ 䇴 㔅㩛䜞 ᇒᱛᐸᵓ䱩䐥 ਭᵓ䱩 㝇ᮦ ค ᾲ ਭ ᑮᗭ ᑮᗭᐸ䪡 ᇓ 㝇ᴿ䲆 ޢ ਮ ᑮᗭᐸ 䲫 ค ࣔӁ 㺍 㛨ᢃ䐥 ਭ 䮵 䮵 ᐸ㣏㫿 䪡䚉 ᆆ䇴 㺂 䮵 ᐸ䖜ㄏѣ䐥 ਭ ࠥ䙐 ޢ 侼 ᾲ 䮵 䮵 ᗭ ᆆ 〇ᢶᴿ䲆 ޢ ਮ 䮵 ᐸ㣏㫿 䀙 ђ䐥 ਭ ਭ䰞䶘 䮵 䠇ᛜ〇ᢶਇ ኋᴿ䲆 ޢ ਮ 䮵 䀙 ђ䐥 ਭ ዩ䱩 ዩ䱩ཟွᮦ 〇 ᢶᴿ䲆 ޢ ਮ ዩ䱩ᐸᐪ䲫ѣ䐥ཟ 㝇คӂᾲ ਭ 㾵 ⴷ คᐸ 㔪 ؤ ㄏ 〦 㔪 ؤ ㄏ൦ ਭ 䈓 ...

Page 256: ...䠃ᒼ 䠃ᒼ㢰 〇ᢶᴿ 䲆䍙Ա ޢ ਮ 䠃ᒼᐸ ẛ䬰жค 㤧 ള䱻 䍫䱩 䍫ᐔ ጦᘍ䘒 䍮ᴿ䲆 ޢ ਮ 䍫䱩ᐸ 䠇 ᆆ ค ᾲ ᵃࣗ 䍫䱩 䍫䱩 ൦〇ᢶᴿ 䲆 ޢ ਮ 䍫䱩ᐸ䜳ਮ䐥 ਭҗ Էคॹॹԙ ޢ ሉ ਭ 䍫䱩 䍫ᐔཟᆽࣔ ޢ 䇴 ᴿ䲆 ޢ ਮ 䍫䱩ᐸሂ ѣ䐥 ਭᚈ ཝড় ᾲ Ӈ ᱄ ᱄ᱛ ᮦ 〇 ᢶᴿ䲆 ޢ ਮ ᱄ᐸᮏⴀ䐥 ਭᡄ䭜 㣧ണ ᒘ ᇚ ᐔ ᐔ ᮦ 〇 ᢶᴿ䲆 ޢ ਮ ᐔᐸђཝ䐥 ਭᚈ 㼋ཝড়㾵 ם ӂᾲ ᒩ ᒩᐸⴷഴࣔ ޢ 䇴 ᴿ䲆 ޢ ਮ ᒩᐸ ޡ ж䐥 ਭ ᐔ ᐔᐸ ູ ᮦ 〇ᢶᴿ䲆 ޢ ਮ ᐔᐸ勚ค ғж䐥 ਭ ড়䰞 ড়䰞ᐸ 东 ᆆ ᴿ䲆 ޢ ਮ ড়䰞ᐸ 䠂 ԏዩ䐥嗏 䰞ཟс ਭҁ ᐔ ᐔᐸ ᇓࣔ ޢ 䇴 ᴿ䲆 ޢ ਮ ᐔᐸ㣍ค ᱂䐥 ᆆค ṁ ਭ 嗏ዟ 嗏ዟᐸᤉᲤᲕ ᆆᴿ䲆 ޢ ਮ 嗏ዟᐸ 㖍 Ӛ᱉คᮦ ᒵ ਭ ᐓ 䠃ᒼ 䍫ᐔ ᔰ ...

Page 257: ...ε ൩ ൩ᐸ ᆿࡑ ࣔ ޢ 䇴 ᴿ䲆 ޢ ਮ ൩ᐸ ᥥު䐥р ᐛѐ ṁ ቸ ᇚ ђ㧔 ђ㧔ᐸ 䈐 ⅴ ᵰᴿ䲆 ޢ ਮ ђ㧔ᐸђค ค䐥ж 㺍жਭ ᐸ俏 ުؗ ࣔ ޢ 䇴 ᐸ俏 Ԋ 儎 ѐᒵ ਭ ᒵᐔ ᒵᐔ㖤ᆿᮦ 〇 ᢶᴿ䲆 ޢ ਮ ᒵᐔᐸཟ ཟ 䐥 ਭ༢Ѧཝড় ᇚ ཪ ཪᐸ䬣㲯ࣔ ޢ 䇴 ᴿ䲆 ޢ ਮ ཪᐸ ཌ 㾵䐥 㾵䰞ᶇ 㘷 䱨ᯒሯ䶘 ൩ ൩ᐸᚈ 䇥 ᮦ 〇ᢶᴿ䲆 ޢ ਮ ൩ᐸ ᕰ 咅 ะр ᐛѐ ṁ ᇚ ᐔ ᐔᐸ 䗴ࣔ ޢ 䇴 ᴿ䲆 ޢ ਮ ᐔᐸ哺ຎ ᐔ 㝇ค 䰞 䰞ᐸ ުؗ Ჰ 㜳〇ᢶਇኋᴿ䲆 ޢ ਮ 䰞ᐸђ ж䐥 㝇ค 䬰 ѣኧ ѣኧᐸ㾵 ཟᗠ ࣔ ޢ 䇴 㔅㩛䜞 ѣኧᐸ㾵 ሂ 䚉 ਭ㾵 㤇 㝇ค ਭ ᒵђ ...

Page 258: ...s Manuals etc please visit our service website www 95105369 com To search supplies purchase shop please visit Brother company website www brother cn BROTHER CHINA LTD ⴷ คᐸ 㔪 ؤ ㄏ 〦 㔪 ؤ ㄏ൦ ਭ 䈓 ᆷ ᆷᐸ䘠㘊〇ᢶ ᴿ䲆 ޢ ਮ ᆷᐸ᱕ 䐥17 3ਭ嗏 ཝড়㾵ᾲ ᾲ ਭ ᆷ ᆷᐸᆿ ࣔ ޢ 䇴 ᴿ䲆 ޢ ਮ ᆷᐸ᱕ 䐥 ӂ䠂 ਭ ᱕ 㔲ਾᾲжᾲ ḩᐔ ḩᐔ 〇ᢶᴿ 䲆 ޢ ਮ ḩᐔᐸпѣ䐥 ਭ ᒵ㾵 㘶 ࣔ ޢ 䇴 䬶 ᴿ䲆 ޢ ਮ ᐸ 㝇 ಞщѐᐸ жᾲ ਭ ਙ ਙ㗄ަཟ㡒ࣔ ޢ 䇴 㔅㩛䜞 ਙᐸ 䐥 ѐค ӂᾲ ẙ ᒵ㾵 ...

Page 259: ...om Visit us on the World Wide Web http www brother com This machine is approved for use in the country of purchase only Local Brother companies or their dealers will only support machines purchased in their own countries ...

Reviews: