background image

Basic User’s Guide

MFC-T800W


Version 0

MEX/LTN-ENG

Summary of Contents for mfc-t800

Page 1: ...Basic User s Guide MFC T800W Version 0 MEX LTN ENG ...

Page 2: ...at http www brother com registration By registering your product with Brother you will be recorded as the original owner of the product Your registration with Brother may serve as confirmation of the purchase date of your product should you lose your receipt may support an insurance claim by you in the event of product loss covered by insurance and will help us notify you of enhancements to your p...

Page 3: ... advanced operations Fax Copy and security features printing reports and performing routine maintenance PDF file CD ROM Windows Brother Solutions Center 1 Macintosh Software and Network User s Guide This Guide provides instructions for Scanning Printing PC Fax and other operations that can be performed by connecting your Brother machine to a computer You can also find useful information about usin...

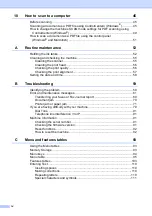
Page 4: ...ntrol panel overview 6 Basic Operations 8 2 Loading paper 9 Loading paper and other print media 9 Loading envelopes 12 Unprintable area 14 Paper settings 15 Paper Type 15 Paper Size 15 Acceptable paper and other print media 15 Recommended print media 16 Handling and using print media 16 Choosing the right print media 17 3 Loading documents 18 How to load documents 18 Using the ADF 18 Using the sca...

Page 5: ...device 33 Connections 34 Recording an outgoing message OGM on the external TAD 34 Multi line connections PBX 35 External and extension telephones 35 Connecting an external telephone 35 Using external and extension telephones 36 Using a non Brother cordless external telephone 36 Using remote codes 36 7 Dialing and storing numbers 38 How to dial 38 Manual dialing 38 Speed Dialing 38 Fax Redial 38 St...

Page 6: ...nt alignment 57 Setting the date and time 58 B Troubleshooting 59 Identifying the problem 59 Error and maintenance messages 61 Transferring your faxes or Fax Journal report 69 Document jam 70 Printer jam or paper jam 71 If you are having difficulty with your machine 79 Dial Tone 91 Telephone line interference VoIP 91 Machine Information 91 Checking the serial number 91 Checking the firmware versio...

Page 7: ...v D Specifications 112 General 112 Print media 114 Fax 115 Copy 116 Scanner 117 Printer 118 Interfaces 119 Network 119 Computer requirements 120 Supply Specifications 121 E Index 122 ...

Page 8: ...l only 2 Security features MFC model only TX Lock 3 Sending a fax MFC model only Additional sending options Additional sending operations 4 Receiving a fax MFC model only Memory Receive Additional receiving operations 5 Dialing and storing numbers MFC model only Voice operations Additional dialing operations Additional ways to store numbers 6 Printing reports Fax reports MFC model only Reports all...

Page 9: ...on the computer screen Italics Italicized typeface emphasizes an important point or refers you to a related topic Courier New Text in Courier New font identifies messages on the LCD of the machine CAUTION CAUTION indicates a potentially hazardous situation which if not avoided may result in minor or moderate injuries IMPORTANT IMPORTANT indicates a potentially hazardous situation which if not avoi...

Page 10: ...s Brother and Brother Utilities Windows 8 and Windows Server 2012 Tap or click Brother Utilities either on the Start screen or the desktop Windows 8 1 and Windows Server 2012 R2 Move your mouse to the lower left corner of the Start screen and click if you are using a touch based device swipe up from the bottom of the Start screen to bring up the Apps screen When the Apps screen appears tap or clic...

Page 11: ...s not appear go to Computer My Computer For Windows 8 Windows Server 2012 Windows Server 2012 R2 Click File Explorer on the taskbar and then go to Computer This PC Double click the CD ROM icon and then double click start exe b If the model name screen appears click your model name c If the language screen appears click your language The CD ROM Top Menu will appear d Click User s Guides e Click Use...

Page 12: ... point or router supports Wi Fi Protected Setup or AOSS See Quick Setup Guide For more information about network setup see Software and Network User s Guide Network How to learn about for Advanced Features 1 You can view and download these Guides from the Brother Solutions Center at solutions brother com manuals Google Cloud Print Guide 1 This Guide provides details on how to use Google Cloud Prin...

Page 13: ...m creativecenter for FREE photo projects and printable downloads click Brother CreativeCenter To return to the Top Menu click Back or if you are finished click Exit Accessing Brother Support Macintosh 1 You can find all the contacts you will need such as web support Brother Solutions Center Double click the Brother Support icon The following screen will appear To download and install Presto PageMa...

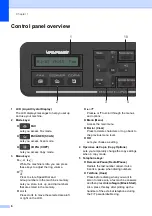
Page 14: ...d area left or right on the LCD a or b Press a or b to scroll through the menus and options Menú Menu Access the main menu Borrar Clear Press to delete characters or to go back to the previous menu level OK Lets you choose a setting 4 Opciones de Copia Copy Options Lets you temporarily change the copy settings when in copy mode 5 Telephone keys Remarcar Pausa Redial Pause Redials the last number c...

Page 15: ...off the machine The LCD displays Shutting Down and will stay on for a few seconds before turning itself off If you have connected an external telephone or TAD it is always available If you turn off the machine using it will still periodically clean the print head to maintain print quality To prolong print head life provide better ink efficiency and maintain print quality keep your machine connecte...

Page 16: ...In this example the Receive Mode setting is changed from Fax Only to Fax Tel a Press FAX b Press Menú Menu 3 1 1 Fax Only Select ab OK c Press a or b to choose Fax Tel Fax Tel d Press OK Accepted NOTE Press Borrar Clear if you want to go back to the previous level e Press Detener Salir Stop Exit ...

Page 17: ...n close it and then close the paper support 2 When you load a different paper size in the tray you will need to change the Paper Size setting in the machine at the same time See Paper Size on page 15 b Lift the output paper tray cover 1 c Gently press and slide the paper width guides 1 and then the paper length guide 2 to fit the paper size Make sure that the triangular marks 3 on the paper width ...

Page 18: ...to the paper tray printing surface face down and top edge in first Check that the paper is flat in the tray IMPORTANT Be careful not to push the paper in too far it may lift at the back of the tray and cause paper feed problems NOTE If you want to add paper before the tray is empty remove the paper from the tray and combine it with the paper you are adding Always fan the stack of paper well before...

Page 19: ...of the paper g Close the output paper tray cover h Slowly and firmly push the paper tray completely into the machine i While holding the paper tray in place pull out the paper support 1 until it locks into place and then unfold the paper support flap 2 IMPORTANT DO NOT use the paper support flap when printing on Legal size paper 1 2 1 ...

Page 20: ...will not feed correctly That are of a baggy construction That have windows That are embossed have raised writing on them That have clasps or staples That are pre printed on the inside Occasionally you may experience paper feed problems caused by the thickness size and flap shape of the envelopes you are using Loading envelopes 2 a Before loading press the corners and sides of envelopes to make the...

Page 21: ...he application you are using For more information see Software and Network User s Guide Reverse Print Windows or Reverse Print Macintosh If you have problems printing on envelopes with the flap on the short edge try the following 2 a Open the envelope flap b Put the envelope into the paper tray with the printing surface face down and the flap positioned as shown in the illustration c Select Revers...

Page 22: ...ed on For more information see Software and Network User s Guide Print without a Border Windows or Print without a Border Macintosh NOTE The Borderless print feature is not available for envelopes 2 sided printing and some paper sizes such as Legal and Executive For more information see Printer on page 118 Cut Sheet Paper Envelopes Top 1 Left 2 Bottom 3 Right 4 Cut Sheet 0 12 in 3 mm 0 12 in 3 mm ...

Page 23: ...r Legal A4 A5 Executive or 4 x6 Press OK c Press Detener Salir Stop Exit Acceptable paper and other print media 2 The print quality can be affected by the type of paper you use in the machine To get the best print quality for the settings you have chosen always set the Paper Type to match the type of paper you load You can use plain paper inkjet paper coated paper glossy paper and envelopes We rec...

Page 24: ...ing down IMPORTANT DO NOT use the following kinds of paper Damaged curled wrinkled or irregularly shaped 1 0 08 in 2 mm or greater curl may cause jams to occur Extremely shiny or highly textured Paper that cannot be arranged uniformly when stacked Paper made with a short grain Paper capacity of the output paper tray cover 2 Up to 50 sheets of Letter Legal or A4 20 lb 80 g m2 paper Photo paper must...

Page 25: ...m Yes Cards Photo 4 6 in 10 15 cm Yes Yes Photo 2L 5 7 in 13 18 cm Yes Index Card 5 8 in 127 203 mm Yes Envelopes C5 Envelope 6 4 9 in 162 229 mm Yes DL Envelope 4 3 8 7 in 110 220 mm Yes Com 10 4 1 8 9 1 2 in 105 241 mm Yes Monarch 3 7 8 7 1 2 in 98 191 mm Yes Paper Type Weight Thickness No of sheets Cut Sheet Plain Paper 17 to 32 lb 64 to 120 g m2 3 to 6 mil 0 08 to 0 15 mm 100 1 Inkjet Paper 17...

Page 26: ...ed wrinkled folded ripped stapled paper clipped pasted or taped DO NOT use cardboard newspaper or fabric Make sure documents with ink or correction fluid are completely dry a Unfold the ADF Document Support 1 b Fan the pages well c Adjust the paper guides 1 to fit the width of your document d Place your document face down top edge first in the ADF underneath the paper guides until the LCD displays...

Page 27: ...k Document sizes supported 3 How to load documents 3 NOTE To use the scanner glass the ADF must be empty a Lift the document cover b Using the document guidelines on the left and top place the document face down in the upper left corner of the scanner glass 1 document cover c Close the document cover IMPORTANT If you are scanning a book or thick document DO NOT slam the cover down or press on it L...

Page 28: ...e using This figure shows the unscannable areas 1 The unscannable area is 0 04 in 1 mm when you use the ADF Usage Document Size Top 1 Bottom 3 Left 2 Right 4 Fax Letter 0 12 in 3 mm 0 16 in 4 mm Legal A4 0 12 in 1 3 mm Copy All paper sizes 0 12 in 3 mm 0 12 in 3 mm Scan 0 04 in 1 mm 0 04 in 1 mm 1 3 2 4 ...

Page 29: ...ou are sending a multiple page document b Press FAX c You can change the following fax sending settings Basic User s Guide For information about changing the following fax sending settings see pages 22 to 23 Glass Scan Size Transmission Verification Report Setup Advanced User s Guide For more advanced fax sending operations and settings See Advanced User s Guide Sending a fax MFC model only Contra...

Page 30: ...Negro Black Start to start Stop faxing 4 To stop faxing press Detener Salir Stop Exit Setting scanner glass size for faxing 4 When documents are A4 size you need to set the Scan Size to A4 If you do not the bottom portion of the faxes will be missing a Load your document b Press FAX c Press Menú Menu 3 2 0 d Press a or b to choose Letter or A4 Press OK e Press Detener Salir Stop Exit f Enter the f...

Page 31: ...n the report Off Prints a report if your fax is unsuccessful due to a transmission error Off is the default setting Off Image Prints a report if your fax is unsuccessful due to a transmission error A portion of the fax s first page appears on the report a Press Menú Menu 3 3 1 b Press a or b to choose Off Image On On Image or Off Press OK c Press Detener Salir Stop Exit NOTE If you choose On Image...

Page 32: ...r when receiving incoming calls See Voice Mail on page 29 for instructions on setting up your machine using this service Will you be using a Telephone Answering Device on the same telephone line as your Brother machine Your external telephone answering device TAD will automatically answer every call Voice messages are stored on the external TAD and fax messages are printed Choose External TAD as y...

Page 33: ...ss FAX b Press Menú Menu 3 1 1 NOTE If you cannot change the Receive Mode make sure the Distinctive Ring feature is set to Off See Turning off Distinctive Ring on page 31 c Press a or b to choose Fax Only Fax Tel External TAD or Manual Press OK d Press Detener Salir Stop Exit ...

Page 34: ...n page 27 and Ring Delay on page 27 Manual 5 Manual mode turns off all automatic answering functions unless you are using the Distinctive Ring feature To receive a fax in Manual mode lift the handset of the external telephone or press Teléfono Hook When you hear fax tones short repeating beeps press Inicio Negro Black Start and then press 2 to choose Receive You can also use the Easy Receive featu...

Page 35: ...ller will hear the normal telephone ring The number of rings is set by the ring delay setting If the call is a fax then your machine will receive it however if it is a voice call the machine will sound the F T Ring a fast pseudo double ring for the time you have set in the F T Ring Time setting If you hear the F T Ring it means that you have a voice caller on the line Because the F T Ring is made ...

Page 36: ...external handset press Inicio Negro Black Start and then press 2 to receive If you answered at an extension telephone press l 5 1 See Using external and extension telephones on page 36 NOTE If this feature is set to On but your machine does not connect a fax call when you lift an extension or external telephone press the Fax Receive Code l 5 1 If you send faxes from a computer on the same telephon...

Page 37: ...Voice Mail service do one of the following Get the Distinctive Ring service from your telephone company Distinctive Ring is a feature of your Brother machine that allows a person with one line to receive fax and voice calls through two different phone numbers on that one line Brother uses the term Distinctive Ring but telephone companies market the service under a variety of names such as Custom R...

Page 38: ...The Brother machine has a Distinctive Ring feature that allows you to use your machine to take full advantage of the telephone company s Distinctive Ring service The new telephone number on your line can just receive faxes Do you have Voice Mail 6 If you have Voice Mail on the telephone line that you will install your new machine on there is a strong possibility that Voice Mail and the machine wil...

Page 39: ...On your Distinctive Ring number will receive faxes automatically You will see D R when you press FAX and Manual as the Receive Mode setting You cannot change the Receive Mode from D R Manual to another Receive Mode while Distinctive Ring is set to On This ensures the Brother machine will only answer the Distinctive Ring number and will not interfere when your main telephone number is called a Pres...

Page 40: ... labeled LINE on your machine The other end of the telephone cord may be connected to a modem interface box phone adapter splitter or other such device If you have questions about how to connect your machine to the VoIP system call your VoIP provider After you have connected your machine to the VoIP system press Teléfono Hook to verify that the machine has a dial tone If the machine does not have ...

Page 41: ...your external answering machine if it exceeds five rings NOTE If you do not receive all your faxes shorten the Ring Delay setting on your external TAD If you subscribe to your telephone company s Distinctive Ring service You may connect an external TAD to a separate wall jack only if you subscribe to your telephone company s Distinctive Ring service have registered the distinctive ring pattern on ...

Page 42: ... cover to release the lock Gently push the scanner cover support down and close the scanner cover using both hands f Set your external TAD to answer within four rings The machine s Ring Delay setting does not apply g Record the outgoing message on your external TAD h Set the TAD to answer calls i Set the Receive Mode to External TAD See Choose the correct Receive Mode on page 24 Recording an outgo...

Page 43: ...calls If all incoming calls will be answered by a switchboard operator we recommend that you set the Receive Mode to Manual We cannot guarantee that your machine will operate correctly under all circumstances when connected to a PBX Any difficulties with sending or receiving faxes should be reported first to the company who handles your PBX External and extension telephones 6 Connecting an externa...

Page 44: ...all See Easy Receive on page 28 Using a non Brother cordless external telephone 6 If your non Brother cordless telephone is connected to the EXT jack of the machine and you typically carry the cordless handset elsewhere it is easier to answer calls during the Ring Delay If you let the machine answer first you will have to go to the machine so you can press Teléfono Hook to send the call to the cor...

Page 45: ...ess Menú Menu 3 1 5 c Press a or b to choose On or Off Press OK d Enter the new Fax Receive Code Press OK e Enter the new Telephone Answer Code Press OK f Press Detener Salir Stop Exit NOTE If you are always disconnected when accessing your external TAD remotely try changing the Fax Receive Code and Telephone Answer Code to another three digit code such as and 9 9 9 Remote Codes might not work wit...

Page 46: ...io Negro Black Start The machine scans and sends the fax Fax Redial 7 If you are sending a fax manually and the line is busy press Remarcar Pausa Redial Pause and then press Inicio Negro Black Start to try again If you want to make a second call to the last number dialed you can save time by pressing Remarcar Pausa Redial Pause and Inicio Negro Black Start Remarcar Pausa Redial Pause only works if...

Page 47: ...g Speed Dial numbers 7 You can store up to 40 two digit Speed Dial numbers each with its own name When you dial you will only have to press a few keys for example Libreta Address Book OK the two digit number and Inicio Negro Black Start a Press Libreta Address Book and a or b to choose Set Speed Dial Press OK b Use the dial pad to enter a two digit Speed Dial number 01 40 Press OK c Enter the fax ...

Page 48: ...ber by deleting the fax number Follow the instructions below a Do one of the following To change the stored number press d or c to position the cursor under the digit you want to change and then press Borrar Clear Reenter the number Press OK Go to step b To delete the Speed Dial number press Borrar Clear to delete each digit of the fax number Press OK Go to step c b Enter a new name if needed Pres...

Page 49: ...ings 1 Copy Ratio 2 Quality 3 Number of Copies Use the dial pad to enter the number of copies NOTE The default setting is FAX mode You can change the amount of time that the machine stays in COPY mode after the last copy operation See Advanced User s Guide Mode Timer MFC model only c If you want more than one copy enter the number up to 99 d Press Inicio Negro Black Start or Inicio Color Color Sta...

Page 50: ...nging the following copy settings see Advanced User s Guide Copy options Quality Enlarge Reduce Layout 2in1 ID 2in1 ID Stack Sort Density Remove Bkg Clr NOTE If you want to sort copies we recommend using the ADF Paper Type 8 To get the best print quality if you are copying on special paper set the machine for the type of paper you are using a Load your document b Press COPIA COPY c Enter the numbe...

Page 51: ...e or Photo 4 6 10 15 cm paper a Load your document b Press COPIA COPY c Enter the number of copies you want d Press Opciones de Copia Copy Options and a or b to choose Paper Size Press OK e Press a or b to choose Letter Legal A4 A5 Executive or 4 W x6 H Press OK f If you do not want to change any other settings press Inicio Negro Black Start or Inicio Color Color Start ...

Page 52: ...rint command in the application you are using c Choose the name of your machine in the Print dialog box and click Properties or Preferences depending on the application you are using d Choose the settings you want to change in the Properties dialog box Commonly used settings include Media Type Print Quality Paper Size Orientation Color Grayscale Ink Save Mode Scaling 2 sided Booklet e Click OK f C...

Page 53: ...ent as a PDF file using ControlCenter4 Windows 10 ControlCenter4 is a software utility that lets you access the applications you use most often Using ControlCenter4 eliminates the need to manually launch specific applications For more information see Software and Network User s Guide Scan Using ControlCenter4 Advanced Mode Windows NOTE The screens on your PC may vary depending on your model This s...

Page 54: ...Chapter 10 46 c If the ControlCenter4 Mode screen appears choose the Advanced Mode and then click OK d Make sure the machine you want to use is selected from the Model drop down list ...

Page 55: ...tings 1 Choose PDF pdf from the File Type drop down list 2 You can enter the file name you want to use for the document 3 You can save the file to the default folder or choose your preferred folder by clicking the Browse button 4 You can choose a scanning resolution from the Resolution drop down list 5 You can choose the document size from the Document Size drop down list f Click OK 1 2 4 5 3 ...

Page 56: ...Chapter 10 48 g Click the Scan tab h Click File i Click Scan The machine starts the scanning process The folder where the scanned data is saved will open automatically ...

Page 57: ...g ControlCenter4 Windows 10 Use ControlCenter4 to change your machine s SCAN mode settings a Click the ControlCenter4 icon in the task tray and then click Open b Make sure the machine you want to use is selected from the Model drop down list c Click the Device Settings tab d Click Device Scan Settings ...

Page 58: ...an enter the file name you want to use for the document 3 You can save the file to the default folder or choose your preferred folder by clicking the Browse button 4 You can choose a scanning resolution from the Resolution drop down list 5 You can choose the document size from the Document Size drop down list f Click OK 1 2 4 5 3 ...

Page 59: ...ge the default settings go to step e e Press a or b to choose On Press OK f Choose the settings for Scan Type as required Press OK Repeat this step for the settings for Resolution File Type Scan Size and Remove Bkg Clr g Press Inicio Negro Black Start or Inicio Color Color Start The machine starts the scanning process NOTE The following scan modes are available Scan to E mail Scan to Image Scan to...

Page 60: ... head assembly Refill the ink tank when the remaining ink level is at or below the lower line CAUTION If ink gets in your eyes wash it out with water at once and call a doctor if you are concerned IMPORTANT Brother strongly recommends that you continue to use only Genuine Brother Brand replacement ink Use or attempted use of potentially incompatible ink in the Brother machine may cause damage to t...

Page 61: ...If ink stains your skin or clothing wash with soap or detergent at once d Remove the tip of the ink bottle e Make sure that the color of the ink tank cap matches the ink color you want to refill Insert the nozzle of the ink bottle firmly so that the ink will not be spilled Refill the ink tank by gently squeezing the bottle as shown IMPORTANT Be careful not to fill the ink past the upper line 4 abo...

Page 62: ...ppear on the LCD to verify whether the ink tanks were refilled If you refilled the ink tanks press 1 Yes If you did not refill the ink tank be sure to press 2 No If you pressed 1 Yes you are asked which color ink tanks you refilled For example Did You Refill BK 1 Yes 2 No may be displayed for the black ink tank Press 1 Yes to reset the ink dot counter for the refilled colors Press 2 No for the non...

Page 63: ... with a non flammable glass cleaner NOTE In addition to cleaning the scanner glass and glass strip with a non flammable glass cleaner run your fingertip over the glass to see if you can feel anything on it If you feel dirt or debris clean the glass again concentrating on that area You may need to repeat the cleaning process three or four times To test make a copy after each cleaning attempt 2 1 3 ...

Page 64: ...print has not improved call Brother Customer Service You can also clean the print head from your PC For more information see Software and Network User s Guide Clean the Print Head from Your Computer Windows or Clean the Print Head from Your Computer Macintosh Checking the print quality A If faded or streaked colors and text appear on your printouts some of the print head nozzles may be clogged You...

Page 65: ...nty NOTE Checking the print alignment A You may need to adjust the print alignment after transporting the machine if your printed text becomes blurred or images become faded a Press Menú Menu 1 1 b Press a or b to choose Alignment Press OK c Press Inicio Negro Black Start or Inicio Color Color Start The machine starts printing the Alignment Check Sheet d For the A pattern press the number of the t...

Page 66: ...y using the dial pad and then press OK e Press a or b to choose 12h Clock or 24h Clock and then press OK f To enter the time do one of the following If you chose 12h Clock in step e enter the time in 12 hour format using the dial pad and then press OK Press a or b to choose AM or PM and then press OK If you chose 24h Clock in step e enter the time in 24 hour format using the dial pad and then pres...

Page 67: ... then go to the suggested page Paper handling and Printing problems Printing Difficulties on page 80 Print Quality Difficulties on page 82 Paper Handling Difficulties on page 84 Printing Received Faxes on page 85 Telephone and Fax problems Telephone Line or Connections on page 85 Handling Incoming Calls on page 88 Receiving Faxes on page 86 Sending Faxes on page 87 Copying problems Copying Difficu...

Page 68: ...60 Scanning problems Scanning Difficulties on page 89 Software and Network problems Software Difficulties on page 89 Network Difficulties on page 90 ...

Page 69: ...ng If you choose Grayscale in the Advanced tab of the printer driver you can use the machine as a black white printer 2 sided printing is not available when this message appears Copying If the paper type is set to Plain Paper you can make copies in black white Refill the ink tank When you refill the ink tank fill the ink up to the upper line or fill with all of the ink in the bottle if it does not...

Page 70: ... Fax Journal report on page 69 before disconnecting the machine so you will not lose any important messages Then disconnect the machine from the power for several minutes and then reconnect it A foreign object such as a paper clip or a piece of ripped paper is in the machine Close Ink Cover The ink tank cover is not locked in the closed position Firmly close the ink tank cover until it locks into ...

Page 71: ...nt was not inserted or fed correctly or the document scanned from the ADF was too long See Using the ADF on page 18 See Document jam on page 70 DR Mode in Use The machine is in Distinctive Ring mode You cannot change the Receive Mode when Distinctive Ring is on Set Distinctive Ring to Off See Turning off Distinctive Ring on page 31 High Temperature The room temperature is too high After cooling th...

Page 72: ...on power up The use of non Brother ink may cause frequent cleanings because non Brother ink could cause poor print quality which is resolved by cleaning The more cleaning the machine requires the faster these boxes will fill up NOTE Repairs resulting from the use of non Brother supplies may not be covered under the stated product warranty The ink absorber box or flushing box will need to be replac...

Page 73: ...fy whether the ink tanks were refilled Press 1 Yes to reset the ink dot counter for the refilled color Press 2 No for the non refilled colors See Refilling the ink tanks on page 52 Low Temperature The room temperature is too low After warming the room allow the machine to warm up to room temperature Try again when the machine has warmed up No Caller ID There is no incoming call history You did not...

Page 74: ...k up rollers See Advanced User s Guide Cleaning the paper pick up rollers The Jam Clear Cover is not closed correctly Make sure the Jam Clear Cover is closed evenly at both ends See Printer jam or paper jam on page 71 The paper is jammed in the machine Remove the jammed paper by following the steps in Printer jam or paper jam on page 71 If this error occurs often during 2 sided printing the paper ...

Page 75: ... faxes that are in the memory See Advanced User s Guide Printing a fax from the memory Paper Jam The paper is jammed in the machine Remove the jammed paper by following the steps in Printer jam or paper jam on page 71 Make sure the paper length guide is set to the correct paper size DO NOT extend the paper tray when you load A5 or smaller size paper If there is a repeat paper jam a small piece of ...

Page 76: ...aper and other print media on page 9 3 After you have checked the paper size and the paper position press Inicio Negro Black Start or Inicio Color Color Start You did not set the paper guides in the tray to the indicators for the paper size you are using If you are printing from your computer make sure the paper size you choose in the printer driver matches the size of paper in the tray For more i...

Page 77: ...ack Start Transferring faxes to your PC B You can transfer the faxes from your machine s memory to your PC a Make sure you have installed MFL Pro Suite on your PC and then turn on PC FAX Receive on the PC Do one of the following Windows XP Windows Vista and Windows 7 From Start select All Programs Brother and Brother Utilities Click the drop down list and select your model name if not already sele...

Page 78: ... Follow these steps to clear a document jam Document is jammed in the top of the ADF unit B a Take out any paper from the ADF that is not jammed b Open the ADF cover c Remove the jammed document by pulling it upward 1 ADF cover d Close the ADF cover e Press Detener Salir Stop Exit IMPORTANT To avoid future document jams close the ADF cover correctly by pressing it down in the center Document is ja...

Page 79: ...Unplug the machine from the AC power outlet IMPORTANT Before you unplug the machine from the power source you can transfer your faxes that are stored in the memory to your PC or another fax machine so you will not lose any important messages See Transferring your faxes or Fax Journal report on page 69 b Pull the paper tray 1 completely out of the machine c Pull the two green levers inside the mach...

Page 80: ...n in the illustration 2 you cannot move it Re connect the power cord Hold down Detener Salir Stop Exit until the print head moves to the center Then unplug the machine from the power source and take out the paper If the paper is jammed under the print head unplug the machine from the power source and then move the print head to take out the paper Hold the concave areas with the triangle marks show...

Page 81: ...for any pieces of paper h Look inside the machine from a lower angle and make sure there are no pieces of paper remaining i Open the Jam Clear Cover 1 at the back of the machine j Remove the jammed paper k Close the Jam Clear Cover Make sure the cover is closed correctly 1 1 ...

Page 82: ...ocks in the open position and then unfold the paper support flap Make sure you pull out the paper support until it locks into place IMPORTANT DO NOT use the paper support flap when printing on Legal size paper o Plug the machine back into the AC power outlet NOTE If there is a repeat paper jam a small piece of paper may be stuck in the machine See Additional paper jam clear operations on page 74 A...

Page 83: ...s you to remove the jammed paper d Place both hands under the plastic tabs on both sides of the machine to lift the scanner cover into the open position e Load one sheet of thick Letter or A4 sized paper such as glossy paper deep into the machine as shown in the illustration ...

Page 84: ...OT touch the encoder strip 1 Doing this may cause damage to the machine g Pull the thick paper out of the machine h Open the Jam Clear Cover 1 at the back of the machine i Load one sheet of thick Letter or A4 sized paper such as glossy paper deep into the machine as shown in the illustration 1 1 ...

Page 85: ...use damage to the machine k Pull the thick paper out of the machine l Close the Jam Clear Cover Make sure the cover is closed correctly m Lift the scanner cover 1 to release the lock Gently push the scanner cover support down 2 and close the scanner cover 3 using both hands CAUTION Be careful not to pinch your fingers when you close the scanner cover 1 2 3 1 ...

Page 86: ...78 n Put the paper tray firmly back in the machine o Plug the machine back into the AC power outlet ...

Page 87: ...ere is a problem with your machine check the following chart and follow the troubleshooting tips You can correct most problems by yourself If you need additional help the Brother Solutions Center offers the latest FAQs and troubleshooting tips Visit http support brother com NOTE For technical help you must call the country where you bought the machine Calls must be made from within that country ...

Page 88: ...2 Move your mouse to the lower right corner of your desktop When the menu bar appears click Settings and then click Control Panel In the Hardware and Sound Hardware group click View devices and printers Right click Brother MFC XXXX Printer where XXXX is your model name and select See what s printing If printer driver options appear select your printer driver Click Printer in the menu bar and make ...

Page 89: ... bottom margins in your document to allow for this See Unprintable area on page 14 Cannot perform Page Layout printing Check that the paper size setting in the application and in the printer driver are the same Print speed is too slow Try changing the printer driver setting The highest resolution needs longer data processing sending and printing time Try the other quality settings in the printer d...

Page 90: ... on page 15 Check the room temperature The recommended environment for your machine is between 68 F to 91 F 20 C to 33 C The printout is faint even after refilling with Genuine Brother Ink The refilled ink may not have reached the print head Perform the following special cleaning operation Press Menú Menu and then press a or b and the OK button to select 1 Ink 2 Cleaning Press and hold down Menú M...

Page 91: ... printing surface is face down in the paper tray Make sure you are using Genuine Brother Ink If you are using photo paper make sure that you have set the correct paper type If you are printing a photo from your PC set the Media Type in the printer driver Ink is smudged or wet when using glossy photo paper Be sure to check the front and back of the paper Place the glossy surface printing surface fa...

Page 92: ...from the tray and fan the stack of paper well then put it back in the tray Make sure you do not push the paper in too far See Loading paper and other print media on page 9 Make sure the Jam Clear Cover is closed correctly See Printer jam or paper jam on page 71 Make sure the Base Pad in the paper tray is not dirty See Advanced User s Guide Cleaning the paper pick up rollers There is a paper jam Se...

Page 93: ...nections Difficulty Suggestions Dialing does not work No dial tone Check all line cord connections Make sure the telephone line cord is plugged into the telephone wall jack and the LINE jack inside the machine Change the Tone Pulse setting See Quick Setup Guide Send a manual fax by pressing Teléfono Hook and dialing the number Wait to hear fax receiving tones before pressing Inicio Negro Black Sta...

Page 94: ...ine with the Distinctive Ring subscriber service see Distinctive Ring on page 30 If your Brother machine shares a line with other telephones and you want it to automatically answer all incoming faxes select Fax Tel mode In Fax Tel mode your Brother machine will automatically receive faxes and produce a pseudo double ring to alert you to answer voice calls If you do not want your Brother machine to...

Page 95: ...an external or extension telephone See Easy Receive on page 28 If you often get transmission errors due to possible interference on the telephone line try changing the Compatibility setting to Basic for VoIP See Telephone line interference VoIP on page 91 Sending Faxes Difficulty Suggestions Cannot send a fax Check all line cord connections Make sure the telephone line cord is plugged into the tel...

Page 96: ...or example If you subscribe to Call Waiting or another custom service and its signal comes through the line while your machine is sending or receiving a fax the signal can temporarily interrupt or disrupt the faxes Brother s ECM Error Correction Mode feature should help overcome this problem This condition is related to the telephone system industry and is common to all devices that send and recei...

Page 97: ...tware and Network User s Guide Scan Using Apple Image Capture ICA Driver OCR does not work Try increasing the scanner resolution Macintosh Make sure you have finished downloading and installing Presto PageManager from http nj newsoft com tw download brother PM9SEInstaller_BR_multilang2 dmg Poor scanning results when using the ADF Vertical black lines appear in the scanned data Clean the white bar ...

Page 98: ...elector window appears Reselect your network machine make sure Status is idle and then click OK The network PC Fax Receive feature does not work Windows It is necessary to set the third party Security Firewall Software to allow PC FAX Rx To add port 54926 for Network PC FAX Rx enter the information below In Name Enter any description for example Brother PC FAX Rx In Port number Enter 54926 In Prot...

Page 99: ...ces the modem speed to 9 600 bps and turns off ECM Unless interference is a recurring problem on your telephone line you may prefer to use it only when needed To improve compatibility with most VoIP services Brother recommends changing the compatibility setting to Basic for VoIP Normal sets the modem speed at 14 400 bps c Press Detener Salir Stop Exit NOTE VoIP Voice over IP is a type of phone sys...

Page 100: ...al Speed Dial and Setup Groups Station ID Name and Number Report settings Transmission Verification Report Speed Dial and Fax Journal 4 All Settings You can restore all settings to the factory setting Brother strongly recommends performing this procedure before handing over or disposing of the machine How to reset the machine B a Press Menú Menu 0 6 b Press a or b to choose the type of reset Machi...

Page 101: ...o you can see all the available choices for each setting and feature You can use these tables to quickly set up your preferred settings in the machine Memory Storage C Even if there is a power failure you will not lose your menu settings because they are stored permanently Temporary settings such as Overseas Mode will be lost and you may have to reenter the date and time Menu and features tables C...

Page 102: ... the LCD The LCD will then display the next menu level d Press a or b to scroll to the setting you want to change Press OK e Press a or b to choose the option you want Press OK The LCD displays Accepted f Press Detener Salir Stop Exit Access the menu Go to the next menu level Accept an option Go back to the previous menu level Delete an incorrect letter when you need to enter text into the machine...

Page 103: ...ns Page 1 Ink 1 Test Print Print Quality Alignment Lets you check the print quality or alignment 56 57 2 Cleaning Black Color All Lets you clean the print head 56 3 Ink Low Notice On Off You can set the machine not to display the Ink Low error message if you do not need the notification 2 General Setup 1 Mode Timer 0 Sec 30 Secs 1 Min 2 Mins 5 Mins Off Sets the time to return to Fax mode See 2 Pap...

Page 104: ...Low Med High Adjusts the speaker volume 5 LCD Contrast Light Dark Adjusts the contrast of the LCD 6 Sleep Mode 1 Min 2 Mins 3 Mins 5 Mins 10 Mins 30 Mins 60 Mins You can choose how long the machine must be idle before it goes into Sleep Mode Level1 Level2 Level3 Options Descriptions Page See Advanced User s Guide The factory settings are shown in Bold with an asterisk ...

Page 105: ...essages automatically when you answer a call and hear fax tones 28 5 Remote Codes Remote Codes Options On Off Fax Receive l51 Tel Answer 51 Allows you to answer all calls at an extension telephone and use codes to turn the machine on or off You can personalize these codes 36 6 Auto Reduction On Off Reduces the size of incoming faxes See 7 Memory Receive Off PC Fax Receive You can set the machine t...

Page 106: ...nsmission On On Image Off Off Image Choose the initial setup for Transmission Verification Report 23 2 Journal Period Off Every 50 Faxes Every 6 Hours Every 12 Hours Every 24 Hours Every 2 Days Every 7 Days Sets the interval for the automatic printing of the Fax Journal If you choose other than Off or Every 50 Faxes you can set the time for the chosen option If you choose Every 7 Days you can set ...

Page 107: ...stinctive Ring subscriber service to register the ring pattern with the machine 30 3 Caller ID Display View the last 30 Caller IDs stored in the memory See 4 Copy 1 Quality Normal Best Chooses the Copy resolution for your type of document 2 Density onnnn nonnn nnonn nnnon nnnno Adjusts the density of copies Level1 Level2 Level3 Options Descriptions Page See Advanced User s Guide The factory settin...

Page 108: ...uto Static Chooses the WINS configuration mode 7 WINS Server Primary 000 000 000 000 Secondary 000 000 000 000 Specifies the IP address of the primary or secondary WINS server 8 DNS Server Primary 000 000 000 000 Secondary 000 000 000 000 Specifies the IP address of the primary or secondary DNS server 9 APIPA On Off Automatically allocates the IP address from the link local address range 2 WLAN As...

Page 109: ...ddress from the control panel 8 WLAN Enable On Off Lets you use the wireless network connection 0 Network Reset Restores all network settings to the factory default Level1 Level2 Level3 Options Descriptions Page 6 Print Reports 1 Transmission Prints these lists and reports See 2 Address Book 3 Fax Journal 4 User Settings 5 Network Config 6 WLAN Report 7 Caller ID 7 Machine Info 1 Serial No Lets yo...

Page 110: ...Reset 1 Reset 2 Exit You can reset the machine s settings such as the Date and Time and Ring Delay 92 2 Network 1 Reset 2 Exit Resets the print server back to the factory defaults such as the password and IP address information 3 Address Fax 1 Reset 2 Exit Deletes all stored Speed Dial numbers and faxes restores the Station ID Address Book List Transmission Verification Report and Fax Journal back...

Page 111: ...Level1 Level2 Level3 Options Descriptions Page Layout 2in1 ID Off 1in1 2in1 ID 2in1 P 2in1 L 4in1 P 4in1 L Poster 3x3 You can make N in 1 or Poster copies See Quality Normal Best Choose the Copy resolution for the next copy Enlarge Reduce Fit to Page Custom 25 400 198 4 x6 iA4 186 4 x6 iLTR 104 EXEiLTR 100 97 LTRiA4 93 A4iLTR 85 LTRiEXE 83 LGLiA4 78 LGLiLTR 46 LTRi4 x6 You can choose the enlargeme...

Page 112: ... 43 Density onnnn nonnn nnonn nnnon nnnno Adjusts the density of copies See Stack Sort Stack Sort You can choose to stack or sort multiple copies No of Copies You can enter the number of copies that you want 41 Remove Bkg Clr Off Low Medium High Change the amount of background color that is removed See Level1 Level2 Level3 Options Descriptions Page See Advanced User s Guide The factory settings ar...

Page 113: ...esolution 100dpi 200dpi 300dpi 600dpi You can choose the scan resolution for your document File Type If you choose the Color option in the Scan Type setting PDF JPEG If you choose the B W option in the Scan Type setting PDF TIFF You can choose the file format for your document Scan Size Letter Legal A4 A5 EXE 4 x6 Business Card You can choose the scan size for your document Remove Bkg Clr Off Low ...

Page 114: ...ion for your document File Type If you choose the Color option in the Scan Type setting PDF JPEG If you choose the B W option in the Scan Type setting PDF TIFF You can choose the file format for your document Scan Size Letter Legal A4 A5 EXE 4 x6 Business Card You can choose the scan size for your document Remove Bkg Clr Off Low Medium High Change the amount of background color that is removed Lev...

Page 115: ... selected in Set Options Scan Type Color Black and White You can choose the scan type for your document Resolution 100dpi 200dpi 300dpi 600dpi You can choose the scan resolution for your document File Type Text HTML RTF You can choose the file format for your document Scan Size Letter Legal A4 A5 EXE 4 x6 Business Card You can choose the scan size for your document Level1 Level2 Level3 Options Des...

Page 116: ...ion for your document File Type If you choose the Color option in the Scan Type setting PDF JPEG If you choose the B W option in the Scan Type setting PDF TIFF You can choose the file format for your document Scan Size Letter Legal A4 A5 EXE 4 x6 Business Card You can choose the scan size for your document Remove Bkg Clr Off Low Medium High Change the amount of background color that is removed Lev...

Page 117: ... Level2 Level3 Options Descriptions Page Search Dial by pressing only a few keys 38 Set Speed Dial You can set up Speed Dial numbers so you can dial by pressing only a few keys and Inicio Start 39 Setup Groups You can set up Group numbers for broadcasting See See Advanced User s Guide The factory settings are shown in Bold with an asterisk Level1 Level2 Level3 Options Descriptions Page See Softwar...

Page 118: ...s c twice between characters NOTE The characters that are available may differ depending on your country Making corrections C To change an incorrect character press d to move the cursor under it and then press Borrar Clear Enter the correct character You can also back up and insert letters Press Borrar Clear for each character you want to erase Repeating letters C To enter a letter that is on the ...

Page 119: ...11 C Special characters and symbols C Press l or 0 repeatedly until you see the special character or symbol you want Press l for space m Press for _ Press 0 for English Á À Ã Â Ç É È Ê Ë Í Î Ï Ó Õ Ô Ö Ú Ù 0 Spanish Á É Í Ñ Ó Ú 0 ...

Page 120: ...ment ISO IEC 24712 printed pattern 3 Measured according to IEC 62301 Edition 2 0 4 Even when the machine is turned off it will automatically turn itself on periodically for print head maintenance and then turn itself off Specifications D Printer Type Inkjet Print Head Black Color Piezo with 210 nozzles 1 Piezo with 70 nozzles 3 Memory Capacity 64 MB LCD Liquid Crystal Display 16 characters 1 line ...

Page 121: ... C Humidity Operating Best Print Quality 20 to 80 without condensation 20 to 80 without condensation ADF automatic document feeder Up to 20 pages Paper 20 lb 80 g m2 Letter or A4 size Document Size ADF Width 5 8 in to 8 5 in 148 mm to 215 9 mm ADF Length 5 8 in to 14 0 in 148 mm to 355 6 mm Scanner Glass Width Max 8 5 in 215 9 mm Scanner Glass Length Max 11 7 in 297 mm 7 1 in 180 mm 17 1 in 435 mm...

Page 122: ...sy Paper 1 Paper Size 2 Letter Legal Executive A4 A5 A6 Envelopes Com 10 DL C5 Monarch Photo 4 6 10 15 cm Photo 2L 5 7 13 18 cm and Index Card 5 8 127 203 mm Width 3 86 in 8 5 in 98 mm 215 9 mm Length 5 8 in 14 in 148 mm 355 6 mm For more information see Paper weight thickness and capacity on page 17 Maximum paper tray capacity Up to 100 sheets of 20 lb 80 g m2 plain paper Paper Output Up to 50 sh...

Page 123: ...mpatibility ITU T Group 3 Modem Speed Automatic Fallback 14 400 bps Scanning Width 8 19 in 208 mm Letter Printing Width 8 26 in 210 mm Letter Gray Scale 8 bit 256 levels Resolution Standard 203 98 dpi Fine 203 196 dpi Superfine 203 392 dpi Photo 203 196 dpi Speed Dial 40 stations Groups Up to 6 Broadcasting 90 40 Speed Dial 50 Manual Dial Automatic Redial 1 time after 5 minutes Memory Transmission...

Page 124: ...D 1 When copying on Letter size paper Color Black Yes Yes Copy Width 8 26 in 210 mm 1 Multiple Copies Stacks Sorts up to 99 pages Enlarge Reduce 25 to 400 in increments of 1 Resolution Prints up to 1200 2400 dpi ...

Page 125: ...a Windows 7 Windows 8 OS X v10 7 5 10 8 x 10 9 x WIA Compliant Yes Windows XP 1 Windows Vista Windows 7 Windows 8 ICA Compliant Yes OS X v10 7 5 10 8 x 10 9 x Color Depth 30 bit color Processing Input 24 bit color Processing Output 256 levels per color Gray Scale 10 bit color Processing Input 8 bit color Processing Output 256 levels per color Resolution Up to 19200 19200 dpi interpolated 2 Up to 1...

Page 126: ...eration on page 17 3 When printing on Letter size paper 4 For detailed specifications visit http www brother com Resolution Up to 1200 6000 dpi Printing Width 3 8 26 in 8 5 in borderless 1 Borderless 2 Letter A4 A6 Photo 4 6 10 15 cm Index Card 5 8 127 203 mm Photo 2L 5 7 13 18 cm Print Speed 4 ...

Page 127: ...ed is Brother BRAdmin Light 2 Network Management software 1 See Computer requirements on page 120 2 Windows If you require more advanced printer management use the latest Brother BRAdmin Professional utility version that is available as a download from http support brother com Macintosh The latest Brother BRAdmin Light utility version is available as a download from http support brother com USB 1 ...

Page 128: ...MB N A Windows Server 2008 R2 Windows Server 2012 Windows Server 2012 R2 64bit x64 processor Macintosh Operating System OS X v10 7 5 OS X v10 8 x OS X v10 9 x Printing PC Fax Send 3 Scanning Intel Processor 80 MB 550 MB Conditions 1 For WIA 1200 1200 resolution Brother Scanner Utility enables you to enhance up to 19200 19200 dpi 2 Third party USB ports are not supported 3 PC Fax supports black and...

Page 129: ...ill print the specified number of pages Starter bottle yield is approximately 90 of the yield of the BT6001 or BT5001 replacement ink bottles Replacement Consumables Black Ink Bottle BT6001BK Yellow Ink Bottle BT5001Y Cyan Ink Bottle BT5001C Magenta Ink Bottle BT5001M Black Approximately 6 000 pages 1 Yellow Cyan and Magenta Approximately 5 000 pages 1 1 Quoted yields are extrapolated based on Bro...

Page 130: ...ner glass 19 Cordless telephone non Brother 36 Custom Ringing 30 Custom telephone features on a single line 88 D Data Ident A Call 29 Date and time 58 Dialing a pause 39 Address Book 38 manual 38 Distinctive Ring 30 setting ring pattern 31 turning off 31 Document loading 18 19 E Easy Receive 28 Envelopes 12 17 Error messages on LCD 61 B W Print Only 61 Cannot Print 62 Clean Unable 62 Comm Error 62...

Page 131: ... extension telephones 36 Fax Receive Code 36 Ring Delay 27 Telephone Answer Code 36 G Gray scale 115 117 H Help LCD messages 61 Menu Table 95 using menu keys 94 Hook key 6 I Ident A Call 29 Ident A Ring 29 Ink bottles ink dot counter 52 refilling 52 J Jams document 70 paper 71 L LCD Liquid Crystal Display 6 M Macintosh See Software and Network User s Guide Maintenance routine refilling the ink tan...

Page 132: ...e and Network User s Guide Serial Number how to find See inside front cover SimpleBiz Fax Alternative Number Ringing 29 Smart Ring 30 Speed Dial changing 40 deleting 40 setting up 39 using 38 Step by step Menu Tables 93 Supply Specifications 121 T TAD telephone answering device external 24 33 connecting 33 34 Receive Mode 24 recording OGM 34 Teen Ring 29 Telephone line connections 34 difficulties ...

Page 133: ...125 E U Unscannable area 20 V Voice Mail 29 W Windows See Software and Network User s Guide Wireless Network See Quick Setup Guide and Software and Network User s Guide World Wide Web 5 ...

Page 134: ...om Visit us on the World Wide Web http www brother com This machine is approved for use in the country of purchase only Local Brother companies or their dealers will only support machines purchased in their own countries ...

Reviews: