background image

1

2

3

4

5

6

7

8

9

27

z

 EDIT

ING A LA

BEL

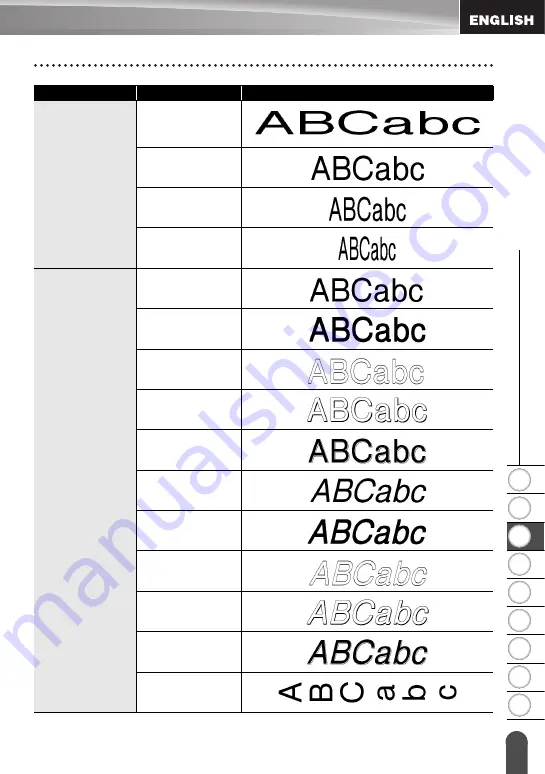
Setting Character Attributes

Width

x2

x1

x2/3

x1/2

Style

Normal

BLD

(Bold)

OUT

(Outline)

SHD

(Shadow)

SLD

(Solid)

ITL

(Italic)

I+BLD

(Italic Bold)

I+OUT

(Italic Outline)

I+SHD

(Italic Shadow)

I+SLD

(Italic Solid)

VRT

(Vertical)

Attribute

Value

Result

Summary of Contents for P-touch 2030

Page 1: ...INTRODUCTION GETTINGSTARTED EDITINGALABEL LABELPRINTING USINGTHEFILEMEMORY MAINTAINNINGYOURP TOUCH TROUBLESHOOTING APPENDIX INDEX ...

Page 2: ... appearing on Brother products related documents and any other materials are all trademarks or registered trademarks of those respective companies For Australia Only Warranty Repair For details about warranty on your Brother Product the details are listed on the following link www brother com au under Service Support Warranty For warranty service repair of your Brother product you will need to ret...

Page 3: ...eeding Tape 18 Feed function 18 LCD Display 18 LCD Contrast 18 Setting Language and Unit 19 Language 19 Unit 19 EDITING A LABEL 20 Entering and Editing Text 20 Entering Text from the Keyboard 20 Adding a New Line 20 Adding a New Block 20 Moving the Cursor 20 Inserting Text 20 Inserting a Tab 20 Deleting Text 21 Entering Symbols 22 Entering Symbols Using the Symbol Function 22 Entering Accented Cha...

Page 4: ...Labels 43 Mirror Printing 44 Setting Margin 45 Adjusting the Label Length 47 Attaching Labels 47 Printing from the Label Collection 48 Printing a label from the Label Collection Stored in the Machine 48 USING THE FILE MEMORY 52 Storing a Label into Memory 52 Opening a Stored Label File 52 Printing a Stored Label File 53 Deleting a Stored Label File 53 MAINTAINING YOUR P TOUCH 54 Resetting the P to...

Page 5: ...1 2 3 4 5 6 7 8 9 3 z INTRODUCTION TROUBLESHOOTING 56 What to do when 56 Error Messages 57 APPENDIX 60 Specifications 60 INDEX 61 ...

Page 6: ...chine How to use the P touch 1 Prepare the P touch P 10 2 In addition to entering text the P touch has a large range of formatting options Create labels like these Entering and Editing text Entering Symbols Entering Accented Characters Using Auto Format Layouts P 20 P 22 P 24 P 31 3 Before printing you can check the layout of your label using the preview function Create labels like these Preview F...

Page 7: ... allow the P touch to get wet in any way DO NOT touch any metal parts near the print head The print head becomes very hot during use and remains very hot immediately after use Do not touch it directly with your hands DO NOT disassemble the P touch For inspection adjustment and repair of the printer contact the retail outlet where the P touch was purchased or your local authorized service centre Pl...

Page 8: ...ied AC adapter adapter cord DO NOT connect the enclosed AC adapter adapter cord to other products Unplug the AC adapter cord immediately and stop using the P touch during an electrical storm There may be a remote risk of electric shock from lightning DO NOT touch the AC adapter or power plug with wet hands DO NOT use the AC adapter in places of high humidity such as bathrooms DO NOT use a damaged ...

Page 9: ...e AC adapter from the power outlet Always hold the AC adapter when disconnecting from the power outlet Tape Cutter Follow these guidelines to avoid minor personal injury and damage to the printer DO NOT open the tape compartment cover when operating the cutter unit DO NOT apply excessive pressure to the cutter unit P touch Follow these guidelines to avoid minor personal injury and damage to the P ...

Page 10: ...ure to the tape in the cassette Otherwise the tape cassette or printer may be damaged DO NOT try to print labels using an empty tape cassette or without a tape cassette set in the P touch Doing so will damage the print head DO NOT attempt to cut the tape while printing or feeding since this will damage the tape We strongly recommend that you read this User s Guide carefully before using your P tou...

Page 11: ...de to indicate additional information Symbols Used in this Guide This symbol indicates information or directions that may result in damage or injury if ignored or operations that will result in errors This symbol indicates information or directions that may help you understand and use the P touch more efficiently ...

Page 12: ...The User s Guide may be provided on CD not printed You can download the PDF version of the User s Guide please go to http solutions brother com General Description When shipped from the factory the LCD display is covered with a protective sheet to prevent damage Remove this sheet before using the P touch Tape compartment cover Tape exit slot Keyboard Tape viewer LCD display Tape cassette compartme...

Page 13: ... line of text 4 Caps mode Indicates that the Caps mode is on 5 8 Style guidance Indicates the current font 5 character size 6 character style 7 and frame 8 settings 9 Tape length Indicates the tape length for the text entered 10 Cursor selection Use the and keys to select menu items and the and keys to change the settings AC adaptor connector Battery compartment cover Battery case LCD Display Keyb...

Page 14: ...urns the display to the data entry screen or the previous step 5 Label Collection Enables label collections to be selected and printed 6 Print Prints the current label design onto the tape Opens the Print Options menu when used in combination with the Shift key 7 Preview Displays a preview of the label Feeds 25 mm of blank tape when used in combination with the Shift key 8 File Enables frequently ...

Page 15: ...ey 14 Tab Inserts a tab to the position of the cursor in the text entry screen 15 Caps Turns Caps mode on and off 16 Shift Use this key in combination with the letter and number keys to type uppercase letters or the symbols indicated on the number keys 17 Symbol Use this to select and enter a symbol from a list of available symbols 18 Backspace Deletes the character to the left of the cursor 19 En...

Page 16: ...of the batteries match the positive and negative marks inside the battery compartment 23 Attach the battery compartment cover by inserting the three hooks at the bottom into the slots on the machine then pushing down firmly until it snaps into place Power Supply Make sure that the power is turned off when replacing batteries 1 Always replace all six batteries at the same time using brand new ones ...

Page 17: ...is designed exclusively for your P touch Failure to observe this may result in an accident or damage Brother shall not assume any responsibility for any accident or damage resulting from not using the specified AC adapter Do not connect the AC adapter to a non standard electrical outlet Failure to observe this may result in an accident or damage Brother shall not assume any responsibility for any ...

Page 18: ...rough the tape guide referring to the illustration After making sure that the power is off lift open the tape compartment cover If there is already a tape cassette in the machine remove it by pulling it straight up Inserting a Tape Cassette If the new tape cassette has a cardboard stopper be sure to remove the stopper before inserting the cassette If the ink ribbon is loose use your finger to wind...

Page 19: ...pe and ink ribbon after inserting the tape cassette by holding down the Shift key and pressing the Preview key Do not pull the label coming out of the tape exit slot Doing so will cause the ink ribbon to be discharged with the tape Store tape cassettes in a cool dark location away from direct sunlight and high temperature high humidity or dusty locations Use the tape cassette as quickly as possibl...

Page 20: ...el using the or key The screen contrast changes each time you press the or key allowing you to set the most suitable contrast Press the OK or Enter key Feeding Tape Be sure to feed tape to remove any slack in the tape and ink ribbon after inserting the tape cassette Do not pull the label coming out of the tape exit slot Doing so will cause the ink ribbon to be discharged with the tape Do not block...

Page 21: ...çais Hrvatski Italiano Magyar Nederlands Norsk Polski Português Română Slovenski Slovenský Suomi Svenska or Türkçe Press the OK or Enter key Unit Press the Setup key to display the Setup menu select Unit using the or key and then press the OK or Enter key Select a unit for dimensions shown on the LCD display by using the or key Either mm or inch can be selected Press the OK or Enter key Setting La...

Page 22: ...e of text move the cursor to the character to the right of the position where you want to start inserting text and then enter the additional text The new text is inserted to the left of the cursor Inserting a Tab To insert a tab space between the existing line of text move the cursor where you wish to add a tab and press the Setup key to open the Setup menu select Tab by using or keys and then pre...

Page 23: ...ting all text at once Use the Clear key to delete all text at once Press the Clear key The Clear options are displayed Using the or key select Text Only to delete all text while retaining the current format settings or select Text Format to delete all text and format settings Press the OK or Enter key All text is deleted All format settings are also deleted if Text Format was selected If you hold ...

Page 24: ...inted on the selected key s upper right corner Entering Symbols Using the Symbol Function Press the Symbol key A list of symbol categories and symbols in that category is displayed Select a symbol category Punctuation Business Mathematics etc using the or key or by pressing the Symbol key repeatedly and then select a symbol using the or key Press the OK or Enter key The selected symbol is inserted...

Page 25: ...hematics Brackets Arrows Unit International Number Pictograph Electrical Audio_Visual Signs Communication Vehicle Sports Nature Others The use of the CE mark is strictly governed by one or more European Council directives Ensure that any labels you produce which use this mark conform with the relevant directives ...

Page 26: ...it by using the or key Press the OK or Enter key The selected accented character is inserted into the line of text zAccented Character Listz Entering Accented Characters 1 Caps mode can be used with the Accent function 2 3 The order of accented characters displayed will differ depending on the selected LCD language 4 Press the Escape key to return to the previous step Refer to the Accented Charact...

Page 27: ...ge the character attribute by using the or key Next press the Text key while holding down Shift key to display the attributes on the screen indicates that you are now applying the attribute for that specific line only Setting Character Attributes 1 2 3 New settings are NOT applied if you do not press the OK or Enter key Press the Escape key to return to the previous step Press the Space key to set...

Page 28: ...etting Optionsz Attribute Value Result Font HEL Helsinki BRU Brussels FLO Florida CAL Calgary Size Auto When Auto is selected the text is automatically adjusted to print in the largest size available for each tape width 42pt 36pt 24pt 18pt 12pt 9pt 6pt ...

Page 29: ...ABEL Setting Character Attributes Width x2 x1 x2 3 x1 2 Style Normal BLD Bold OUT Outline SHD Shadow SLD Solid ITL Italic I BLD Italic Bold I OUT Italic Outline I SHD Italic Shadow I SLD Italic Solid VRT Vertical Attribute Value Result ...

Page 30: ... required to fit the text into the selected label length the total text size will be modified after reducing the text width to x1 2 setting Press the Setup key to display the Setup menu Select Auto Fit Style using the or key and then press the OK or Enter key The Auto Fit Style screen is displayed Select the style using the or key Press the OK or Enter key to apply the setting Line Off UND Underli...

Page 31: ...the or key Press the OK or Enter key to apply the settings zFramesz Setting Label Attributes 1 When setting the tab length hold down the or key to change the value faster When setting the label length refer to Adjusting the Label Length on page 47 2 New settings are NOT applied if you do not press the OK or Enter key 3 Press the Escape key to return to the previous step Press the Space key to set ...

Page 32: ...The length of the label can be set within the range 30mm 300mm When Auto is selected the length of the label is automatically adjusted based on the amount of text entered Tab Length The length of the tab can be set within the range 0mm 100mm The default setting is 50mm Attribute Value Result ...

Page 33: ...mplate using the or key Press the OK or Enter key The Style screen is displayed Select an attribute using the or key and then set a value for that attribute using the or key Press the OK or Enter key The Bar Code Setup screen is displayed Select an attribute using the or key and then set a value for that attribute using the or key Press the OK or Enter key The template text entry screen is display...

Page 34: ... Refer to the Templates table for a list of available templates To print multiple copies sequentially numbered copies or a mirror image of the label with the print menu displayed hold down the Shift key and press the Print key to display the Print Options menu If the width of the current tape cassette does not match the set width for the selected layout an error message is displayed when youtry to...

Page 35: ...8 mm x 76 mm Equipment Label 18 mm x 58 mm Faceplate VRT 12 mm x 70 mm Cable Wrap 18 mm x 39 mm Address Label 18 mm x 70 mm Name Badge 1 18 mm x 72 mm Name Badge 2 12 mm x 72 mm CD Case Spine 1 6 mm x 113 mm CD Case Spine 2 3 5 mm x 113 mm VHS Spine 18 mm x 140 mm MiniDV Spine 9 mm x 42 mm Attribute Value Details ...

Page 36: ...an attribute using the or key and then set a value for that attribute using the or key Press the OK or Enter key The block layout text entry screen is displayed Enter text and then press the OK or Enter key Repeat for each text field After all text fields are completed press the OK or Enter key to display the print menu Select Print using the or key and then press the OK or Enter to print the labe...

Page 37: ...u If the width of the current tape cassette does not match the set width for the selected layout an error message is displayed when you try toprint the label Press theEscape key or anyother key to clear the error message and insert a tape cassette of the correct width If the number of characters entered exceeds the limit Text Too Long is displayed when the OK or Enter key is pressed Press the Esca...

Page 38: ...EDITING A LABEL 36 Using Auto Format Layouts Block layout 12 mm tape 2LineA 2LineB 3Line 1 2Line Block layout 9 mm tape 2LineA 2LineB 1 2Line Block layout 6 mm tape 1 2Line Attribute Value Details ...

Page 39: ... For best results print bar code labels in black ink on white tape Some bar code readers may not be able to read bar code labels created using coloured tape or ink Use the Large setting for Width whenever possible Some bar code readers may not be able to read bar code labels created using the Small setting Continuously printing a large number of labels with bar codes can overheat the print head wh...

Page 40: ...rs available for the current protocol is displayed Select a character using the or key then press the OK or Enter key to insert the character in the bar code data Press the OK or Enter key to insert the bar code in the label The bar code is displayed on the text entry screen Attribute Value Protocol CODE39 CODE128 EAN 8 EAN 13 GS1 128 UCC EAN 128 UPC A UPC E I 2 5 ITF CODABAR Width Small Large Und...

Page 41: ...de Label zSpecial Character Listz CODE39 CODABAR Press the Escape key to return to the previous step Refer to the Special Characters List table for a list of all available settings Code Special Character Code Special Character 0 0 1 1 2 SPACE 2 3 3 4 4 5 5 6 ...

Page 42: ...d then open the Bar Code Setup screen Refer to Setting Bar Code Parameters on page 37 To delete a bar code from a label position the cursor to the right of the bar code mark on the data entry screen and press the Backspace key Code Special Character Code Special Character Code Special Character 0 SPACE 24 48 DC3 1 25 49 DC4 2 26 50 NAK 3 27 51 SYN 4 28 NUL 52 ETB 5 29 53 CAN 6 30 SOH 54 EM 7 31 ST...

Page 43: ...d press the or key To print the label directly from the preview screen press the Print key or open the print options screen and select a print option Refer to Printing a Label below for details The print preview is a generated image of the label and may differ from the actual label when printed Printing a Label Do not pull the label coming out of the tape exit slot Doing so will cause the ink ribb...

Page 44: ...o display the Copies screen and then select the number of copies to be printed using the or key or type the number using the number keys Press the OK or Enter key Printing Copies is displayed while the labels are being printed 1 2 To stop printing press the Power key to turn off the P touch There are several other messages that may appear when you press the Print key Refer to Error Messages on pag...

Page 45: ...r using the number key Press the OK or Enter key The labels are printed As each label is printed the number of copies printed is shown 1 2 Toapplyauto numberingtoabarcode selectthebarcode here After selecting the bar code you will be promptedto enter the number of labels to be printed step 6 3 4 5 Hold down the or key to change the number of labels faster 6 7 Press the Escape key to return to the ...

Page 46: ...e message Mirror Print is displayed Press the OK or Enter key Printing Copies is displayed while the labels are being printed Letters and numbers increase as shown below 0 Î 1 9 Î 0 Î A Î B Z Î A Î a Î b z Î a Î A0 Î A1 A9 Î B0 Î Spaces shown as underscores _ in the example below can be used to adjust the spacing between characters or to control the number of digits that are printed _9 Î 10 99 Î 0...

Page 47: ...OT applied if you do not press the OK or Enter key Press the Escape key to return to the previous step Refer to the Tape Cutting table for a list of all available settings Setting Description Example Full Each label is printed leaving a margin of 25 mm on each end Half A margin of 25 mm is printed first and then each label is printed leaving a margin of 12 mm before and after the text Dots are pri...

Page 48: ... pull the tape since this may damage the tape cassette After pressing Print OK to Feed appears Press the Escape key to enter more texts or press the OK or Enter key to feed The final label is printed with an 9 4 mm margin to the right of the characters Use scissors to cut off any part of this margin that is not required Setting Description Example ABC ABC Feed the tape before using the cutter 9 4 ...

Page 49: ...el Adjusting the Label Length 1 2 3 Press the Escape key to return to the previous step Press the Space key to set the value to default setting Approximately 1 of the total label length will be adjusted by 1 level Attaching Labels 1 2 3 The backing of some types of tapes may be pre cut to make it easier to peel the backing To remove the backing simply fold the label lengthwise with the text facing...

Page 50: ...int using the or key and then press the OK or Enter key Printing from the Label Collection 1 2 3 Refer to the Label Collection List to view all of the available labels 4 To add the label to your Favorites select Add to Favorites using the or key and then press the OK or Enter key to register the selected label image in the Favorites category Registering your most frequently used label images allow...

Page 51: ...2 3 4 5 6 7 8 9 49 z LABEL PRINTING Printing from the Label Collection zLabel Collection Listz Category Label Files 12 mm tape only Office Signage 18 mm tape only Labels are for illustrative purposes only ...

Page 52: ...LABEL PRINTING 50 Printing from the Label Collection Caution 18 mm tape only Shipping 18 mm tape only ECO 18 mm tape only Category Label Labels are for illustrative purposes only ...

Page 53: ...1 2 3 4 5 6 7 8 9 51 z LABEL PRINTING Printing from the Label Collection Retail 18 mm tape only Personal 12 mm tape only Category Label Labels are for illustrative purposes only ...

Page 54: ...ress the OK or Enter key The file number of a stored label is displayed The label text is also displayed to identify the label Select a file number using the or key and then press the OK or Enter key to open the selected file The file is opened and displayed on the text entry screen When the file memory is full each time you save a file you will need to overwrite one of your stored files Storing a...

Page 55: ...een Select Delete using the or key Press the OK or Enter key The file number of a stored label is displayed The label text is also displayed to identify the label Select a file number using the or key and then press the OK or Enter key The message Delete is displayed Press the OK or Enter key to delete the file The file is deleted and the screen returns to the text entry screen Printing a Stored L...

Page 56: ...lt to remove marks Cleaning the Print Head Streaks or poor quality characters on printed labels generally indicates that the print head is dirty Clean the print head using a cotton swab or the optional print head cleaning cassette TZ CL4 Resetting the P touch Release the Power key before releasing the other key All text format settings option settings and stored label files are cleared when you re...

Page 57: ...n build up on the cutter blade after repeated use taking the edge off the blade which may result in the tape jamming in the cutter About once every year wipe the cutter blade using a cotton swab moistened with Isopropyl alcohol rubbing alcohol Do not touch the cutter blade directly with your bare hands ...

Page 58: ...ction and thread the tape through the tape exit slot If the tape is jammed remove the tape cassette and then pull out the jammed tape and cut it Check that the end of the tape passes through the tape guide before reinstalling the tape cassette The label is not printed correctly Remove the tape cassette and reinstall it pressing it firmly until it clicks into place If the print head is dirty clean ...

Page 59: ...led when you try to print or preview a label or feed tape Install a tape cassette before continuing Line Limit Max 5 Lines There are already five lines of text when you press the Enter key Limit the number of lines to five Tape Width Limit Max 3 Lines There are more than three lines of text when you press the Print or Preview key while using 12 mm tape Limit the number of lines to three or replace...

Page 60: ...ected Install an 3 5 mm tape cassette Too Much Text For This Layout The maximum number of characters for the selected layout have already been entered Edit the text to use fewer characters or use a different layout Incorrect Value The value entered for setting the tape length tab length multiple copies or numbering function is invalid Enter a valid value for the setting Select Other Margin The tap...

Page 61: ... you try to enter a new bar code You can only use up to five bar codes in each label Category Full The memory available for categories is full To make more memory available delete any unnecessary registered label files by highlighting the label file and pressing the OK key Installed tape is not compatible with this machine Tape that is incompatible with the machine has been installed Use compatibl...

Page 62: ...mm tape 1 3 lines 9 mm tape 1 2 lines 6 mm tape 1 2 lines 3 5 mm tape 1 line Margin Full Half Narrow Chain Memory Memory buffer size Maximum 1800 characters File storage Maximum 9 files Other Features Templates Label Collections Auto Format Block Layouts Power Supply Power supply AC adapter AD 24ES AD 5000ES For Australia New Zealand Only Six AA size alkaline batteries LR6 Auto Power off Battery 5...

Page 63: ...21 text only 21 E entering text 20 F formatting character attributes 25 label attributes 29 Frames 29 K Keyboard 12 L Label Collection 48 length 29 line 25 Line number 11 N new line 20 P Power Supply 14 R Return mark 11 S size 25 Special Character List 39 Specifications 60 style 25 Symbol List 23 symbols 22 T tape cassettes 16 tape length 11 Templates 32 text entering and editing 20 lines 20 W wid...

Page 64: ...Printed in China LW6163001A ...

Reviews: