-47-
*
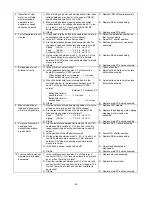
You must turn off the power and remove connectors from printed circuit boards before measuring resistance.
PROBLEM
CHECK
REMEDY
1. When power is turned
on, buzzer does not
sound and nothing
appears on display.
1) Has the display contrast been adjusted?
2) If the voltage between both inlet terminals is
measured when the power cord is plugged in, is the
standard voltage (120 VAC, 220V, 230V, 240V)
displayed?
3) When power switch is set to on, is resistance between
both ends less than 1
W
?
4) Remove connector CN13 from the power supply
board, and check following voltages using a tester:
Voltage between pins 4 and 5 should be 8 to 12 VDC.
Voltage between pins 6 and 7 should be 22 to 26 VDC.
5) Is fuse blown?
6) Others
1) Adjust the contrast.
2) Replace the power cord.
3) Replace power supply unit
assembly.
4) Replace power supply unit
assembly.
5) Replace fuse after correcting defect
that caused fuse to blow.
6) Replace SS PC board assembly.
2. After the power is
turned on, pulse motors
do not return to their
home positions with
respect to the needle
position. (Zigzag pulse
motor when needle bar
is raised and feed and
horizontal feed pulse
motors when needle
bar is lowered.)
1) Are the resistances between the connector pins given
below normal for the pulse motors which do not return
to the home position?
Zigzag
(CN13)...... 1-3, 2-3, 4-5, 4-6
®
8-10
W
Feed
(CN16)...... 1-3, 2-3, 4-5, 4-6
®
8-10
W
Horizontal (CN17)...... 1-6, 2-5, 3-6, 4-5
®
8-10
W
2) Set the home position for the same pulse motors
irrespective of needle position.
3) Is a fuse blown?
4) Is the voltage between pins 4-5 normal when the
output connector (CN7) is disconnected from the main
power board ?
Between 4-5
22-26 VDC
5) Others
1) Replace the pulse motor which
shows an abnormality.
2) Replace NP board assembly.
3) Replace fuse after correcting defect
that caused fuse to blow.
4) Replace power supply unit
assembly.
5) Replace main PC board assembly.
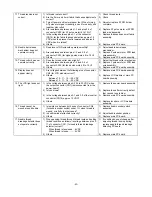
3. Pattern cannot be
selected.
1) Does switch on SS (VR) PC board remain pressed?
2) When the foot controller is connected, does it remain
depressed?
3) Others
1) Adjust or exchange SS (VR) PC
board assembly.
2) Check foot control unit operation.
3) Replace LCD module.
4. Main motor does not
run.
1) Does balance wheel rotate easily?
2) Is main motor connector (CN2 on power supply unit)
attached properly?
3) Is resistance of both ends on main motor connector
(CN2 on power supply unit) 24 to 34
W
?
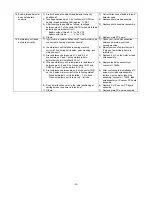
4) Do start/stop switch, needle position switch, and
thread cutter switch operate correctly?
Voltage between ends of each switch should be;
under 1
W
when switch is pressed.
infinite when switch is released.
5) Is presser foot lifter lowered? Does presser foot switch
operate correctly?
When presser foot lifter is raised, voltage between
pins 2-1 of fabric thickness detector (CN14) is
approx. 1.5 VDC.
When presser foot lifter is lowered, it is approx. 4
VDC.
6) Others
1) Adjust balance wheel position.
2) Check connector connection.
3) Replace main motor.
4) Replace SS PC board assembly.
5) Check fabric thickness detection or
replace fabric thickness sensor
assembly.
6) Replace main PC board or power
supply unit assembly.
Summary of Contents for PC8200 SUPER GALAXIE 2000
Page 1: ...SERVICE MANUAL FOR COMPUTERIZED SEWING MACHINE PC8200 SUPER GALAXIE 2000 9 1997 ...
Page 4: ... 2 1 MECHANICAL CHART EMBROIDERY UNIT MECHANISM ...
Page 6: ... 4 3 ELECTRONIC PARTS ARRANGEMENT CHART PC 8200 Model 985 4 CONTROL SYSTEM BLOCK DIAGRAM ...
Page 16: ... 14 ...
Page 18: ... 16 ...
Page 20: ... 18 ...
Page 23: ... 21 2 LEAD WIRE ARRANGEMENT PC 8200 Model 985 ...
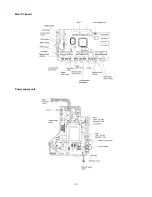
Page 53: ... 51 Main PC board Power supply unit ...
Page 54: ... 52 LCD unit Other PC boards 985 ...
Page 55: ... 53 PC8200 SG2000 H7070093 ...


