background image

CHAPTER 3  PROGRAMMING WITH ICONS 

58 PD-3000 

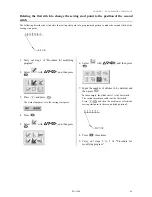
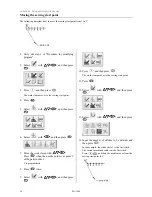
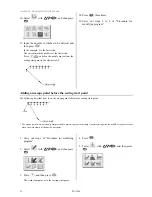
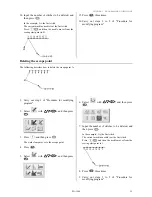
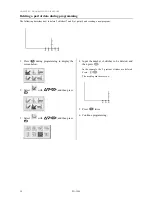
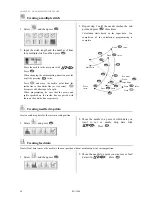
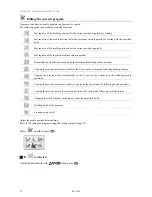
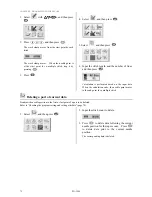
Deleting a part of data during programming 

The following describes how to delete 2 stitches (7 and 8) at point 8 and creating a new program. 


1. Press 

 during programming to display the 

screen below. 


2. Select 

 with 

, and then press 


3. Select 

 with 

, and then press 


4.  Input the number of stitches to be deleted, and 

then press 

In the example, the 2 previous stitches are deleted.  
Press 

The needle point moves to 6. 


5. Press 

 twice. 

6. Continue programming. 

Summary of Contents for PD-3000

Page 1: ...PD 3000 Please read this manual before using the machine Please keep this manual within easy reach for quick reference PROGRAMMER INSTRUCTION MANUAL ...

Page 2: ...lf are provided in order to ensure safe operation of this machine and to prevent accidents and injury to yourself or other people Indications WARNING The instructions which follow this term indicate situations where failure to follow the instructions can result in severe injury or death CAUTION The instructions which follow this term indicate situations where failure to follow the instructions cou...

Page 3: ...ration Installation Do not use any AC adapter other than the one from Brother otherwise it may cause fire or electric shocks or problems with correct operation When using the AC adapter do not use any voltage other than the specified voltage otherwise it may cause fire or electric shocks or problems with correct operation Do not damage or process the connection cable for the sewing machine or the ...

Page 4: ...n off the power and disconnect the power cord from the wall outlet Lightning may cause problems with correct operation of the programmer and the sewing machine Installation Do not place the programmer on unstable surfaces such as unsteady tables or high shelves otherwise it may tip over or fall down and cause injury Do not place heavy objects on top of the programmer otherwise it may become unbala...

Page 5: ...ogramming tracing according to a pattern 43 Procedure for modifying program 44 Example of modified program 46 Resizing a pattern 46 Modifying a part of pattern 47 Deleting the first stitch to change the sewing start point to the position of the second stitch 49 Moving the sewing start point 50 Adding a new sewing start point before the first stitch 51 Adding an escape point before the sewing start...

Page 6: ...9 Programming 120 Creating a line 120 Creating a curve 121 Creating a circle 121 Creating an arc 123 Creating a semicircle 124 Creating a zigzag stitch 125 Creating a multiple stitch 126 Creating double stitch 128 Creating a parallel stitch 129 Creating an offset 130 Creating feed data 130 Creating split data 131 Creating magnified data 131 Low speed sewing 132 Setting the option output 132 Settin...

Page 7: ...Moving Changing Program 183 Checking program 184 Displaying program information 184 Selecting a program display method 184 Displaying detailed information of a file 187 Copying moving deleting program renaming a file 188 Chapter 8 Displaying Sewing Machine Program 191 Displaying sewing machine program 192 Displaying sewing machine program 192 Chapter 9 Displaying a Clock 193 Displaying a clock 194...

Page 8: ...PD 3000 ...

Page 9: ...PD 3000 Chapter 1 Read Me ...

Page 10: ...C Co on nf fi ir rm mi in ng g t th he e c co on nt te en nt ts s o of f t th he e b bo ox x Open the box and make sure all the following items are in it 1 Programmer main unit 2 Basic operation manual 3 Document CD Manual CD ROM ...

Page 11: ...s how to create programs with commands consisting of numerics and characters It is recommended for persons who is specially responsible for program creation and who have created programs for BAS 300 series Chapter 5 Extended Option Output PROGRAM Describes how to set the extended option output Chapter 6 Reading Saving Deleting Program and Formatting Media PROGRAM Describes how to read save and del...

Page 12: ...CHAPTER 1 READ ME 4 PD 3000 ...

Page 13: ...PD 3000 Chapter 2 Setting Up Your Programmer ...

Page 14: ...strap is not provided as a standard accessory After use Wind the cable as shown in the figure After using the programmer keep it in a safe place Display panel Displays a program image and messages being programmed AC adapter jack Operation panel Press these keys for operation CF card slot Connector Hole for a strap HOME key BACK key DISP key ENTER key JOG key P key ...

Page 15: ...ect operation Do not damage or process the connection cable for the sewing machine or the AC adapter cable or place heavy objects such as furniture on top of them or bend or pull them with excessive force otherwise it may cause fire or electric shocks or problems with correct operation Do not use the programmer if a problem is noticed such as smoke or a bad odor coming from the programmer otherwis...

Page 16: ...wing machine Check that the sewing machine is off before connecting the cable 1 Connect the cable to the connector on the left side of the operation panel Fasten the screws securely Turning the power on 1 Switch on the sewing machine 2 Set a pattern sheet For preventing the pattern sheet from moving secure it by using adhesive tape 3 Press of the programmer ...

Page 17: ...e Saving program page 178 If there is no need to save the program delete it See Deleting program saved on a medium page 179 2 Press of the programmer The panel is turned off 3 Press the foot switch pedal to raise the work clamp 4 Remove the pattern sheet 5 Switch off the sewing machine Foot switch pedal Foot switch pedal ...

Page 18: ...hnician to carry out any internal inspections adjustments or repairs that may be required Any problems with correct operation that occur as a result of the customer attempting to disassemble or modify the programmer will not be covered by the warranty For preventing the internal wiring from being damaged considerable care must be taken when assembling and disassembling the case For preventing the ...

Page 19: ...gs s If the following menu is displayed at power up make an entry at every item by using and the numeric keys When the setting has been completed press Adjusts the contrast of the screen Selects a language Selects a date format Inputs the year Inputs the month Inputs the date Inputs the hour Inputs the minute ...

Page 20: ...g process 1 Select on the launcher screen Press 2 Select by using Press Adjusts the contrast of the screen Selects a language Selects a date format Inputs the year Inputs the month Inputs the date Inputs the hour Inputs the minute Switches between ON and OFF of the buzzer sound Switches between ON and OFF of the key click sound Switches between ON and OFF of the warning display ...

Page 21: ...heet Write a pattern on thin plotting paper or use copies of pattern sheet Design pattern sheet in full scale Adjust the size to magnification 2 5 or 10 when using the magnified input Creates and edits program Displays the date and time Displays the data list and detailed data in each medium Makes settings of the programmer such as a display language and clock Displays the data image of the sewing...

Page 22: ...ant data Be sure to turn off the sewing machine before loading and ejecting a CF card Commercially available CF cards are preformatted Do not format them again Recommended CF cards are commercially available ones from SanDisk and Hagiwawa Sys Com Though products from other manufacturers are also available in some cases you cannot read and write data on them due to the difference in their formats A...

Page 23: ...e back side of the programmer Do not store floppy disks in a place subject to high or low ambient temperature Do not use floppy disks under high humidity Do not use or store floppy disks in a dusty place Do not store floppy disks subject to direct sunlight Do not bend floppy disks Do not put things on them Do not subject floppy disks to solvent or drink Do not eject a floppy disk from the slot dur...

Page 24: ...rns Up to 20 000 stitches in total 0 2 mm pulse 2DD floppy disk 3 Formatted automatically Not available 1 Five types of data above can be read Data written on 2HD and 2DD disks are automatically converted to BAS 300E and former BAS 300A data respectively 2 TFD embroidery data is converted to BAS 300G data by the programmer and becomes available for sewing 3 Restrictions when using a 2DD To keep co...

Page 25: ...o the programmer 1 Turn off the programmer 2 Load a CF card into the CF slot in correct orientation When ejecting the CF card from the programmer 1 Raise the eject lever 2 Press the eject lever to eject the CF card Caution z Do not eject the CF card during writing or reading program This may lead to program corruption ...

Page 26: ...ard Dust intrusion may cause malfunctions z When no enabled data is found the CF lamp does not light When ejecting the CF card from the sewing machine 1 Press the eject lever to eject the CF card Caution z Do not eject the CF card during writing or reading data This may lead to data corruption Floppy disk FD When setting a floppy disk insert it straight into the slot with the label side upward Whe...

Page 27: ...eleting accidentally Write protected disks are for read only You are recommended to write protect floppy disks holding important data To enable the write protect slide the write protect notch to the side where a square hole shows up Slide the notch in this direction to prevent data loss or overwriting Slide the notch in this direction to write data ...

Page 28: ...CHAPTER 2 SETTING UP YOUR PROGRAMMER 20 PD 3000 ...

Page 29: ...PD 3000 Chapter 3 Programming with Icons ...

Page 30: ... mode for programming with icons and the mode for programming with commands Refer to Chapter 4 Programming with Commands page 88 Keys to be used This section describes keys to be used for programming with icons Switches the display size of an image Hold this key down to switch to the command mode Turns on off the programmer See Turning power OFF page 8 Use these keys to input numerical values Use ...

Page 31: ...ng equal pitch Creates data so that the pitch becomes equal within the specified pitch range when the smoothing function is used Area check Does not create data outside the sewing area when program is being created or edited Marker display Displays a marker on the screen JOG acceleration pattern Changes the moving speed of a feed Select Press Selecting the smoothing equal pitch and area check func...

Page 32: ...g the sewing machine Displays a program number No number is displayed when creating a new program Displays a distance from the previous needle position Displays an end code if it is set Displays the icon type of the function Displays the current needle position number Displays a comment Nothing is displayed when creating a new program or there is no comment Displays a program image Displays a dist...

Page 33: ...iameter clockwise or counterclockwise Creating a zigzag stitch Creating a zigzag circle by specifying 3 points on the circumference Creating a zigzag circle of the specified diameter clockwise or counterclockwise Creating a zigzag circle of the specified radius clockwise or counterclockwise Creating double stitch data in the reverse direction of the sewing path Creating double stitch data in the s...

Page 34: ...king the program setting and setting attribute Editing the current program Moving a pattern in parallel by feeding Moving a pattern in parallel by sewing with the specified pitch Moving in parallel Moving a part of the pattern in parallel Repeated copying a pattern Copying a pattern symmetrically to the Y axis Copying a pattern symmetrically to the X axis Copying a pattern symmetrically to a point...

Page 35: ...ly to a point Resizing a pattern Copying a resized pattern Resizing a pattern to the center point of data Copying a resized pattern to the center point of data Rotating a pattern clockwise or counterclockwise Copying a rotated pattern clockwise or counterclockwise Rotating a pattern to the center point of data clockwise or counterclockwise Copying a rotated pattern to the center point of data cloc...

Page 36: ... the programming screen the following five kinds of icons of media are displayed Flash memory of the programmer CF card of the programmer Flash memory of the sewing machine CF card of the sewing machine Floppy disk of the sewing machine option Preference Carries out the preference setting of the programmer Smoothing equal pitch Area check Displaying marker Jogging movement acceleration pattern ...

Page 37: ...gramming screen is displayed 2 Starting program creation Select with and press 3 Positioning the machine needle point at the first stitch of pattern sheet Move the work clamp with Press when the needle point is at the first stitch of the pattern sheet The first stitch is programmed and the following screen appears 4 Creating program Select an icon depending on your goal on the screen displayed in ...

Page 38: ... any end code 111 Normal end 112 Fixing the sewing speed at 1200 rpm or lower 113 Carrying out no thread wiping 114 Setting the sewing speed at 1200 rpm or lower without thread wiping 115 Carrying out no thread trimming 116 Fixing the sewing speed at 1500 rpm or lower 117 to 119 are not available 1 Select with and then press 2 Select an end code type with and then press 111 is selected in this exa...

Page 39: ...00 31 3 Input the program number and then press 4 Select characters with and then press to input comments 5 Select OK with and then press Note To confirm the contents of the save destination select and then press 7 Ending programming Press ...

Page 40: ...Page 39 Zigzag stitch Page 40 Multiple stitch Page 41 Programming tracing according to a pattern Page 43 For function and operating information about each icon refer to Programming page 62 In the programming example point A in the illustration is the first stitch Programming for each stitch The following describes how to perform programming for each stitch according to the pattern sheet 1 Carry ou...

Page 41: ...et 6 Create the program up to points C and D as in step 5 7 When point D is programmed press three times 8 Carry out steps 5 to 7 of Procedure for programming with icons Pattern with lines The following describes how to program a pattern with lines 1 Carry out steps 1 to 3 of Procedure for programming with icons 2 Select with and then press 3 Select with and then press 4 Input the stitch length an...

Page 42: ... Procedure for programming with icons 2 Select with and then press 3 Select with and then press 4 Input the stitch length and then press Input 030 to make the stitch length 3 0 mm 5 Move the work clamp with Press when the needle point is at point B 6 Program point C as in step 5 7 When point C is programmed press again for a split To change the stitch length press to reset 8 Create the program to ...

Page 43: ...es refer to Creating double stitch page 67 4 Select where a double stitch is created on the right or left of the sewing direction with and then press When creating it on the left side select 5 Input the stitch length and width and then press Input 030 to make the stitch length 3 0 mm To switch input between the stitch length and the width use 6 Move the work clamp with Press twice for a split when...

Page 44: ...utting point B The number of times should be pressed depends on the programming method for pattern 1 When a linear line is programmed press three time When each stitch is programmed press it twice 3 Select with and then press 4 Select with and then press 5 Move the work clamp with Press when the needle point is at point C of the pattern sheet 6 Press twice 7 Program pattern 2 Refer to Pattern with...

Page 45: ...ress 4 Move the work clamp with Press when the needle point is at point B 5 Program point C as in step 4 6 When point C is programmed press 7 Select with and then press 8 Move the work clamp with Press when the needle point is at D 9 Program points E and F as in steps 8 10 Press 11 Select with and then press 12 Program points G and H 13 When point H is programmed press twice 14 Carry out steps 5 t...

Page 46: ...Programming for each stitch page 32 or Pattern with curves page 34 2 When point B is programmed press three time The number of times should be pressed depends on the programming method 3 Select with and then press 4 Select a symmetrical pattern type and then press 5 Input the number of feed boundaries to be ignored and then press Refer to Editing the current program page 70 6 The needle point move...

Page 47: ...ogramming method for pattern 1 3 Select with and then press 4 Select with and then press 5 Move the work clamp with Press when the needle point is at point C of the pattern sheet 6 Press twice 7 Select with and then press 8 Select with and then press 9 Select ON OFF of needle stopping at the bottom with and then press 10 Press 11 Program pattern 2 Refer to Pattern with lines page 33 12 Program pat...

Page 48: ...d then press 3 Select with and then press 4 Select with and then press 5 Input the zigzag width and the stitch length and then press Input 030 to make the stitch length 3 0 mm To switch input between the stitch length and the width use 6 Move the work clamp with Press when the needle point is at point B of the pattern sheet To program curving zigzag repeat this step 7 Press again 8 Press three tim...

Page 49: ...ious point In that case start inputting the points of another side outside or inside line or change the point input position or pattern Creating a stitch pattern 1 Create a pattern of the inner and outer lines for a multiple stitch The two lines should be spaced uniformly 2 Connect each direction change point on the inside line with the matched direction change point on the outside line using a li...

Page 50: ...he line end point and press twice In the example a linear line is programmed between points 7 and 9 Be sure to program a linear line also for the matched section between points 24 and 26 To return the needle point follow the steps below Returning to the previous point Press The needle cannot be returned beyond the previous split Returning the previous split Press When the needle position is at a s...

Page 51: ...sing Press 3 Select by using Press 4 Input a stitch length Press To set the stitch length 3 0 mm input 030 5 Operate the needle from the sewing start point A by using the so that its point accurately moves according to the pattern 6 Press when the needle point is at point B 7 Press three times 8 Carry out steps 5 and 6 of Procedure for programming with icons Note At positions you want to sew with ...

Page 52: ...played 2 Select with and then press 3 Confirm that is selected Press 4 Input a program number to select by using the numeric keys Press 5 Select Press To display the program list select Refer to Switching between media page 186 2 Starting program modification Input an icon with depending on your reason for modifying the program For details about program modification refer to Example of modified pr...

Page 53: ...CHAPTER 3 PROGRAMMING WITH ICONS PD 3000 45 4 Select characters with and then press to input comments 5 Select OK with and then press 5 Ending programming Press ...

Page 54: ...g start point Page 56 Moving the pattern in parallel when the first stitch is the escape point Page 56 Deleting a part of data during programming Page 58 Modifying a part of continuous program in parallel Page 59 Modifying a part of continuous program in parallel Page 60 Not breaking thread at the last stitch Page 61 Resizing a pattern The following describes how to resize a programmed pattern The...

Page 55: ... there is no need to move the needle 7 Press The pattern is resized 8 Press 9 Carry out steps 3 to 5 of Procedure for modifying program Modifying a part of pattern part of the programmed pattern is changed The following describes how to modify 5 6 and 7 to 5 6 and 7 1 Carry out step 1 of Procedure for modifying program 2 Select with and then press 3 Press and then press The work clamp moves from t...

Page 56: ...th and then press 12 Press and then press The needle point moves to 5 13 Press 14 Select with and then press 15 Select with and then press 16 Input the number of stitches to be deleted and then press In the example 3 stitches ahead are deleted Press The needle point moves to 6 7 and 8 Points 5 6 and 7 are deleted 17 Press three times 18 Carry out steps 3 to 5 of Procedure for modifying program ...

Page 57: ... modifying program 2 Select with and then press 3 Press and press The work clamp moves to the sewing start point 4 Press 5 Select with and then press 6 Select with and then press 7 Input the number of stitches to be deleted and then press In the example the white circle 1 is the first stitch The current machine needle is at the first stitch Press and then the needle moves from the sewing start poi...

Page 58: ...ect with and then press 7 Move the work clamp with Press when the needle point is at point 1 of the pattern sheet 1 is programmed 8 Press twice 9 Select with and then press 10 Press and then press The work clamp moves to the sewing start point 11 Press 12 Select with and then press 13 Select with and then press 14 Input the number of stitches to be deleted and then press In the example the white c...

Page 59: ...ss 3 Press and then press The work clamp moves to the sewing start point 4 Press 5 Select with and then press 6 Select with and then press 7 Move the work clamp with so that the needle point is at 1 of the pattern Record the coordinates values of X and Y 8 Press 1 is programmed 9 Move the work clamp with an equivalent of the coordinates value recorded in step 5 in the opposite direction so that th...

Page 60: ... to 5 of Procedure for modifying program Adding an escape point before the sewing start point The following describes how to set the escape point A before the sewing start point The escape point is a provisional point provided to preventing the work clamp from interfering with the needle or the presser foot when the work clamp is lifted at the start point 1 Carry out step 1 of Procedure for modify...

Page 61: ...at 1 of the pattern sheet 10 Press 1 is programmed again 11 Press twice 12 Select with and then press 13 Press and then press The work clamp moves to the sewing start point 14 Press 15 Select with and then press 16 Select with and then press 17 Input the number of stitches to be deleted and then press In the example 1 is the first stitch The current machine needle is at the first stitch Press and ...

Page 62: ...rt point 1 Carry out step 1 of Procedure for modifying program 2 Select with and then press 3 Press and then press The work clamp moves to the escape point 4 Press 5 Select with and then press 6 Select with and press 7 Move the work clamp with Press when the needle point is at point B of the pattern sheet B is programmed 8 Press twice 9 Select with and then press 10 Press and then press The work c...

Page 63: ...nt The following describes how to delete the escape point A 1 Carry out step 1 of Procedure for modifying program 2 Select with and then press 3 Press and then press The work clamp moves to the escape point 4 Press 5 Select with and then press 6 Select with and then press 7 Input the number of stitches to be deleted and then press In the example 1 is the first stitch The current machine needle is ...

Page 64: ...ith and then press 4 Move the work clamp with Press when the needle point is at point A of the pattern sheet 5 Press 6 Carry out steps 3 to 5 of Procedure for modifying program Moving the pattern in parallel when the first stitch is the escape point The following describes how to move the pattern in parallel when the first stitch is the escape point 1 Carry out step 1 of Procedure for modifying pr...

Page 65: ... 11 Press 12 Select with and then press 13 Select with and then press 14 Move the work clamp with an equivalent of the coordinate value recorded in step 6 15 Turn the pulley with a hand and put a marking with the needle to indicate the position of point D 16 Turn the pulley with a hand and move the needle to the top point 17 Press three times 18 Select with and then press 19 Select with and then p...

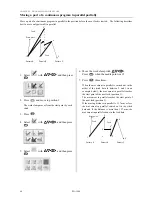
Page 66: ... and 8 at point 8 and creating a new program 1 Press during programming to display the screen below 2 Select with and then press 3 Select with and then press 4 Input the number of stitches to be deleted and then press In the example the 2 previous stitches are deleted Press The needle point moves to 6 5 Press twice 6 Continue programming ...

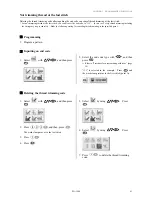
Page 67: ...press The work clamp moves from the start point by each stitch 3 When the needle point reaches 1 press The work clamp stops When returning the needle point input the number of stitches to be returned and press 4 Press 5 Select with and then press 6 Select with and then press 7 Move the work clamp with Press when the needle point is at 2 8 Move 3 to 4 as in steps 1 to 7 Feed Pattern A Pattern B Pat...

Page 68: ...mp with Press when the needle point is at 2 7 Press three times When the movement in parallel is carried out in the midst of the stitch data 6 between 2 and 3 in an example below the movement in parallel reaches the start point of the next feed position 3 The movement in parallel reaches the start point of the next feed position 3 If the moving distance in parallel is 12 7 mm or less the movement ...

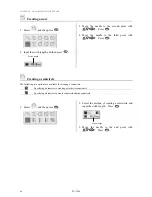
Page 69: ...setting for canceling thread trimming at the specified point Programming 1 Program a pattern Inputting an end code 1 Select with and then press 2 Select the end code type with and then press Refer to Procedure for programming with icons page 29 111 is selected in the example Press and the work clamp returns to the first stitch point A Deleting the thread trimming code 1 Select with and then press ...

Page 70: ...hen press 3 Input the stitch length and then press 4 Move the needle to the next point with Press Creating a curve Increase the number of plotting points to create a smoother curve One to 99 points are available for plotting 1 Select and then press 2 Select and then press 3 Input the stitch length and then press 4 Move the needle with Press 5 Repeat step 4 until a desired pattern is created When t...

Page 71: ...press 2 Input the stitch length and the overlap stitch count and then press Values of 0 to 9 are available for input 3 Move the needle to the second point with Press 4 Move the needle to the third point with Press If is selected 1 Select the sewing path of the needle and input the overlap stitch count then press Values of 0 to 9 are available for input 2 Move the needle to a point you want to set ...

Page 72: ...ird point with Press Creating a semicircle The following two options are available for creating a semicircle Specifying a diameter to creating a clockwise semicircle Specifying a diameter to create counterclockwise semicircle 1 Select and then press 2 Select the method of creating a semicircle and input the stitch length Press 3 Move the needle to the end point with Press Stitch length Stitch leng...

Page 73: ... the needle to the second stitch with Press 4 Repeat step 3 to a desired point When the needle point reaches the end point press twice Creating a zigzag circle The following three options are available for creating a zigzag circle Specifying 3 points on the circumference to create a zigzag circle Specifying a diameter to create a zigzag circle clockwise or counterclockwise Specifying a radius to c...

Page 74: ...le input a zigzag stitch width stitch length and the overlap stitch count and then press Values of 0 to 9 are available for input 2 Move the needle to a point you want to set as a diameter or radius with Press Zigzag width Stitch count for overlap sewing The sewing path of the needle Zigzag pitch ...

Page 75: ...d then press 2 Select the type of double stitch and then press 3 Select a position where a double stitch is created input the stitch length and the double stitch width and then press 4 Move the needle to the next point with Press Press twice to change the direction of sewing 5 Repeat step 4 until the needle reaches the end point and press three times Press twice Calculation starts After the calcul...

Page 76: ... those on the outside line respectively 3 Repeat step 3 until the needle reaches the end point and press three times Calculation starts based on the input data On completion of the calculation programming is complete Creating needle drop data Create needle drop data for the current needle position 1 Select and press 2 Move the needle to a point of which data you want to set as needle drop data wit...

Page 77: ...eys and so that the needle point accurately traces a pattern 1 Select and then press 2 Input the stitch length and then press 3 Start operating the needle at the sewing start point using the so that the needle point accurately traces the pattern 4 Press when the needle point reaches the sewing end point Checking the program setting and setting attributes Refer to Checking the program setting and s...

Page 78: ...on the current and following needle positions Copying the previous data symmetrically to the Y axis on the current and following needle positions Copying the previous data symmetrically to the X axis on the current and the following needle positions Copying the previous data symmetrically to a point on the current and the following needle positions Copying the previous data in the reverse directio...

Page 79: ...ndaries to be ignored is 1 Data unit B and C are copied If the number of feed boundaries to be ignored is 2 Data unit A B and C are copied 1 Input the number of feed boundaries to be neglected To ignore all feed input 99 2 Press Modifying the stitch length or the number or lines for a multiple stitch When modifying the stitch length or the number of lines for a multiple stitch the previously creat...

Page 80: ...s and then press Calculation is performed based on the input data When the calculation ends the needle point moves to the end point for a multiple stitch Deleting a part of current data Preadjust the needle position to the first or last point of a part to be deleted Refer to Checking the program setting and setting attribute page 78 1 Select and then press 2 Input the stitch count to delete 3 Pres...

Page 81: ...t a stop stitch count and stop stitch creation count Press For example input 3 for the stop stitch count and 2 for the stop stitch creation count Then data for 3 stitches backward from the current needle position and without a break data for 3 stitches forward are created With this two stop stitch creations are completed ...

Page 82: ...flop with and then press Low speed sewing By setting low speed sewing you can reduce sewing speed The following five low speed sewing settings are available 0 Low speed 0 Sewing speed is not reduced Used for canceling other options 1 Low speed 1 The maximum sewing speed is set at 1200 rpm or lower 2 Low speed 2 The maximum sewing speed is set at 800 rpm or lower 3 Low speed 3 The maximum sewing sp...

Page 83: ...step 2 and then press 9 Select Low speed 0 with 10 Press Creating split data Specify breakpoints for sewing a series of different patterns For details refer to Programming different patterns by splitting each in sequence page 39 1 Select and then press 2 Use to specify whether to stop the needle at the lower end or not and then press Basting Basting can be input 1 Select and then press 2 Use to se...

Page 84: ...ead tension level and then press Inputting the trigger Input the trigger for the extended option output Adjust the needle position before inputting the trigger and setting attribute Refer to Checking the program setting and setting attribute page 78 1 Select and then press 2 Input the number of option output For the number of option output refer to Extended option output page 74 3 Move the cursor ...

Page 85: ...x end codes are available 111 Normal end 112 Fixing the sewing speed at 1200 rpm or lower 113 Making no thread wiping 114 Setting the sewing speed at 1200 rpm or lower without thread wiping 115 Making no thread trimming 116 Fixing the sewing speed at 1500 rpm or lower 1 Select and then press 2 Select a code with and then press ...

Page 86: ...e es s It is possible to check the program setting and setting attributes The following items are displayed Regarding data type items marked with you can set their attributes Select or and press Data type Stitch Feed Thread trimming Basting Option output Low speed Splitting Height of presser foot Thread tension Trigger Inputs the stitch count to confirm Displays details of data ...

Page 87: ...nt to move 2 Press to move the needle forward and press to move it backward The needle moves according to the input count and the setting of the data is displayed Input 999 to check all stitches Skipping 1 Input the stitch count to the destination 2 Press and then press to move the needle forward and to move it backward The needle skips sewing according to the input stitch count Input 999 to skip ...

Page 88: ...ute 1 Move the needle to the position you want to apply the command at and then press The attribute setting screen appears 2 Set the attribute Example option output 3 Press after setting The screen returns to the confirmation screen Option output Use for selection ...

Page 89: ...ally to a point Resizing a pattern Copying a resized pattern Resizing a pattern to the center point of data Copying a resized pattern to the center point of data Rotating a pattern clockwise or counterclockwise Copying a rotated pattern clockwise or counterclockwise Moving a pattern to the center point of data clockwise or counterclockwise Copying a rotated pattern to the center point of data cloc...

Page 90: ...g start point If is selected 1 Input a resizing scale in the X and Y directions and stitch length Resizing scale between 0 and 400 are available If the stitch length is 0 0 the pattern is resized with the same number of stitches as the original data 2 Press 3 Move the needle point to the reference point of resizing with 4 Press ...

Page 91: ...re copied A B and C become split programs 1 Input a resizing scale in the X and Y directions stitch length and the number of feed boundaries to ignore Resizing scale between 0 and 400 are available If the stitch length is 0 0 the pattern is resized with the same number of stitches as the original data Inputting 99 as the number of feed boundaries to ignore ignores all boundaries 2 Press 3 Move the...

Page 92: ...e same number of stitches as the original data 2 Press If is selected 1 Input a resizing scale in the X and Y directions and stitch length Resizing scale between 0 and 400 are available If the stitch length is 0 0 the pattern is resized with the same number of stitches as the original data 2 Input the number of feed boundaries to be ignored and then press For the method to ignore all feed boundari...

Page 93: ...r of feed boundaries to ignore and then press For the method to ignore all feed boundaries refer to If is selected page 83 2 Move the needle point to the rotational reference point with Press If is selected 1 Input the rotation direction and the angle of rotation and then press If is selected 1 Input the rotation direction the angle of rotation and the number of feed boundaries to ignore and then ...

Page 94: ...p pr ro og gr ra am m b be ei in ng g c cr re ea at te ed d e ed di it te ed d Delete program being edited 1 Press or to display the programming screen 2 Select and then press The confirmation screen appears 3 Press to delete program and then press to cancel this command ...

Page 95: ...PD 3000 Chapter 4 Programming with Commands ...

Page 96: ...with icons and the mode for programming with commands Refer to Chapter 3 Programming with Icons page 22 Keys to be used Switches the display size of an image Hold this key down to switch to the command mode Deletes a part of the data Press this key to create a line or a circle Turns on off the programmer See Turning power OFF page 8 These values are available for input Cancels operation Inputs the...

Page 97: ...ewing machine Displays the program number Displays the distance from the previous needle position Displays the end code when it is set Displays a command type Displays the input value Displays the current needle position number Displays a comment maximum 64 one byte characters If it is not displayable scroll it Displays program image Displays program size Displays the count of created stitches Dis...

Page 98: ...e Input the overlap stitch counts in Specifying a diameter to create a counterclockwise circle Input the overlap stitch counts in Specifying a radius to create a clockwise circle Input the overlap stitch counts in Circle Specifying a radius to create a counterclockwise circle Input the overlap stitch counts in Arc Creating an arc by specifying 3 points Creating a clockwise semicircle Semicircle Cr...

Page 99: ...wing different patterns separately in a sequence after feed Feed Moving in parallel for the feed Starting a multiple stitch Multiple stitch Creating a multiple stitch Input the number of lines for a multiple stitch in Trace Creating data by tracing a pattern Editing program Moving a pattern symmetrical to the Y axis Moving a pattern symmetrical to the X axis Moving a pattern symmetrical to a point...

Page 100: ...pm or lower Setting the maximum sewing speed at 600 rpm or lower Canceling low speed data setting Turning on option output 1 Turning on option output 2 Turning on option output 3 Turning off all option outputs Canceling setting for the height of presser foot Setting the height of presser foot Input the height of presser foot from 00 to 99 in Not breaking thread for feed only when the needle positi...

Page 101: ...AMMING WITH COMMANDS PD 3000 93 Other operations Returning to the launcher screen Switching the display size of an image Hold this key down to switch to the command mode Turning on off the programmer Canceling command ...

Page 102: ...a command depending on your purpose for creating program for the pattern you want to create The program is available until deletion For details about program creations refer to Programming example page 95 Programming page 120 4 Inputting an end code When programming is completed input an end code to control the machine operation The following six end codes from 111 to 116 are available each of whi...

Page 103: ...work clamp in position after thread trimming Page 99 Basting Page 100 Symmetrical pattern Page 101 Programming multiple patterns by splitting each in sequence split Page 102 Zigzag stitch Page 103 Multiple stitch Page 104 Programming by tracing a pattern trace Page 106 For more information about the functions and operations of each command refer to Programming page 120 In the programming example p...

Page 104: ...ication 02 05 10 in 3 Move the work clamp with Press when the needle point is at B 4 Create the program to points C and D as in step 3 5 Carry out steps 4 to 6 of Procedure for programming with command Pattern with lines The following describes how to program a pattern with lines 1 Carry out all the steps up to step 2 of Procedure for programming with command 2 Input the stitch length 3 0 mm is in...

Page 105: ...in the example Input 030 to make the stitch length 3 0 mm 3 Move the work clamp with Press when the needle point is at B 4 Move the work clamp with Press when the needle point is at point C of the pattern Point C becomes a sharp corner The points A to C are programmed 5 Press To change the stitch length specify the pitch value before pressing 6 Move the work clamp with Press when the needle point ...

Page 106: ...re for programming with command 2 Press and then press is the command for the double stitch Input the width of the double stitch in 3 0 mm is input in the example 3 Input the stitch length and press 3 0 mm is input in the example Input 030 to make the stitch length 3 0 mm 4 Program points B C D and E 5 When point E is programmed press again to make a split 6 Program point F 7 When point F is progr...

Page 107: ...n 2 with a feed after pattern 1 1 Carry out all the steps up to step 2 of Procedure for programming with command 2 Program pattern 1 Refer to Pattern with lines page 96 3 Press after input of point B 4 Move the work clamp with Press when the needle point is at point C of the pattern sheet 5 Program pattern 2 Refer to Pattern with lines page 96 6 Carry out steps 4 to 6 of Procedure for programming ...

Page 108: ...th command 2 Move the work clamp with Press when the needle point is at point B 3 Program point C as in step 2 4 Press Input the basting command 5 Move the work clamp with Press when the needle point is at point D of the pattern 6 Program points E and F as in steps 4 and 5 7 Program points G and H as in step 2 8 Carry out steps 4 and 6 of Procedure for programming with command ...

Page 109: ...Use the command Symmetric to point Use the command Turnover Use the command 1 Carry out steps 1 and 2 of Procedure for programming with command 2 Create the program to point B Refer to Programming for each stitch page 95 or Pattern with curves page 97 3 Press Input the symmetric to Y axis command 4 The needle point moves slowly from point B to point A in the right half and a symmetrical pattern is...

Page 110: ... to Pattern with lines page 96 3 Move the work clamp with Press when the needle point is at point B of the pattern sheet 4 Move the work clamp with Press when the needle point is at point C of the pattern sheet To change the pattern press the pressure holder lift switch and replace the pattern 5 Program pattern 2 Refer to Pattern with lines page 96 6 Program pattern 3 in the same way Refer to Patt...

Page 111: ...g with command 2 Press and then press is the command for the zigzag stitch Input the width of the zigzag stitch in 3 Input the stitch length and then press 3 0 mm is input in the example Input 030 to make the stitch length 3 0 mm 4 Move the work clamp with Press when the needle point is at B of the pattern 5 Press Zigzag stitch with even width to the left and the right is programmed 6 Carry out st...

Page 112: ...evious point In that case start inputting points from another side either the inside or the outside line or change the point input position or pattern Creating a stitch pattern 1 Create a pattern combining the outer and inner lines for a multiple stitch The two lines should be spaced uniformly apart 2 Connect direction change points in pairs on the inner and outer lines using a line 3 Create at le...

Page 113: ...beyond the previous split Returning the previous split Press When the needle position is at a split it cannot be moved Returning to the split before the previous one Press 6 Press and move the work clamp with Press when the needle point is at point 18 of the pattern 7 Program the following points up to point 34 in the same manner When programming be sure that the points and splits specified on the...

Page 114: ... if a stitch length is not specified or it is specified to 0 2 mm or less or 12 7 mm displayed as 127 or more 4 Start operating the needle at the sewing start point A using so that the needle point accurately traces the pattern 5 Press when the needle point is at point B 6 Carry out steps 4 to 6 Procedure for programming with command Note 1 At positions where you are required to sew with care such...

Page 115: ...e program Programming with icons is also possible Refer to Chapter 3 Programming with Icons page 21 2 Starting program modification Input a command depending on your purpose to modify the program For details of program modification refer to Example of modified program page 108 3 Saving the modified program Specify the program number on the operation panel and press the read write switch for writin...

Page 116: ...the sewing start point Page 112 Adding a new sewing start point before the first stitch Page 113 Adding an escape point before the sewing start point Page 114 Moving the escape point Page 115 Deleting the escape point Page 116 Moving the pattern in parallel when the first stitch is the sewing start point Page 116 Moving the pattern in parallel when the first stitch is the escape point Page 117 Del...

Page 117: ... point of resizing with When resizing the pattern to the home position there is no need to move the needle 3 Press and then press Input the resizing command 4 Press and then press Input the resizing percentage for the X axis Enter the 3 digit number in to specify the magnification percentage 150 is specified in the example 5 Press and then press Input the resizing percentage for the Y axis Enter t...

Page 118: ...e needle point reaches 4 press The work clamp stops When returning the needle point input the number of stitches to be returned and press 4 Move the work clamp with Press when the needle point is at 5 5 Program 6 and 7 as in step 4 6 Press and then press The needle point moves to 5 7 Press 8 Input the number of stitches to be deleted and then press In the example 3 stitches ahead are deleted press...

Page 119: ... to make the second stitch as the sewing start point 1 Carry out step 1 of Procedure for modifying program to call program 2 Press and then press The work clamp moves to the sewing start point 3 Press 4 Input the number of stitches to be deleted and then press In the example the first stitch is deleted Press The needle point moves to 2 5 Carry out steps 3 and 4 of Procedure for modifying program t...

Page 120: ...The work clamp moves to the sewing start point 3 Move the work clamp with Press when the needle point is at point 1 of the pattern sheet 1 is programmed 4 Press and then press The work clamp moves to the sewing start point 5 Press 6 Input the number of stitches to be deleted and then press In the example the first stitch is deleted Press The needle point moves to 1 7 Carry out steps 3 and 4 of Pro...

Page 121: ... work clamp with so that the needle point is at 1 of the pattern sheet Record the coordinates values of and 5 Press 1 is programmed 6 Move the work clamp with an equivalent of the coordinate value recorded in step 4 to the opposite direction Press If the moving distance is long press 7 Press The work clamp returns to the home position 8 Press and then press The needle point returns to the first st...

Page 122: ...e sewing start point 3 Press 4 Move the work clamp with so that the needle point is at A of the pattern sheet Record the coordinates values of and 5 Press A is programmed 6 Press 7 Move the work clamp with an equivalent of the coordinate value recorded in step 4 in the opposite direction so that the needle point is at 1 of the pattern sheet A is programmed 8 Press 1 is programmed again 9 Press and...

Page 123: ... Carry out step 1 of Procedure for modifying program to call program 2 Press and then press The work clamp moves to the escape point 3 Press 4 Move the work clamp with Press when the needle point is at point B of the pattern sheet B is programmed 5 Press and then press The needle point moves to A 6 Press 7 Input the number of stitches to be deleted and then press In the example the first stitch is...

Page 124: ...rst stitch is deleted Press The needle point moves to 1 5 Carry out steps 3 and 4 of Procedure for modifying program to save program Moving the pattern in parallel when the first stitch is the sewing start point The following describes how to move the pattern in parallel when the first stitch is the sewing start point 1 Carry out step 1 of Procedure for modifying program to call program 2 Move the...

Page 125: ... press before moving the work clmap 4 Press The needle point returns to the home position 5 Press and then press The needle point moves to C 6 Move the work clamp with an equivalent of the coordinate value recorded in step 3 The moved point is now D If the moving distance is long press before moving the work clamp 7 Turn the pulley with a hand and put a marking with the needle to indicate the posi...

Page 126: ...gramming The following describes how to delete 2 stitches 7 and 8 at point 8 and creating a new program 1 Press 2 Input the number of stitches to be deleted and then press In the example 2 previous stitches are deleted and then press The needle point moves to 6 3 Continue programming ...

Page 127: ...d in parallel If it is inconvenient move pattern C in parallel as in steps 1 2 3 and 4 Or follow the chapter 3 Moving a part of continuous program in parallel partially page 60 6 Carry out steps 3 and 4 of Procedure for modifying program to save program Not trimming thread at the last stitch Deleting the thread trimming code after inputting the end code can cancel thread trimming at the last stitc...

Page 128: ...rogram and explains how to use them For details about operations refer to Programming example page 95 Creating a line Command to be used Input the stitch length in Example Pitch Input value 0 5 mm 005 12 0 mm 120 1 Select the sewing start point with and then press 2 Input the stitch length in 3 digits and then press 3 Move the needle with Press ...

Page 129: ...he circumference Input the overlap stitch counts in Specifying a diameter to create a clockwise circle Input the overlap stitch counts in Specifying a diameter to create a counterclockwise circle Input the overlap stitch counts in Specifying a radius to create a clockwise circle Input the overlap stitch counts in Specifying a radius to create a counterclockwise circle Input the overlap stitch coun...

Page 130: ... zigzag stitch length in 3 digits and then press 5 Move the needle with to select the second point Press 6 Move the needle with to select the third point Press Creating a circle zigzag circle by specifying the diameter 1 Input clockwise or counterclockwise 2 Input the stitch length in 3 digits and then press Creating a zigzag circle skip to step 5 when not creating a zigzag circle 3 Input width 4 ...

Page 131: ...creating a zigzag circle 3 Input width 4 Input the zigzag stitch length in 3 digits and then press 5 Move the needle with to select the second point Press Creating an arc Command to be used Creating an arc passing 3 points 1 Select the sewing start point with and then press 2 Input 3 Input the stitch length in 3 digits and then press 4 Move the needle with to select the second point Press 5 Move t...

Page 132: ...to be used Creating a clockwise semicircle Creating a counterclockwise semicircle 1 Select the sewing start point with and then press 2 Input clockwise or counterclockwise 3 Input the stitch length in 3 digits and then press 4 Move the needle with to select the second point Press ...

Page 133: ...ag stitch symmetrically to the sewing path Carrying out zigzag stitch on the left of the sewing path Carrying out zigzag stitch on the right of the sewing path 1 Select the sewing start point with and then press 2 Input width 3 Input the zigzag stitch length in 3 digits and then press 4 Move the needle with to select the second point Press 5 Input at the end position of the needle Input for creati...

Page 134: ...ch length in Inputting a split 1 Select the sewing start point with and then press 2 Input 3 Move the needle point to the second point or after with Press 4 When the needle point is moved to the corner press 5 Repeat steps 3 and 4 until the end point of the inside or the outside line is input Press 6 Move the needle point to the start point of the outside or the inside line with Press 7 Program al...

Page 135: ...be used Input the number of lines for a multiple stitch in The specifiable number of lines is 2 to 99 Example Number of line for a multiple stitch Input value 5 lines 505 Input the stitch length in 1 Press The work clamp moves to the home position 2 Input The needle point moves When the needle point is at the start point for a multiple stitch stop it by pressing 3 Input the desired number of lines...

Page 136: ...n the right of the sewing path Starting double stitch calculations This is the code to end programming For details refer to page 133 If sharp angles or fine curves are included in the pattern sheet the desired double stitch may not be achieved 1 Select the sewing start point with and then press 2 Input the stitch width and then press 3 Move the needle point to or after the second point with Press ...

Page 137: ... the left of the sewing path Carrying out parallel stitch on the right of the sewing path Starting parallel stitch calculations This is the code to end programming For details refer to page 133 1 Select the sewing start point with and then press 2 Input the stitch width and then press 3 Move the needle point to the second point or after with Press 4 Move the needle to the corner point and input 5 ...

Page 138: ...nt with and then press 2 Input the stitch width and then press 3 Move the needle point to the second point or after with Press 4 When the needle point is moved to the corner press 5 Repeat steps 3 and 4 and move the needle to the end point Then input When the calculation is complete the needle point moves to the end position Creating feed data Commands to be used Specifying split the separation po...

Page 139: ...e used Magnified input 2 Magnified input 5 Magnified input 10 The following three scales are available for magnification 2 5 and 10 Use a pattern sheet suitable for the magnified pattern The magnified data is reduced when the end code is input 1 Make sure that the needle point is at the home position When returning the needle point to the home position press 2 Select magnification and then press 3...

Page 140: ...f low speed sewing and input the command Setting the option output This is set to flip flop the option output Commands to be used Flipping flopping option output 1 Flipping flopping option output 2 Flipping flopping option output 3 Canceling option output setting 1 Move the needle to the position you want to apply the command at For moving the needle position refer to Description of commands page ...

Page 141: ... Commands to be used Normal end Normal end Carrying out no thread wiping Setting the sewing speed at 1200 rpm or lower without thread wiping Carrying out no thread trimming Fixing the sewing speed at 1500 rpm or lower 1 When the program has been created input the end code Data after the end code is input is deleted ...

Page 142: ...ion in the X direction in and input the magnification in the Y direction in Repeated copying Copying a pattern symmetrically to a point Copying a pattern symmetrically to the X axis Copying a pattern symmetrically to the Y axis Copying in the reverse direction Moving data in parallel from the current needle position changing the moving amount of the data for the needle position Moving data in para...

Page 143: ...e home position 1 Make sure that the needle point is at the home position Press if the needle is not at the home position 2 Input 3 Press Moving a pattern symmetrically to a point Command to be used Moving a pattern symmetrically to the sewing start point This function is available only when the needle point is at the home position 1 Make sure that the needle point is at the home position Press if...

Page 144: ...erclockwise This function is available only when the needle point is at the home position Values of 1 to 359 degrees are available for input 1 Make sure that the needle point is at the home position Press if the needle is not at the home position 2 Determine the center point for rotation with 3 Input or 4 Input the angle in 3 digits and then press ...

Page 145: ...erclockwise This function is available only when the needle point is at the home position Values of 1 to 359 degrees are available for input The copied data is linked to the original data with a split data 1 Make sure that the needle point is at the home position Press if the needle is not at the home position 2 Determine the center point for rotation with 3 Input or 4 Input the angle in 3 digits ...

Page 146: ...t is at the home position Press if the needle is not at the home position 2 Determine the reference point for resizing with 3 Input 4 Input the magnification in 3 digits in the X direction and then press Magnification values of 0 to 400 are available for input 5 Input the magnification in 3 digits in the Y direction and then press Magnification values of 0 to 400 are available for input 6 Input th...

Page 147: ...t data 1 Make sure that the needle point is at the home position Press if the needle is not at the home position 2 Determine the reference point for resizing with 3 Input 4 Input the magnification in 3 digits in the X direction and then press Magnification values of 0 to 400 are available for input 5 Input the magnification in 3 digits in the Y direction and then press Magnification values of 0 to...

Page 148: ...ed Copying data from the start point or the feed point excluding the number of feed boundaries to be ignored to the current needle position symmetrically to the current needle position 1 Move to the desired needle position you want to apply the command at For moving the needle position refer to Description of commands page 90 2 Input Copying a pattern symmetrically to the X axis Commands to be use...

Page 149: ... reverse direction from the start point or the feed point excluding the number of feed boundaries to be ignored to the current needle position 1 Move the needle to the position you want to apply the command at For moving the needle position refer to Description of commands page 90 2 Input Moving in parallel Commands to be used Changing the moving amount of the data for the current needle position ...

Page 150: ... deleted and the current needle position becomes the sewing start point Deletes data before stitches If this command is used at the sewing end position the end code is deleted 1 Move the needle to the position you want to apply the command at For moving the needle position refer to Description of commands page 90 2 Input the command Input to delete data after the current needle position Input to d...

Page 151: ...ro og gr ra am m s se et tt ti in ng g a an nd d s se et tt ti in ng g a at tt tr ri ib bu ut te e 1 Move the needle to a desired data position for changing attributes For moving the needle position refer to Description of commands page 90 Refer to Chapter 3 Programming with Icons page 21 ...

Page 152: ...CHAPTER 4 PROGRAMMING WITH COMMANDS 144 PD 3000 ...

Page 153: ...PD 3000 Chapter 5 Extended Option Output ...

Page 154: ...rmation on the training contact an engineer who have received training or store where you purchased your sewing machine Only when 3 conditions i e output conditions enabling conditions and disabling conditions three items for each are established the extended option output is executed The relationship between the output and the conditions is as follows Opening the extended option output setting sc...

Page 155: ...nded option output No Specify any output number between 1 and 20 with the numeric keys See Table of extended option output page 153 Operation setting Select ON OFF or F F FLIP and FLOP with Output conditions Input conditions for the extended option output 3 conditions can be specified See Table of extended option output page 153 Timer 1 Set a time until the output is switched after the output cond...

Page 156: ...ng any do not set any value as enabling conditions When setting has been completed be sure to press To cancel the set value input at or and then press R Re ea ad di in ng g t th he e e ex xt te en nd de ed d o op pt ti io on n o ou ut tp pu ut t d da at ta a Reading the extended option output data saved in the media the FLASH ROM incorporated in the sewing machine CompactFlash inserted into the se...

Page 157: ... a medium to save the data and then press The data is written and you are returned to the extended option output setting screen D De el le et ti in ng g t th he e e ex xt te en nd de ed d o op pt ti io on n o ou ut tp pu ut t d da at ta a Deleting the extended option output data being edited or saved in the media 1 Load a medium from which you want to delete the data Load a medium before turning o...

Page 158: ...the lower thread replacement wait state ends 12 After a program starts 13 After a program ends 14 When trigger data is detected during sewing 15 After an emergency stop occurs 16 After a thread breakage is detected 17 After a program is changed 18 After the power switch is turned on 19 After a low air pressure error is detected 20 Before moving to the next start point on completion of sewing in th...

Page 159: ... extended option output 2 is turned on 73 When extended option output 2 is turned off 74 When extended option output 3 is turned on 75 When extended option output 3 is turned off 76 When extended option output 4 is turned on 77 When extended option output 4 is turned off 78 When extended option output 5 is turned on 79 When extended option output 5 is turned off 80 When extended option output 6 is...

Page 160: ... 3 1 7 Pno input bit1 MEMORY SW354 1 2 5 6 4 8 Pno input bit2 MEMORY SW354 1 2 8 9 7 9 Pno input bit3 MEMORY SW354 1 2 11 12 10 10 Pno input bit4 MEMORY SW354 1 2 P24 EXIN2 14 15 13 11 THREAD CATCH F SENSOR MEMORY SW500 ON 2 1 3 12 THREAD CATCH R SENSOR MEMORY SW500 ON P10 SENSOR2 5 4 6 13 AIR SW MEMORY SW558 ON P12 AIR1 12 11 9 14 P8 SENSOR1 11 10 12 1 Use this output when an optional part is mou...

Page 161: ... output bit1 MEMORY SW951 ON 2 6 Pno output bit2 MEMORY SW951 ON 3 7 Pno output bit3 MEMORY SW951 ON 4 8 5 9 SIGNAL TOWER GREEN MEMORY SW559 ON 6 10 SIGNAL TOWER YELLOW MEMORY SW559 ON 7 11 SIGNAL TOWER RED MEMORY SW559 ON P25 AIR2 8 9 10 12 NEEDLE COOLER MEMORY SW550 ON 8 13 INNER CLAMPING DEVICE MEMORY SW556 1 2 3 4 14 3 15 LCLAMP When 2 stage work clamp is used 2 16 RCLAMP For the air type P12 ...

Page 162: ... material immediately after the work clamp rises on completion of sewing and programs stacking operation Option output 4 BAR1 For holding material Option output 5 BAR2 For moving material Option output 6 AIR For air blow Timing chart Program setting values Output condition Enabling conditions Disabling conditions Output No Operation setting Condition No Content Timer 1 ms Timer 2 ms Condition No C...

Page 163: ...etting values Output condition Enabling conditions Disabling conditions Output No Operation setting Condition No Content Timer 1 ms Timer 2 ms Condition No Content Condition No Content ON 2 Movement of sewing start point 0 0 3 OFF 78 Output 5 ON 200 0 6 End of sewing 1 Sewing machine returns to home position ON 14 Trigger detection 0 0 4 OFF 40 Input 1 ON 0 0 ON 42 Input 2 ON 0 0 5 OFF 78 Output 6...

Page 164: ...tting Condition No Content Timer 1 ms Timer 2 ms Condition No Content Condition No Content ON 2 Movement of sewing start point 0 0 1 Sewing machine returns to home position 4 OFF 17 Change of P No 0 0 5 ON 2 Movement of sewing start point 0 100 6 End of sewing 1 Sewing machine returns to home position ON 16 Thread breakage detection 0 0 8 Start of step back 6 OFF 77 Output 4 OFF 0 0 0 1 sec Return...

Page 165: ...unction as programmed as option output The examples show how to program option outputs No 15 and 16 to confirm their operation acceptable if the left and right work clamps function as programmed Caution One example shows how to sew with the work clamp raised Please be careful when attempting it Be sure to remove the needle before confirming its operation Turning the output interlocking on and off ...

Page 166: ...en lowers whenever the needle returns to the sewing start point If the left work clamp operates in this manner it is operating in accordance with the program Modifying programmed data Modify existing program data according to the procedure described in Turning the output interlocking on and off corresponding to sewing machine operations In most cases only one option program can be stored on one CF...

Page 167: ...reate a program to keep the output on state for a time set for Timer 2 and return it to the off state automatically In this example create a program to automatically open the left work clamp at the sewing start point option output No 15 ON and close it simultaneously when the machine starts option output NO 15 OFF Confirm that on and off output conditions are different 1 Have the programmer at han...

Page 168: ...ng machine operation mode condition numbers see page 150 set ON when condition No 14 trigger data detection is established On the setting screen overwrite the values as follows Move the cursor to ON Press the key The value is switched to OFF Confirm that the data set in the previous section remains 3 Write the option program over the program on the CF card Press to turn the programmer light off 4 ...

Page 169: ... when No 15 is turned on Set Timer 1 to 0 5 sec 500 ms and Timer 2 to 0 7 sec 700 ms On the setting screen make the following settings 4 Write the option program over the program on the CF card of the sewing machine Press to turn the programmer light off Turn off the power then turn it back on again 5 Set the memory switch No 50 to 3 the work clamps are automatically raised when sewing is complete...

Page 170: ...n program over the program on the sewing machine CF card Press to turn the programmer light off Turn off the power then turn it back on again If an enabling condition has been set this output is disabled immediately after power on as initial setting 5 Read sewing data to carry out sewing operation Confirm that the left and right work clamps option outputs No 15 and 16 do not operate when the foot ...

Page 171: ...ow according to the operation of the extended option output see page 146 2 Delete the extended option output data from the sewing machine by using 3 Press to turn the programmer light off Turn off the power then turn it back on again Read sewing data to carry out sewing operation Confirm that the extended option output data has been deleted The extended option output data remains on the CF card To...

Page 172: ...led in this case Disabled when many AND conditions are set For example operation by switching among multiple modes and inhibition of output by combining multiple inputs are disabled Settings of 2 input AND conditions per option output are enabled configuration of 3 input AND conditions is enabled by setting one output as a virtual output See Examples of option outputs Control of the incorporated s...

Page 173: ...ion No 1 to enabling when condition No 40 input 1 ON is established Set disabling when condition No 41 input 1 OFF is established 3 Write the option program over the program on the sewing machine CF card Press to turn the programmer light off Turn off the power then turn it back on again 4 Other than the conditions in the previous section confirm also that sewing commences only when option input N...

Page 174: ...tion for No 2 ON On the setting screen make the following settings 4 Referring to the table of external input condition numbers see page 151 set OFF when condition No 41 input 1 OFF is established as the output condition for No 2 OFF On the setting screen make the following settings 5 Referring to the table of external input condition numbers see page 151 set enabling when condition No 42 input 1 ...

Page 175: ...ing Turn off the programmer then turn it back on 2 Referring to Example 1 Sequence 1 for the stacker in the programmer instruction manual see page 154 program outputs of No 4 5 and 6 and enabling conditions for No 4 3 After confirming that the sewing machine can be operated as programmed press the temporary pause switch during the sequence operation to cancel it Operating temporary pause during se...

Page 176: ... is recommended that you mount an external fuse for each circuit Selecting hardware on the input side Use non isolated IC inputs Circuit board Example connection to a proximity sensor In addition to using a contact switch or a 24 V sensor use relays to isolate inputs Circuit board External relay Use relays for an electronic circuit with a min application load of 5 V and 1 mA or less I 70 mA COM te...

Page 177: ... 1 5 6 2 3 P12 AIR1 10 11 4 1 5 2 6 3 7 4 8 5 9 6 10 7 11 P25 AIR2 8 9 10 12 8 13 4 14 3 15 2 16 P12 AIR1 1 10 11 17 1 18 2 19 3 20 P26 AIR3 4 5 Table of option input Allocation Connector Pin No Option input No Name Description Connector No Signal 24V 0V 1 2 3 1 2 5 6 4 3 8 9 7 4 11 12 10 5 P23 EXIN1 14 15 13 6 2 3 1 7 5 6 4 8 8 9 7 9 11 12 10 10 P24 EXIN2 14 15 13 11 2 1 3 12 P10 SENSOR2 5 4 6 13...

Page 178: ... option outputs 1 to 3 and 12 to 16 For option input 13 12 pin connector of NH series from J S T Mfg Co Ltd Housing for P25 AIR 2 connector For option output 4 to 11 10 pin housing of NH series from J S T Mfg Co Ltd Housing for P26 AIR 3 connector For option output 17 to 20 5 pin housing of NH series from J S T Mfg Co Ltd Parts for the extended option input Housing and pin for P23 EXIN 1 connector...

Page 179: ... 19 Output 20 Output 16 Option output 15 Option output 14 Option output 13 Option output 1 Option output 2 Option output 3 Option output 12 Option input 16 Option output 4 Option output 5 Option output 6 Option output 7 Option output 8 Option output 9 Option output 10 Option output 11 Option output 17 Option output 18 Option output 19 Option output 20 Option input 1 Option input 2 Option input 3 O...

Page 180: ...CHAPTER 5 EXTENDED OPTION OUTPUT 172 PD 3000 Block diagram Connector layout of the main circuit board ...

Page 181: ...PD 3000 Chapter 6 Reading Saving Deleting Program and Formatting Media ...

Page 182: ...n ng g m me ed di ia a This section describes how to read save and delete program and format media 1 Press 2 Select by using Press 3 Select by using Press 4 Select an icon depending on your purpose on the screen displayed in step 3 by using Press For more information see Reading program page 175 Saving program page 178 Deleting program page 179 and Formatting media page 181 ...

Page 183: ...tion panel This operation is not available in command mode You can also read program created by BAS 300 BAS 300A and BAS 300E series 1 Execute steps 1 to 3 of Procedures for reading saving deleting program and formatting media 2 Confirm that is selected Press 3 Input a program number to select by using the numeric keys Press 4 Select Press To display the program list select Also the read destinati...

Page 184: ...is not available in command mode You can also read program created by BAS 300 BAS 300A and BAS 300E series 1 Execute steps 1 to 3 of Procedures for reading saving deleting program and formatting media 2 Confirm that is selected Press 3 Input a program number to select by using the numeric keys Press 4 Select Press To display the program list select Also the read destination can be changed See Swit...

Page 185: ... Execute steps 1 to 3 of Procedures for reading saving deleting program and formatting media 2 Confirm that is selected Press 3 Select program to read by using and then press When checking program by displaying its image skip to step 5 when not checking program 4 Press To return to the previous screen press 5 Select program to read by using 6 Press If the image is displayed press again to read pro...

Page 186: ...ration panel This operation is not available in command mode 1 Execute step 1 to 3 of Procedures for reading saving deleting program and formatting media 2 Confirm that is selected Press 3 Input a program number Press 4 Input a comment by selecting characters using Press 5 Select by using Press To display the program list select Also the read destination can be changed See Switching between media ...

Page 187: ...operation is not available in command mode 1 Execute step 1 to 3 of Procedures for reading saving deleting program and formatting media 2 Confirm that is selected Press 3 Input a program number to delete by using the numeric keys Press When checking program by displaying its image 4 Select Press 5 Select a program to delete and then press 6 To start deleting press To cancel deleting press ...

Page 188: ...180 PD 3000 When not checking program by displaying its image 7 Select Press 8 To start deleting press To cancel deleting press ...

Page 189: ...es are provided This operation is not available in command mode Formatting procedure 1 1 Execute step 1 to 3 of Procedures for reading saving deleting program and formatting media 2 Select Press 3 Select a medium Press 4 To start formatting press To cancel formatting press Formatting procedure 2 1 Select on the launcher screen Press 2 Select Press 3 Select a medium Press 4 To start formatting pres...

Page 190: ...CHAPTER6 READING SAVING DELETING PROGRAM AND FORMATTING MEDIA 182 PD 3000 ...

Page 191: ...Chapter 7 Checking Copying Moving Changing Program ...

Page 192: ...ds of program display methods Display of a list and Display of thumbnails Hold down Every pressing switches between two displays Display of a list Lists selected program in the folder of a media Displays the number of pages Current page entire number of pages Displays an access destination medium Displays a detail of program Displays an access destination folder Displays program number Displays st...

Page 193: ...nails Switching between pages To display the next page press To display the previous page press Switching between folders 1 Select by using Press Displays an access destination folder Displays a detail of program Display a program image Displays the number of pages Current page entire number of pages Displays an access destination medium Display a program size ...

Page 194: ...ING COPYING MOVING CHANGING PROGRAM FILE 186 PD 3000 2 Select a target folder by using Press Switching between media 1 Select a media icon by using Press 2 Select the icon of switching destination media by using Press ...

Page 195: ...ion of a file Display the image and detailed information of a file 1 Select a file of which detailed information you want to display Press The image and detailed information of the file are displayed 2 To zoom in the image press To zoom out the image press 3 To return to the previous display press ...

Page 196: ...eration menu Press Copying program Select 1 Specify a copy destination When a A file with the same name exists Do you overwrite it message is issued 2 To start overwriting press To rename the file press to change the program number Moving program Select 1 Specify a move destination When a A file with the same name exists Do you overwrite it message is issued 2 To start overwriting press To rename ...

Page 197: ...Changing a program number Select 1 Input a program number Press 2 Input a comment by selecting characters using Press To switch between the upper case and lower case press To change the comment input position press 3 Select by using Press Deletes the previous character ...

Page 198: ... message is issued 1 To start deleting press To cancel deleting press Editing a program Select The screen is switched to the programming screen where you can edit the program you selected Carrying out sewing according to a program Select The screen is switched to the PANEL screen where you can carry out sewing according to the selected program ...

Page 199: ...PD 3000 Chapter 8 Displaying Sewing Machine Program ...

Page 200: ...ed on the panel of the sewing machine on the programmer 1 Press 2 Select Press Screen image To zoom in the image press To zoom out the image press To switch to the launcher menu press End code Displays a program number Displays the date and time of creation file size capacity and stitch count Program image display area Displays a program size Displays the production counter Displays the lower thre...

Page 201: ...PD 3000 Chapter 9 Displaying a Clock ...

Page 202: ...c cl lo oc ck k Displaying a clock 1 Press 2 Select Press Selecting a clock display method You can select one of two kinds of clock display methods analog display and digital display 1 Press Every pressing switches between two displays Press to return to the launcher screen ...

Page 203: ...CHAPTER 9 DISPLAY A CLOCK PD 3000 195 Setting a clock 1 Select Press 2 Select Press 3 Set the time Press ...

Page 204: ...CHAPTER 9 DISPLAY A CLOCK 196 PD 3000 ...

Page 205: ...PD 3000 Additional Information ...

Page 206: ...g the copied upgrade file into the CF slot of the programmer 4 While pressing and at the same time turn on the programmer Upgrading starts If you see a message indicating upgrading completion on the screen the upgrading is completed 5 Turn on the programmer again A new program starts T Tr ro ou ub bl le es sh ho oo ot ti in ng g The programmer can be troubleshooted by the procedure below 1 Turn of...

Page 207: ...he memory switch setting list of the connected sewing machine can be displayed by the procedure below 1 Select on the launcher screen Press 2 Select by using Press The list is displayed Press to display the next page or press to display the previous page Memory switch number Settings Setting range of each memory switch Initial Minimum Maximum ...

Page 208: ...ror log list of the connected sewing machine can be displayed by the procedure below 1 Select on the launcher screen Press 2 Select by using Press The list is displayed Press to display the next page or press to display the previous page Serial number Error code The stitch counter s value when the error is occurred ...

Page 209: ... ar rt ts s The following shows available spare parts Part No Part name SA5164001 LCD MODULE SA5165001 LCD INVERTER SA5166001 INVERTER HARNESS SA5170001 PROGRAMMER PCB ASSY SA5172001 SWITCH PCB ASSY XD1115051 FFC SML2CD 20 X 70 SA5167001 PROGRAMMER HARNESS ...

Page 210: ...INSTRUCTION MANUAL 15 1 Naeshiro cho Mizuho ku Nagoya 467 8561 Japan Phone 81 52 824 2177 2005 2006 Brother Industries Ltd All Rights Reserved PD 3000 SA6103 201 E 2006 01 B 1 http www brother com ...

Reviews: