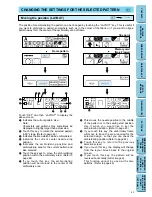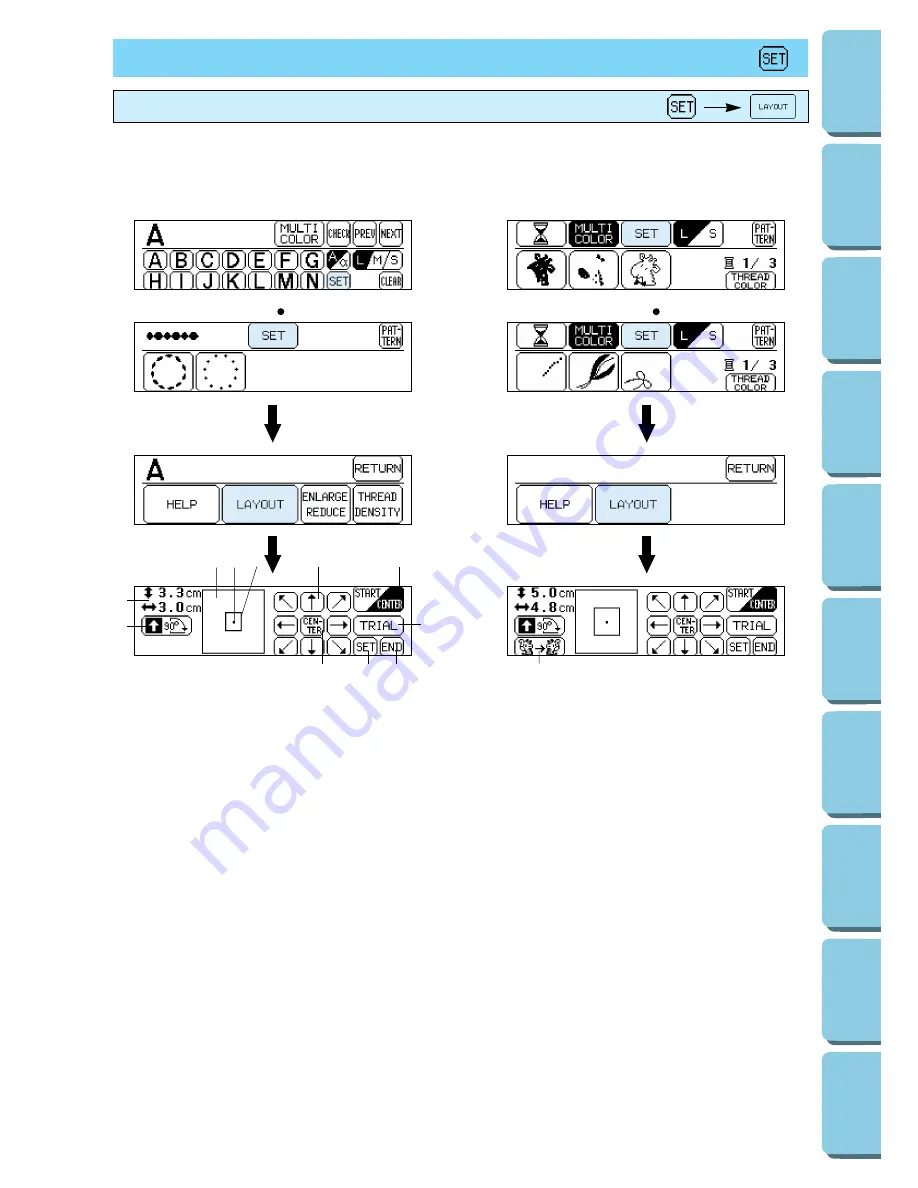
The position for embroidering the pattern can be changed by touching the “LAYOUT” key. This is useful if
you want to embroider a pattern somewhere such as in the corner of the fabric or if you want to align a
pattern away form the center of the embroidery area of frame.
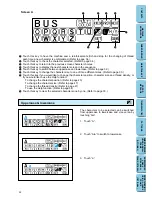
Touch “SET” and then “LAYOUT” to display the
above screen.
1
Indicates the current pattern size.
Note:
Characters and patterns may sometimes be
displayed in slightly larger than actual size.
2
Touch this key to rotate the selected pattern
in 90° steps. (Refer to page 45)
3
Indicates the area which can be embroidered.
4
Indicates the current center needle drop
position.
5
Indicates the embroidering position and
embroidering area for the current pattern and
size selected.
6
Touch these keys to move the embroidering
position within the embroidery area. (Refer to
page 44)
7
If you touch this key, the embroidering
position will be returned to the center of the
embroidery area.
8
This moves the needle position to the middle
of the pattern or to the sewing start position.
Use it when you would like to set the
embroidering position. (Refer to page 45)
9
If you touch this key, the embroidery frame
will move to trace the area required for the
selected design, so that you can check the
embroidering position.(Refer to page 44)
0
Touch this key to return to the previous
selection screen.
A
If you touch this key, the display will change
from the layout screen back to the original
screen.
B
If you touch this key, the pattern will be
reversed horizontally (mirror imaged).
This function cannot be used with some
patterns. (Refer to page 46)
43
CONTENTS
MACHINE
KNOWLEDGE
EMBROIDERING
MAINTENANCE
ERROR
MESSAGE
TROUBLESHOOTING
PATTERNS
EMBROIDERING
USING A SMALL
FRAME
(OPTIONAL)
EMBROIDERING
USING A
EXTRA-SMALL
FRAME (OPTIONAL)
EMBROIDERING
USING A LARGE
FRAME
(OPTIONAL)
Moving the position (LAYOUT)
CHANGING THE SETTINGS FOR THE SELECTED PATTERN
1
9
2
3 4 5
6
8
A
0
7
B
Character
Frame pattern
One point
Memory card
(No.2 Flower)

