- 39 -
12. BOBBIN WINDER (ADJUST BOBBIN WINDER SWITCH)
STANDARD
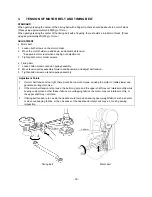
Thread should be wind parallel to the bobbin and around about 75-95% of the circumference of the bobbin.
During bobbin winding, loosen bobbin winder switch 1-1.2mm and switch on.
ADJUSTMENT
1. Loosen screw on bobbin winder switch and adjust the overlap of bobbin winder switch.
2. Tighten screw on bobbin winder switch.
3. Loosen bobbin winder thread guide screw a little bit. Move bobbin winder thread guide back and forth. Adjust
bobbin winding.
4. Tighten bobbin winder thread guide screw.
5. Turn bobbin presser screws 2-3 revolutions, turn bobbin presser, and adjust bobbin winding volume (see
diagram A)
6. Tighten bobbin presser screw.
Adjustment Points
* If bobbin winder thread guide and bobbin presser screws are not screwed on tightly enough, the nuts
could fall into the inside of the sewing machine, so take care that they are fastened securely.
(1) When adjusting bobbin winding, if bobbin winds as shown by figure (B) the spool guide should be moved
forward. If it winds as shown by figure (C) the spool guide should be moved backward.
4
3
75-95%
C
A
B
6
5
2
1
Summary of Contents for PE-300S
Page 1: ... 2 1999 ...
Page 4: ... 2 1 MECHANICAL CHART EMBROIDERY UNIT MECHANISM ...
Page 6: ... 4 3 ELECTRONIC PARTS ARRANGEMENT CHART ...
Page 7: ... 5 4 CONTROL SYSTEM BLOCK DIAGRAM ...
Page 11: ... 9 9 1 1 9 9 8 7 7 3 3 6 6 2 2 3 1 1 9 5 5 5 ...
Page 13: ... 11 12 11 17 20 20 15 16 19 20 18 13 14 10 10 ...
Page 15: ... 13 25 2 25 1 23 36 29 29 37 32 22 22 24 24 27 27 30 30 31 31 33 33 34 32 28 36 35 26 ...
Page 17: ... 15 39 39 38 ...
Page 19: ... 17 Diagram A 45 1 45 2 42 53 48 52 49 50 43 42 41 44 47 47 46 40 51 ...
Page 21: ... 19 Diagram A 55 60 56 54 58 64 64 65 61 61 59 59 54 57 ...
Page 23: ... 21 diagram A 74 69 69 68 69 75 73 72 70 67 67 ...
Page 25: ... 23 77 78 84 68 84 78 78 79 86 86 84 ...
Page 27: ... 25 5 3 2 2 2 2 3 4 1 5 ...
Page 28: ... 26 3 LEAD WIRE ARRANGEMENT ...
Page 57: ...PE 300S H8080132 ...


