68
Arranging Embroidery Designs (Layout & Editing)
Specifying the Design Page Size and Color
The color and size of the Design Page in addition to the color of the background can be changed. You can
select a Design Page size according to the size of hoop that you will be using with your embroidery machine.
You can also specify a custom size for the Design Page for embroidery patterns that will be split and
embroidered in multiple sections.
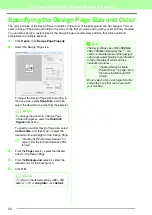
1.
Click
Option
, then
Design Page Property
.
2.
Select the Design Page size.
To adjust the Design Page size according to
the hoop size, select
Hoop Size
, and then
select the desired hoop size from the selector.
To specify a custom Design Page size, select
Custom Size
, and then type or select the
desired width and height for the Design Page.
c
“Creating Split Embroidery Designs” on
page 176 in the Instruction Manual (PDF
format).
3.
From the
Page
selector, select the desired
color for the Design Page.
4.
From the
Background
selector, select the
desired color for the background.
5.
Click
OK
.
b
Memo:
To arrange the pattern in a Design Page
rotated 90 degrees, select the
Rotate 90
Degrees
check box.
b
Memo:
To return to the default settings (
100
×
100
mm
(
4”
×
4”
) of
Hoop Size
), click
Default
.
a
Note:
• The Design Page sizes
130
×
300 mm
,
100
×
172 mm
indicated by the “*”, are
used to embroider multi-position designs
using a special embroidery hoop attached
to the embroidery machine at three
installation positions.
c
“Creating Design for Multi-
Position Hoops” on page 182 in
the Instruction Manual (PDF
format).
• Do not select a hoop size larger than the
embroidery hoop that can be used with
your machine.
Summary of Contents for PE-Design 8
Page 1: ...Instruction Manual ...
Page 146: ...144 Arranging Embroidery Designs Layout Editing ...
Page 200: ...198 Managing Embroidery Design Files Design Database ...
Page 218: ...216 Creating Custom Stitch Patterns Programmable Stitch Creator ...
Page 244: ...242 Tips and Techniques ...
Page 269: ...English ...


