Using the Optional Cap Frame
179
7
7
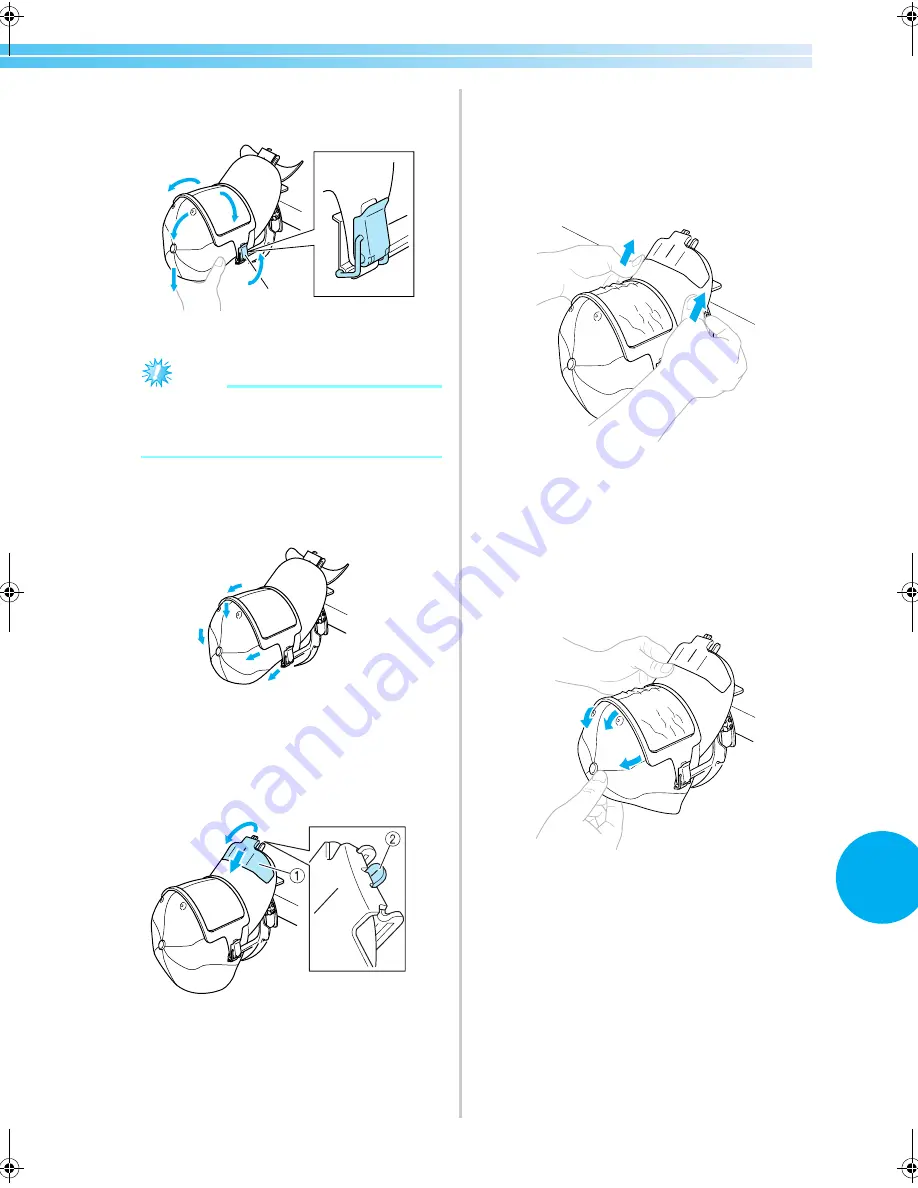
While pulling the cap down with one hand,
pull the lever of the snap lock to securely
close it.
1
Lever of the snap lock
Note
●
Make sure that there are no wrinkles within
the clamping frame. Otherwise miss
alignment will occurred.
8
While again pulling on the fabric around the
cap frame to stretch it, adjust the
embroidering position.
9
Pull the brim holder up as far as possible.
Next, turn the brim holder over the cap brim,
and then lower the brim holder. Finally,
arrange the brim so that it maintains a slightly
rounded shape.
1
Brim holder
2
Centerline of brim presser
• Make sure the notch comes out.
0
As shown in the illustration, use both hands to
press in on the sides of the brim to reshape it
so that the sides do not fold out.
If the pattern is embroidered with the sides of
the brim folded out, the brim will hit the
machine and cause the pattern to become
misaligned.
a
Stretch the fabric in the embroidering area so
that it is taut.
While pressing in on the sides of the brim, the
fabric within the cap frame may be pressed,
causing slack in the fabric. Pull the fabric along
the left, right and center seams in the direction
of the arrows, and stretch the fabric so that the
embroidering area is taut.
X
This completes the positioning of the cap in
the standard cap frame.
1
Sapphire_chapt7.fm Page 179 Friday, November 18, 2005 12:10 PM
Summary of Contents for PR-620
Page 1: ...EMBROIDERY MACHINE O P E R A T I O N M A N U A L PR 620 ...
Page 77: ...EMBROIDERING TUTORIAL 60 ...
Page 115: ...EMBROIDERING SETTINGS 98 ...
Page 171: ...BASIC SETTINGS AND HELP FEATURE 154 ...
Page 229: ...APPENDIX 212 ...
Page 236: ...Index 219 7 ...
Page 237: ......


