ADVANCED EMBROIDERY
109
3
Instead of using thread marks, the camera can be used to
connect patterns.
An area of 330 mm × 170 mm (13 inches × 6-1/2 inches)
can be embroidered when the camera is used to connect
patterns. Select the appropriate frame depending on the
size of the embroidery. We recommend using the extra-
large embroidery frame (360 mm × 200 mm (14 inches ×
7-7/8 inches)) when using the camera to connect patterns.
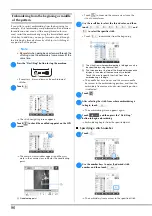
Connecting three patterns
Example:
1
Pattern A
2
Pattern B
3
Pattern C
a
Specify the appropriate image settings in advance.
(page 73)
• Better scanning results can be achieved with the
appropriate settings.
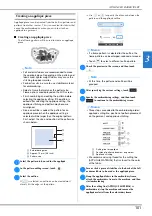
b
Select the first pattern A, and then touch
.
c
Hoop fabric in the extra-large embroidery frame (360
mm × 200 mm (14 inches × 7 7/8 inches)), and then
attach the frame to the machine.
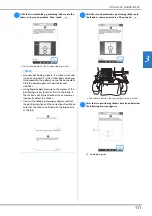
d
Touch
to display the embroidering settings
screen. Touch
.
•
needs to be selected in order to continue
connecting patterns.
appears at the bottom left side of pattern
display area, and then
changes to
.
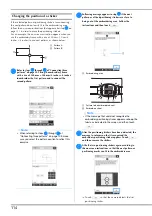
e
Touch
, then touch
and then press
the “Start/Stop” button to embroider the first pattern.
f
After embroidering of the first pattern is finished, the
message to confirm to connect the next pattern
appears. Touch
.
g
When the following message appears, touch
.
USING THE CAMERA TO CONNECT
PATTERNS
Note
• When installing the embroidery frame (small) (60
mm × 40 mm (2-3/8 inches × 1-1/2 inches)), cap
frames, cylinder frame, sleeve frame, clamp
frames, name frame or the round frames, you
cannot connect patterns using this function.
• Split (large-size) patterns created with PE-DESIGN
version 7 or later cannot be used with this function.
• You cannot connect patterns using this function
while the machine is set to the Link mode.
Memo
• A pattern cannot be saved in the machine’s memory
while patterns are being connected.


