GETTING READY
11
1
■
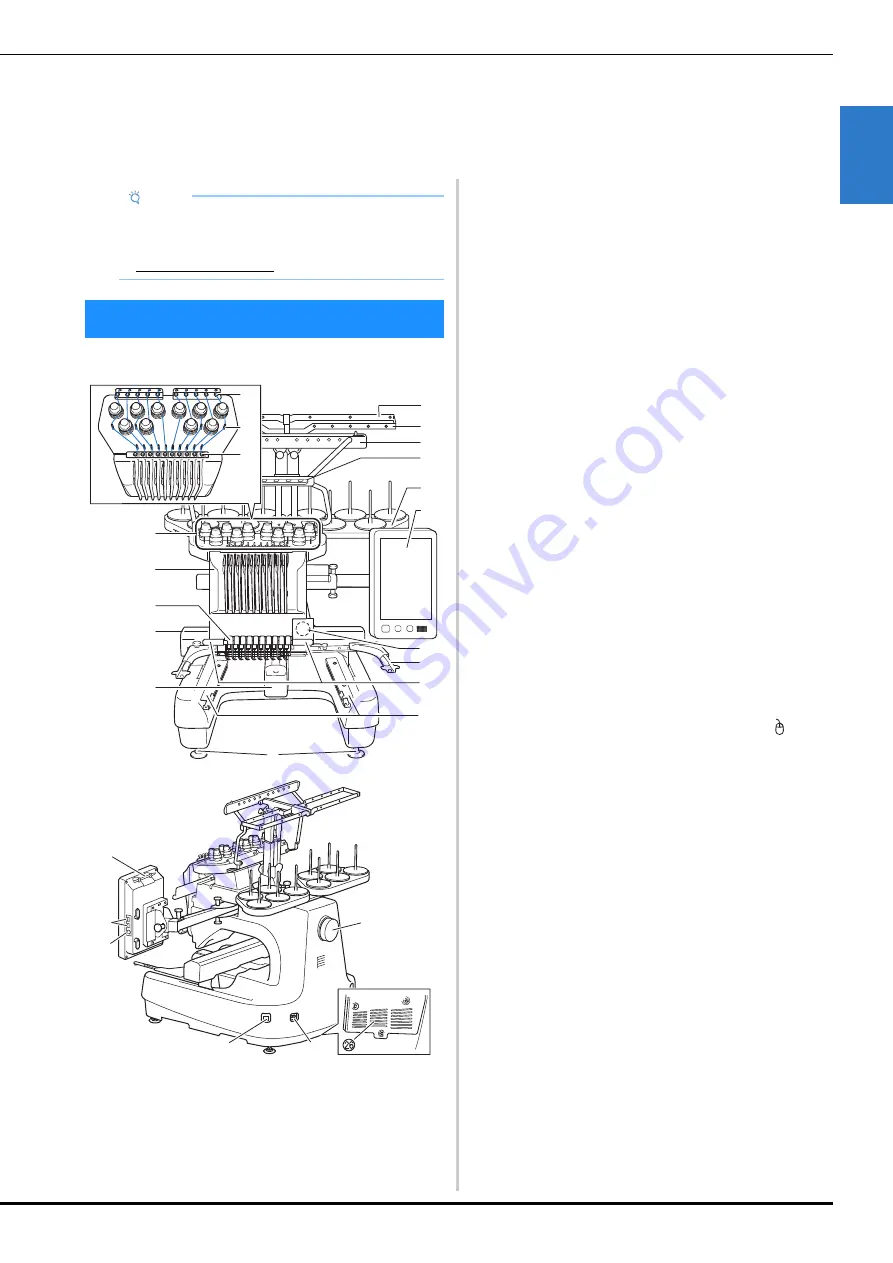
Main parts
1
Thread tension knobs (page 118)
2
Needle bar case
Moves to the left and right to move the needle to the
embroidering position.
3
Lower thread guide
4
Carriage
Attach the embroidery frame to the carriage. When the
machine is turned on or when the machine is embroidering, the
carriage moves forward, backward, left and right.
5
Hook cover/Hook (page 33)
6
Thread guide A (page 83)
7
Thread guide B (page 83)
8
Thread guide C (page 83)
9
Thread guide D (page 83)
0
Spool stand (page 20)
A
Operation panel (page 12)
B
Built-in camera (page 72)
C
Embroidery frame holder (page 21)
D
Embroidery light
The brightness of the embroidery light can be adjusted in the
settings screen.
E
Wide table brackets (page 137)
F
Upper thread guide (page 83)
G
Thread guide pins (page 84)
H
Middle thread guide (page 84)
I
Feet (page 18)
J
Touch pen holder
Use the touch pen holder to hold the touch pen when not in
use.
K
USB port for media (page 32, page 130)
In order to send patterns from/to USB media, plug the USB
media directly into the USB port.
Connect a USB mouse to the USB port marked with .
L
USB port for computer (page 130)
In order to import/export patterns between a computer and the
machine, plug the USB cable into the USB port.
M
Handwheel
Rotate the handwheel to move the needle up and down. Be
sure to rotate the handwheel toward the LCD panel.
N
Power supply plug (page 22)
O
Main power switch (page 22)
Do not turn the power on soon after turning the power off. It is
recommended that you wait 5 seconds before turning the
power back on.
P
Ventilation slots
The ventilation slots allow the air surrounding the motor to
circulate. Do not cover the ventilation slots while the machine is
being used.
Chapter
1
GETTING READY
Note
• Be sure to install the latest software.
Refer to “UPGRADING YOUR MACHINE’S
SOFTWARE” on page 192.
http://s.brother/cubah/
NAMES OF MACHINE PARTS
Bottom
a
b
c
d
e
f
g
h
i
j
k
l
m
n
o
s
p
q
r
t
u
v
w
x
y

