-20-
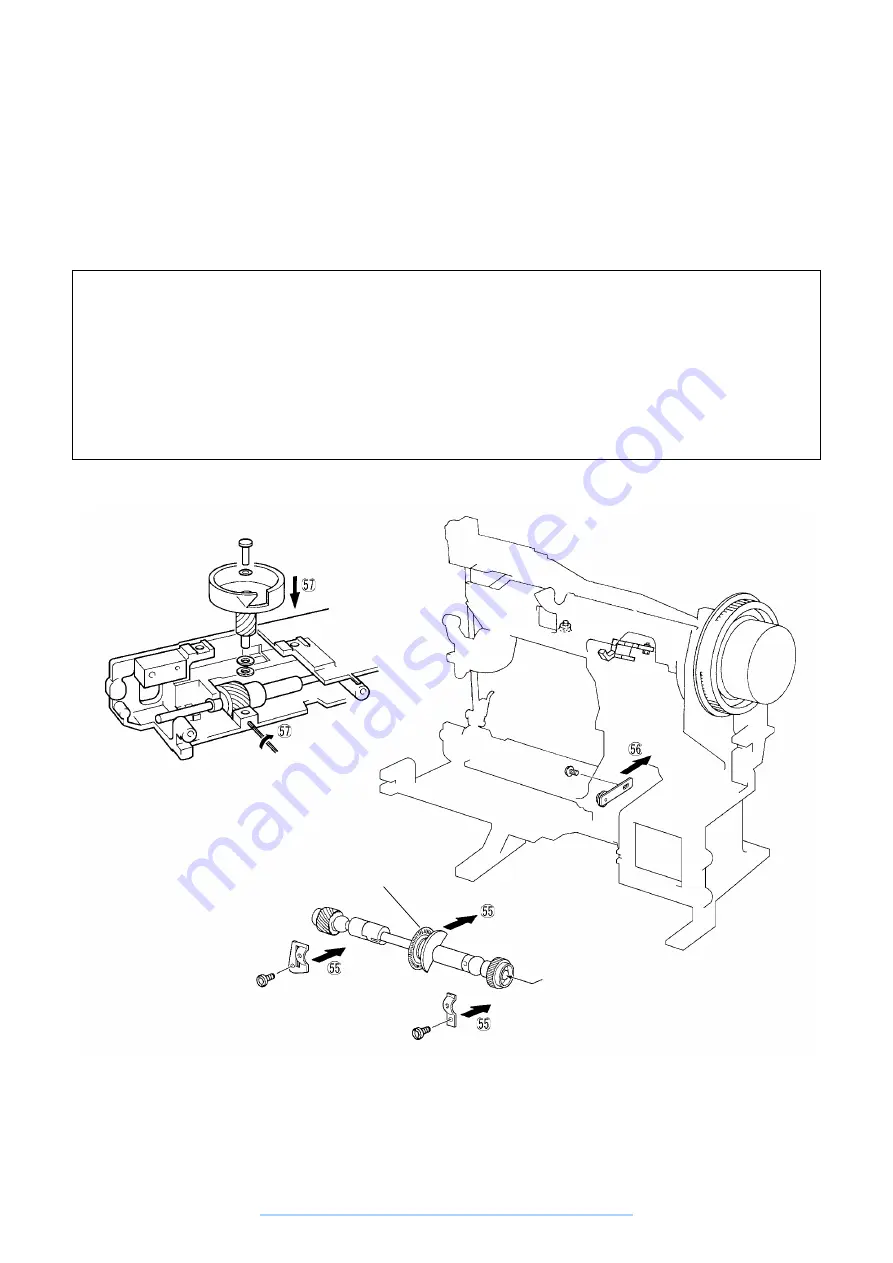
55. Pass the lower shaft section through the timing belt and secure with the eccentric metal presser (left side),
the lower shaft metal presser (right side), and install with the two screws. Align the timing of the upper shaft
and lower shaft. (See Adjustment Procedure 2.)
56. Secure the tension pulley assembly with the screw and install while adjusting the tension of the timing belt.
(See Adjustment Procedure 3.)
57. Pass the spacer U, rotary hook assembly, spacer, and flat washer (thin) onto the rotary hook shaft in that
order and secure with the screw.
Assembly Points
55. When installing the lower shaft, check that the lower shaft rotates freely, then align the timing of the upper
and lower shafts and hang the timing belt on the upper shaft and lower shaft pulleys. (See Adjustment
Procedure 2.)
56. When adjusting the tension of the timing belt with the timing pulleys, check the upper shaft and lower shaft
timing. (See Adjustment Procedure 2.)
57. Install the spacer under the rotary hook assembly passed onto the rotary hook shaft with the thicker side
facing up. After the rotary hook assembly is installed, check that the rotary hook assembly has no vertical
play.
STAR240E,
STAR230E only
www.promelectroavtomat.ru
Summary of Contents for PS-53
Page 1: ... 7 2001 www promelectroavtomat ru ...
Page 4: ... 2 1 MECHANICAL CHART www promelectroavtomat ru ...
Page 8: ... 6 3 ELECTRONIC PARTS ARRANGEMENT CHART STAR240E STAR230E only www promelectroavtomat ru ...
Page 31: ... 29 2 LEAD WIRES ARRANGEMENT STAR240E STAR230E PS57 PS55 PS53 www promelectroavtomat ru ...
Page 77: ...STAR240E STAR230E PS 57 PS 55 PS 53 H1060212 www promelectroavtomat ru ...


