3. ASSEMBLY
RH-981A
24
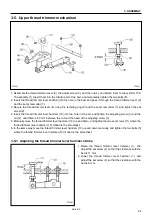
3-5. Upper thread trimmer mechanism
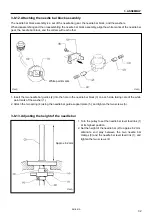
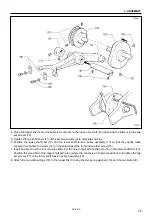
1. Assemble the thread trimmer lever (2), the adjust screw (3), and the nut (4), and attach them to the cylinder 10 X
15 assembly (1). Insert them into the tubular part of the bed, and temporarily tighten the two bolts (5).
2. Insert the thread trimmer lever shaft (6) into the hole in the bed, and pass it through the thread trimmer lever (2)
and the set screw collar (7).
3. Secure the thread trimmer lever (2) using the retaining ring (8) and the set screw collar (7), and tighten the set
screw (9).
4. Insert the thread trimmer lever hammer (10) into the hole in the bed, and tighten the adjusting screw (3) and the
nut (4), until there is 2.7 mm between the nut and the head of the adjusting screw (3).
5. Manually move the thread trimmer lever hammer (10) up and down, and tighten the two set screws (11) where the
thread trimmer lever hammer (10) motion is the smoothest.
6. In the same way, move the thread trimmer lever hammer (10) up and down manually, and tighten the two bolts (5)
where the thread trimmer lever hammer (10) motion is the smoothest.
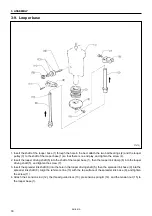
3-5-1. Adjusting the thread trimmer lever hammer stroke
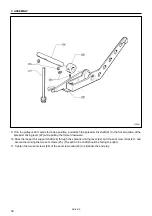
1. Raise the thread trimmer lever hammer (1), and
adjust the set screw (2) so that the clearance with the
bed is 11 mm.
2. Lower the thread trimmer lever hammer (1), and
adjust the set screw (3) so that the clearance with the
bed is 6 mm.
3724Q
3725Q
3726Q


