4. ADJUSTMENT
RH-981A
66
4-22-4. Adjusting the thread handler
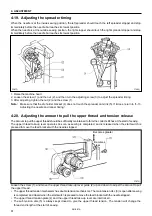
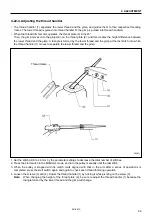
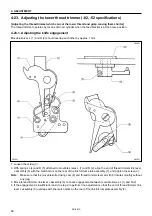
• The thread handler (1) separates the lower thread and the gimp, and guides them to their respective threading
routes. The lower thread is guided into thread handler D; the gimp is guided into thread handler U.
• When the thread trimmer arm operates, the throat plate (2) turns 45
o
.
Then, the gimp moves onto the projection on the throat plate (2), and this creates the height difference between
the lower thread and the gimp. A triangle is formed by the lower thread and the gimp at the last stitch, into which
the thread handler (1) moves to separate the lower thread and the gimp.
1. Set the stitch pitch to 2.0 mm by the parameter settings to decrease the total number of stitches.
2. Press the start switch in the MANUAL mode, and turn the pulley manually until the last stitch.
3. When the pulley is stopped with its match mark aligned with that in the arm after a series of operations is
completed, press the start switch again and again to check each thread trimming operation.
4. Loosen the screws (3) and (4). Adjust the thread handler (1) by turning it while pivoting on the screw (3).
Note:
When changing the height of the throat plate (2), be sure to adjust the thread handler (1) because the
triangle formed by the lower thread and the gimp will change.
3808Q
Thread clamp

