51
5
5
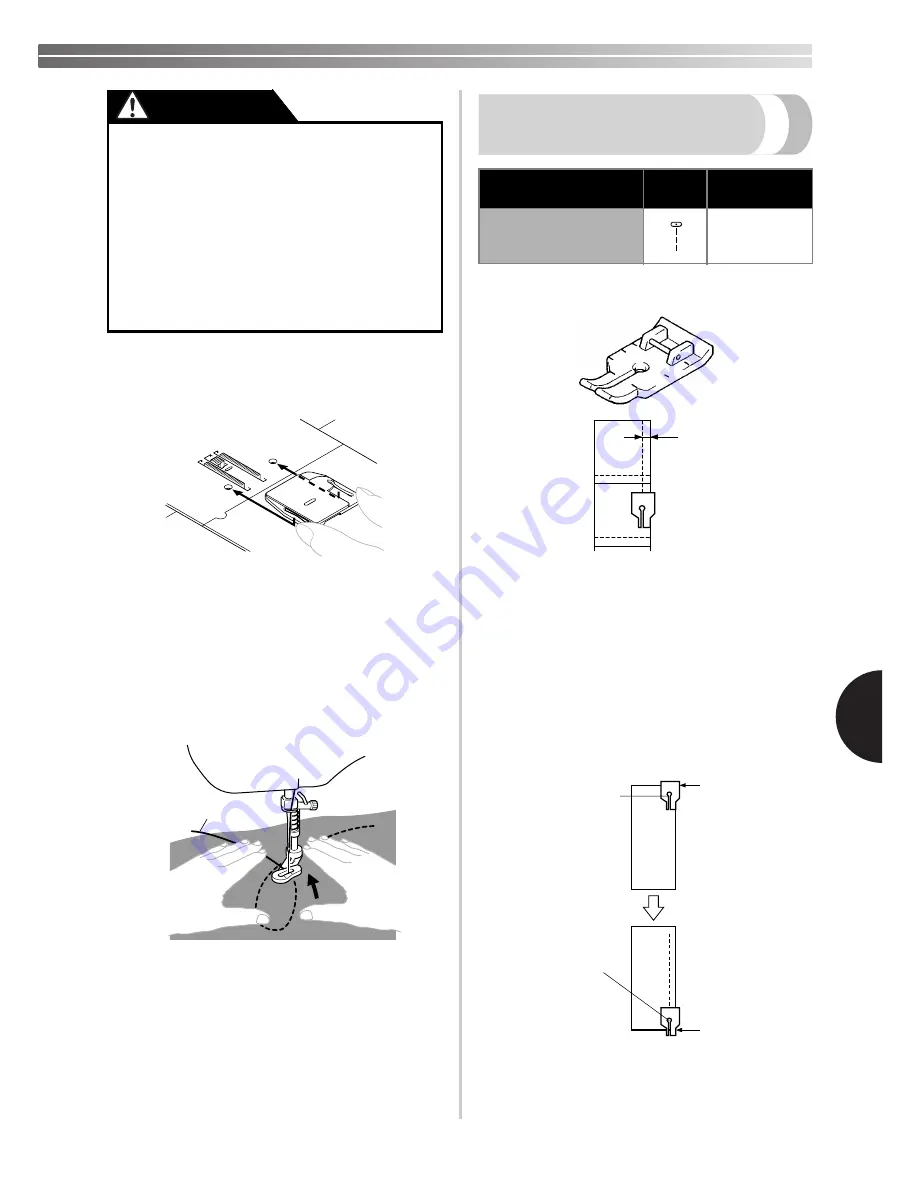
Put the darning plate on the needle plate.
Connect the power supply plug into the wall
outlet.
6
Set the Pattern Selection Dial to Straight
Stitch (Center Needle Position).
• Before starting to sew, draw the quilting
design on the fabric.
7
Use both hands to keep the fabric firmly
stretched and move the fabric to sew over the
drawn design.
1
Quilting design (Line)
8
The length of the stitch depends on how
quickly you move the fabric and on the
machine’s sewing speed. Sew while moving
the fabric slowly.
Using the 1/4-Inch
Quilting Foot
You can use the 1/4-Inch Quilting Foot to sew fixed
seams when piecing together a quilt.
1
Seam allowance 6.5 millimetres (1/4 inch)
1
Set the Pattern Selection Dial to Straight
Stitch (Center Needle Position (2.5mm
(3/32 inch)).
2
Change the foot to the 1/4-Inch Quilting Foot.
3
Position the presser foot over the fabric and
sew, as shown in the diagram below.
■
Achieving an accurate seam allowance.
1
Beginning of stitching.
2
Align this mark up the edge of the fabric.
3
End of stitching
4
Align this mark up the edge of the fabric.
●
Be careful not to touch the needle,
otherwise you may be injured.
●
Use a screwdriver to tighten the presser
foot holder screw securely. If the screw is
loose, the needle may hit the presser foot
and you may be injured.
●
Before you start sewing, make sure you
turn the balance wheel toward the front
of the machine to check that the needle
does not hit the presser foot.
CAUTION
1
Stitch Name
Pattern
Stitch length
[mm(inch)]
Straight Stitch
(Center Needle Position)
2.5 (3/32)
1
2
1
3
4
Summary of Contents for XL-2121
Page 1: ...Operation Manual Operation Manual ...
Page 8: ...1 KNOWING YOUR SEWING MACHINE ...
Page 31: ...KNOWING YOUR SEWING MACHINE 30 ...
Page 32: ...2 STRAIGHT AND ZIGZAG STITCHING ...
Page 36: ...3 BUILT IN STITCHES ...
Page 39: ...BUILT IN STITCHES 38 ...
Page 40: ...4 SEWING BUTTONHOLES AND BUTTONS ...
Page 44: ...5 USING ATTACHMENTS AND APPLICATIONS ...
Page 54: ...6 APPENDIX ...


