-51-
23.
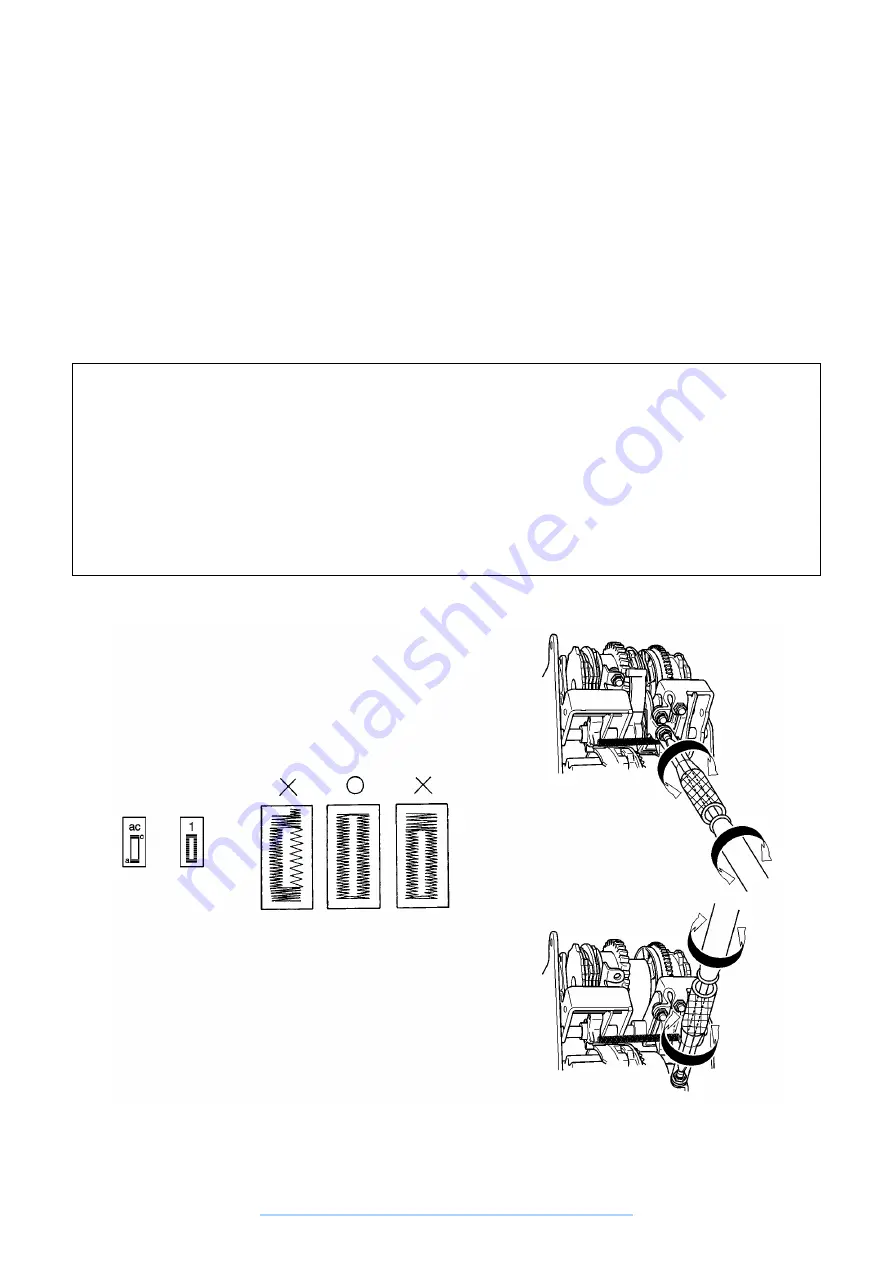
BUTTON HOLE STITCH BAR TACK FEED ADJUSTMENT
STANDARD
The button hole stitch bar tack feed distance should be no greater than 1 mm for 10 pitch.
ADJUSTMENT
1.
Turn the selection dial to BH sewing and execute bar tack sewing.
2.
Loosen the bar tack adjustment screw nut.
3.
Adjust by turning the bar tack adjustment screw.
4.
Tighten the bar tack adjustment screw nut.
Adjustment Points
2.
When adjusting using a box driver as shown in the figure, since the selection dial interferes slightly with
the box driver, remove the selection dial screw and the selection dial beforehand.
3.
To forward the bar tack, turn the adjustment screw to the left. To reverse the bar tack, turn the
adjustment screw to the right.
4.
When fastening the adjustment screw with the nut, in order to maintain the position and prevent deviation,
hold the adjustment screw with the screwdriver while you tighten down the nut.
*
Note that unless the 22. BUTTON HOLE STITCH LEFT REVERSE STITCH AND RIGHT FORWARD
STITCH LENGTH is completed before the button hole stitch bar tack sewing feed adjustment, the button
hole stitch bar tack sewing feed adjustment will need to be repeated.
XL-6060
XL-6050
XL-6040
XL-6060
XL-6050
XL-6040
www.promelectroavtomat.ru
Summary of Contents for XL-6040
Page 1: ... 6 2001 www promelectroavtomat ru ...
Page 3: ... 1 I 1 MECHANICAL CHART 2 2 POWER TRANSMISSION CHART 3 www promelectroavtomat ru ...
Page 4: ... 2 1 MECHANICAL CHART www promelectroavtomat ru ...
Page 29: ... 27 2 LEAD WIRES ARRANGEMENT www promelectroavtomat ru ...
Page 61: ...XL 6060 Series XL 6050 Series XL 6040 Series H1040194 www promelectroavtomat ru ...


