36
TROUBLESHOOTING
Warning:
Compressor repairs are to be performed by an authorized dealer/service center only. Any repairs made
by the user are to be made at the user’s own risk and will void Brownie’s Third Lung warranty unless the
user has been authorized to make a repair and has been given appropriate repair instructions. Repairs
must never be carried out without sufficient knowledge and understanding of compressor technology. If
you have any questions or are unsure of a problem’s cause, contact our Service Department for advice
prior to disassembly of the unit or component parts.
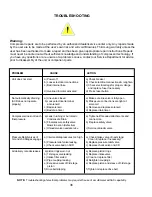
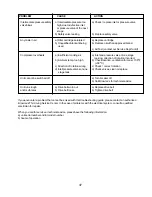
PROBLEM
CAUSE
ACTION
Unit does not start
a) Power off
a) Check breaker
b) Loose electrical connections
b) Check electrical connections & retighten
c) Bad internal fuse
c) Check electrical legs for proper voltage
and replace fuse if necessary
d) Overload in motor activated
d) Press reset button
Not automatically draining
a) Line valve closed
a) Make sure line valve is fully open
(ACD does not operate
b) Loose electrical terminal
b) Make sure connections are tight at
properly)
at solenoid
solenoid
c) Bad solenoid
c) Remove and replace solenoid
d) Bad drain timer
d) Replace drain timer
Compressor does not reach
a) Leak in tubing or Automatic
a) Tighten all threaded attachments and
final pressure
Condensate Drain
connectors.
b) Final pressure safety valve
b) Replace safety valve
blows too soon (defective)
c) Unloader valve needs service
c) Service unloader valve
Pressure Relief valves of
a) Intermediate pressures too high
a) Check intake valve of next stage:
1st and 2nd Stages engage
Clean it (replace if necessary)
b) Pressure relief valve leaking
b) Replace pressure relief valve
c) Check valve bad on ACD
c) Replace check valve on ACD
Air delivery rate decreases
a) piston rings worn out
a) Replace piston rings
b) 1st stage valve leaking
b) Replace intake valve
c) Intake filter soiled
c) Clean or replace filter
d) Pipe coupling leaking
d) Retighten couplings
e) Excessive wear of 3rd stage
e) Replace piston and sleeve of 3rd stage
piston
f) Drive belt slipping
f) Tighten or replace drive belt
NOTE:
Troubleshooting of electrical problems may require the use of a multimeter with AC capability.
Summary of Contents for YP25DF
Page 2: ...2 ...
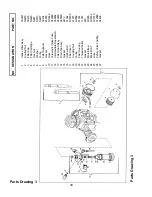
Page 30: ...30 Parts Drawing 1 Parts Drawing 1 ...
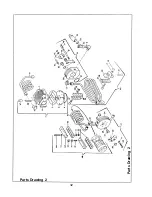
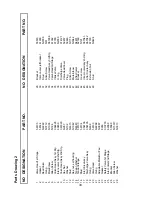
Page 32: ...32 Parts Drawing 2 Parts Drawing 2 ...
Page 35: ...35 Figure 5 Black Filter Tower Figure 5 Black Filter Tower ...
Page 44: ...44 NOTES ...


