background image

9

WARNING:

 Divers lives depend upon proper operation of the system. 

Brownie’s Third Lung highly recommends that all system operators take a 
System Training Course.

PRE START-UP CHECKS

Consult the system log to see if the following maintenance needs to be done:

•  Purification Cartridge inspection/replacement (see pages 11, 20, 22)
•  Sightglass Element replacement  (see page 18)    (6 month installed life)
•  Oil Check/Change (see pages 17, 27)

1.  Check oil level
The oil level must be between the upper and lower marks on the dipstick (see picture page 17). If the oil is low, 
add oil through the dipstick tube. Use only Brownie’s recommended oil (see page 11 for recommended oils). Do 
not mix oils or use non-recommended oils which may adversely affect the life of the unit or even destroy the unit.

2.  Check Purification Cartridges
Inspect both cartridges by following the procedure on page 11. Replace either cartridge if present cartridge has 
been used up or the cartridge has been in place for 6 months. (This is the maximum installed life of the purifica-
tion cartridges. If the cartridges are close to expiration, Brownie’s recommends replacing the cartridge with a new 
one.) Replacement Cartridge for the Black Tower is X53240. Replacement cartridge for the Gold Tower is X22679.

WARNING

Failure to monitor or replace the purification cartridge WILL contaminate all air 

lines, fill assemblies, divers air tanks, regulators, and may cause severe injury or even diver 
death. The system operator is responsible for the lives and safety of the divers using air pro-
duced by the system.

3.  Check Visual Carbon Monoxide / Moisture Indicator
The visual indicator has two elements. An outer blue ring for indicating the presence of moisture, and a central tan 
to orange disc, indicating the presence of carbon monoxide. Any change in color, (the central disc (CO) turns dark 
brown or has black spots, and/or the outer ring (moisture) turns pink or beige, indicates that the air leaving the 
purification system is contaminated and not breathable. The visual monitor is the last monitor of the air leaving the 
purification system, and must be checked during operation for any changes.

WARNING: 

Any color change in the elements of the visual indicator means that con-

taminated air has passed downstream. All air lines, fill assemblies, and equipment must 
be cleaned or replaced. An Air Test must be done to insure thoroughness of all cleaning. 
Breathing contaminated air may result in personal injury or death.

4.  Check Air Intake
Remove and inspect the Air Intake Filter. If the system is equipped with a remote air intake, be sure it is properly 
located, and clear of any water or obstructions.

5.  Add all pre-startup maintenance/inspection notations to the system log with date, hours, and operator name.

6.  Inspect ALL tanks to be filled:

• Make sure the tanks are in good condition with no deep scratches, gouges, or pitting.
• The tanks must be within current hydrostatic test and Visual Inspection dates.
• Do not fill empty tanks without first visually inspecting them for water intrusion.
• Make sure that the valves are in good condition and not in need of service. Do not fill tanks with damaged 

valves.

• Do not fill tanks that have been exposed to extreme heat, i.e.:  tanks that have been in or near fires.
• Do not fill tanks designated for air with other gas mixtures, ie: Nitrox, Trimix, etc.

Summary of Contents for YP25DF

Page 1: ...ad Fort Lauderdale FL 33316 Ph 954 524 2112 Fx 954 524 7598 info yachtdiver com Brownie s Yacht Toys 2301 South Federal Hwy Fort Lauderdale FL 33316 Ph 954 463 9446 Fx 954 524 6722 Toll Free 800 949 0822 Brownie s Palm Beach Divers 3619 Broadway Riviera Beach FL 33404 Ph 561 844 3483 Fx 561 845 1500 info yachtdiver com ...

Page 2: ...2 ...

Page 3: ... Yacht Pro Series Compressor as it contains pertinent information for the safe operation of the system Failure to follow the instructions in this manual may result in damage to the compressor and or personal injury or death WARNING Installation and operation of the system without the guidelines set forth in this manual may result in damage to the system and or personal injury or death WARNING Neve...

Page 4: ... belt Tension Adjustment 16 Cooling System 16 Oil Level Check 17 Oil Types 17 Intake Filter 17 Sightglass Element Change Demonstration 18 Black Filter Cartridge Replacement Demonstration 20 Gold Filter Cartridge Replacement Demonstration 22 Tankfill Demonstration 24 Oil Change Demonstration 27 Troubleshooting 36 Systems Operations Log 38 Warranty Information 45 Physical Layout Features Figure 1 Bl...

Page 5: ...78901234567890121234567890123456789012345678901212345678901234567890123456789012123456789012345678901234567890121234 123456789012345678901234567890121234567890123456789012345678901212345678901234567890123456789012123456789012345678901234567890121234 123456789012345678901234567890121234567890123456789012345678901212345678901234567890123456789012123456789012345678901234567890121234 12345678901234567...

Page 6: ...ssure Std 3200 PSI Pressure setting final 3400 PSI pressure safety valve STD Dimensions 36 L x 17 W x 18 H 91 x 44 x 46 cm Weight Approx 110 lbs 50kg Use Compression of atmospheric air Intake Pressure Atmospheric Pressure Compressor RPM YP25DF 1800 YP35DF 2300 Drive Belt Type 3VX355 Number of Stages 3 Number of Cylinders 3 Cylinder Bore 1st Stage 60 mm Cylinder Bore 2nd Stage 28 mm Cylinder Bore 3...

Page 7: ...r Tool Kit One liter Synthetic Compressor Oil The following are included with the YP25DF YP35DF One Four way Manifold with 10 foot connection hose including stainless steel quick disconnect end One inch padded Custom Cordura Manifold Bag NOTICE Please read this Owner s Manual before you operate your Yacht Pro Series Compressor Optional Equipment One Starboard Mounting and Spill Containment Tray St...

Page 8: ...n a flat level surface No more than 10 deg inclination must occur during operation 4 The Yacht Pro Series units are provided as a complete assembly ready for installation NOTE Some installations may require remote mounting of package components This must be approved by our Technical Department NOTE Any alterations of the original system without approval by our technical department will void the ma...

Page 9: ...Check Visual Carbon Monoxide Moisture Indicator The visual indicator has two elements An outer blue ring for indicating the presence of moisture and a central tan to orange disc indicating the presence of carbon monoxide Any change in color the central disc CO turns dark brown or has black spots and or the outer ring moisture turns pink or beige indicates that the air leaving the purification syste...

Page 10: ... aluminum cylinder from 500 psi to 3000 psi and are approximately as follows YP25DF 28 minutes per tank and YP35DF 22 minutes per tank Cylinder volume starting tank pressure and tank pressure ratings will vary the fill times WARNING Brownie s recommends a two hour approximately 4 tanks duty cycle with a one hour period between cycles Note that the indicator light is still on after the compressor a...

Page 11: ...be replaced The hours the cartridge is used and replaced needs to be recorded in the system log The Yacht Pro purification cartridges have a shelf life of two years in the original sealed package and a maximum installed life of six months Spare cartridges should be kept in a cool dry location The boxes must not be crushed and the packaging must not be punctured WARNING Do not use cartridges that h...

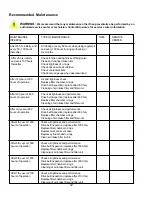
Page 12: ...nspection replace after 900 hrs Replace filter chamber o rings Cleaning of air intake filter and filter unit WARNING We recommend that any maintenance other than preventative be performed by an authorized service center or technician Contact Brownie s for service center information After 4th year or 1200 Check air tightness and performance hours of operation Drive belt inspection replace after 120...

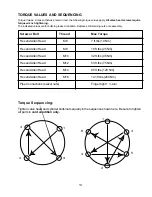
Page 13: ...78901234567890123456789012123456789012345678901234567890121234 123456789012345678901234567890121234567890123456789012345678901212345678901234567890123456789012123456789012345678901234567890121234 123456789012345678901234567890121234567890123456789012345678901212345678901234567890123456789012123456789012345678901234567890121234 TORQUE VALUES AND SEQUENCING Torque Values Unless otherwise noted in te...

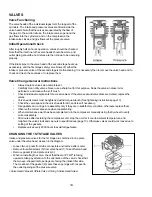
Page 14: ... warm and outlet piping should be hot Valves are then shown to be operating properly If the intake pipe to the valve head of the second stage heats up excessively and the first stage safety valve blows off either the intake or pressure valve of the second stage is malfunctioning It is necessary then to remove the valve head and to check and clean these valves or to replace them Valve Change Genera...

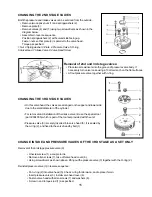
Page 15: ...STAGE VALVES On this valve head the valves are arranged on the upper and lower side due to the small diameter of the cylinder For removal and installation of the intake valve 4 use the special tool part 004555 which is part of the tool set provided with the unit Pressure valve 3 is merely inserted into valve head 5 It is sealed by the o ring 2 and fixed to the valve head by bolt 1 CHANGE INTAKE AN...

Page 16: ...EM The cylinders of the compressor block the intermediate coolers and the after cooler are all air cooled For this purpose the compressor is equipped with a fanwheel connected to the counter weight at the crankshaft end opposite to the V belt pulley It draws the cooling air through the fanwheel cover from the surroundings Refer to page 6 for specific ambient temperature data CHECKING THE DRIVE BEL...

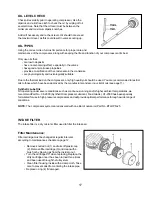
Page 17: ...ed the maximum level as this could result in valves sooting up OIL TYPES Using the correct oil is of utmost importance for proper care and maintenance of the compressor along with keeping the life and function of your compressor at its best Only use oils that are low in deposits have no carbonizing effect especially in the valves have good anti corrosive properties provide emulsification of the co...

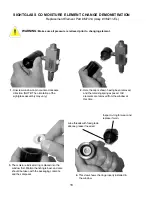
Page 18: ...orn Lube threads with food grade silicone grease if needed 1 Unscrew window cap in counter clockwise direction NOTE The orientation of the sightglass assembly may vary 2 Here the cap is shown having been removed and the retaining spring exposed Old elements are removed from the window at this time WARNING Make sure all pressure is relieved prior to changing element SIGHTGLASS CO MOISTURE ELEMENT C...

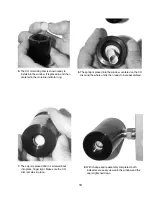
Page 19: ... The spring is placed into the window centered on the CO disc and the whole unit is then ready to be reassembled 7 The cap is replaced and it is screwed back into place finger tight Make sure the CO disc remains in place 8 With change and reassembly completed both indicators are easily viewed in the window and the cap is tightened down ...

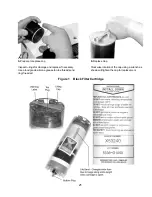
Page 20: ...t on the bottom BLACK FILTER CARTRIDGE REPLACEMENT DEMONSTRATION REPLACEMENT CARTRIDGE PART X53240 WARNING Prior to changing the filter purge all pressure using the bleeder valve 1 Remove Cap Counter clockwise rotation of the cap using a wrench as shown will loosen the cap for removal 2 Remove Old Filter While removing the old filter check the Lifeband indicator to determine filter usage or replac...

Page 21: ...gs for damage and replace if necessary Use a food grade silicone grease to lube threads and ring if needed 6 Replace Cap Clockwise rotation of the cap using a wrench as shown will tighten the cap for replacement Figure 1 Black Filter Cartridge ...

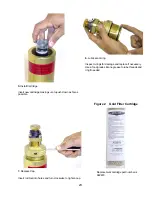
Page 22: ...cessary to vent excess pressure by turning the small cap on the gold tower clockwise After venting pressure close cap by turning counter clockwise 2 Remove Cap Insert rod tool into holes in cap and turn counter clockwise 3 Remove Old Filter Remove old filter by pulling up on wire 4 Prepare Filter Pull plastic cap off of bottom plug of cartridge and discard ...

Page 23: ... 6 Lubricate O ring Inspect o rings for damage and replace if necessary Use a food grade silicone grease to lube threads and ring if needed 7 Replace Cap Insert rod tool into holes and turn clockwise to tighten cap Replacement cartridge part number is X22679 Figure 2 Gold Filter Cartridge ...

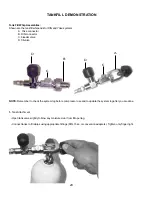
Page 24: ...bleeder valve D fill valve B C D 1 Tank Attachment Open tank valve slightly to blow any moisture clear from fill opening Connect tanks to fill whips using appropriate fittings DIN Yoke or conversion adapters Tighten only finger tight NOTE Remember to check the system log before compressor use and to update the system log after you are done A D C ...

Page 25: ...his valve will open the tanks for filling 4 Open Fill Valves Counter clockwise rotation of this valve will open the line to the tanks The tanks will now equalize any differences in their pressures 5 Start The Compressor The indicator light will come on If you have a dual pressure switch be sure the control is in the correct position ...

Page 26: ... the knob closes off the fill lines 7 Close Tanks Clockwise rotation of the knob closes the tank valves 8 Open Bleeder Valves Counter clockwise rotation of this valve will allow pressure to vent 9 Remove Tanks Disconnect tanks from the fill line New tanks may be attached at this time and the process repeated ...

Page 27: ...il to drain Care should be taken in draining the oil into a proper container for disposal per local guidelines and laws 4 Replace the oil plug again using a wrench to stabilize the drain and another one to secure the plug Fill the unit with approved oil through the dipstick tube Check the level with the dipstick and add as necessary for proper levels OIL CHANGE DEMONSTRATION ...

Page 28: ... Off Switch TEFC Motor Heavy Duty Stainless Steel Frame Outlet to Condensate Drain Reservoir Automatic Drain Timers Lighted On Off Switch Oil Drain Outlet to Remote Filter Tower or Fill Manifold Initial Filter Tower with Integrated Safety Oil Dipstick Fill Tube Air Intake Filter Housing Belt Guard NEMA4 Sealed Electric Control Box Vibration Isolators ...

Page 29: ...stem and Compressor Features LED Pressure Switch Air Outlet to Black Filter Tower Inlet to Condensate Bottle Intermediate Separator Manual Drain Valve normally closed Intermediate Separator Automatic Drain Solenoid Timers Intermediate Separator Automatic Drain Solenoid Valve Gold Filter Tower Automatic Drain Solenoid Valve Gold Filter Tower Automatic Drain Solenoid Timer ...

Page 30: ...30 Parts Drawing 1 Parts Drawing 1 ...

Page 31: ...45678 12345678 12345678 12345678 12345678 12345678 12345678 12345678 12345678 12345678 12345678 12345678 12345678 12345678 12345678 12345678 12345678 12345678 12345678 12345678 12345678 12345678 12345678 12345678 12345678 12345678 12345678 12345678 12345678 12345678 12345678 12345678 12345678 12345678 12345678 12345678 12345678 12345678 12345678 12345678 NO DESIGNATION PART NO 1 Driving Gear Assy ...

Page 32: ...32 Parts Drawing 2 Parts Drawing 2 ...

Page 33: ...78 12345678 12345678 12345678 12345678 12345678 12345678 12345678 12345678 12345678 12345678 12345678 12345678 12345678 12345678 12345678 12345678 12345678 12345678 12345678 12345678 12345678 12345678 12345678 12345678 12345678 12345678 12345678 12345678 12345678 12345678 12345678 12345678 12345678 12345678 12345678 12345678 12345678 12345678 12345678 12345678 12345678 12345678 12345678 12345678 1...

Page 34: ...12345678 12345678 12345678 12345678 12345678 12345678 12345678 12345678 12345678 12345678 NO DESIGNATION PART NO Parts Drawing 3 Parts Drawing 3 1 Intake Filter Assy 059377 2 Knurled Nut N4870 3 Filter Cap 59433 4 Filter Cartridge N4823 5 Hex Nut N287 6 Washer N3313 7 O ring N4877 8 Filter Support 59434 9 Gasket 65985 10 Hose N17442 11 Telescopic Intake Tube 062080 12 Intermediate Separator A 0699...

Page 35: ...35 Figure 5 Black Filter Tower Figure 5 Black Filter Tower ...

Page 36: ...ate b Loose electrical terminal b Make sure connections are tight at properly at solenoid solenoid c Bad solenoid c Remove and replace solenoid d Bad drain timer d Replace drain timer Compressor does not reach a Leak in tubing or Automatic a Tighten all threaded attachments and final pressure Condensate Drain connectors b Final pressure safety valve b Replace safety valve blows too soon defective ...

Page 37: ... high b Check location ventilation for max 100º F 38º C c Direction of rotation wrong c Check correct rotation d Inlet pressure valves on one d Check valves clean or replace stage leak Unit cannot be switched off a Turn breaker off b Call Brownie s for technical advice Unit runs rough a Drive belt worn out a Replace drive belt and or vibrates b Drive belt loose b Tighten drive belt If you encounte...

Page 38: ...890121234 123456789012345678901234567890121234567890123456789012345678901212345678901234567890123456789012123456789012345678901234567890121234 123456789012345678901234567890121234567890123456789012345678901212345678901234567890123456789012123456789012345678901234567890121234 1234567890123456789012345678901212345678901234567890123456789012123456789012345678901234567890121234567890123456789012345678...

Page 39: ...890121234 123456789012345678901234567890121234567890123456789012345678901212345678901234567890123456789012123456789012345678901234567890121234 123456789012345678901234567890121234567890123456789012345678901212345678901234567890123456789012123456789012345678901234567890121234 1234567890123456789012345678901212345678901234567890123456789012123456789012345678901234567890121234567890123456789012345678...

Page 40: ...890121234 123456789012345678901234567890121234567890123456789012345678901212345678901234567890123456789012123456789012345678901234567890121234 123456789012345678901234567890121234567890123456789012345678901212345678901234567890123456789012123456789012345678901234567890121234 1234567890123456789012345678901212345678901234567890123456789012123456789012345678901234567890121234567890123456789012345678...

Page 41: ...890121234 123456789012345678901234567890121234567890123456789012345678901212345678901234567890123456789012123456789012345678901234567890121234 123456789012345678901234567890121234567890123456789012345678901212345678901234567890123456789012123456789012345678901234567890121234 1234567890123456789012345678901212345678901234567890123456789012123456789012345678901234567890121234567890123456789012345678...

Page 42: ...890121234 123456789012345678901234567890121234567890123456789012345678901212345678901234567890123456789012123456789012345678901234567890121234 123456789012345678901234567890121234567890123456789012345678901212345678901234567890123456789012123456789012345678901234567890121234 1234567890123456789012345678901212345678901234567890123456789012123456789012345678901234567890121234567890123456789012345678...

Page 43: ...890121234 123456789012345678901234567890121234567890123456789012345678901212345678901234567890123456789012123456789012345678901234567890121234 123456789012345678901234567890121234567890123456789012345678901212345678901234567890123456789012123456789012345678901234567890121234 1234567890123456789012345678901212345678901234567890123456789012123456789012345678901234567890121234567890123456789012345678...

Page 44: ...44 NOTES ...
Page 45: ...ured by BROWNIE S THIRD LUNG are warranted only to the extent that they are warranted by the original manufacturer BROWNIE S THIRD LUNG shall have no responsibility for any cost or ex pense incurred by Buyer due to the inability of BROWNIE S THIRD LUNG to repair under said warranty when such inability is beyond the control of BROWNIE S THIRD LUNG or caused solely by the Buyer THERE ARE NO OTHER WA...

Page 46: ... SALES AND SERVICE Brownie s Southport Divers 1530 Cordova Road Fort Lauderdale FL 33316 Ph 954 524 2112 Fx 954 524 7598 info yachtdiver com Brownie s Yacht Toys 2301 South Federal Hwy Fort Lauderdale FL 33316 Ph 954 463 9446 Fx 954 524 6722 Toll Free 800 949 0822 info yachtdiver com Brownie s Palm Beach Divers 3619 Broadway Riviera Beach FL 33404 Ph 561 844 3483 Fx 561 845 1500 info yachtdiver co...

Reviews: