background image

10

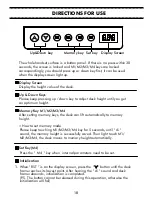
Display Screen

The whole handset surface is a button panel. If there is no press within 30


seconds, the screen is locked and M1/M2/M3/M4 keys are locked


correspondingly, you should press up or down key first, it can be used 


when the display screen light up.

Memory Key M1/M2/M3/M4

After setting memory keys, the desk can lift automatically to memory

height.

How to set memory mode

Please keep touching M1/M2/M3/M4 key for 5 seconds, until "


di "

sound, the memory height is successfully saved. Then light


touch M1/

M2/M3/M4, the desk moves to memory height automatically.

Up&Down key

Memory key

Display Screen 

Display the height value of the desk.


Set Key(M4)


Press the "  M4  " key when  internal parameters need to be set.

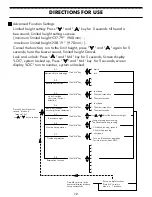
1.

Initialization 

When " RST ” is on the display screen, press the


 "    " button until the desk


frame reaches its lowest point. After hearing the "


di


" sound and desk 

frame rebounds, initialization is completed. 

(P.S. The button cannot be released during this operation, otherwise the 

initialization will fail) 

Set key

Up & Down Keys 

Please keep pressing up / down key to adjust desk height until you get 

an optimum height.

DIRECTIONS FOR USE

Summary of Contents for 810559478

Page 1: ......

Page 2: ...th a soft clean cloth In the event of the occurrence of jarring sounds during operation Stop using the desk and please contact customer service Do not use abrasive chemicals for cleaning This desk com...

Page 3: ...se Place the desk in a safe distance from window frames radiators furniture etc so that people do not get stuck Do not place any objects above 16 93 430 mm underneath the desk 2 2 SPECIFICATIONS Make...

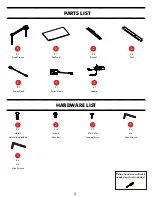
Page 4: ...Bracket Foot Power Cord Power Supply Handset X 1 X 1 X 2 X 2 X 1 X 1 X 1 M6x12 Philips head screwdriver is needed and not included 3 X 14 X 8 M8x30 Umbrella Head Bolt X 1 Allen Bolt 3 X 2 ST4 2x16 Tap...

Page 5: ...4 STEP 1 x M4 x C C Use M4 Allen Wrench 4 to attach Bracket C to Desk Frame A with Allen Bolt 2 Fully tighten all bolts...

Page 6: ...5 STEP 2 x x Use M4 Allen Wrench 4 to attach Assembled Frame in Step 1 to Top Panel B with Allen Bolt 2 Fully tighten all bolts B M4 0...

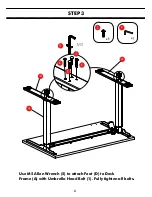
Page 7: ...6 STEP 3 x x Use M5 Allen Wrench 5 to attach Foot D to Desk Frame A with Umbrella Head Bolt 1 Fully tighten all bolts M5 5 5...

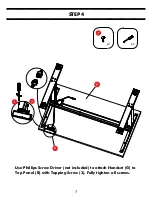
Page 8: ...7 All screws need to be tightened to obtain optimal stability STEP4 G x x1 Use Phillips Screw Driver not included to attach Handset G to Top Panel B with Tapping Screw 3 Fully tighten all screws...

Page 9: ...8 STEP5 E F STEP b STEP a Connect the Cord on the Handset G and Power Supplier F as shown in STEP a then insert the Power Cord E in the Power Supplier F as shown in STEP b...

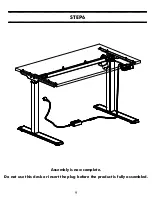
Page 10: ...9 STEP6 Assembly is now complete Do not use this desk or insert the plug before the product is fully assembled...

Page 11: ...ht is successfully saved Then light touch M1 M2 M3 M4 the desk moves to memory height automatically Up Down key Memory key Display Screen Display the height value of the desk Set Key M4 Press the M4 k...

Page 12: ...E17 E18 HOT Anticollision alert desktop sloping Connection cable failure controller fault motor fault overloading overtime operation Change power Unplug and replug the cable of hand set Rebound remin...

Page 13: ...sensitivity Current detection S 4 down anti collison sensitivity Current detection S 5 Basement height S 6 Memory key operation S 7 Overheat protection S 8 Reservation function Click M4 Key Click M4...

Reviews: