background image

Read all instructions before starting

Clear a  flat covered space to begin

Two adults are recommended for assembly

Note that hardware required is provided for every step

Pay attention to orientation

Letter of the part corresponds to a sticker on the product

Number of the hardware corresponds to its number in the package

Helpful hints provided along the way

MAINTENANCE:

WARNINGS:

GENERAL BEST PRACTICES FOR ASSEMBLY:

Regularly check hardware and tighten if necessary 

Cleaning Instructions:

Clean periodically by wiping the product with a soft clean cloth.

In the event of the occurrence of jarring sounds during operation, 

Stop using the desk and please contact customer service.

Do not use abrasive chemicals for cleaning.

This desk complies with the prescribed safety regulations. Inappropriate use may cause damage to persons and desk.

Please guard this operation manual and pass it on to any future owner!

Do not use power tools.

1

Please make sure all screws are fully tighten before using the product.

Not intended for commercial use.

Please read the operation manual prior to using the desk. It provides you with important information about safety,
use, installation and maintenance of the desk, and thus protecting you and your children and avoiding damage to 
the desk.

Summary of Contents for 810559478

Page 1: ......

Page 2: ...th a soft clean cloth In the event of the occurrence of jarring sounds during operation Stop using the desk and please contact customer service Do not use abrasive chemicals for cleaning This desk com...

Page 3: ...se Place the desk in a safe distance from window frames radiators furniture etc so that people do not get stuck Do not place any objects above 16 93 430 mm underneath the desk 2 2 SPECIFICATIONS Make...

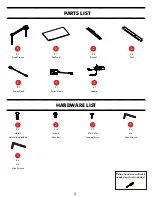
Page 4: ...Bracket Foot Power Cord Power Supply Handset X 1 X 1 X 2 X 2 X 1 X 1 X 1 M6x12 Philips head screwdriver is needed and not included 3 X 14 X 8 M8x30 Umbrella Head Bolt X 1 Allen Bolt 3 X 2 ST4 2x16 Tap...

Page 5: ...4 STEP 1 x M4 x C C Use M4 Allen Wrench 4 to attach Bracket C to Desk Frame A with Allen Bolt 2 Fully tighten all bolts...

Page 6: ...5 STEP 2 x x Use M4 Allen Wrench 4 to attach Assembled Frame in Step 1 to Top Panel B with Allen Bolt 2 Fully tighten all bolts B M4 0...

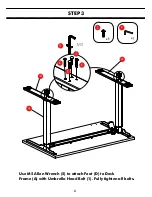
Page 7: ...6 STEP 3 x x Use M5 Allen Wrench 5 to attach Foot D to Desk Frame A with Umbrella Head Bolt 1 Fully tighten all bolts M5 5 5...

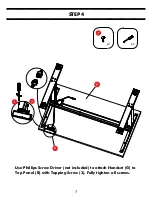
Page 8: ...7 All screws need to be tightened to obtain optimal stability STEP4 G x x1 Use Phillips Screw Driver not included to attach Handset G to Top Panel B with Tapping Screw 3 Fully tighten all screws...

Page 9: ...8 STEP5 E F STEP b STEP a Connect the Cord on the Handset G and Power Supplier F as shown in STEP a then insert the Power Cord E in the Power Supplier F as shown in STEP b...

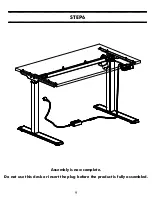
Page 10: ...9 STEP6 Assembly is now complete Do not use this desk or insert the plug before the product is fully assembled...

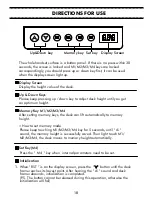
Page 11: ...ht is successfully saved Then light touch M1 M2 M3 M4 the desk moves to memory height automatically Up Down key Memory key Display Screen Display the height value of the desk Set Key M4 Press the M4 k...

Page 12: ...E17 E18 HOT Anticollision alert desktop sloping Connection cable failure controller fault motor fault overloading overtime operation Change power Unplug and replug the cable of hand set Rebound remin...

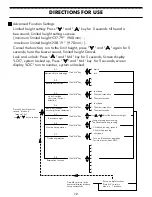
Page 13: ...sensitivity Current detection S 4 down anti collison sensitivity Current detection S 5 Basement height S 6 Memory key operation S 7 Overheat protection S 8 Reservation function Click M4 Key Click M4...

Reviews: