background image

STEP  6

Page 10 of 14

Assembled View:

Insert the Bottom Glider of Left Door (F) into the groove of the 

Bottom Panel (M) and lean the door against the Middle Panels.

Hang the Sliding Hardware (9) on the Metal Rail so it rolls smoothly.

Align the holes in Sliding Hardware (9) with the holes in the door 

and attach Sliding Hardware (9) to the door with Allen Bolt (1) using 

Allen Key (5). Do not Fully tighten bolts.

Hang a second Sliding Hardware (9) and attach it to the Left Door

(F) with Allen Bolt (1) using Allen Key (5).

Align the hardware so it is straight and fully tighten bolts. 

Repeat the process to install the Right Door (G). Once both doors 

are installed, attach the Plastic Pad (10) on the outside edge of both

doors as shown in diagram. 

x8

x1

Hardware needed

x4

x6

1

5

9

10

F

G

10

9

1

5

M

M

Summary of Contents for 810566183

Page 1: ......

Page 2: ...uct can be used the wall anchoring system must be installed as directed in the assembly instructions WARNING Changes or modifications not expressly approved by the party responsible for compliance cou...

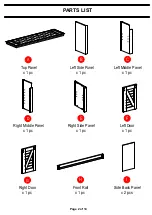
Page 3: ...anel x 1 pc Left Side Panel x 1 pc Left Middle Panel x 1 pc Right Middle Panel x 1 pc Right Side Panel x 1 pc Left Door x 1 pc Right Door x 1 pc Front Rail x 1 pc Side Back Panel x 2 pcs A B A C D E F...

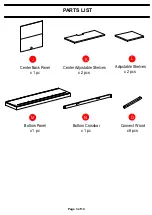
Page 4: ...PARTS LIST Center Back Panel x 1 pc Center Adjustable Shelves x 2 pcs Adjustable Shelves x 2 pcs Bottom Panel x 1 pc Connect Wood x 8 pcs Page 3 of 14 J K L M N O Bottom Crossbar x 1 pc...

Page 5: ...asher x 38 pcs 1 4 1mmT Flat Washer x 42 pcs 1 4 16mmW 1mmT Allen Key x 1 pc 4mm Wood Dowel x 18 pcs 8 30mmL Plastic Block x 8 pcs 30 14 8mm Screw x 8 pcs 7 19mmL Sliding Hardware x 4 pcs Plastic Pad...

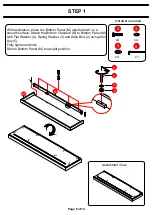
Page 6: ...anel M upside down on a smooth surface Attach the Bottom Crossbar N to Bottom Panel M with Flat Washer 4 Spring Washer 3 and Allen Bolt 2 using Allen Key 5 Fully tighten all bolts Return Bottom Panel...

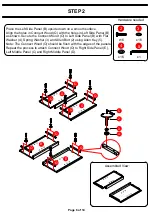
Page 7: ...h the holes in Left Side Panel B as shown Secure the Connect Wood O to Left Side Panel B with Flat Washer 4 Spring Washer 3 and Allen Bolt 2 using Allen Key 5 Note The Connect Wood O should be flush w...

Page 8: ...the holes in Right Side Panel E and slide to place Secure Right Side Panel E to Bottom Panel M with Flat Washer 4 Spring Washer 3 and Allen Bolt 2 using Allen Key 5 Fully tighten all bolts Repeat the...

Page 9: ...the remain Side Back Panel I to attach to Right Side Panel E and Right Middle Panel D Insert Wood Dowel 6 into Left Middle Panel C and Right Middle Panel D With assistance align holes of Front Rail H...

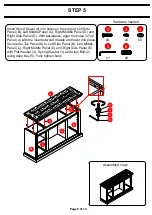
Page 10: ...E With assistance align the holes in Top Panel A with the inserted wood dowels and lower into place Secure the Top Panel A to Left Side Panel B Left Middle Panel C Right Middle Panel D and Right Side...

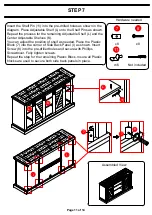
Page 11: ...door and attach Sliding Hardware 9 to the door with Allen Bolt 1 using Allen Key 5 Do not Fully tighten bolts Hang a second Sliding Hardware 9 and attach it to the Left Door F with Allen Bolt 1 using...

Page 12: ...le Shelf L and the Center Adjustable Shelves K You can adjust the position of shelf as needed Place the Plastic Block 7 into the corner of Side Back Panel I as shown Insert Screw 8 into the pre drille...

Page 13: ...e console Remove the console Drill holes in the marked locations on the wall and insert the Wall Anchor 13 Place the console back into position leaving room to attach the Anti tipping Strips 12 to the...

Page 14: ...n the furnishing may encourage a child to climb on the furnishing and as a result the furnishing may tip over on to the child WARNING Relocating audio and or video equipment to furniture not specifica...

Page 15: ...PRINTED IN VIETNAM ASSEMBLY IS COMPLETED Page 14 of 14...

Reviews: