background image

Page 1 of 14

GENERAL BEST PRACTICES FOR ASSEMBLY:


WARNINGS:

MAINTENANCE:

Determine you have adequate space for assembly.

Assembly by two adults is recommended.

Assemble on soft surfaces to prevent damage to product finish.

Keep children away during assembly. This item contains small parts which can be 

swallowed by children.

Do not discard any of packaging until you have checked that you have all parts and hardware.

Retain the assembly instructions for future reference.

The manufacturer will not accept responsibility for unauthorized repairs or modifications to 

this product.

This product is for residential use only, not for commercial use.

A Phillips head screwdriver is necessary for assembly but is not included.

Should this product become damaged, and/or components are broken or missing,

DO NOT USE.

This product will burn if left in contact with flame source.

To prevent serious injury or death, this product is equipped with a wall anchoring system.

Before this product can be used, the wall anchoring system must be installed as directed in

the assembly instructions.

WARNING: Changes or modifications not expressly approved by the party responsible for

compliance could void the user's authority to operate the equipment.

WARNING - Death or serious injury may occur when children climb on audio and/or video 

equipment furniture. A remote control or toys placed on the furnishing may encourage 

a child to climb on the furnishing and as a result the furnishing may tip over on to the child.

WARNING - Relocating audio and/or video equipment to furniture not specifically designed

to support audio and/or video equipment may result in death or serious injury due to the 

furnishing collapsing or over turning onto a child.

Wipe with a damp cloth. Use Furniture polish or lemon oil on the wood as needed.

Avoid prolonged exposure to moisture.

Do not scratch or chip the finish.

Do not put hot objects which are more than 80 degrees Fahrenheit directly on the surface. 

Check bolts/screws periodically and tighten if necessary. 

To prolong the life of product we recommend storage in a dry area when not in use

or during austere weather conditions.

Summary of Contents for 810566183

Page 1: ......

Page 2: ...uct can be used the wall anchoring system must be installed as directed in the assembly instructions WARNING Changes or modifications not expressly approved by the party responsible for compliance cou...

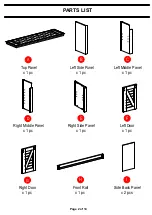
Page 3: ...anel x 1 pc Left Side Panel x 1 pc Left Middle Panel x 1 pc Right Middle Panel x 1 pc Right Side Panel x 1 pc Left Door x 1 pc Right Door x 1 pc Front Rail x 1 pc Side Back Panel x 2 pcs A B A C D E F...

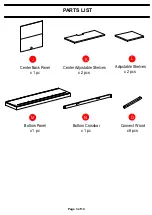
Page 4: ...PARTS LIST Center Back Panel x 1 pc Center Adjustable Shelves x 2 pcs Adjustable Shelves x 2 pcs Bottom Panel x 1 pc Connect Wood x 8 pcs Page 3 of 14 J K L M N O Bottom Crossbar x 1 pc...

Page 5: ...asher x 38 pcs 1 4 1mmT Flat Washer x 42 pcs 1 4 16mmW 1mmT Allen Key x 1 pc 4mm Wood Dowel x 18 pcs 8 30mmL Plastic Block x 8 pcs 30 14 8mm Screw x 8 pcs 7 19mmL Sliding Hardware x 4 pcs Plastic Pad...

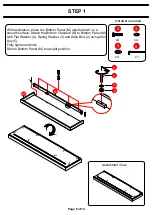
Page 6: ...anel M upside down on a smooth surface Attach the Bottom Crossbar N to Bottom Panel M with Flat Washer 4 Spring Washer 3 and Allen Bolt 2 using Allen Key 5 Fully tighten all bolts Return Bottom Panel...

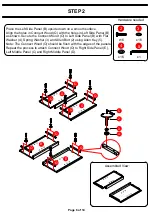
Page 7: ...h the holes in Left Side Panel B as shown Secure the Connect Wood O to Left Side Panel B with Flat Washer 4 Spring Washer 3 and Allen Bolt 2 using Allen Key 5 Note The Connect Wood O should be flush w...

Page 8: ...the holes in Right Side Panel E and slide to place Secure Right Side Panel E to Bottom Panel M with Flat Washer 4 Spring Washer 3 and Allen Bolt 2 using Allen Key 5 Fully tighten all bolts Repeat the...

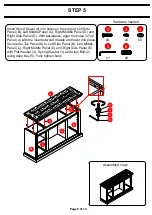
Page 9: ...the remain Side Back Panel I to attach to Right Side Panel E and Right Middle Panel D Insert Wood Dowel 6 into Left Middle Panel C and Right Middle Panel D With assistance align holes of Front Rail H...

Page 10: ...E With assistance align the holes in Top Panel A with the inserted wood dowels and lower into place Secure the Top Panel A to Left Side Panel B Left Middle Panel C Right Middle Panel D and Right Side...

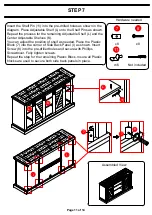
Page 11: ...door and attach Sliding Hardware 9 to the door with Allen Bolt 1 using Allen Key 5 Do not Fully tighten bolts Hang a second Sliding Hardware 9 and attach it to the Left Door F with Allen Bolt 1 using...

Page 12: ...le Shelf L and the Center Adjustable Shelves K You can adjust the position of shelf as needed Place the Plastic Block 7 into the corner of Side Back Panel I as shown Insert Screw 8 into the pre drille...

Page 13: ...e console Remove the console Drill holes in the marked locations on the wall and insert the Wall Anchor 13 Place the console back into position leaving room to attach the Anti tipping Strips 12 to the...

Page 14: ...n the furnishing may encourage a child to climb on the furnishing and as a result the furnishing may tip over on to the child WARNING Relocating audio and or video equipment to furniture not specifica...

Page 15: ...PRINTED IN VIETNAM ASSEMBLY IS COMPLETED Page 14 of 14...

Reviews: