background image

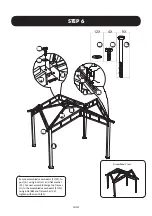
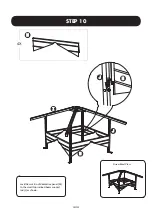
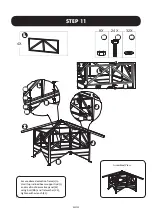
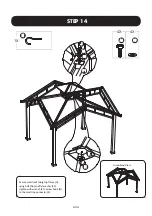
Assembled View:

67(3

8X 

4X

4X

8X 

8X 

26/31

Secure 

Large top and small cover 

(

T

1/

T

2

)

 to 

the top skew beam (F1)


using bolt (

AA

) and 

flat


washer (CC)

tighten with wrench (Z1).


Summary of Contents for THORNWOOD 810490210

Page 1: ...T H O R N W O O D ASSEMBLY INSTRUCTIONS ITEM A102004103 A102004104 A102004105 SKU 810490210 810490381 810490382 THORNWOOD HARD TOP PAVILION...

Page 2: ...of the product must be carried out by adults only Please check your state and local regulations prior to purchasing Some jurisdictions may require permits for installation and use Some special proced...

Page 3: ...EXPLODED DRAWING 3 31...

Page 4: ...EXPLODED DRAWING 4 31...

Page 5: ...ription Qty Part Image 3 SRVW 3 DVH RYHU 3 DVH 3 EHDP 3 EHDP 3 7RS VNHZ EHDP 3 RWWRP VNHZ EHDP 3 0LGGOH HDP 3 DUJH WRS IUDPH 3 6PDOO WRS VNHZ EHDP 3 6PDOO WRS LQFOLQHG EHDP VXSSRUW URG 3 6PDOO 7RS RQQ...

Page 6: ...EHDP 3 3 DWHUDO WUDEHFXOD RI WKH JUHDWHU URRI 3 3 DWHUDO WUDEHFXOD RI WKH JUHDWHU URRI 4 3 RZHU EDIIOH RI LQFOLQHG EHDP 5 3 6PDOO WRS FRYHU 6 3 6PDOO 5RRI 3DQHO 7 3 DUJH WRS DQG VPDOO FRYHU 7 3 DUJH W...

Page 7: ...7 3 LJ 7RS DQG DUJH RYHU 7 3 LJ 7RS DQG DUJH RYHU 8 3 6PDOO URRI LQFOLQHG EHDP FRYHU SODWH 9 3 QFOLQHG EHDP WRS FRYHU 9 3 QFOLQHG EHDP ORZHU FRYHU SODWH 3 HQWHU EHDP FRYHU SODWH 7 31...

Page 8: ...HARDWARE LIST Label Part Number Description Qty Add Part Image 0 ROW 0 ROW 0 ODW ZDVKHU 0 1XW 0 6SULQJ ZDVKHU 0 ROW 0 ROW 6WDNH 0 ROW 0 ODW ZDVKHU 0 1XW 0 ROW 0 UHQFK 0 UHQFK 00 8 31 0 rubber washer...

Page 9: ...L HINTS Tools needed and not included How many people needed for the installation work Estimate assemble time 150 180 Minutes 3URYLGHG LQ KDUGZDUH SDFN How many people needed for the installation work...

Page 10: ...Assembled View 67 3 10 31 Insert post A to base cover B secure base C to the post A using bolt BB and washer CC tighten with wrench Z1...

Page 11: ...Assembled View 67 3 11 31 Connect beam 1 D1 and beam 2 D2 using bolt FF washer JJ and nut KK tighten with wrench Z2...

Page 12: ...Assembled View 67 3 12 31 Secure assmebled beam D1 D2 to post A using bolt II spring washer EE and flat washer JJ tighten with wrench Z2...

Page 13: ...Assembled View 67 3 13 31 Connect Large top frames H in the direction shown using bolt AA and flat washer CC tighten with wrench Z1...

Page 14: ...Assembled View 67 3 14 31 Connect top skew beam F1 and bottom skew beam F2 using bolt AA and flat washer CC tighten with wrench Z1...

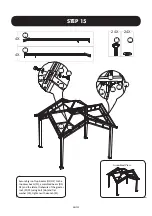
Page 15: ...67 3 15 31 Secure assembled skew beams F1 F2 to post A using bolt LL and flat washer CC Connect assembled large top frames H to the assembled skew beams F1 F2 using bolt BB and flat washer CC tighten...

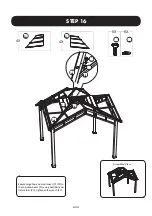
Page 16: ...Assembled View 67 3 16 31 Connect middle beam G assembled large top frames H and assembled beam D1 D2 using bolt AA and flat washer CC tighten with wrench Z1...

Page 17: ...Assembled View 67 3 17 31 Secure lateral trabecula of the greater roof P1 P2 to the bottom skew beam F2 and the middle beam G using bolt AA and flat washer CC tighten with wrench Z1...

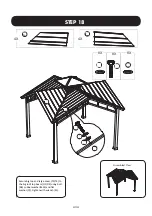
Page 18: ...Assembled View 67 3 18 31 Connect small top connector K to small top skew beam I using push pin Connect small top skew beam I to small top inclined beam support rod J using push pin...

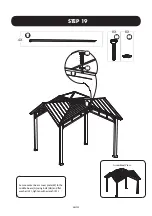
Page 19: ...Assembled View 67 3 19 31 Lock the small roof decorative panel M to the small top inclined beam support rod J as shown...

Page 20: ...ssembled View 67 3 4X 24X 32X 8X 20 31 Secure dome decoration frame L to small top inclined beam support rod J and small roof decorative panel M using bolt BB and flat washer CC tighten with wrench Z1...

Page 21: ...Assembled View 67 3 4X 21 31 Lock the small roof panel S to small top skew beam I...

Page 22: ...4X 1X 22 31 Secure small roof inclined beam cover plate U to small top skew beam I using bolt BB and flat washer CC then secure small top cover R to small top connector K using bolt AA and flat washe...

Page 23: ...Assembled View 67 3 1X 4X 4X 23 31 Secure small roof to big top frame H using bolt AA and flat washer CC tighten with wrench Z1 Screw hook N to the small top connector K...

Page 24: ...ew 67 3 4X 24X 24X 4X 24 31 Secure big roof top beams O1 O2 to the top skew beam F1 assembled beam D1 D2 and the lateral trabecula of the greater roof P1 P2 using bolt AA and flat washer CC tighten wi...

Page 25: ...Assembled View 67 3 4X 4X 8X 8X 25 31 Secure Large top and small cover T1 T2 to the top skew beam F1 using bolt AA and flat washer CC tighten with wrench Z1...

Page 26: ...Assembled View 67 3 8X 4X 4X 8X 8X 26 31 Secure Large top and small cover T1 T2 to the top skew beam F1 using bolt AA and flat washer CC tighten with wrench Z1...

Page 27: ...Assembled View 67 3 4X 4X 8X 8X 8X 27 31 Secure big top and large cover T5 T6 to the big roof top beam O1 O2 using bolt BB rubber washer MM and flat washer CC tighten with wrench Z1...

Page 28: ...Assembled View 67 3 8X 4X 8X 28 31 Secure center beam cover plate W to the middle beam G using bolt GG and flat washer CC tighten with wrench Z1...

Page 29: ...31 Insert inclined beam top cover V1 to the small top inclined beam support rod J then connect inclined beam top cover V1 inclined beam lower cover plate V2 and skew beam F1 F2 using bolt GG and flat...

Page 30: ...Assembled View 67 3 4X 4X 4X 30 31 Connect lower baffle of inclined beam Q inclined beam lower cover plate V2 and bottom skew beam F2 using bolt GG and flat washer CC tighten with wrench Z1...

Page 31: ...Assembled View 8X 31 31 STEP 22 Lift the base cover B secure the gazebo to the ground using stakes HH...

Reviews: