44
INSTALLATION AND PREDELIVERY
PROPELLER SELECTION
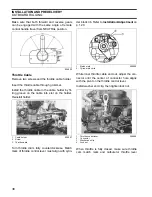
Propeller Hardware Installation
Apply
Triple-Guard
grease to the entire propeller
shaft before installing the propeller.
Install thrust bushing onto propeller shaft with
shoulder of thrust bushing facing aft. Taper of
bushing must match taper of propshaft.
Install propeller on propeller shaft by aligning
splines and pushing until seated on the thrust
bushing.
IMPORTANT:
Depending on propeller style, dif-
ferent thrust bushings, spacers, and cotter pin
keepers are used. See the
Evinrude/Johnson
Genuine Parts
book for a complete listing and
descriptions.
Install the spacer, engaging the propeller shaft
splines.
Wedge a block of wood between propeller blade
and the anti-ventilation plate.
Install the propeller nut and torque to:
•
217 in. lbs. (24.5 N·m)
If cotter pin holes in the propeller nut and propeller
shaft are not aligned, tighten the nut until they are
in line. Do not loosen.
Insert a new cotter pin through the propeller nut
and shaft. Bend its ends over the nut to secure the
assembly.
IMPORTANT:
After fastening propeller nut,
make sure outboard is in NEUTRAL and carefully
spin propeller. Propeller must turn freely and
should not spin off center. If propeller appears to
wobble, check for possible bent propeller shaft.
WARNING
When servicing the propeller, always shift
the outboard to NEUTRAL, turn the key
switch OFF, and twist and remove all spark
plug leads so the engine cannot be started
accidentally.
1.
Thrust bushing
2.
Propeller
3.
Spacer
4.
Washer
5.
Propeller Nut
6.
Cotter pin
004361
DRC3984

